SwiftUI - 绘制矩形
矩形是几何中的四边形。它有四条边,对边长度相等且彼此平行。矩形的所有角都是直角。它通常用于创建各种对象,如门、床单、托盘等。
SwiftUI 中的矩形形状用于定义各种 UI 组件的边界,如按钮、文本框、图像框、容器、面板等。或者我们可以说矩形是一种形状视图,用于在屏幕上显示矩形区域。我们可以根据需要通过调整大小、位置、角、颜色等来自定义矩形的外观。

在 SwiftUI 中绘制矩形
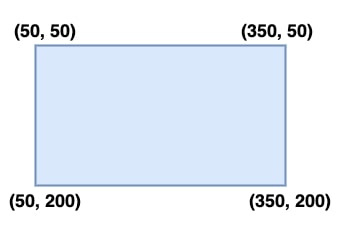
众所周知,矩形是通过连接四条线创建的,其中相对的边彼此平行且长度相同。因此在 SwiftUI 中,我们将使用 addLine(to:) 方法来绘制矩形。此方法从当前点到给定点(终点)添加一条直线段。
语法
以下是语法 −
addLine(to end: CGPoint)
此函数接受一个参数,即 end。它表示线段终点在用户空间坐标中的位置。
在 SwiftUI 中绘制矩形的步骤
按照以下步骤在 SwiftUI 中绘制矩形 −
步骤 1:初始化 Path
要创建矩形,首先我们需要初始化 Path,并在闭包中提供详细说明。使用路径,我们可以通过指定一系列连接的点和线来创建简单或复杂的图形。
Path() {}
步骤 2:移动到指定坐标
现在要开始绘制矩形,我们需要移动到矩形的起点,为此我们将使用 move(to:) 方法。它用于到达矩形/形状的当前点/起点。
Path() {
   xPath in
      xPath.move(to: CGPoint(x: 50, y: 50))
}
步骤 3:绘制矩形
现在我们调用 addLine(to:) 方法从给定点到给定点绘制线条以创建一个矩形。
Path() {
   xPath in
      xPath.move(to: CGPoint(x: 50, y: 50))
      xPath.addLine(to: CGPoint(x: 350, y: 50))
      xPath.addLine(to: CGPoint(x: 350, y: 200))
      xPath.addLine(to: CGPoint(x: 50, y: 200))
}
步骤 4:填充颜色
默认情况下,矩形以黑色创建,因此使用 .fill 修饰符我们可以更改矩形的颜色
Path(){
   xPath in
      xPath.move(to: CGPoint(x: 50, y: 50))
      xPath.addLine(to: CGPoint(x: 350, y: 50))
      xPath.addLine(to: CGPoint(x: 350, y: 200))
      xPath.addLine(to: CGPoint(x: 50, y: 200))
}.fill(Color.orange)
示例 1
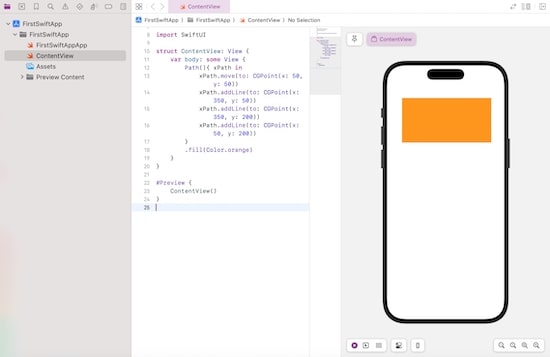
以下 SwiftUI 程序用于绘制橙色实心矩形。
import SwiftUI

struct ContentView: View {
   var body: some View {
      Path(){
	     xPath in
            xPath.move(to: CGPoint(x: 50, y: 50))
            xPath.addLine(to: CGPoint(x: 350, y: 50))
            xPath.addLine(to: CGPoint(x: 350, y: 200))
            xPath.addLine(to: CGPoint(x: 50, y: 200))
      }.fill(Color.orange)
   }
}

#Preview {
   ContentView()
}
输出

示例 2
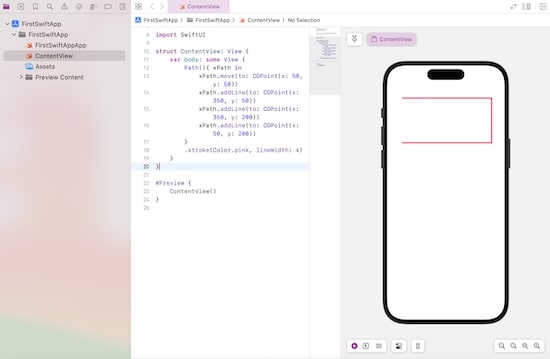
以下 SwiftUI 程序用于绘制描边矩形。这意味着它仅包含矩形的边界。
import SwiftUI

struct ContentView: View {
   var body: some View {
      Path(){
         xPath in
            xPath.move(to: CGPoint(x: 50, y: 50))
            xPath.addLine(to: CGPoint(x: 350, y: 50))
            xPath.addLine(to: CGPoint(x: 350, y: 200))
            xPath.addLine(to: CGPoint(x: 50, y: 200))
      }.stroke(Color.pink, lineWidth: 4)
   }
}
#Preview {
   ContentView()
}
输出

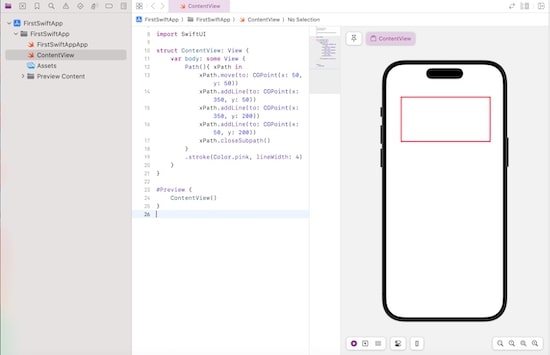
这里我们没有画一条线来连接坐标 (50, 200) 和 (50, 50),它将显示一条开放的路径。因此,为了关闭此路径,我们将在 Path 闭包的末尾调用 closeSubpath() 方法。它会自动将当前点与原点连接起来。
import SwiftUI

struct ContentView: View {
   var body: some View {
      Path(){
	     xPath in
            xPath.move(to: CGPoint(x: 50, y: 50))
            xPath.addLine(to: CGPoint(x: 350, y: 50))
            xPath.addLine(to: CGPoint(x: 350, y: 200))
            xPath.addLine(to: CGPoint(x: 50, y: 200))
            xPath.closeSubpath()
      }.stroke(Color.pink, lineWidth: 4)
   }
}

#Preview {
    ContentView()
}
输出


