WebdriverIO - Waits
WebdriverIO 中的 waitUnit 方法是等待页面上的操作/元素的标准方法。它等待满足条件(真值)。
例如,我们经常等待文本出现在页面上。
语法
waitUnit 方法的语法如下 −
browser.waitUntil(condition, { timeout, timeoutMsg, interval })
这里,
condition = 等待的条件。
超时以毫秒为单位。默认值为5000,为可选参数。
timeoutMsg为超时时抛出的错误消息,为可选参数。
interval为验证间隔。默认值为 500,它也是一个可选参数。
在下图中,让我们单击链接 - Team,然后等待文本 - Team @ Tutorials Point 出现在页面上。

单击链接 Team 时,页面上会显示突出显示的消息。

首先,请按照标题为"使用 WebdriverIO 的快乐路径流"一章中的步骤 1 到 5 进行操作,如下所示 −
步骤 1 − 安装 NodeJS。如何执行此安装的详细信息在标题为"开始使用 NodeJS"的章节中给出。
步骤 2 − 安装 NPM。如何执行此安装的详细信息在标题为"安装 NPM"的章节中给出。
步骤 3 − 安装 VS Code。如何执行此安装的详细信息在标题为"VS Code 安装"的章节中给出。
步骤 4 − 创建配置文件。如何执行此安装的详细信息在标题为"配置文件生成"的章节中给出。
步骤 5 − 创建 spec 文件。如何执行此安装的详细信息在标题为"Mocha 安装"的章节中给出。
步骤 6 −在创建的 Mocha 规范文件中添加以下代码。
// 测试套件名称
describe('Tutorialspoint Application', function(){
   //test case
   it('Waits', function(){
      // launch url
      browser.url('https://www.tutorialspoint.com/about/about_careers.htm')
      //identify then click link - Team
      const p = $('=Team')
      p.click()
      //wait for text
      browser.waitUntil(
         () => $('<h1>').getText() === 'Team @ Tutorials Point', {
            timeout: 6000,
            timeoutMsg: 'expected text did not match'
         }
      );
      //identify required text
      const m = $('<h1>')
      console.log(m.getText())
   });
});
使用以下命令运行配置文件 - wdio.conf.js 文件 −
npx wdio run wdio.conf.js
有关如何创建配置文件的详细信息在标题为 Wdio.conf.js 文件的章节和标题为配置文件生成的章节中进行了详细讨论。您的计算机上将显示以下屏幕 −
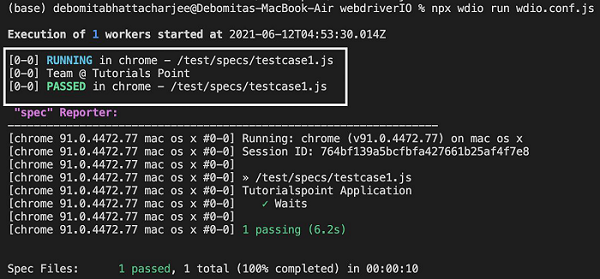
命令成功执行后,单击 Team 链接 - Team @ Tutorials Point 时生成的文本将打印在控制台中。


