使用 Mocha 选项执行测试
specs 文件夹中的测试文件由 describe 和 it 块组成。describe 块指的是测试套件,而 it 块指的是测试用例。describe 块可以有多个块。
有关如何创建 describe 和 it 块的详细信息,请参阅标题为"使用 Webdriverio 的快乐路径流"的章节。
要验证从开发团队获得的新构建是否健康,我们不需要执行套件中的所有测试用例。我们确定了一些用于冒烟/健全性测试的测试用例,一旦我们有了新构建,就会执行它们。
我们可以使用名为 Grep 的 Mocha 选项对测试用例进行分组并一起运行它们。为此,我们必须在 it 描述中添加一个关键字,例如 Smoke。然后在运行时,我们可以指示 WebdriverIO 测试仅触发描述中包含 Smoke 的 it 块。
让我们以一个包含四个 it 块的测试文件为例。在四个 it 块中,有两个 it 块的描述中包含关键字 Smoke。
首先,请按照标题为"使用 WebdriverIO 的快乐路径流"一章中的步骤 1 到 5 进行操作,如下所示 −
步骤 1 − 安装 NodeJS。有关如何执行此安装的详细信息在标题为"开始使用 NodeJS"一章中详细说明。
步骤 2 − 安装 NPM。有关如何执行此安装的详细信息在标题为"安装 NPM"一章中详细说明。
步骤 3 − 安装 VS Code。有关如何执行此安装的详细信息在标题为"安装 VS Code"一章中详细说明。
步骤 4 − 创建配置文件。有关如何执行此安装的详细信息,请参阅"配置文件生成"一章。
步骤 5 − 创建一个 spec 文件。有关如何执行此安装的详细信息,请参阅"Mocha 安装"一章。
步骤 6 − 在创建的 Mocha spec 文件中添加以下代码。
//import chai library
const c = require('chai').expect
//library for parsing JSON file
const s =require('fs')
let h = JSON.parse(s.readFileSync('test/testData/test1.json'))
// test suite name
describe('Tutorialspoint application', function(){
   //iterate the test case
   h.forEach(  ({email,password})  =>{
      //test case
      it('Data Driven testing', function(){
         // launch url
         browser.url('https://www.linkedin.com/login')
         //identify the email field then enter key - email
         $("#username").setValue(email)
         //identify password field then enter key - password
         $("#password").setValue(password)
         //identify SSign in button then click
         $("button[type='submit']").click()
         //verify error message
         const e = $('#error-for-password')
         console.log(e.getText() + ' - Error Text')
         //verify Alert text with Chai assertion
         c(e.getText()).to.equal("The password must be provided.")
      });
   });
   // it is blocked with Smoke keyword
   it('Identify element with Id - Smoke', function(){
      // launch url
      browser.url('https://the-internet.herokuapp.com/redirector')
      //identify element with id then click
      $("#redirect").click()
      //obtain page title
      console.log('Page title after click: ' + browser.getTitle())
   });
   // it block with Smoke keyword
   it('Identify element with Tagname - Smoke', function(){
      // launch url
      browser.url('https://www.tutorialspoint.com/about/about_careers.htm')
      //identify element with tagname then obtain text
      console.log($("<h1>").getText() + " - is the text.")
   });
   //test case
   it('Identify element with Class Name', function(){
      // launch url
      browser.url('https://www.tutorialspoint.com/about/about_careers.htm')
      //identify element with Class Name then obtain text
      console.log($(".heading").getText() + " - is the text.")
   });
});
要仅触发与 Smoke 相关的 it 块,请使用以下命令运行配置文件 - wdio.conf.js 文件 −
npx wdio run wdio.conf.js --mochaOpts.grep Smoke
有关如何创建配置文件的详细信息在标题为 Wdio.conf.js 文件的章节和标题为配置文件生成的章节中进行了详细讨论。
您的计算机上将显示以下屏幕 −
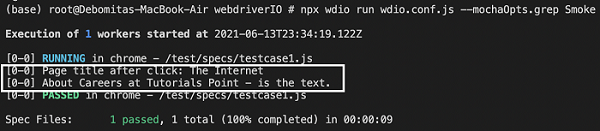
命令成功执行后,我们发现在四个 it 块中,只有两个 it 块(描述中有 Smoke 标签)已被执行。


