处理复选框和下拉菜单
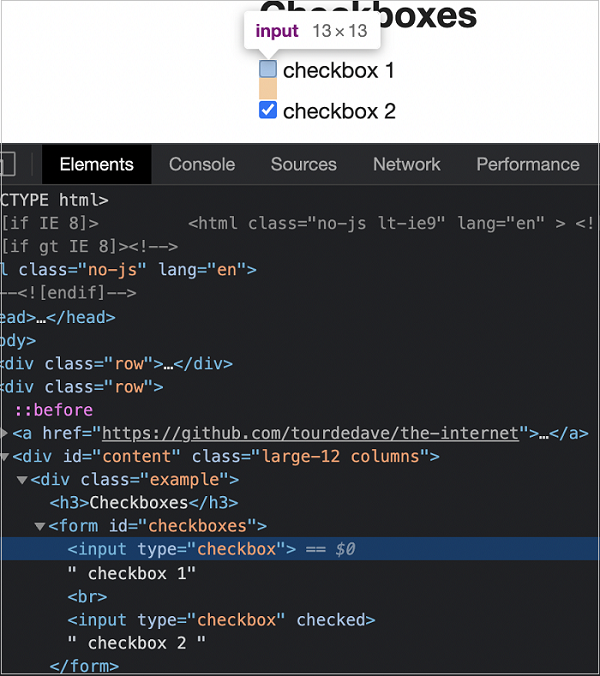
我们可以在使用 WebdriverIO 自动化测试时处理 UI 中的复选框。复选框在 html 代码中以标签名称作为输入、类型为复选框的方式进行标识。
您的计算机上将显示以下屏幕 −
使用复选框的方法
使用复选框的一些方法如下 −
click()
用于选中复选框。
语法
语法如下 −
let p = $('#loc')
p.click()
isSelected()
用于检查复选框类型的元素是否被选中。它返回一个布尔值(如果选中则为 true,否则为 false)。
语法如下 −
let p = $('#loc')
p.isSelected()
首先,请按照标题为"使用 WebdriverIO 的快乐路径流"一章中的步骤 1 到 5 进行操作,如下所示 −
步骤 1 − 安装 NodeJS。有关如何执行此安装的详细信息在标题为"开始使用 NodeJS"一章中详细说明。
步骤 2 − 安装 NPM。有关如何执行此安装的详细信息在标题为"安装 NPM"一章中详细说明。
步骤 3 − 安装 VS Code。有关如何执行此安装的详细信息,请参阅标题为 VS Code 安装的章节。
步骤 4 − 创建配置文件。有关如何执行此安装的详细信息,请参阅标题为配置文件生成的章节。
步骤 5 − 创建 spec 文件。有关如何执行此安装的详细信息,请参阅标题为 Mocha 安装的章节。
步骤 6 − 在创建的 Mocha spec 文件中添加以下代码。
// test suite name
describe('Tutorialspoint application', function(){
   //test case
   it('Checkbox', function(){
      // launch url
      browser.url('https://the-internet.herokuapp.com/checkboxes')
      //identify checkbox with CSS then click
      const p = $("input[type='checkbox']")
      p.click()
      //verify if checked with assertion
      expect(p).toBeSelected()
      //uncheck checkbox
      p.click()
      //verify if not checked with assertion
      expect(p).not.toBeSelected()
   });
});
使用以下命令运行配置文件 - wdio.conf.js 文件 −
npx wdio run wdio.conf.js
有关如何创建配置文件的详细信息在标题为 Wdio.conf.js 文件的章节和标题为配置文件生成的章节中详细讨论。
您的计算机上将显示以下屏幕 −
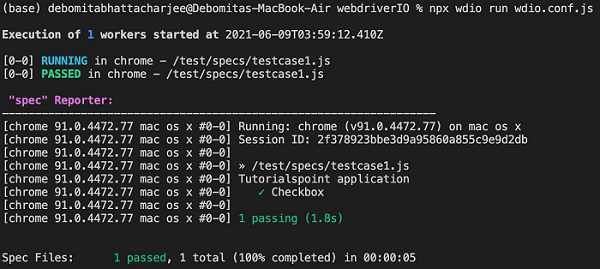
命令成功执行后,所有断言均按预期执行,并且我们已收到通过的测试。
处理下拉菜单
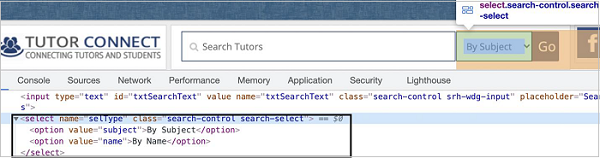
我们可以在使用 WebdriverIO 自动化测试时处理 UI 中的下拉菜单。静态下拉菜单在 html 代码中以 select 标记名标识,其选项以 option 标记名标识。
您的计算机上将显示以下屏幕 −
静态下拉菜单的方法
以下是一些处理静态下拉菜单的方法 −
selectByVisibleText
此方法用于选择与作为参数传递给此方法的选项的可见文本匹配的选项。
语法如下 −
let p = $('#loc')
p.selectByVisibleText('By Subject')
selectByAttribute
此方法用于选择与作为参数传递给此方法的任何属性的值匹配的选项。
语法如下 −
let p = $('#loc')
p.selectByAttribute('value', 'subject')
此处,选项具有值为 subject 的属性。
selectByIndex
此方法用于选择与作为参数传递给此方法的选项的索引/位置匹配的选项。索引从0开始。
语法如下 −
let p = $('#loc')
p.selectByIndex(1)
getValue()
此方法用于获取下拉列表中所选选项的属性值。
语法如下 −
let p = $('#loc')
p.getValue()
首先,请按照标题为"使用 WebdriverIO 的快乐路径流"一章中的步骤 1 到 5 进行操作,如下所示 −
步骤 1 − 安装 NodeJS。有关如何执行此安装的详细信息在标题为"开始使用 NodeJS"一章中详细说明。
步骤 2 − 安装 NPM。有关如何执行此安装的详细信息在标题为"安装 NPM"一章中详细说明。
步骤 3 − 安装 VS Code。有关如何执行此安装的详细信息在标题为"安装 VS Code"一章中详细说明。
步骤 4 − 创建配置文件。有关如何执行此安装的详细信息在标题为"配置文件生成"一章中详细说明。
步骤 5 − 创建规范文件。有关如何执行此安装的详细信息,请参阅标题为 Mocha 安装的章节。
步骤 6 − 在创建的 Mocha spec 文件中添加以下代码。
// test suite name
describe('Tutorialspoint application', function(){
    //test case
    it('Drodowns', function(){
        // launch url
        browser.url('https://www.tutorialspoint.com/tutor_connect/index.php')
        //identify dropdown
        const p = $("select[name='selType']")
        //select by index
        p.selectByIndex(1)
        //get option selected
        console.log(p.getValue() + ' - option selected by index')
        //select by visible text
        p.selectByVisibleText('By Subject')
        //get option selected
        console.log(p.getValue() + ' - option selected by visible text')
         //select by value attribute
         p.selectByAttribute('value', 'name')
         //get option selected
         console.log(p.getValue() + ' - option selected by attribute value')
    });
});
Run the Configuration file - wdio.conf.js file with the following command −
npx wdio run wdio.conf.js
The details on how to create a Configuration file are discussed in detail in the Chapter titled Wdio.conf.js file and Chapter titled Configuration File generation.
The following screen will appear on your computer −
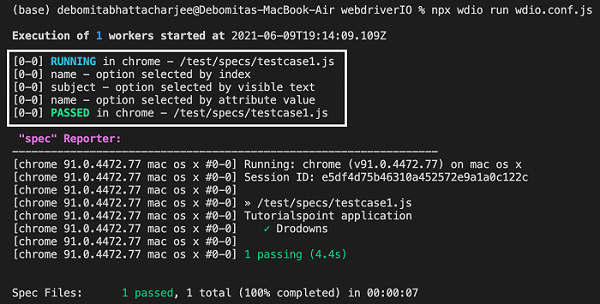
After the command has been executed successfully, first the value of the option selected with the option index - name is printed in the console.
Then, the value of the option selected with the option visible text - subject is printed in the console.
Finally, the value of the option selected with the option attribute value - name is printed in the console.


