JOGL - 使用 GL 线条进行绘图
在上一章中,我们学习了如何使用 JOGL 绘制一条基本线条。我们通过将预定义字段 Gl_lines 传递给 glBegin() 方法来绘制线条。
本章提供了使用 glBegin() 方法和 GL_Lines 绘制三角形、菱形和房屋等形状的示例。
让我们通过一个程序使用 GL_LINES 绘制三角形 −
import javax.media.opengl.GL2;
import javax.media.opengl.GLAutoDrawable;
import javax.media.opengl.GLCapabilities;
import javax.media.opengl.GLEventListener;
import javax.media.opengl.GLProfile;
import javax.media.opengl.awt.GLCanvas;

import javax.swing.JFrame;

public class Triangle implements GLEventListener {

   @Override
   public void display(GLAutoDrawable drawable) {
        final GL2 gl = drawable.getGL().getGL2();
        gl.glBegin (GL2.GL_LINES);

        //绘制底部
        gl.glBegin (GL2.GL_LINES);
        gl.glVertex3f(-0.50f, -0.50f, 0);
        gl.glVertex3f(0.50f, -0.50f, 0);
        gl.glEnd();

        //绘制右边缘
        gl.glBegin (GL2.GL_LINES);
        gl.glVertex3f(0f, 0.50f, 0);
        gl.glVertex3f(-0.50f, -0.50f, 0);
        gl.glEnd();

        //绘制左边缘
        gl.glBegin (GL2.GL_LINES);
        gl.glVertex3f(0f, 0.50f, 0);
        gl.glVertex3f(0.50f, -0.50f, 0);
        gl.glEnd();
        gl.glFlush();
   }

   @Override
   public void dispose(GLAutoDrawable arg0) {
        //方法主体
   }

   @Override
   public void init(GLAutoDrawable arg0) {
        // 方法主体
   }

   @Override
   public void reshape(GLAutoDrawable arg0, int arg1, int arg2, int arg3, int arg4) {
        // 方法主体
   }

   public static void main(String[] args) {

        //获取 GL2 配置文件的功能对象
        final GLProfile profile = GLProfile.get(GLProfile.GL2);
        GLCapabilities capabilities = new GLCapabilities(profile);

        // 画布
        final GLCanvas glcanvas = new GLCanvas(capabilities);
        Triangle l = new Triangle();
        glcanvas.addGLEventListener(l);
        glcanvas.setSize(400, 400);

        //创建框架
        final JFrame frame = new JFrame ("Triangle");

        //将画布添加到框架
        frame.getContentPane().add(glcanvas);

        frame.setSize(frame.getContentPane().getPreferredSize());
        frame.setVisible(true);

   }//end of main

}//end of classimport javax.media.opengl.GL2;
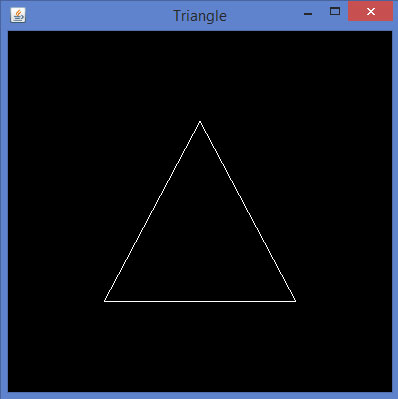
如果编译并执行上述程序,将生成以下输出。它显示使用 glBegin() 方法的 GL_LINES 绘制的三角形。
让我们通过一个程序来使用 GL_LINES 绘制菱形 −
import javax.media.opengl.GL2;
import javax.media.opengl.GLAutoDrawable;
import javax.media.opengl.GLCapabilities;
import javax.media.opengl.GLEventListener;
import javax.media.opengl.GLProfile;
import javax.media.opengl.awt.GLCanvas;

import javax.swing.JFrame;

public class Rhombus implements GLEventListener {

   @Override
   public void display( GLAutoDrawable drawable ) {
      final GL2 gl = drawable.getGL().getGL2();

        //edge1
      gl.glBegin( GL2.GL_LINES );
      gl.glVertex3f( 0.0f,0.75f,0 );
      gl.glVertex3f( -0.75f,0f,0 );
      gl.glEnd();

        //edge2
      gl.glBegin( GL2.GL_LINES );
      gl.glVertex3f( -0.75f,0f,0 );
      gl.glVertex3f( 0f,-0.75f, 0 );
      gl.glEnd();

        //edge3
      gl.glBegin( GL2.GL_LINES );
      gl.glVertex3f( 0f,-0.75f, 0 );
      gl.glVertex3f( 0.75f,0f, 0 );
      gl.glEnd();

        //edge4
      gl.glBegin( GL2.GL_LINES );
      gl.glVertex3f( 0.75f,0f, 0 );
      gl.glVertex3f( 0.0f,0.75f,0 );
      gl.glEnd();
      gl.glFlush();
   }

   @Override
   public void dispose( GLAutoDrawable arg0 ) {
        //方法主体
   }

   @Override
   public void init(GLAutoDrawable arg0 ) {
        // 方法主体
   }

   @Override
   public void reshape( GLAutoDrawable arg0, int arg1, int arg2, int arg3, int arg4 ) {
        // 方法主体
   }

   public static void main( String[] args ) {

        //获取 GL2 配置文件的功能对象
        final GLProfile profile = GLProfile.get( GLProfile.GL2 );
        GLCapabilities capabilities = new GLCapabilities(profile);

        // 画布
        final GLCanvas glcanvas = new GLCanvas( capabilities );
        Rhombus rhombus = new Rhombus();
        glcanvas.addGLEventListener( rhombus );
        glcanvas.setSize( 400, 400 );

        //创建框架
        final JFrame frame = new JFrame ( "Rhombus" );

        //将画布添加到框架
        frame.getContentPane().add( glcanvas );
        frame.setSize(frame.getContentPane().getPreferredSize() );
        frame.setVisible( true );
   }

}
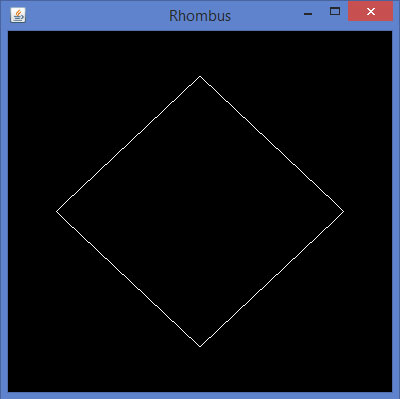
如果您编译并执行上述程序,您将获得以下输出。它显示了使用 glBegin() 方法的 GL_LINES 生成的菱形。
让我们通过一个使用 GL_LINES 绘制房屋的程序 −
import javax.media.opengl.GL2;
import javax.media.opengl.GLAutoDrawable;
import javax.media.opengl.GLCapabilities;
import javax.media.opengl.GLEventListener;
import javax.media.opengl.GLProfile;
import javax.media.opengl.awt.GLCanvas;

import javax.swing.JFrame;

public class House implements GLEventListener {

   @Override
   public void display( GLAutoDrawable drawable ) {
      final GL2 gl = drawable.getGL().getGL2();

        //绘制顶部
        gl.glBegin ( GL2.GL_LINES );
        gl.glVertex3f( -0.3f, 0.3f, 0 );
        gl.glVertex3f( 0.3f,0.3f, 0 );
        gl.glEnd();

        //绘制底部
        gl.glBegin( GL2.GL_LINES );
        gl.glVertex3f( -0.3f,-0.3f, 0 );
        gl.glVertex3f( 0.3f,-0.3f, 0 );
        gl.glEnd();

        //绘制右边缘
        gl.glBegin( GL2.GL_LINES );
        gl.glVertex3f( -0.3f,0.3f, 0 );
        gl.glVertex3f( -0.3f,-0.3f, 0 );
        gl.glEnd();

        //绘制左边缘
        gl.glBegin( GL2.GL_LINES );
        gl.glVertex3f( 0.3f,0.3f,0 );
        gl.glVertex3f( 0.3f,-0.3f,0 );
        gl.glEnd();

        //建筑屋顶
        //建筑左侧直径
        gl.glBegin( GL2.GL_LINES );
        gl.glVertex3f( 0f,0.6f, 0 );
        gl.glVertex3f( -0.3f,0.3f, 0 );
        gl.glEnd();

        //建筑右侧直径
        gl.glBegin( GL2.GL_LINES );
        gl.glVertex3f( 0f,0.6f, 0 );
        gl.glVertex3f( 0.3f,0.3f, 0 );
        gl.glEnd();

        //建筑门
        //绘制顶部
        gl.glBegin ( GL2.GL_LINES );
        gl.glVertex3f( -0.05f, 0.05f, 0 );
        gl.glVertex3f( 0.05f, 0.05f, 0 );
        gl.glEnd();

        //绘制左边缘
        gl.glBegin ( GL2.GL_LINES );
        gl.glVertex3f( -0.05f, 0.05f, 0 );
        gl.glVertex3f( -0.05f, -0.3f, 0 );
        gl.glEnd();

        //绘制右边缘
        gl.glBegin ( GL2.GL_LINES );
        gl.glVertex3f( 0.05f, 0.05f, 0 );
        gl.glVertex3f( 0.05f, -0.3f, 0 );
      	gl.glEnd();
   }

   @Override
   public void dispose( GLAutoDrawable arg0 ) {
        //方法主体
   }

   @Override
   public void init( GLAutoDrawable arg0 ) {
        // 方法主体
   }

   @Override
   public void reshape( GLAutoDrawable arg0, int arg1, int arg2, int arg3, int arg4 ) {
        // 方法主体
   }

   public static void main( String[] args ) {

        //获取 GL2 配置文件的功能对象
        final GLProfile profile = GLProfile.get( GLProfile.GL2 );
        GLCapabilities capabilities = new GLCapabilities(profile);

        // 画布
        final GLCanvas glcanvas = new GLCanvas( capabilities );
        House house = new House();
        glcanvas.addGLEventListener( house );
        glcanvas.setSize(400, 400);

        //创建框架
        final JFrame frame = new JFrame( "House" );

        //将画布添加到框架
        frame.getContentPane().add( glcanvas );
        frame.setSize(frame.getContentPane().getPreferredSize() );
        frame.setVisible( true );

   }//end of main

}//end of class
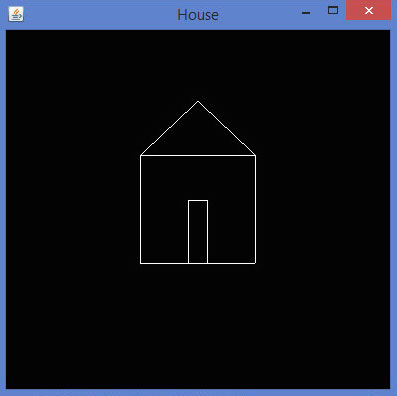
如果您编译并执行上述程序,您将获得以下输出。它显示了使用 GL_LINES() 方法生成的房屋图。