Yii - 快速指南
Yii - 概述
Yii[ji:] 框架是一个开源 PHP 框架,用于快速开发现代 Web 应用程序。它围绕模型-视图-控制器复合模式构建。
Yii 提供安全且专业的功能,可快速创建强大的项目。Yii 框架具有基于组件的架构和全面可靠的缓存支持。因此,它适用于构建各种 Web 应用程序:论坛、门户、内容管理系统、RESTful 服务、电子商务网站等。它还有一个名为 Gii 的代码生成工具,其中包含完整的 CRUD(创建-读取-更新-删除)接口生成器。
核心功能
Yii 的核心功能如下 −
- Yii 实现了 MVC 架构模式。
- 它为关系数据库和 NoSQL 数据库提供功能。
- Yii 从不为了遵循某些设计模式而过度设计事物。
- 它具有极强的可扩展性。
- Yii 提供多层缓存支持。
- Yii 提供 RESTful API 开发支持。
- 它具有高性能。
总的来说,如果您需要的只是一个用于底层数据库的简洁接口,那么 Yii 是正确的选择。目前,Yii 有两个版本:1.1 和 2.0。
版本 1.1 现在处于维护模式,版本 2 采用了最新技术,包括用于包分发的 Composer 实用程序、PSR 级别 1、2 和 4 以及许多 PHP 5.4+ 功能。版本 2 将在未来几年内获得主要的开发工作。
Yii 是一个纯 OOP(面向对象编程)框架。因此,它需要 OOP 的基本知识。Yii 框架还使用了 PHP 的最新功能,如特征和命名空间。如果您理解这些概念,您将更容易掌握 Yii 2.0。
环境
Yii2 的主要要求是 PHP 5.4+ 和 Web 服务器。 Yii 是一个功能强大的控制台工具,可管理数据库迁移、资产编译和其他内容。建议通过命令行访问您开发应用程序的机器。
出于开发目的,我们将使用 −
- Linux Mint 17.1
- PHP 5.5.9
- PHP 内置 Web 服务器
安装前检查
要检查您的本地机器是否适合使用最新的 Yii2 版本,请执行以下操作 −
步骤 1 − 安装最新的 php 版本。
sudo apt-get install php5
步骤 2 −安装最新的 mysql 版本。
sudo apt-get install mysql-server
步骤 3 − 下载 Yii2 基本应用程序模板。
composer create-project --prefer-dist --stability=dev yiisoft/yii2-app-basic basic
步骤 4 − 要启动 PHP 内置服务器,请在 basic 文件夹中运行。
php -S localhost:8080
有一个有用的脚本 requirements.php。它会检查您的服务器是否满足运行应用程序的要求。您可以在应用程序的根文件夹中找到此脚本。
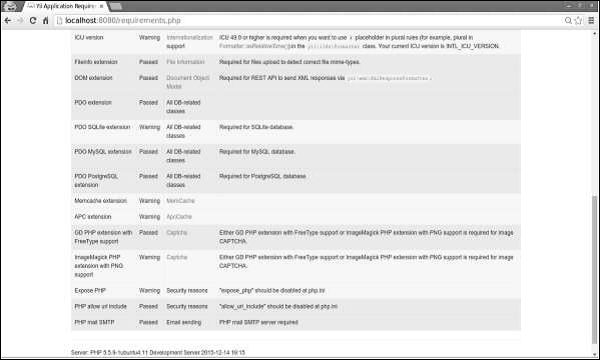
如果您在 Web 浏览器的地址栏中输入 http://localhost:8080/requirements.php,页面将如以下屏幕截图所示 −
Yii - 安装
开始使用 Yii2 最直接的方式是使用 Yii2 团队提供的基本应用程序模板。此模板也可以通过 Composer 工具获得。
步骤 1 − 在您的硬盘驱动器中找到合适的目录,并通过以下命令下载 Composer PHAR(PHP 存档)。
curl -sS https://getcomposer.org/installer | php
步骤 2 − 然后将这个存档移动到 bin 目录。
mv composer.phar /usr/local/bin/composer
步骤 3 − 安装 Composer 后,您可以安装 Yii2 基本应用程序模板。运行这些命令。
composer global require "fxp/composer-asset-plugin:~1.1.1"
composer create-project --prefer-dist yiisoft/yii2-app-basic helloworld
第一个命令安装 composer asset 插件,该插件管理 npm 和 bower 依赖项。第二个命令将 Yii2 基本应用程序模板安装在名为 helloworld 的目录中。
步骤 4 − 现在打开 helloworld 目录并启动 PHP 内置的 Web 服务器。
php -S localhost:8080 -t web
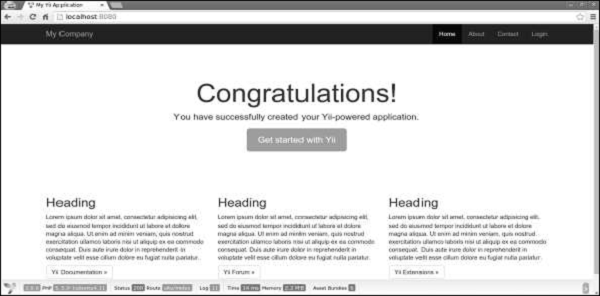
步骤 5 − 然后在浏览器中打开 http://localhost:8080。您可以看到欢迎页面。
Yii - 创建页面
现在我们要在您的应用程序中创建一个 "Hello world" 页面。要创建页面,我们必须创建一个动作和一个视图。
动作在控制器中声明。最终用户将收到动作的执行结果。
步骤 1 − 在现有的 SiteController 中声明说话动作,该动作在类文件 controllers/SiteController.php 中定义。
<?php
   namespace app\controllers;
   use Yii;
   use yii\filters\AccessControl;
   use yii\web\Controller;
   use yii\filters\VerbFilter;
   use app\models\LoginForm;
   use app\models\ContactForm;
   class SiteController extends Controller {
      /* other code */
      public function actionSpeak($message = "default message") {
         return $this->render("speak",['message' => $message]);
      }
   }
?>
我们将发言动作定义为名为 actionSpeak 的方法。在 Yii 中,所有动作方法都以单词 action 为前缀。这是框架区分动作方法和非动作方法的方式。如果动作 ID 需要多个单词,则它们将用破折号连接起来。因此,动作 ID add-post 对应于动作方法 actionAddPost。
在上面给出的代码中,'out' 函数采用 GET 参数 $message。我们还调用名为 'render' 的方法来呈现名为发言的视图文件。我们将消息参数传递给视图。呈现结果是一个完整的 HTML 页面。
View 是一个生成响应内容的脚本。对于发言动作,我们创建一个打印消息的发言视图。调用 render 方法时,它会查找名为 view/controllerID/vewName.php 的 PHP 文件。
步骤 2 − 因此,在 views/site 文件夹中创建一个名为 speak.php 的文件,其中包含以下代码。
<?php
use yii\helpers\Html;
?>
<?php echo Html::encode($message); ?>
请注意,我们在打印之前对消息参数进行 HTML 编码,以避免 XSS 攻击。
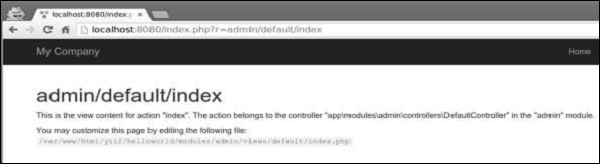
步骤 3 −在您的 Web 浏览器中输入以下内容 http://localhost:8080/index.php?r=site/speak&message=hello%20world。
您将看到以下窗口 −
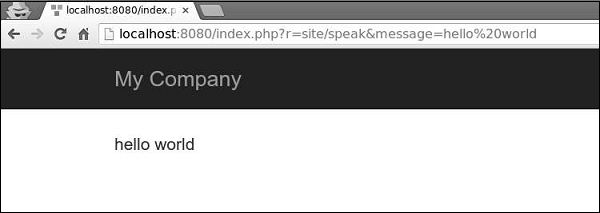
URL 中的 'r' 参数代表路由。路由的默认格式为 controllerID/actionID。在我们的例子中,路由 site/speak 将由 SiteController 类和 talk 操作解析。
Yii - 应用程序结构
整个代码库中只有一个文件夹可供 Web 服务器公开使用。它是 web 目录。 Web 根目录之外的其他文件夹对于 Web 服务器来说是无法访问的。
注意 − 所有项目依赖项都位于 composer.json 文件中。Yii2 有一些重要的包,这些包已由 Composer 包含在您的项目中。这些包如下 −
- Gii – 代码生成器工具
- 调试控制台
- Codeception 测试框架
- SwiftMailer 库
- Twitter Bootstrap UI 库
前三个包仅在开发环境中有用。
Yii2 的应用程序结构精确清晰。它包含以下文件夹 −
Assets −此文件夹包含网页中引用的所有 .js 和 .css 文件。
命令 − 此文件夹包含可从终端使用的控制器。
配置 − 此文件夹包含用于管理数据库、应用程序和应用程序参数的 config 文件。
邮件 − 此文件夹包含邮件布局。
模型 − 此文件夹包含应用程序中使用的模型。
运行时 − 此文件夹用于存储运行时数据。
测试 −此文件夹包含所有测试(验收、单元、功能)。
Vendor − 此文件夹包含 Composer 管理的所有第三方软件包。
Views − 此文件夹用于存放由控制器显示的视图。layout 文件夹用于存放页面模板。
Web − 来自 Web 的入口点。
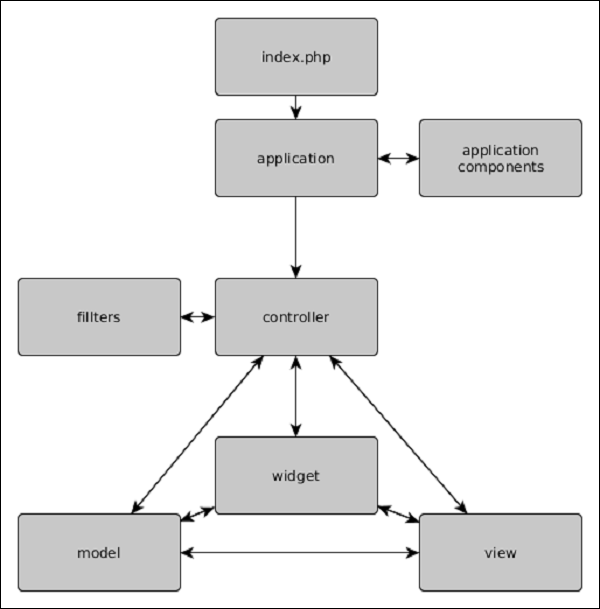
应用程序结构
以下是应用程序结构的示意图。
Yii2 – 对象
以下列表包含所有 Yii2 的对象 −
模型、视图和控制器
模型用于数据表示(通常来自数据库)。视图用于显示数据。控制器用于处理请求和生成响应。
组件
要创建可重用的功能,用户可以编写自己的组件。组件只是包含逻辑的对象。例如,组件可以是重量转换器。
应用程序组件
这些是在整个应用程序中仅实例化一次的对象。组件和应用程序组件之间的主要区别在于后者在整个应用程序中只能有一个实例。
小部件
小部件是可重复使用的对象,包含逻辑和渲染代码。例如,小部件可以是图库滑块。
过滤器
过滤器是在执行控制器操作之前或之后运行的对象。
模块
您可以将模块视为可重复使用的子应用程序,包含模型、视图、控制器等。
扩展
扩展是可以由 Composer 管理的包。
Yii - Entry 入口脚本
入口脚本负责启动请求处理周期。它们只是用户可访问的 PHP 脚本。
下图显示了应用程序的结构 −
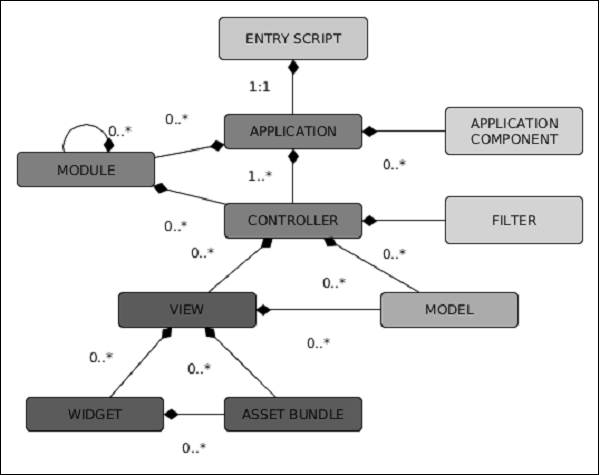
Web 应用程序(以及控制台应用程序)具有单个入口脚本。最终用户向入口脚本发出请求。然后入口脚本实例化应用程序实例并将请求转发给它们。
控制台应用程序的入口脚本通常存储在项目基本路径中,并命名为 yii.php。Web 应用程序的入口脚本必须存储在 Web 可访问的目录下。它通常被称为 index.php。
入口脚本执行以下操作 −
- 定义常量。
- 注册 Composer 自动加载器。
- 包含 Yii 文件。
- 加载配置。
- 创建并配置应用程序实例。
- 处理传入请求。
以下是 基本应用程序 模板的入口脚本 −
<?php
    //定义全局常量
    defined('YII_DEBUG') or define('YII_DEBUG', true);
    defined('YII_ENV') or define('YII_ENV', 'dev');

    //注册 Composer 自动加载器
    require(__DIR__ . '/../vendor/autoload.php');
    //包含 yii 文件
    require(__DIR__ . '/../vendor/yiisoft/yii2/Yii.php');

    //加载应用程序配置
    $config = require(__DIR__ . '/../config/web.php');

    //创建、配置和处理请求
    (new yii\web\Application($config))->run();
?>
以下是 console 应用程序的入口脚本 −
#!/usr/bin/env php
<?php
    /**
    * Yii console bootstrap file.
    * @link http://www.yiiframework.com/
    * @copyright Copyright (c) 2008 Yii Software LLC
    * @license http://www.yiiframework.com/license/
    */
    //定义全局常量
    defined('YII_DEBUG') or define('YII_DEBUG', true);

    //注册 Composer 自动加载器
    require(__DIR__ . '/vendor/autoload.php');
    require(__DIR__ . '/vendor/yiisoft/yii2/Yii.php');

    //加载配置
    $config = require(__DIR__ . '/config/console.php');

    //将配置应用于应用程序实例
    $application = new yii\console\Application($config);

    //处理请求
    $exitCode = $application->run();
    exit($exitCode);
?>
定义全局常量的最佳位置是入口脚本。Yii 支持三种常量 −
YII_DEBUG − 定义您是否处于调试模式。如果设置为 true,我们将看到更多日志数据和详细的错误调用堆栈。
YII_ENV − 定义环境模式。默认值为 prod。可用值为 prod、dev 和 test。它们用于配置文件中,例如定义不同的 DB 连接(本地和远程)或其他值。
YII_ENABLE_ERROR_HANDLER −指定是否启用默认的 Yii 错误处理程序。
要定义全局常量,请使用以下代码 −
//定义全局常量
defined('YII_DEBUG') 或 define('YII_DEBUG', true);
相当于:
if(!defined('YII_DEBUG')) {
    define('YII_DEBUG', true);
}
注意 − 全局常量应在入口脚本的开头定义,以便在包含其他 PHP 文件时生效。
Yii - 控制器
控制器负责处理请求并生成响应。用户请求后,控制器将分析请求数据,将其传递给模型,然后将模型结果插入视图并生成响应。
了解操作
控制器包含操作。它们是用户可以请求执行的基本单元。一个控制器可以有一个或多个操作。
让我们看一下基本应用程序模板的SiteController −
<?php
   namespace app\controllers;
   use Yii;
   use yii\filters\AccessControl;
   use yii\web\Controller;
   use yii\filters\VerbFilter;
   use app\models\LoginForm;
   use app\models\ContactForm;
   class SiteController extends Controller {
      public function behaviors() {
         return [
            'access' => [
               'class' => AccessControl::className(),
               'only' => ['logout'],
               'rules' => [
                  [
                     'actions' => ['logout'],
                     'allow' => true,
                     'roles' => ['@'],
                  ],
               ],
            ],
            'verbs' => [
               'class' => VerbFilter::className(),
               'actions' => [
                  'logout' => ['post'],
               ],
            ],
         ];
      }
      public function actions() {
         return [
            'error' => [
               'class' => 'yii\web\ErrorAction',
            ],
            'captcha' => [
               'class' => 'yii\captcha\CaptchaAction',
               'fixedVerifyCode' => YII_ENV_TEST ? 'testme' : null,
            ],
         ];
      }
      public function actionIndex() {
         return $this->render('index');
      }
      public function actionLogin() {
         if (!\Yii::$app->user->isGuest) {
            return $this->goHome();
         }
         $model = new LoginForm();
         if ($model->load(Yii::$app->request->post()) && $model->login()) {
            return $this->goBack();
         }
         return $this->render('login', [
            'model' => $model,
         ]);
      }
      public function actionLogout() {
         Yii::$app->user->logout();
         return $this->goHome();
      }
      public function actionContact() {
         //load ContactForm model
         $model = new ContactForm();
         //if there was a POST request, then try to load POST data into a model
         if ($model->load(Yii::$app->request->post()) && $model>contact(Yii::$app->params
            ['adminEmail'])) {
            Yii::$app->session->setFlash('contactFormSubmitted');
            return $this->refresh();
         }
         return $this->render('contact', [
            'model' => $model,
         ]);
      }
      public function actionAbout() {
         return $this->render('about');
      }
      public function actionSpeak($message = "default message") {
         return $this->render("speak",['message' => $message]);
      }
   }
?>
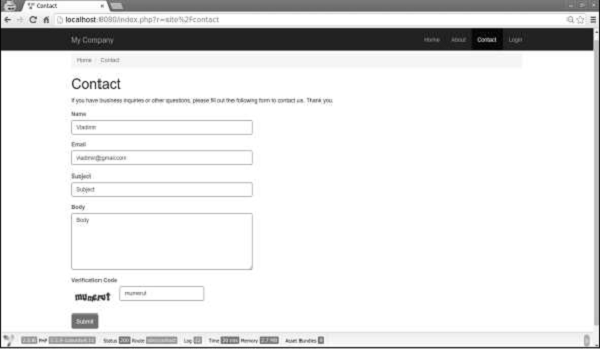
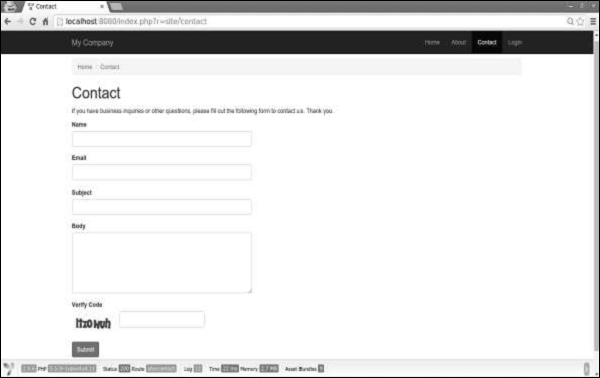
使用 PHP 内置服务器运行基本应用程序模板,然后转到 Web 浏览器的 http://localhost:8080/index.php?r=site/contact。您将看到以下页面 −
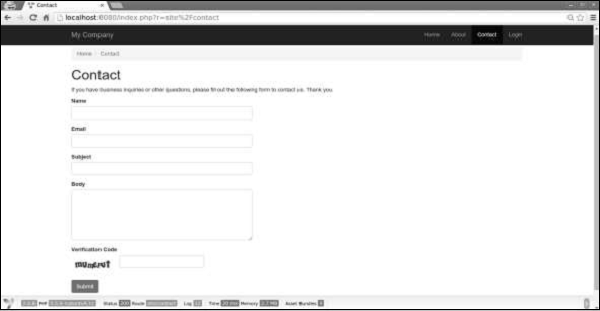
打开此页面时,将执行 SiteController 的联系操作。代码首先加载 ContactForm 模型。然后它渲染联系人视图并将模型传递到其中。
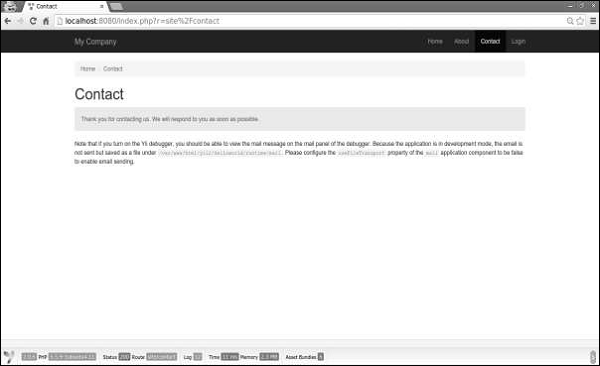
如果您填写表单并点击提交按钮,您将看到以下 −
请注意,这次执行了以下代码 −
if ($model->load(Yii::$app->request->post()) && $model->contact(Yii::$app>params ['adminEmail'])) {
   Yii::$app->session->setFlash('contactFormSubmitted');
   return $this->refresh();
}
如果有 POST 请求,我们将 POST 数据分配给模型并尝试发送电子邮件。如果成功,我们将设置一条带有文本"感谢您联系我们。我们将尽快回复您。"的 flash 消息并刷新页面。
了解路由
在上面的示例中,在 URL http://localhost:8080/index.php?r=site/contact 中,路由为 site/contact。将执行 SiteController 中的联系操作 (actionContact)。
路由由以下部分组成−
moduleID −如果控制器属于某个模块,则存在此部分路由。
controllerID(上例中的 site)− 在同一模块或应用程序内的所有控制器中标识控制器的唯一字符串。
actionID(上例中的 contact)− 在同一控制器内的所有操作中标识操作的唯一字符串。
路由的格式为 controllerID/actionID。如果控制器属于某个模块,则其格式为:moduleID/controllerID/actionID。
Yii - 使用控制器
Web 应用程序中的控制器应从 yii\web\Controller 或其子类扩展。在控制台应用程序中,它们应从 yii\console\Controller 或其子类扩展。
让我们在 controllers 文件夹中创建一个示例控制器。
步骤 1 − 在 Controllers 文件夹中,使用以下代码创建一个名为 ExampleController.php 的文件。
<?php
   namespace app\controllers;
   use yii\web\Controller;
   class ExampleController extends Controller {
      public function actionIndex() {
         $message = "index action of the ExampleController";
         return $this->render("example",[
            'message' => $message
         ]);
      }
   }
?>
步骤 2 − 在 views/example 文件夹中创建一个示例视图。在该文件夹中,使用以下代码创建一个名为 example.php 的文件。
<?php
    echo $message;
?>
每个应用程序都有一个默认控制器。对于 Web 应用程序,站点是控制器,而对于控制台应用程序,则是帮助。因此,当打开 http://localhost:8080/index.php URL 时,站点控制器将处理请求。您可以在应用程序配置中更改默认控制器。
考虑给定的代码 −
'defaultRoute' => 'main'
步骤 3 −将以上代码添加到以下config/web.php中。
<?php
   $params = require(__DIR__ . '/params.php');
   $config = [
      'id' => 'basic',
      'basePath' => dirname(__DIR__),
      'bootstrap' => ['log'],
      'components' => [
         'request' => [
            // !!! insert a secret key in the following (if it is empty) - this is
               //cookie 验证所需
            'cookieValidationKey' => 'ymoaYrebZHa8gURuolioHGlK8fLXCKjO',
         ],
         'cache' => [
            'class' => 'yii\caching\FileCache',
         ],
         'user' => [
            'identityClass' => 'app\models\User',
            'enableAutoLogin' => true,
         ],
         'errorHandler' => [
            'errorAction' => 'site/error',
         ],
         'mailer' => [
            'class' => 'yii\swiftmailer\Mailer',
            // 默认将所有邮件发送到一个文件。您必须设置
            // 'useFileTransport' 为 false 并配置传输
            // 以便邮件程序发送真实的电子邮件。
            'useFileTransport' => true,
         ],
         'log' => [
            'traceLevel' => YII_DEBUG ? 3 : 0,
            'targets' => [
               [
                  'class' => 'yii\log\FileTarget',
                  'levels' => ['error', 'warning'],
               ],
            ],
         ],
         'db' => require(__DIR__ . '/db.php'),
      ],
      //changing the default controller
      'defaultRoute' => 'example',
      'params' => $params,
   ];
   if (YII_ENV_DEV) {
      // 针对"dev"环境的配置调整
      $config['bootstrap'][] = 'debug';
      $config['modules']['debug'] = [
         'class' => 'yii\debug\Module',
      ];
      $config['bootstrap'][] = 'gii';
      $config['modules']['gii'] = [
         'class' => 'yii\gii\Module',
      ];
   }
   return $config;
?>
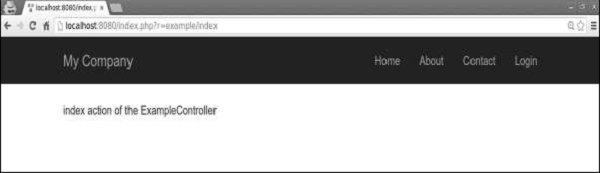
步骤 4 − 在 Web 浏览器的地址栏中输入 http://localhost:8080/index.php,您将看到默认控制器是示例控制器。
注意 −控制器 ID 应包含小写英文字母、数字、正斜杠、连字符和下划线。
要将控制器 ID 转换为控制器类名,应执行以下操作 −
- 取出所有用连字符分隔的单词的首字母并将其转换为大写。
- 删除连字符。
- 将正斜杠替换为反斜杠。
- 添加控制器后缀。
- 在前面添加控制器命名空间。
示例
page 变为 app\controllers\PageController。
post-article 变为app\controllers\PostArticleController。
user/post-article 变为 app\controllers\user\PostArticleController。
userBlogs/post-article 变为 app\controllers\userBlogs\PostArticleController。
Yii - 使用 action 操作
要在控制器类中创建操作,您应该定义一个名称以单词 action 开头的公共方法。操作的返回数据表示要发送给最终用户的响应。
步骤 1 − 让我们在 ExampleController 中定义 hello-world 操作。
<?php
   namespace app\controllers;
   use yii\web\Controller;
   class ExampleController extends Controller {
      public function actionIndex() {
         $message = "index action of the ExampleController";
         return $this->render("example",[
            'message' => $message
         ]);
      }
      public function actionHelloWorld() {
         return "Hello world!";
      }
   }
?>
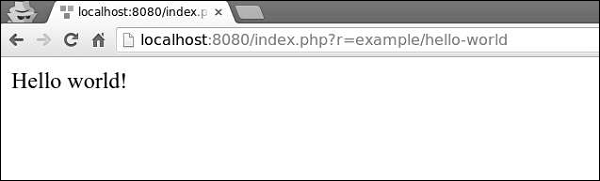
步骤 2 − 在 Web 浏览器的地址栏中输入 http://localhost:8080/index.php?r=example/hello-world。您将看到以下内容。
操作 ID 通常是动词,例如创建、更新、删除等。这是因为操作通常旨在对资源执行特定的更改。
操作 ID 应该只包含这些字符 − 小写英文字母、数字、连字符和下划线。
操作有两种类型:内联和独立。
内联操作在控制器类中定义。动作的名称以这种方式从动作 ID 派生而来 −
- 将动作 ID 的所有单词的首字母变为大写。
- 删除连字符。
- 添加动作前缀。
示例 −
- index 变为 actionIndex。
- hello-world(如上例所示)变为 actionHelloWorld。
如果您计划在不同的地方重复使用相同的动作,则应将其定义为独立动作。
创建独立动作类
要创建独立动作类,您应该扩展 yii\base\Action 或子类,并实现 run() 方法。
步骤1 − 在项目根目录中创建一个组件文件夹。在该文件夹中创建一个名为 GreetingAction.php 的文件,其中包含以下代码。
<?php
   namespace app\components;
   use yii\base\Action;
   class GreetingAction extends Action {
      public function run() {
         return "Greeting";
      }
   }
?>
我们刚刚创建了一个可重复使用的操作。要在我们的 ExampleController 中使用它,我们应该通过重写 action() 方法在操作映射中声明我们的操作。
步骤 2 − 以这种方式修改 ExampleController.php 文件。
<?php
   namespace app\controllers;
   use yii\web\Controller;
   class ExampleController extends Controller {
      public function actions() {
         return [
            'greeting' => 'app\components\GreetingAction',
         ];
      }
      public function actionIndex() {
         $message = "index action of the ExampleController";

         return $this->render("example",[
            'message' => $message
         ]);
      }
      public function actionHelloWorld() {
         return "Hello world!";
      }
   }
?>
actions() 方法返回一个数组,该数组的值是类名,键是操作 ID。
步骤 3 − 转到 http://localhost:8080/index.php?r=example/greeting。您将看到以下输出。
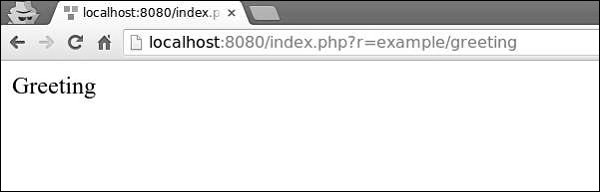
步骤 4 − 您还可以使用操作将用户重定向到其他 URL。将以下操作添加到 ExampleController.php。
public function actionOpenGoogle() {
    // 将用户浏览器重定向到 http://google.com
    return $this->redirect('http://google.com');
}
现在,如果您打开 http://localhost:8080/index.php?r=example/open-google,您将被重定向到 http://google.com。
操作方法可以接受参数,称为操作参数。它们的值是使用参数名称作为键从 $_GET 检索的。
步骤 5 − 将以下操作添加到我们的示例控制器。
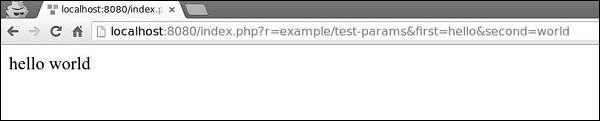
public function actionTestParams($first, $second) {
    return "$first $second";
}
步骤 6 −在 Web 浏览器的地址栏中输入 URL http://localhost:8080/index.php?r=example/testparams&first=hello&second=world,您将看到以下输出。
每个控制器都有一个默认操作。当路由仅包含控制器 ID 时,表示请求默认操作。默认情况下,操作为 index。您可以轻松地在控制器中覆盖此属性。
步骤 7 − 以这种方式修改我们的 ExampleController。
<?php
namespace app\controllers;
use yii\web\Controller;
class ExampleController extends Controller {
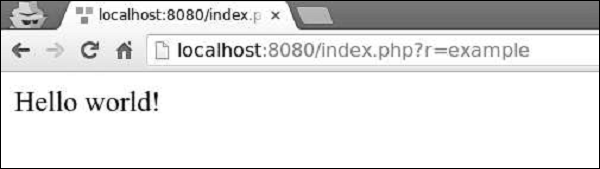
public $defaultAction = "hello-world";
/* other actions */
}
?>
步骤 8 −现在,如果您转到 http://localhost:8080/index.php?r=example,您将看到以下内容。
为了满足请求,控制器将经历以下生命周期 −
调用 yii\base\Controller:init() 方法。
控制器根据操作 ID 创建操作。
控制器依次调用 Web 应用程序、模块和控制器的 beforeAction() 方法。
控制器运行操作。
控制器依次调用 Web 应用程序、模块和控制器的 afterAction() 方法应用程序、模块和控制器。
应用程序将操作结果分配给响应。
要点
控制器应该 −
- 非常精简。每个操作应该只包含几行代码。
- 使用视图进行响应。
- 不嵌入 HTML。
- 访问请求数据。
- 调用模型的方法。
- 不处理请求数据。这些应该在模型中处理。
Yii - 模型
模型是代表业务逻辑和规则的对象。要创建模型,您应该扩展 yii\base\Model 类或其子类。
属性
属性代表业务数据。它们可以像数组元素或对象属性一样被访问。每个属性都是模型的可公开访问的属性。要指定模型拥有哪些属性,您应该重写 yii\base\Model::attributes() 方法。
让我们看一下基本应用程序模板的 ContactForm 模型。
<?php
   namespace app\models;
   use Yii;
   use yii\base\Model;
   /**
   * ContactForm is the model behind the contact form.
   */
   class ContactForm extends Model {
      public $name;
      public $email;
      public $subject;
      public $body;
      public $verifyCode;
      /**
      * @return array the validation rules.
      */
      public function rules() {
         return [
            // name, email, subject and body are required
            [['name', 'email', 'subject', 'body'], 'required'],
            // email has to be a valid email address
            ['email', 'email'],
            // verifyCode needs to be entered correctly
            ['verifyCode', 'captcha'],
         ];
      }
      /**
      * @return array customized attribute labels
      */
      public function attributeLabels() {
         return [
            'verifyCode' => 'Verification Code',
         ];
      }
      /**
      * Sends an email to the specified email address using the information
         collected by this model.
      * @param  string  $email the target email address
      * @return boolean whether the model passes validation
      */
      public function contact($email) {
         if ($this->validate()) {
            Yii::$app->mailer->compose()
               ->setTo($email)
               ->setFrom([$this->email => $this->name])
               ->setSubject($this->subject)
               ->setTextBody($this->body)
               ->send();
            return true;
         }
         return false;
      }
   }
?>
步骤 1 − 在 SiteController 中创建一个名为 actionShowContactModel 的函数,并编写以下代码。
public function actionShowContactModel() {
   $mContactForm = new \app\models\ContactForm();
   $mContactForm->name = "contactForm";
   $mContactForm->email = "user@gmail.com";
   $mContactForm->subject = "subject";
   $mContactForm->body = "body";
   var_dump($mContactForm);
}
在上面的代码中,我们定义了 ContactForm 模型,设置了属性,并在屏幕上显示了该模型。
步骤 2 − 现在,如果您在 Web 浏览器的地址栏中输入 http://localhost:8080/index.php?r=site/show-contact-model,您将看到以下内容。

如果您的模型从 yii\base\Model 扩展而来,那么它的所有成员变量(公共和非静态)都是属性。ContactForm 模型中有五个属性 − name、email、subject、body、verifyCode,并且您可以轻松添加新的。
属性标签
您经常需要显示与属性关联的标签。默认情况下,属性标签由yii\base\Model::generateAttributeLabel()方法自动生成。要手动声明属性标签,您可以重写yii\base\Model::attributeLabels()方法。
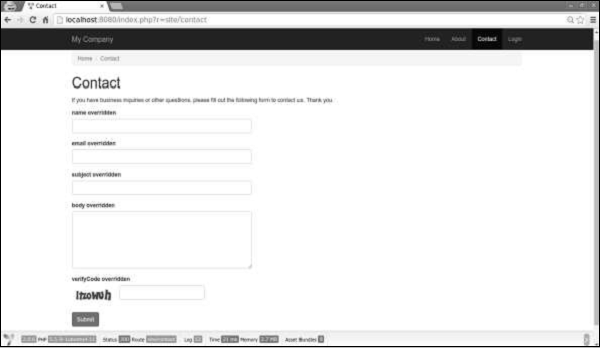
步骤 1 − 如果您打开http://localhost:8080/index.php?r=site/contact,,您将看到以下页面。
请注意,属性标签与其名称相同。
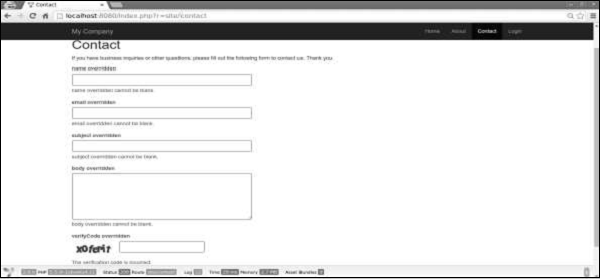
步骤 2 −现在,按以下方式修改 ContactForm 模型中的 attributeLabels 函数。
public function attributeLabels() {
   return [
      'name' => 'name overridden',
      'email' => 'email overridden',
      'subject' => 'subject overridden',
      'body' => 'body overridden',
      'verifyCode' => 'verifyCode overridden',
   ];
}
步骤 3 − 如果再次打开 http://localhost:8080/index.php?r=site/contact,您会注意到标签已更改,如下图所示。
场景
您可以在不同场景中使用模型。例如,当客人想要发送联系表单时,我们需要所有模型属性。当用户想要做同样的事情时,他已经登录,因此我们不需要他的姓名,因为我们可以轻松地从数据库中获取。
要声明场景,我们应该覆盖 scenarios() 函数。它返回一个数组,其键是场景名称,值是 活动属性。活动属性是需要验证的属性。它们也可以被批量分配。
步骤 1 − 按以下方式修改 ContactForm 模型。
<?php
   namespace app\models;
   use Yii;
   use yii\base\Model;
   /**
   * ContactForm is the model behind the contact form.
   */
   class ContactForm extends Model {
      public $name;
      public $email;
      public $subject;
      public $body;
      public $verifyCode;
      const SCENARIO_EMAIL_FROM_GUEST = 'EMAIL_FROM_GUEST';
      const SCENARIO_EMAIL_FROM_USER = 'EMAIL_FROM_USER';
      public function scenarios() {
         return [
            self::SCENARIO_EMAIL_FROM_GUEST => ['name', 'email', 'subject',
               'body', 'verifyCode'],
            self::SCENARIO_EMAIL_FROM_USER => ['email' ,'subject', 'body',
               'verifyCode'],
         ];
      }
      /**
      * @return array the validation rules.
      */
      public function rules() {
         return [
            // name, email, subject and body are required
            [['name', 'email', 'subject', 'body'], 'required'],
            // email has to be a valid email address
            ['email', 'email'],
            // verifyCode needs to be entered correctly
            ['verifyCode', 'captcha'],
         ];
      }
      /**
      * @return array customized attribute labels
      */
      public function attributeLabels() {
         return [
            'name' => 'name overridden',
            'email' => 'email overridden',
            'subject' => 'subject overridden',
            'body' => 'body overridden',
            'verifyCode' => 'verifyCode overridden',
         ];
      }
      /**
      * Sends an email to the specified email address using the information
         collected by this model.
      * @param  string  $email the target email address
      * @return boolean whether the model passes validation
      */
      public function contact($email) {
         if ($this -> validate()) {
            Yii::$app->mailer->compose()
               ->setTo($email)
               ->setFrom([$this->email => $this->name])
               ->setSubject($this->subject)
               ->setTextBody($this->body)
               ->send();
            return true;
         }
         return false;
      }
   }
?>
我们添加了两个场景。一个用于访客,另一个用于经过身份验证的用户。当用户经过身份验证时,我们不需要他的姓名。
步骤 2 − 现在,修改 SiteController 的 actionContact 函数。
public function actionContact() {
   $model = new ContactForm();
   $model->scenario = ContactForm::SCENARIO_EMAIL_FROM_GUEST;
   if ($model->load(Yii::$app->request->post()) && $model->
      contact(Yii::$app->params ['adminEmail'])) {
         Yii::$app->session->setFlash('contactFormSubmitted');
         return $this->refresh();
   }
   return $this->render('contact', [
      'model' => $model,
   ]);
}
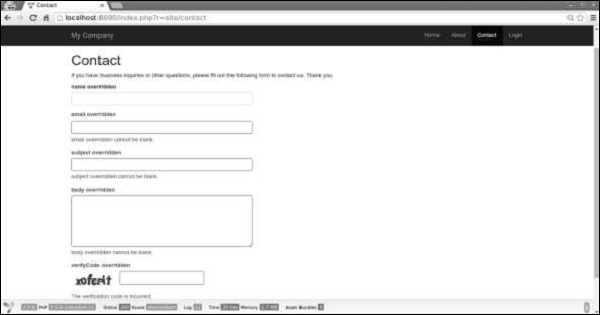
步骤 3 − 在 Web 浏览器中输入 http://localhost:8080/index.php?r=site/contact。您会注意到,目前所有模型属性都是必需的。
步骤 4 − 如果您在 actionContact 中更改模型的场景,如以下代码所示,您会发现 name 属性不再是必需的。
$model->scenario = ContactForm::SCENARIO_EMAIL_FROM_USER;
大规模赋值
大规模赋值是一种通过一行代码从多个输入属性创建模型的便捷方式。
代码行数为 −
$mContactForm = new \app\models\ContactForm;
$mContactForm->attributes = \Yii::$app->request->post('ContactForm');
上面给出的代码行相当于 −
$mContactForm = new \app\models\ContactForm;
$postData = \Yii::$app->request->post('ContactForm', []);
$mContactForm->name = isset($postData['name']) ? $postData['name'] : null;
$mContactForm->email = isset($postData['email']) ? $postData['email'] : null;
$mContactForm->subject = isset($postData['subject']) ? $postData['subject'] : null;
$mContactForm->body = isset($postData['body']) ? $postData['body'] : null;
前者更简洁。请注意,大量赋值仅适用于安全属性。它们只是scenario()函数中列出的当前场景属性。
数据导出
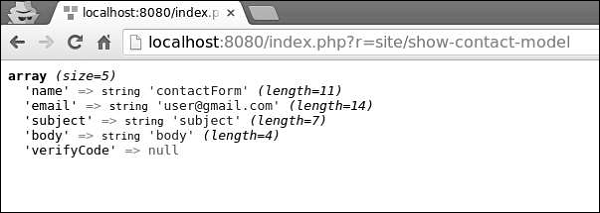
模型通常需要以不同的格式导出。要将模型转换为数组,请修改SiteController的actionShowContactModel函数 −
public function actionShowContactModel() {
    $mContactForm = new \app\models\ContactForm();
    $mContactForm->name = "contactForm";
    $mContactForm->email = "user@gmail.com";
    $mContactForm->subject = "subject";
    $mContactForm->body = "body";
    var_dump($mContactForm->attributes);
}
在地址栏中输入 http://localhost:8080/index.php?r=site/show-contact-model,您将看到以下 −
要将模型转换为 JSON 格式,请按以下方式修改 actionShowContactModel 函数 −
public function actionShowContactModel() {
   $mContactForm = new \app\models\ContactForm();
   $mContactForm->name = "contactForm";
   $mContactForm->email = "user@gmail.com";
   $mContactForm->subject = "subject";
   $mContactForm->body = "body";
   return \yii\helpers\Json::encode($mContactForm);
}
浏览器输出 −
{
    "name":"contactForm",
    "email":"user@gmail.com",
    "subject":"subject",
    "body":"body ",
    "verifyCode":null
}
要点
在设计良好的应用程序中,模型通常比控制器快得多。模型应该 −
- 包含业务逻辑。
- 包含验证规则。
- 包含属性。
- 不嵌入 HTML。
- 不直接访问请求。
- 没有太多场景。
Yii - 小部件
小部件是可重复使用的客户端代码,包含 HTML、CSS 和 JS。此代码包含最少的逻辑,并包装在 yii\base\Widget 对象中。我们可以轻松地在任何视图中插入和应用此对象。
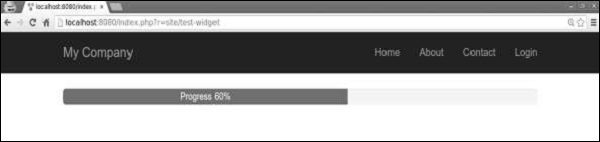
步骤 1 − 要查看小部件的实际操作,请使用以下代码在 SiteController 中创建一个 actionTestWidget 函数。
public function actionTestWidget() {
    return $this->render('testwidget');
}
在上面的例子中,我们刚刚返回了一个名为 "testwidget" 的 View。
步骤 2 −现在,在 views/site 文件夹中,创建一个名为 testwidget.php 的视图文件。
<?php
   use yii\bootstrap\Progress;
?>
<?= Progress::widget(['percent' => 60, 'label' => 'Progress 60%']) ?>
步骤 3 − 如果您转到 http://localhost:8080/index.php?r=site/test-widget,您将看到进度条小部件。
使用小部件
要在 View 中使用小部件,您应该调用 yii\base\Widget::widget() 函数。此函数采用配置数组来初始化小部件。在上一个示例中,我们插入了一个带有百分比和配置对象标签参数的进度条。
某些小部件采用内容块。它应该包含在 yii\base\Widget::begin() 和 yii\base\Widget::end() 函数之间。例如,以下小部件显示联系表单 −
<?php $form = ActiveForm::begin(['id' => 'contact-form']); ?>
   <?= $form->field($model, 'name') ?>
   <?= $form->field($model, 'email') ?>
   <?= $form->field($model, 'subject') ?>
   <?= $form->field($model, 'body')->textArea(['rows' => 6]) ?>
   <?= $form->field($model, 'verifyCode')->widget(Captcha::className(), [
      'template' =>
         '<div class="row">
            <div class = "col-lg-3">{image}</div>
            <div class = "col-lg-6">{input}</div>
         </div>',
   ]) ?>
   <div class = "form-group">
      <?= Html::submitButton('Submit', ['class' => 'btn btn-primary',
         'name' => 'contact-button']) ?>
   </div>
<?php ActiveForm::end(); ?>
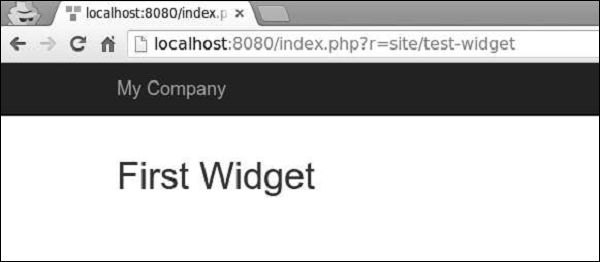
创建小部件
要创建小部件,您应该从 yii\base\Widget 扩展。然后,您应该覆盖 yii\base\Widget::init() 和 yii\base\Widget::run() 函数。run() 函数应返回渲染结果。init() 函数应规范化小部件属性。
步骤 1 − 在项目根目录中创建一个组件文件夹。在该文件夹中,使用以下代码创建一个名为 FirstWidget.php 的文件。
<?php
   namespace app\components;
   use yii\base\Widget;
   class FirstWidget extends Widget {
      public $mes;
      public function init() {
         parent::init();
         if ($this->mes === null) {
            $this->mes = 'First Widget';
         }
      }
      public function run() {
         return "<h1>$this->mes</h1>";
      }
   }
?>
步骤 2 − 按以下方式修改 testwidget 视图。
<?php
   use app\components\FirstWidget;
?>
<?= FirstWidget∷widget() ?>
步骤 3 − 转到 http://localhost:8080/index.php?r=site/test-widget。您将看到以下内容。
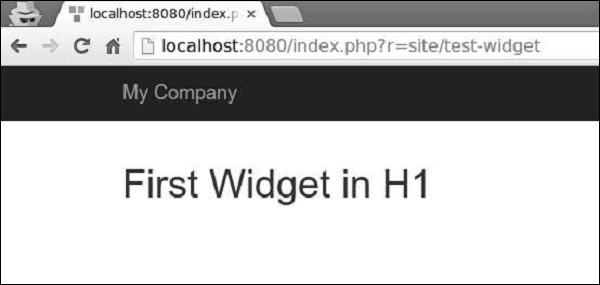
步骤 4 − 要将内容包含在 begin() 和 end() 调用之间,您应该修改 FirstWidget.php 文件。
<?php
   namespace app\components;
   use yii\base\Widget;
   class FirstWidget extends Widget {
      public function init() {
         parent::init();
         ob_start();
      }
      public function run() {
         $content = ob_get_clean();
         return "<h1>$content</h1>";
      }
   }
?>
步骤 5 − 现在 h1 标签将包围所有内容。请注意,我们使用 ob_start() 函数来缓冲输出。修改 testwidget 视图,如以下代码所示。
<?php
   use app\components\FirstWidget;
?>
<?php FirstWidget::begin(); ?>
   First Widget in H1
<?php FirstWidget::end(); ?>
您将看到以下输出 −
要点
Widget 应该 −
按照 MVC 模式创建。您应将表示层保留在视图中,将逻辑保留在小部件类中。
设计为自包含的。最终开发人员应该能够将其设计成视图。
Yii - 模块
模块是一个实体,它有自己的模型、视图、控制器,可能还有其他模块。它实际上是应用程序内部的一个应用程序。
步骤 1 − 在项目根目录中创建一个名为 modules 的文件夹。在 modules 文件夹中,创建一个名为 hello 的文件夹。这将是我们的 Hello 模块的基本文件夹。
步骤 2 − 在 hello 文件夹中,使用以下代码创建一个文件 Hello.php。
<?php
   namespace app\modules\hello;
   class Hello extends \yii\base\Module {
      public function init() {
         parent::init();
      }
   }
?>
我们刚刚创建了一个模块类。它应该位于模块的基本路径下。每次访问模块时,都会创建相应模块类的实例。init() 函数用于初始化模块的属性。
步骤 3 − 现在,在 hello 文件夹内再添加两个目录 − controllers 和 views。将 CustomController.php 文件添加到控制器的文件夹中。
<?php
   namespace app\modules\hello\controllers;
   use yii\web\Controller;
   class CustomController extends Controller {
      public function actionGreet() {
         return $this->render('greet');
      }
   }
?>
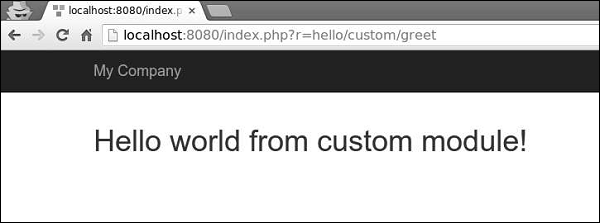
创建模块时,惯例是将控制器类放入模块基本路径的控制器目录中。我们刚刚定义了 actionGreet 函数,它只返回一个 greet 视图。
模块中的视图应放在模块基本路径的 views 文件夹中。如果视图由控制器呈现,则它们应位于与 controllerID 对应的文件夹中。将 custom 文件夹添加到 views 文件夹。
步骤 4 − 在自定义目录中,使用以下代码创建一个名为 greet.php 的文件。
<h1>来自自定义模块的 Hello world!</h1>
我们刚刚为 actionGreet 创建了一个 View。要使用这个新创建的模块,我们应该配置应用程序。我们应该将我们的模块添加到应用程序的 modules 属性中。
步骤 5 − 修改 config/web.php 文件。
<?php
   $params = require(__DIR__ . '/params.php');
   $config = [
      'id' => 'basic',
      'basePath' => dirname(__DIR__),
      'bootstrap' => ['log'],
      'components' => [
         'request' => [
            // !!! insert a secret key in the following (if it is empty) - this is
               //cookie 验证所需
            'cookieValidationKey' => 'ymoaYrebZHa8gURuolioHGlK8fLXCKjO',
         ],
         'cache' => [
            'class' => 'yii\caching\FileCache',
         ],
         'user' => [
            'identityClass' => 'app\models\User',
            'enableAutoLogin' => true,
         ],
         'errorHandler' => [
            'errorAction' => 'site/error',
         ],
         'mailer' => [
            'class' => 'yii\swiftmailer\Mailer',
            // 默认将所有邮件发送到一个文件。您必须设置
            // 'useFileTransport' 为 false 并配置传输
            // 以便邮件程序发送真实的电子邮件。
            'useFileTransport' => true,
         ],
         'log' => [
            'traceLevel' => YII_DEBUG ? 3 : 0,
            'targets' => [
               [
                  'class' => 'yii\log\FileTarget',
                  'levels' => ['error', 'warning'],
               ],
            ],
         ],
         'db' => require(__DIR__ . '/db.php'),
      ],
      'modules' => [
         'hello' => [
            'class' => 'app\modules\hello\Hello',
         ],
      ],
      'params' => $params,
   ];
   if (YII_ENV_DEV) {
      // 针对"dev"环境的配置调整
      $config['bootstrap'][] = 'debug';
      $config['modules']['debug'] = [
         'class' => 'yii\debug\Module',
      ];
      $config['bootstrap'][] = 'gii';
      $config['modules']['gii'] = [
         'class' => 'yii\gii\Module',
      ];
   }
   return $config;
?>
模块控制器的路由必须以模块 ID 开头,后跟控制器 ID 和操作 ID。
步骤 6 − 要在我们的应用程序中运行 actionGreet,我们应该使用以下路由。
hello/custom/greet
其中 hello 是模块 ID,custom 是 控制器 ID,greet 是 操作 ID。
步骤 7 −现在,输入 http://localhost:8080/index.php?r=hello/custom/greet,您将看到以下输出。
要点
模块应该 −
在大型应用程序中使用。您应该将其功能分为几组。每个功能组都可以开发为一个模块。
可重复使用。一些常用的功能,如SEO管理或博客管理,可以开发为模块,以便您可以在未来的项目中轻松重用它们。
Yii - 视图
视图负责向最终用户呈现数据。在 Web 应用程序中,视图只是包含 HTML 和 PHP 代码的 PHP 脚本文件。
创建视图
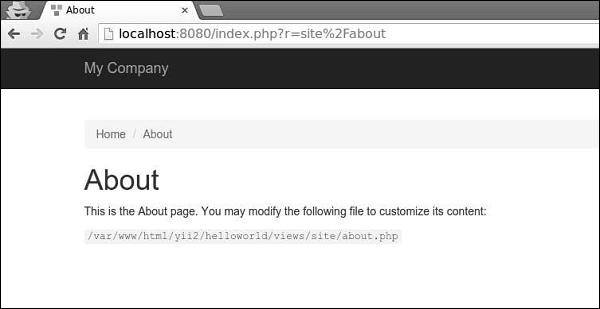
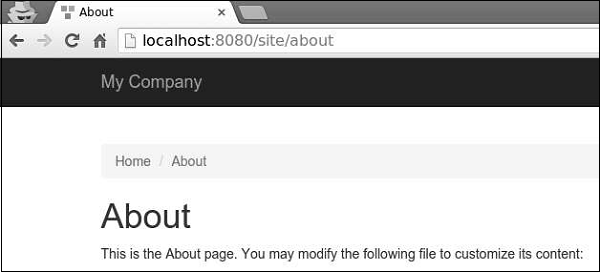
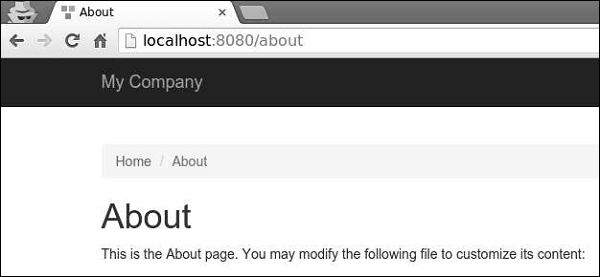
步骤 1 − 让我们看一下基本应用程序模板的"关于"视图。
<?php
   /* @var $this yii\web\View */
   use yii\helpers\Html;
   $this->title = 'About';
   $this->params['breadcrumbs'][] = $this->title;
?>
<div class="site-about">
   <h1><?= Html::encode($this->title) ?></h1>
   <p>
      This is the About page. You may modify the following file to customize its content:
   </p>
   <code><?= __FILE__ ?></code>
</div>
$this 指标是管理和呈现此视图模板的视图。
"关于"页面如下所示−
为了避免 XSS 攻击,对来自最终用户的数据进行编码和/或过滤非常重要。您应该始终通过调用 yii\helpers\Html::encode() 对纯文本进行编码,并通过调用 yii\helpers\HtmlPurifier 对 HTML 内容进行编码。
步骤 2 − 按照以下方式修改"关于"视图。
<?php
   /* @var $this yii\web\View */
   use yii\helpers\Html;
   use yii\helpers\HtmlPurifier;
   $this->title = 'About';
   $this->params['breadcrumbs'][] = $this->title;
?>
<div class="site-about">
   <h1><?= Html::encode($this->title) ?></h1>
   <p>
      This is the About page. You may modify the following file to customize its content:
   </p>
   <p>
      <?= Html::encode("<script>alert('alert!');</script><h1>ENCODE EXAMPLE</h1>>") ?>
   </p>
   <p>
      <?= HtmlPurifier::process("<script>alert('alert!');</script><h1> HtmlPurifier EXAMPLE</h1>") ?>
   </p>
   <code><?= __FILE__ ?></code>
</div>
步骤 3 − 现在输入 http://localhost:8080/index.php?r=site/about。您将看到以下屏幕。
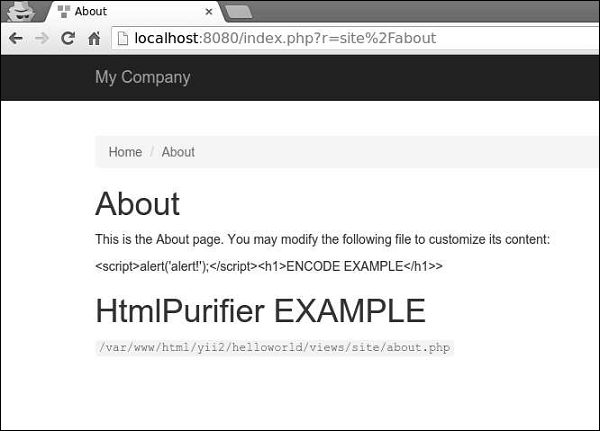
请注意,Html::encode() 函数内的 javascript 代码显示为纯文本。HtmlPurifier::process() 调用也是如此。仅显示 h1 标签。
视图遵循这些约定 −
由控制器呈现的视图应放入 @app/views/controllerID 文件夹中。
在小部件中呈现的视图应放入 widgetPath/views 文件夹中。
要在控制器内呈现 视图,您可以使用以下方法 −
render() − 呈现视图并应用布局。
renderPartial() −渲染没有布局的视图。
renderAjax() − 渲染没有布局的视图,但注入所有已注册的 js 和 css 文件。
renderFile() − 在给定的文件路径或别名中渲染视图。
renderContent() − 渲染静态字符串并应用布局。
要在另一个视图中渲染视图,您可以使用以下方法 −
render() − 渲染视图。
renderAjax() −渲染没有布局的视图,但注入所有已注册的 js 和 css 文件。
renderFile() − 在给定的文件路径或别名中渲染视图。
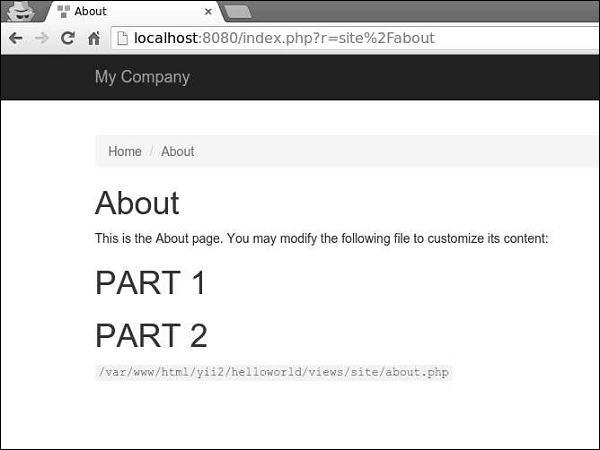
步骤 4 − 在 views/site 文件夹中,创建两个视图文件:_part1.php 和 _part2.php。
_part1.php −
<h1>PART 1</h1>
_part2.php −
<h1>PART 2</h1>
步骤 5 − 最后,在 'About' 视图中呈现这两个新创建的视图。
<?php
   /* @var $this yii\web\View */
   use yii\helpers\Html;
   $this->title = 'About';
   $this->params['breadcrumbs'][] = $this->title;
?>
<div class="site-about">
   <h1><?= Html::encode($this->title) ?></h1>
   <p>
      This is the About page. You may modify the following file to customize its content:
   </p>
   <?= $this->render("_part1") ?>
   <?= $this->render("_part2") ?>
   <code><?= __FILE__ ?></code>
</div>
您将看到以下输出 −
渲染视图时,您可以使用视图名称或视图文件路径/别名来定义视图。视图名称按以下方式解析 −
视图名称可以省略扩展名。例如,about 视图对应于 about.php 文件。
如果视图名称以"/"开头,则如果当前活动模块为 forum,视图名称为 comment/post,则路径为 @app/modules/forum/views/comment/post。如果没有活动模块,则路径为 @app/views/comment/post。
如果视图名称以"//"开头,则相应的路径为 @app/views/ViewName。例如,//site/contact 对应于 @app/views/site/contact.php。
如果视图名称为 contact,上下文控制器为 SiteController,则路径为 @app/views/site/contact.php。
如果价格视图在商品视图中呈现,则价格将在 @app/views/invoice/goods.php 中呈现,并解析为 @app/views/invoice/price.php。
访问视图中的数据
要访问视图中的数据,应将数据作为第二个参数传递给视图呈现方法。
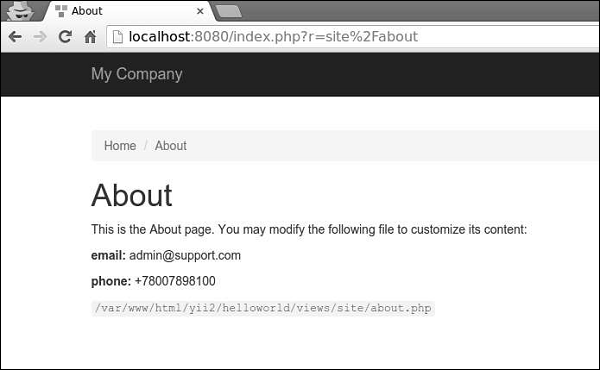
步骤 1 − 修改 SiteController 的 actionAbout。
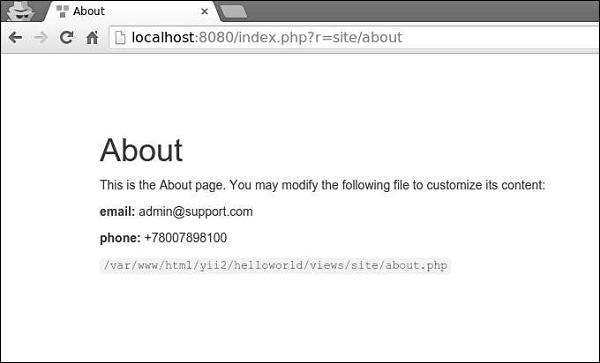
public function actionAbout() {
   $email = "admin@support.com";
   $phone = "+78007898100";
   return $this->render('about',[
      'email' => $email,
      'phone' => $phone
   ]);
}
在上面给出的代码中,我们传递两个变量 $email 和 $phone 以在 About 视图中呈现。
步骤 2 − 更改关于视图代码。
<?php
   /* @var $this yii\web\View */
   use yii\helpers\Html;
   $this->title = 'About';
   $this->params['breadcrumbs'][] = $this->title;
?>
<div class = "site-about">
   <h1><?= Html::encode($this->title) ?></h1>
   <p>
      This is the About page. You may modify the following file to customize its content:
   </p>
   <p>
      <b>email:</b> <?= $email ?>
   </p>
   <p>
      <b>phone:</b> <?= $phone ?>
   </p>
   <code><?= __FILE__ ?></code>
</div>
我们刚刚添加了从 SiteController 收到的两个变量。
步骤 3 − 在 Web 浏览器中输入 URL http://localhost:8080/index.php?r=site/about,您将看到以下内容。
Yii - 布局
布局代表多个视图的公共部分,例如页眉和页脚。默认情况下,布局应存储在 views/layouts 文件夹中。
让我们看一下基本应用程序模板的主要布局 −
<?php
   /* @var $this \yii\web\View */
   /* @var $content string */
   use yii\helpers\Html;
   use yii\bootstrap\Nav;
   use yii\bootstrap\NavBar;
   use yii\widgets\Breadcrumbs;
   use app\assets\AppAsset;
   AppAsset::register($this);
?>

<?php $this->beginPage() ?>
<!DOCTYPE html>
<html lang = "<?= Yii::$app->language ?>">
   <head>
      <meta charset = "<?= Yii::$app->charset ?>">
      <meta name = "viewport" content = "width = device-width, initial-scale = 1">
      <?= Html::csrfMetaTags() ?>
      <title><?= Html::encode($this->title) ?></title>
      <?php $this->head() ?>
   </head>

   <body>
      <?php $this->beginBody() ?>
         <div class = "wrap">
            <?php
               NavBar::begin([
                  'brandLabel' => 'My Company',
                  'brandUrl' => Yii::$app->homeUrl,
                  'options' => [
                     'class' => 'navbar-inverse navbar-fixed-top',
                  ],
               ]);

               echo Nav::widget([
                  'options' => ['class' => 'navbar-nav navbar-right'],
                  'items' => [
                     ['label' => 'Home', 'url' => ['/site/index']],
                     ['label' => 'About', 'url' => ['/site/about']],
                     ['label' => 'Contact', 'url' => ['/site/contact']],
                     Yii::$app->user->isGuest ?
                        ['label' => 'Login', 'url' => ['/site/login']] :
                        [
                           'label' => 'Logout (' . Yii::$app->user->identity->username.')',
                           'url' => ['/site/logout'],
                           'linkOptions' => ['data-method' => 'post']
                        ],
                  ],
               ]);

               NavBar::end();
            ?>
            <div class = "container">
               <?= Breadcrumbs::widget([
                  'links' => isset($this->params['breadcrumbs']) ? $this>params
                     ['breadcrumbs'] : [],
               ]) ?>
               <?= $content ?>
            </div>

         </div>

         <footer class = "footer">
            <div class = "container">
               <p class = "pull-left">© My Company <?= date('Y') ?></p>
               <p class = "pull-right"><?= Yii::powered() ?></p>
            </div>
         </footer>

      <?php $this->endBody() ?>
   </body>
</html>
<?php $this->endPage() ?>
此布局生成所有页面通用的 HTML 页面。$content 变量是内容视图的渲染结果。以下方法触发有关渲染过程的事件,以便可以正确注入在其他地方注册的脚本和标签 −
head() − 应在 head 部分内调用。生成一个占位符,它将被替换为针对 head 位置的已注册 HTML。
beginBody() − 应在 body 部分的开头调用。触发 EVENT_BEGIN_BODY 事件。生成一个占位符,它将被替换为针对 body 开始位置的已注册 HTML。
endBody() −应在 body 部分末尾调用。触发 EVENT_END_BODY 事件。生成占位符,该占位符将被替换为针对正文末尾位置的已注册 HTML。
beginPage() − 应在布局开始时调用。触发 EVENT_BEGIN_PAGE 事件。
endPage() − 应在布局末尾调用。触发 EVENT_END_PAGE 事件。
创建布局
步骤 1 − 在 views/layouts 目录中,使用以下代码创建一个名为 newlayout.php 的文件。
<?php
   /* @var $this \yii\web\View */
   /* @var $content string */
   use yii\helpers\Html;
   use yii\bootstrap\Nav;
   use yii\bootstrap\NavBar;
   use yii\widgets\Breadcrumbs;
   use app\assets\AppAsset;
   AppAsset::register($this);
?>
<?php $this->beginPage() ?>
<!DOCTYPE html>
<html lang = "<?= Yii::$app->language ?>">
   <head>
      <meta charset = "<?= Yii::$app->charset ?>">
      <meta name = "viewport" content = "width = device-width, initial-scale = 1">
      <? = Html::csrfMetaTags() ?>
      <title><? = Html::encode($this->title) ?></title>
      <?php $this->head() ?>
   </head>

   <body>
      <?php $this->beginBody() ?>
         <div class = "wrap">
            <div class = "container">
               <? = $content ?>
            </div>
         </div>

         <footer class = "footer">
            <div class = "container">
               <p class = "pull-left">© My Company <?= date('Y') ?></p>
               <p class = "pull-right"><? = Yii::powered() ?></p>
            </div>
         </footer>
      <?php $this->endBody() ?>
   </body>

</html>
<?php $this->endPage() ?>
我们已删除顶部菜单栏。
步骤 2 − 要将此布局应用于 SiteController,请将 $layout 属性添加到 SiteController 类。
<?php
   namespace app\controllers;
   use Yii;
   use yii\filters\AccessControl;
   use yii\web\Controller;
   use yii\filters\VerbFilter;
   use app\models\LoginForm;
   use app\models\ContactForm;
   class SiteController extends Controller {
      public $layout = "newlayout";
      /* other methods */
   }
?>
步骤 3 − 现在,如果您在 SiteController 的任何视图中转到 Web 浏览器,您将看到布局已更改。
步骤 4 − 要注册各种元标记,您可以在内容视图中调用 yii\web\View::registerMetaTag()。
步骤 5 − 修改 SiteController 的 '关于' 视图。
<?php
   /* @var $this yii\web\View */
   use yii\helpers\Html;
   $this->title = 'About';
   $this->params['breadcrumbs'][] = $this->title;
   $this->registerMetaTag(['name' => 'keywords', 'content' => 'yii, developing, views,
      meta, tags']);
   $this->registerMetaTag(['name' => 'description', 'content' => 'This is the description
      of this page!'], 'description');
?>
<div class="site-about">
   <h1><?= Html::encode($this->title) ?></h1>
   <p>
      This is the About page. You may modify the following file to customize its content:
   </p>
   <code><?= __FILE__ ?></code>
</div>
我们刚刚注册了两个元标记 − 关键词和描述。
步骤 6 − 现在转到 http://localhost:8080/index.php?r=site/about,您将在页面的头部找到元标记,如以下屏幕截图所示。

视图触发多个事件 −
EVENT_BEGIN_BODY − 通过调用 yii\web\View::beginBody() 在布局中触发。
EVENT_END_BODY −通过调用 yii\web\View::endBody() 在布局中触发。
EVENT_BEGIN_PAGE − 通过调用 yii\web\View::beginPage() 在布局中触发。
EVENT_END_PAGE − 通过调用 yii\web\View::endPage() 在布局中触发。
EVENT_BEFORE_RENDER − 在开始渲染文件时在控制器中触发。
EVENT_AFTER_RENDER −在渲染文件后触发。
您可以响应这些事件以将内容注入视图。
步骤 7 − 要在 SiteController 的 actionAbout 中显示当前日期和时间,请按如下方式修改它。
public function actionAbout() {
   \Yii::$app->view->on(View::EVENT_BEGIN_BODY, function () {
      echo date('m.d.Y H:i:s');
   });
   return $this->render('about');
}
步骤 8 −在 Web 浏览器的地址栏中输入 http://localhost:8080/index.php?r=site/about,您将看到以下内容。

要点
为了使视图更易于管理,您应该 −
- 将复杂的视图分成几个较小的视图。
- 对常见的 HTML 部分(页眉、页脚、菜单等)使用布局。
- 使用小部件。
视图应该 −
- 包含 HTML 和简单的 PHP 代码来格式化和呈现数据。
- 不处理请求。
- 不修改模型属性。
- 不执行数据库查询。
Yii - 资源
资源是可在网页中引用的文件(css、js、视频、音频或图像等)。Yii 以资源包的形式管理资源。资源包的目的是在代码库中拥有一组相关的JS或CSS文件,并能够在单个 PHP 调用中注册它们。资源包还可以依赖于其他资源包。
在资源文件夹中,您将找到基本应用程序模板的资源包 −
<?php
   namespace app\assets;
   use yii\web\AssetBundle;
   /**
   * @author Qiang Xue <qiang.xue@gmail.com>
   * @since 2.0
   */
   class AppAsset extends AssetBundle {
      public $basePath = '@webroot';
      public $baseUrl = '@web';
      public $css = [
         'css/site.css',
      ];
      public $js = [];
      public $depends = [
         'yii\web\YiiAsset',
         'yii\bootstrap\BootstrapAsset',
      ];
   }
?>
上述类指定资源文件位于 @webroot 文件夹内,该文件夹对应于 URL @web。该包不包含 JS 文件,只包含一个 CSS 文件。该包依赖于其他包 −
yii\web\YiiAsset 和 yii\bootstrap\BootstrapAsset。
AssetBundle 的属性
以下是 AssetBundle 的属性。
basePath − 定义一个可通过 Web 访问的目录,其中包含此包中的资源文件。
baseUrl −指定 basePath 属性对应的 URL。
js − 定义此包中包含的 JS 文件的数组。
css − 定义此包中包含的 CSS 文件的数组。
depends − 定义此包所依赖的资源包的数组。这意味着当前资源包的 CSS 和 JS 文件将在 depends 属性声明的包之后包含。
sourcePath − 定义包含资源文件的根目录。如果根目录无法通过 Web 访问,则应设置此属性。否则,您应该设置 basePath 和 baseUrl 属性。
cssOptions − 定义将传递给 yii\web\View←registerCssFile 函数的选项。
jsOptions −定义将传递给 yii\web\View::registerJsFile 函数的选项。
publishOptions:指定将传递给 yii\web\AssetManager::publish 函数的选项。
资产分类
根据位置,资产可归类为 −
源资产 − 资产位于无法通过 Web 直接访问的目录中。应将它们复制到 Web 目录以便在页面中使用源资产。此过程称为 资产发布。
已发布资产 −资产位于可通过 Web 访问的目录中
外部资产 − 资产位于另一台 Web 服务器上。
使用资产包
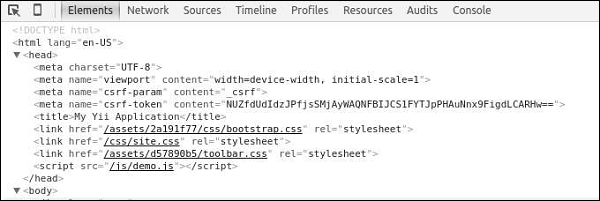
步骤 1 − 在 assets 文件夹中,创建一个名为 DemoAsset.php 的新文件,其中包含以下内容。
<?php
   namespace app\assets;
   use yii\web\AssetBundle;
   class DemoAsset extends AssetBundle {
      public $basePath = '@webroot';
      public $baseUrl = '@web';
      public $js = ['js/demo.js'];
   }
?>
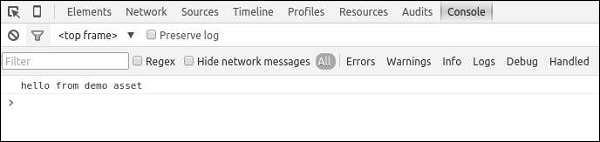
步骤 2 − 我们刚刚用单个 demo.js 文件声明了一个新的资源包。现在,在 web/js 文件夹中,使用此代码创建一个名为 demo.js 的文件。
console.log("hello from demo asset");
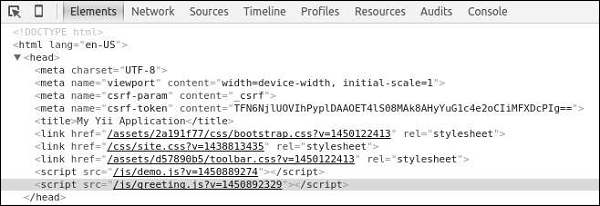
步骤 3 − 要注册新创建的资源包,请转到 views/layouts 目录,并在 main.php 文件的顶部添加以下行。
\app\assets\DemoAsset::register($this);
步骤 4 −如果您的 Web 浏览器指向 http://localhost:8080/index.php,您应该会看到以下 chrome 控制台输出。
您还可以定义 jsOptions 和 cssOptions 属性来自定义 CSS 和 JS 文件包含在页面中的方式。默认情况下,JS 文件包含在结束 body 标签之前。
步骤 5 − 要在 head 部分包含 JS 文件,请按以下方式修改 DemoAsset.php 文件。
<?php
   namespace app\assets;
   use yii\web\AssetBundle;
   use yii\web\View;
   class DemoAsset extends AssetBundle {
      public $basePath = '@webroot';
      public $baseUrl = '@web';
      public $js = ['js/demo.js'];
      public  $jsOptions = ['position' => View::POS_HEAD];
   }
?>
步骤 6 − 现在转到 http://localhost:8080/index.php,您应该看到 demo.js 脚本包含在页面的 head 部分中。
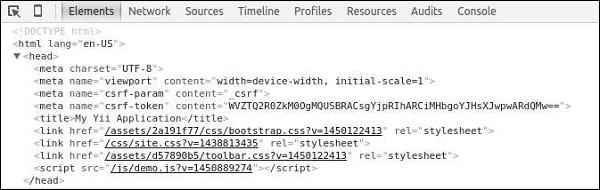
对于在生产模式下运行的 Web 应用程序来说,启用资产的 HTTP 缓存是一种常见的做法。通过这样做,最后修改时间戳将附加到所有已发布的资产。
步骤 7 − 转到 config 文件夹并修改 web.php 文件,如以下代码所示。
<?php
   $params = require(__DIR__ . '/params.php');
   $config = [
      'id' => 'basic',
      'basePath' => dirname(__DIR__),
      'bootstrap' => ['log'],
      'components' => [
         'assetManager' => [
            'appendTimestamp' => true,
         ],
         'request' => [
            // !!! insert a secret key in the following (if it is empty) - this is
               //required by cookie validation
            'cookieValidationKey' => 'ymoaYrebZHa8gURuolioHGlK8fLXCKjO',
         ],
         'cache' => [
            'class' => 'yii\caching\FileCache',
         ],
         'user' => [
            'identityClass' => 'app\models\User',
            'enableAutoLogin' => true,
         ],
         'errorHandler' => [
            'errorAction' => 'site/error',
         ],
         'mailer' => [
            'class' => 'yii\swiftmailer\Mailer',
            // send all mails to a file by default. You have to set
            // 'useFileTransport' to false and configure a transport
            // for the mailer to send real emails.
            'useFileTransport' => true,
         ],
         'log' => [
            'traceLevel' => YII_DEBUG ? 3 : 0,
            'targets' => [
               [
                  'class' => 'yii\log\FileTarget',
                  'levels' => ['error', 'warning'],
               ],
            ],
         ],
         'db' => require(__DIR__ . '/db.php'),
      ],
      'modules' => [
         'hello' => [
            'class' => 'app\modules\hello\Hello',
         ],
      ],
      'params' => $params,
   ];
   if (YII_ENV_DEV) {
      // configuration adjustments for 'dev' environment
      $config['bootstrap'][] = 'debug';
      $config['modules']['debug'] = [
         'class' => 'yii\debug\Module',
      ];
      $config['bootstrap'][] = 'gii';
      $config['modules']['gii'] = [
         'class' => 'yii\gii\Module',
      ];
   }
   return $config;
?>
我们添加了 AssetManager 组件并设置了 appendTimestamp 属性。
步骤 8 − 现在在 Web 浏览器的地址栏中输入 http://localhost:8080/index.php。您会注意到所有资产现在都有一个时间戳,如下图所示。
核心 Yii Assetbundles
以下是核心 Yii Assetbundles。
yii\web\JqueryAsset −包含 jquery.js 文件。
yii\web\YiiAsset − 包含 yii.js 文件,该文件实现了在模块中组织 JS 代码的机制。
yii\bootstrap\BootstrapAsset − 包含来自 Twitter Bootstrap 框架的 CSS 文件。
yii\bootstrap\BootstrapPluginAsset − 包含来自 Twitter Bootstrap 框架的 JS 文件。
yii\jui\JuiAsset − 包含来自 jQuery UI 库的 CSS 和 JS 文件。
Yii - 资源转换
开发人员通常不编写 CSS 或 JS 代码,而是使用扩展语法,例如 LESS、SCSS、Stylus for CSS 和 TypeScript、CoffeeScript for JS。然后他们使用特殊工具将这些文件转换为真正的 CSS 和 JS。
Yii 中的资源管理器会自动将扩展语法中的资源转换为 CSS 和 JS。当视图呈现时,它将在页面中包含 CSS 和 JS 文件,而不是扩展语法中的原始资源。
步骤 1 − 以这种方式修改 DemoAsset.php 文件。
<?php
   namespace app\assets;
   use yii\web\AssetBundle;
   use yii\web\View;
   class DemoAsset extends AssetBundle {
      public $basePath = '@webroot';
      public $baseUrl = '@web';
      public $js = [
         'js/demo.js',
         'js/greeting.ts'
      ];
      public  $jsOptions = ['position' => View::POS_HEAD];
   }
?>
我们刚刚添加了一个 typescript 文件。
步骤 2 − 在 web/js 目录中,使用以下代码创建一个名为 greeting.ts 的文件。
class Greeter {
   constructor(public greeting: string) { }
   greet() {
      return this.greeting;
   }
};
var greeter = new Greeter("Hello from typescript!");
console.log(greeter.greet());
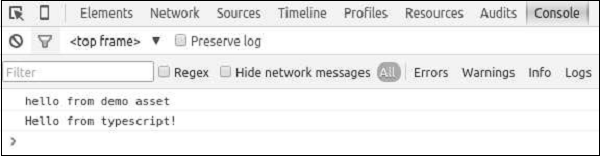
在上面的代码中,我们定义了一个 Greeter 类,它只有一个方法 greet()。我们将问候语写入 chrome 控制台。
步骤 3 − 转到 URL http://localhost:8080/index.php。您会注意到 greeting.ts 文件已转换为 Greeting.js 文件,如以下屏幕截图所示。
以下是输出。
Yii - 扩展
扩展是专门设计用于 Yii 应用程序的包。您可以将自己的代码作为扩展共享,也可以使用第三方扩展为您的应用程序添加功能。
使用扩展
大多数扩展都作为 Composer 包分发。Composer 从 Packagist(Composer 包的存储库)安装包。
要安装第三方扩展,您应该 −
将扩展添加到 composer.json 文件。
运行 composer install。
添加日期和时间小部件
让我们为我们的项目添加一个简洁的 datetime 小部件。
步骤 1 −按照这种方式修改基本应用程序模板的 composer.json 文件。
{
   "name": "yiisoft/yii2-app-basic",
   "description": "Yii 2 Basic Project Template",
   "keywords": ["yii2", "framework", "basic", "project template"],
   "homepage": "http://www.yiiframework.com/",
   "type": "project",
   "license": "BSD-3-Clause",
   "support": {
      "issues": "https://github.com/yiisoft/yii2/issues?state=open",
      "forum": "http://www.yiiframework.com/forum/",
      "wiki": "http://www.yiiframework.com/wiki/",
      "irc": "irc://irc.freenode.net/yii",
      "source": "https://github.com/yiisoft/yii2"
   },
   "minimum-stability": "stable",
   "require": {
      "php": ">=5.4.0",
      "yiisoft/yii2": ">=2.0.5",
      "yiisoft/yii2-bootstrap": "*",
      "yiisoft/yii2-swiftmailer": "*",
      "kartik-v/yii2-widget-datetimepicker": "*"
   },
   "require-dev": {
      "yiisoft/yii2-codeception": "*",
      "yiisoft/yii2-debug": "*",
      "yiisoft/yii2-gii": "*",
      "yiisoft/yii2-faker": "*"
   },
   "config": {
      "process-timeout": 1800
   },
   "scripts": {
      "post-create-project-cmd": [
         "yii\composer\Installer::postCreateProject"
      ]
   },
   "extra": {
      "yii\composer\Installer::postCreateProject": {
         "setPermission": [
            {
               "runtime": "0777",
               "web/assets": "0777",
               "yii": "0755"
            }
         ],
         "generateCookieValidationKey": [
            "config/web.php"
         ]
      },
      "asset-installer-paths": {
         "npm-asset-library": "vendor/npm",
         "bower-asset-library": "vendor/bower"
      }
   }
}
我们已将依赖项 "kartik-v/yii2-widget-datetimepicker": "*" 添加到所需部分。
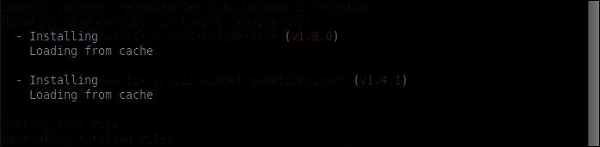
步骤 2 − 现在,在项目根目录中,运行 composer update 以更新所有依赖项。
我们刚刚安装了扩展。您会在 vendor/kartik-v/yii2widget-datetimepicker 文件夹中找到它。
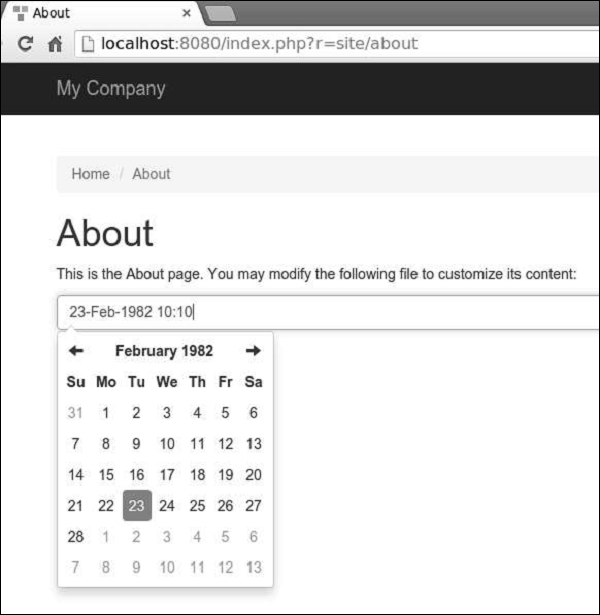
步骤 3 − 要在页面中显示新安装的小部件,请修改 SiteController 的 actionAbout 方法的 About 视图。
<?php
   /* @var $this yii\web\View */
   use kartik\datetime\DateTimePicker;
   use yii\helpers\Html;
   $this->title = 'About';
   $this->params['breadcrumbs'][] = $this->title;
   $this->registerMetaTag(['name' => 'keywords', 'content' => 'yii, developing, views,
      meta, tags']);
   $this->registerMetaTag(['name' => 'description',
      'content' => 'This is the description of this page!'], 'description');
?>
<div class="site-about">
   <h1><?= Html::encode($this->title) ?></h1>
   <p>
      This is the About page. You may modify the following file to customize its content:
   </p>
   <?php
      echo DateTimePicker::widget([
         'name' => 'dp_1',
         'type' => DateTimePicker::TYPE_INPUT,
         'value' => '23-Feb-1982 10:10',
         'pluginOptions' => [
            'autoclose'=>true,
            'format' => 'dd-M-yyyy hh:ii'
         ]
      ]);
   ?>
</div>
步骤 4 − 现在,通过 php -S localhost:8080t web 命令从项目根目录运行内置 php 服务器。
步骤 5 − 转到 http://localhost:8080/index.php?r=site/about。 您将看到一个整洁的 datetime 选择器,如以下屏幕截图所示。
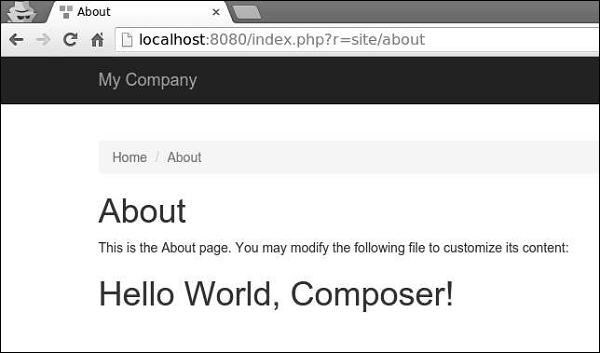
Yii - 创建扩展
让我们创建一个简单的扩展,显示标准的"Hello world"消息。此扩展将通过 Packagist 存储库分发。
步骤 1 − 在您的硬盘驱动器中创建一个名为 hello-world 的文件夹(但不在 Yii 基本应用程序模板内)。在 hello-world 目录中,使用以下代码创建一个名为 composer.json 的文件。
{
    "name": "tutorialspoint/hello-world",
    "authors": [
        {
            "name": "tutorialspoint"
        }
    ],
    "require": {},
    "autoload": {
        "psr-0": {
            "HelloWorld": "src/"
        }
    }
}
我们声明了我们使用 PSR-0 标准,所有扩展文件都在 src 文件夹下。
步骤 2 − 创建以下目录路径:hello-world/src/HelloWorld。
步骤 3 − 在 HelloWorld 文件夹中,创建一个名为 SayHello.php 的文件,其中包含以下代码。
<?php
   namespace HelloWorld;
   class SayHello {
      public static function world() {
         return 'Hello World, Composer!';
      }
   }
?>
我们定义了一个带有 world 静态函数的 SayHello 类,该函数返回我们的 hello 消息。
步骤 4 − 扩展已准备就绪。现在在您的 github 帐户中创建一个空存储库,并将此扩展推送到那里。
在 hello-world 文件夹中运行 −
- git init
- git add
- git commit -m "initial commit"
- git remote add origin <YOUR_NEWLY_CREATED_REPOSITORY>
- git push -u origin master
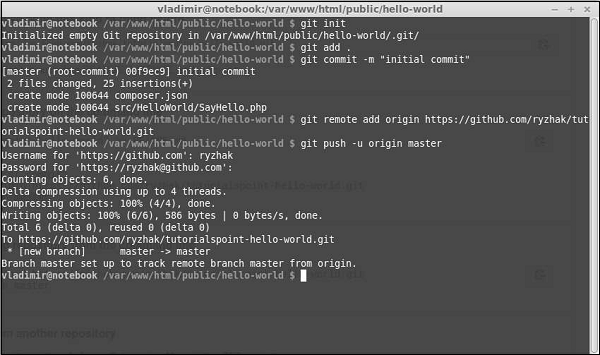
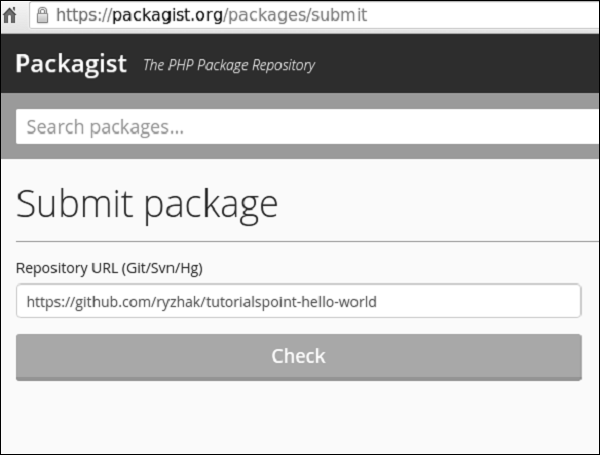
我们刚刚将扩展发送到 github。现在,转到 https://packagist.org,登录并单击顶部菜单中的 "提交"。
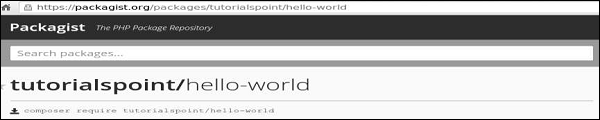
您将看到一个页面,您应该在其中输入您的 github 存储库以进行发布。
步骤 5 − 单击 "检查" 按钮,您的扩展程序已发布。
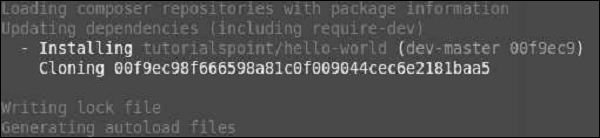
步骤 6 − 返回基本应用程序模板。将扩展添加到 composer.json。
{
   "name": "yiisoft/yii2-app-basic",
   "description": "Yii 2 Basic Project Template",
   "keywords": ["yii2", "framework", "basic", "project template"],
   "homepage": "http://www.yiiframework.com/",
   "type": "project",
   "license": "BSD-3-Clause",
   "support": {
      "issues": "https://github.com/yiisoft/yii2/issues?state=open",
      "forum": "http://www.yiiframework.com/forum/",
      "wiki": "http://www.yiiframework.com/wiki/",
      "irc": "irc://irc.freenode.net/yii",
      "source": "https://github.com/yiisoft/yii2"
   },
   "minimum-stability": "dev",
   "prefer-stable" : true,
   "require": {
      "php": ">=5.4.0",
      "yiisoft/yii2": ">=2.0.5",
      "yiisoft/yii2-bootstrap": "*",
      "yiisoft/yii2-swiftmailer": "*",
      "kartik-v/yii2-widget-datetimepicker": "*",
      "tutorialspoint/hello-world": "*"
   },
   "require-dev": {
      "yiisoft/yii2-codeception": "*",
      "yiisoft/yii2-debug": "*",
      "yiisoft/yii2-gii": "*",
      "yiisoft/yii2-faker": "*"
   },
   "config": {
      "process-timeout": 1800
   },
   "scripts": {
      "post-create-project-cmd": [
         "yii\composer\Installer::postCreateProject"
      ]
   },
   "extra": {
      "yii\composer\Installer::postCreateProject": {
         "setPermission": [
            {
               "runtime": "0777",
               "web/assets": "0777",
               "yii": "0755"
            }
         ],
         "generateCookieValidationKey": [
            "config/web.php"
         ]
      },
      "asset-installer-paths": {
         "npm-asset-library": "vendor/npm",
         "bower-asset-library": "vendor/bower"
      }
   }
}
步骤 7 − 在项目根文件夹中,运行 composer update 来安装/更新所有依赖项。
步骤 8 − 我们的扩展应该已安装。要使用它,请修改 SiteController 的 actionAbout 方法的 About 视图。
<?php
   /* @var $this yii\web\View */
   use yii\helpers\Html;
   $this->title = 'About';
   $this->params['breadcrumbs'][] = $this->title;
   $this->registerMetaTag(['name' => 'keywords', 'content' => 'yii, developing, views,
      meta, tags']);
   $this->registerMetaTag(['name' => 'description', 'content' => 'This is the
      description of this page!'], 'description');
?>
<div class = "site-about">
   <h1><?= Html::encode($this->title) ?></h1>
   <p>
      This is the About page. You may modify the following file to customize its content:
   </p>
   <h1><?= HelloWorld\SayHello::world();  ?></h1>
</div>
步骤 9 − 在 Web 浏览器中输入 http://localhost:8080/index.php?r=site/about。您将看到来自我们扩展的 hello world 消息。
Yii - HTTP 请求
请求由 yii\web\Request 对象表示,该对象提供有关 HTTP 标头、请求参数、cookie 等的信息。
方法 get() 和 post() 返回请求组件的请求参数。
示例 −
$req = Yii::$app->request;
   /*
   * $get = $_GET;
   */
   $get = $req->get();

   /*
   * if(isset($_GET['id'])) {
   *     $id = $_GET['id'];
   * } else {
   *     $id = null;
   * }
   */
   $id = $req->get('id');

   /*
   * if(isset($_GET['id'])) {
   *     $id = $_GET['id'];
   * } else {
   *     $id = 1;
   * }
   */
   $id = $req->get('id', 1);

   /*
   * $post = $_POST;
	*/
   $post = $req->post();

   /*
   * if(isset($_POST['name'])) {
   *     $name = $_POST['name'];
   * } else {
   *     $name = null;
   * }
   */
   $name = $req->post('name');

   /*
   * if(isset($_POST['name'])) {
   *     $name = $_POST['name'];
   * } else {
   *     $name = '';
   * }
   */
   $name = $req->post('name', '');
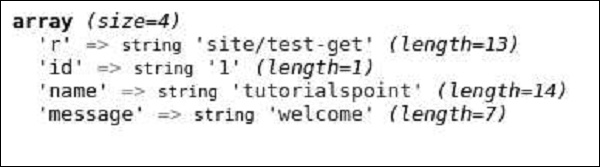
步骤 1 − 在基本应用模板的 SiteController 中添加一个 actionTestGet 函数。
public function actionTestGet() {
    var_dump(Yii::$app->request->get());
}
步骤 2 −现在转到 http://localhost:8080/index.php?r=site/testget&id=1&name=tutorialspoint&message=welcome,您将看到以下内容。
要检索其他请求方法(PATCH、DELETE 等)的参数,请使用 yii\web\Request::getBodyParam() 方法。
要获取当前请求的 HTTP 方法,请使用 Yii::$app→request→method 属性。
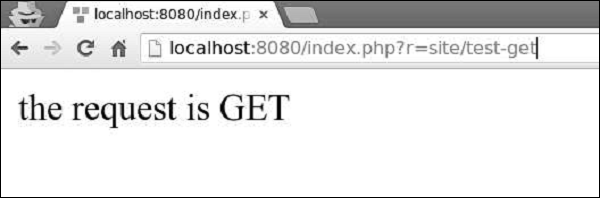
步骤 3 −修改 actionTestGet 函数,如以下代码所示。
public function actionTestGet() {
   $req = Yii::$app->request;
   if ($req->isAjax) {
      echo "the request is AJAX";
   }
   if ($req->isGet) {
      echo "the request is GET";
   }
   if ($req->isPost) {
      echo "the request is POST";
   }
   if ($req->isPut) {
      echo "the request is PUT";
   }
}
步骤 4 − 转到 http://localhost:8080/index.php?r=site/test-get。您将看到以下内容。
请求组件提供了许多属性来检查请求的 URL。
步骤 5 − 修改 actionTestGet 函数如下。
public function actionTestGet() {
    //不带主机的 URL
    var_dump(Yii::$app->request->url);

    //包括主机路径的整个 URL
    var_dump(Yii::$app->request->absoluteUrl);

    //URL 的主机
    var_dump(Yii::$app->request->hostInfo);

    //入口脚本之后、问号之前的部分
    var_dump(Yii::$app->request->pathInfo);

    //问号之后的部分
    var_dump(Yii::$app->request->queryString);

    //主机之后、入口脚本之前的部分
    var_dump(Yii::$app->request->baseUrl);

    //不包含路径信息和查询字符串的 URL
    var_dump(Yii::$app->request->scriptUrl);

    //URL 中的主机名
    var_dump(Yii::$app->request->serverName);

    //Web 服务器使用的端口
    var_dump(Yii::$app->request->serverPort);
}
步骤 6 − 在 Web 浏览器的地址栏中输入 http://localhost:8080/index.php?r=site/testget&id=1&name=tutorialspoint&message=welcome,您将看到以下内容。

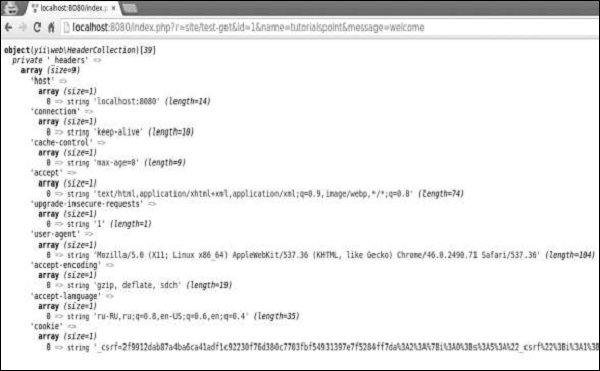
步骤 7 − 要获取 HTTP 标头信息,您可以使用 yii\web\Request::$headers 属性。以这种方式修改 actionTestGet 函数。
public function actionTestGet() {
    var_dump(Yii::$app->request->headers);
}
步骤 8 − 如果您访问 URL http://localhost:8080/index.php?r=site/testget&id=1&name=tutorialspoint&message=welcome,您将看到如以下代码所示的输出。
要获取客户端计算机的主机名和 IP 地址,请使用 userHost 和 userIP 属性。
步骤 9 −按照这种方式修改 actionTestGet 函数。
public function actionTestGet() {
    var_dump(Yii::$app->request->userHost);
    var_dump(Yii::$app->request->userIP);
}
步骤 10 − 转到地址 http://localhost:8080/index.php?r=site/test-get,您将看到以下屏幕。

Yii - 响应
当 Web 应用程序处理请求时,它会生成一个响应对象,其中包含 HTTP 标头、正文和 HTTP 状态代码。在大多数情况下,您将使用响应应用程序组件。默认情况下,它是 yii\web\Response 的一个实例。
要管理响应 HTTP 状态代码,请使用 yii\web\Response::$statusCode 属性。yii\web\Response::$statusCode 的默认值为 200。
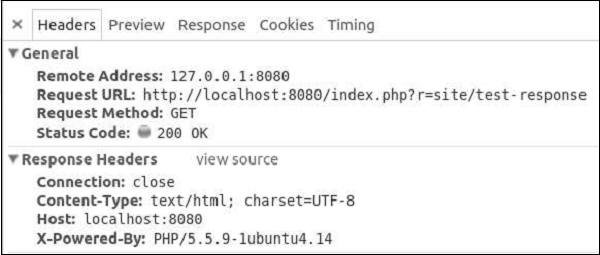
步骤 1 − 将名为 actionTestResponse 的函数添加到 SiteController。
public function actionTestResponse() {
Yii::$app→response->statusCode = 201;
}
步骤 2 − 如果您将 Web 浏览器指向 http://localhost:8080/index.php?r=site/testresponse,您应该注意到 201 Created response HTTP 状态。

如果您想表明请求不成功,您可以抛出一个预定义的 HTTP 异常 −
yii\web\BadRequestHttpException − 状态代码 400。
yii\web\UnauthorizedHttpException −状态代码 401。
yii\web\ForbiddenHttpException − 状态代码 403。
yii\web\NotFoundHttpException − 状态代码 404。
yii\web\MethodNotAllowedHttpException − 状态代码 405。
yii\web\NotAcceptableHttpException − 状态代码 406。
yii\web\ConflictHttpException − 状态代码 409。
yii\web\GoneHttpException −状态代码 410。
yii\web\UnsupportedMediaTypeHttpException − 状态代码 415。
yii\web\TooManyRequestsHttpException − 状态代码 429。
yii\web\ServerErrorHttpException − 状态代码 500。
步骤 3 − 修改 actionTestResponse 函数,如以下代码所示。
public function actionTestResponse() {
   throw new \yii\web\GoneHttpException;
}
步骤 4 − 在 Web 浏览器的地址栏中输入 http://localhost:8080/index.php?r=site/test-response,您可以看到 410 Gone 响应 HTTP 状态,如下图所示。
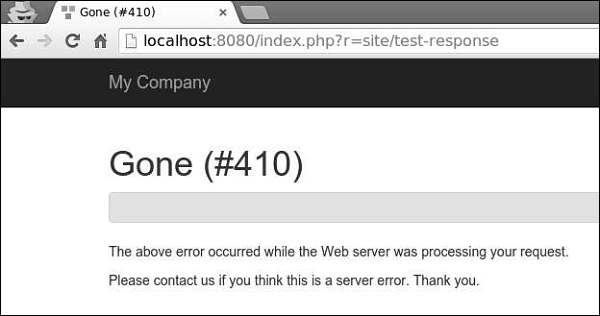
步骤 5 − 您可以通过修改响应组件的 headers 属性来发送 HTTP 标头。要向响应添加新标头,请修改 actionTestResponse 函数,如以下代码所示。
public function actionTestResponse() {
    Yii::$app->response->headers->add('Pragma', 'no-cache');
}
步骤 6 − 转到 http://localhost:8080/index.php?r=site/test-response, 您将看到我们的 Pragma 标头。
Yii 支持以下响应格式 −
HTML −由 yii\web\HtmlResponseFormatter 实现。
XML − 由 yii\web\XmlResponseFormatter 实现。
JSON − 由 yii\web\JsonResponseFormatter 实现。
JSONP − 由 yii\web\JsonResponseFormatter 实现。
RAW − 响应不带任何格式。
步骤 7 − 要以 JSON 格式响应,请修改 actionTestResponse 函数。
public function actionTestResponse() {
   \Yii::$app->response->format = \yii\web\Response::FORMAT_JSON;
   return [
      'id' => '1',
      'name' => 'Ivan',
      'age' => 24,
      'country' => 'Poland',
      'city' => 'Warsaw'
   ];
}
步骤 8 − 现在,在地址栏中输入 http://localhost:8080/index.php?r=site/test-response,您可以看到以下 JSON 响应。

Yii 通过发送 Location HTTP 标头来实现浏览器重定向。您可以调用 yii\web\Response::redirect() 方法将用户浏览器重定向到 URL。
步骤 9 − 以这种方式修改 actionTestResponse 函数。
public function actionTestResponse() {
    return $this->redirect('http://www.tutorialspoint.com/');
}
现在,如果您访问 http://localhost:8080/index.php?r=site/test-response,您的浏览器将被重定向到 TutorialsPoint 网站。
发送文件
Yii 提供以下方法来支持文件发送 −
yii\web\Response::sendFile() − 发送现有文件。
yii\web\Response::sendStreamAsFile() − 将现有文件流作为文件发送。
yii\web\Response::sendContentAsFile() −将文本字符串作为文件发送。
按此方式修改 actionTestResponse 函数−
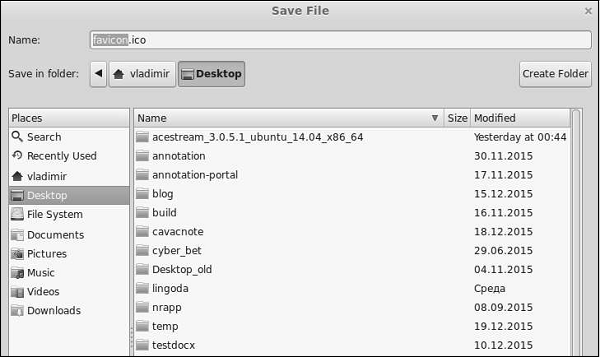
public function actionTestResponse() {
   return \Yii::$app->response->sendFile('favicon.ico');
}
输入 http://localhost:8080/index.php?r=site/test-response,您将看到一个下载 favicon.ico 文件的对话框窗口 −
直到调用 yii\web\Response::send() 函数,才会发送响应。默认情况下,此方法在 yii\base\Application::run() 方法的末尾调用。要发送响应,yii\web\Response::send() 方法遵循以下步骤 −
- 触发 yii\web\Response::EVENT_BEFORE_SEND 事件。
- 调用 yii\web\Response::prepare() 方法。
- 触发 yii\web\Response::EVENT_AFTER_PREPARE 事件。
- 调用 yii\web\Response::sendHeaders() 方法。
- 调用 yii\web\Response::sendContent() 方法。
- 触发 yii\web\Response::EVENT_AFTER_SEND 事件。
Yii - URL 格式
当 Yii 应用程序处理请求的 URL 时,它首先将 URL 解析为路由。然后,为了处理请求,此路由用于实例化相应的控制器操作。此过程称为 路由。反向过程称为 URL 创建。urlManager 应用程序组件负责路由和 URL 创建。它提供了两种方法 −
parseRequest() − 将请求解析为路由。
createUrl() −从给定的路由创建 URL。
URL 格式
urlManager 应用程序组件支持两种 URL 格式 −
默认格式使用查询参数 r 来表示路由。例如,URL /index.php?r=news/view&id=5 表示路由 news/view 和 id 查询参数 5。
漂亮的 URL 格式使用带有入口脚本名称的额外路径。例如,在前面的示例中,漂亮的格式将是 /index.php/news/view/5。要使用此格式,您需要设置 URL 规则。
要启用漂亮的 URL 格式并隐藏入口脚本名称,请按照以下步骤操作 −
步骤 1 − 按以下方式修改 config/web.php 文件。
<?php
   $params = require(__DIR__ . '/params.php');
   $config = [
      'id' => 'basic',
      'basePath' => dirname(__DIR__),
      'bootstrap' => ['log'],
      'components' => [
         'request' => [
            // !!! insert a secret key in the following (if it is empty) -
               //this is required by cookie validation
            'cookieValidationKey' => 'ymoaYrebZHa8gURuolioHGlK8fLXCKjO',
         ],
         'cache' => [
            'class' => 'yii\caching\FileCache',
         ],
         'user' => [
            'identityClass' => 'app\models\User',
            'enableAutoLogin' => true,
         ],
         'errorHandler' => [
            'errorAction' => 'site/error',
         ],
         'mailer' => [
            'class' => 'yii\swiftmailer\Mailer',
            // send all mails to a file by default. You have to set
            // 'useFileTransport' to false and configure a transport
            // for the mailer to send real emails.
            'useFileTransport' => true,
         ],
         'log' => [
            'traceLevel' => YII_DEBUG ? 3 : 0,
            'targets' => [
               [
                  'class' => 'yii\log\FileTarget',
                  'levels' => ['error', 'warning'],
               ],
            ],
         ],
         'urlManager' => [
            'showScriptName' => false,
            'enablePrettyUrl' => true
         ],
         'db' => require(__DIR__ . '/db.php'),
      ],
      'modules' => [
         'hello' => [
            'class' => 'app\modules\hello\Hello',
         ],
      ],
      'params' => $params,
   ];
   if (YII_ENV_DEV) {
      // configuration adjustments for 'dev' environment
      $config['bootstrap'][] = 'debug';
      $config['modules']['debug'] = [
         'class' => 'yii\debug\Module',
      ];
      $config['bootstrap'][] = 'gii';
      $config['modules']['gii'] = [
         'class' => 'yii\gii\Module',
      ];
   }
   return $config;
?>
我们刚刚启用了 漂亮的 URL 格式,并禁用了入口脚本名称。
步骤 2 − 现在,如果您在 Web 浏览器的地址栏中输入 http://localhost:8080/site/about,您将看到漂亮的 URL 正在运行。
请注意,URL 不再是 http://localhost:8080/index.php?r=site/about。
Yii - URL 路由
要更改应用程序的默认路由,您应该配置 defaultRoute 属性。
步骤 1 − 按照以下方式修改 config/web.php 文件。
<?php
   $params = require(__DIR__ . '/params.php');
   $config = [
      'id' => 'basic',
      'basePath' => dirname(__DIR__),
      'bootstrap' => ['log'],
      'defaultRoute' => 'site/contact',
      'components' => [
         //other code
?>
步骤 2 − 转到 http://localhost:8080/index.php。您将看到默认的 contact 页面。

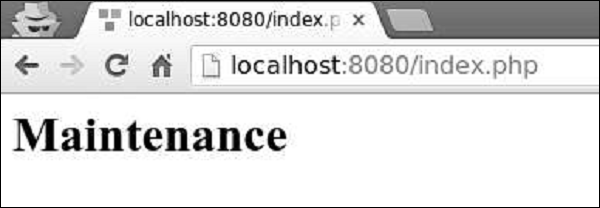
要暂时将应用程序置于维护模式,您应该配置 yii\web\Application::$catchAll 属性。
步骤 3 − 将以下函数添加到 SiteController。
public function actionMaintenance() {
    echo "<h1>Maintenance</h1>";
}
步骤 4 −然后,按照下列方式修改 config/web.php 文件。
<?php
   $params = require(__DIR__ . '/params.php');
   $config = [
      'id' => 'basic',
      'basePath' => dirname(__DIR__),
      'bootstrap' => ['log'],
      'catchAll' => ['site/maintenance'],
      'components' => [
         //OTHER CODE
步骤 5 − 现在输入应用程序的任意 URL,您将看到以下内容。
创建 URL
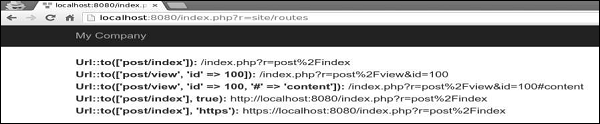
要创建各种类型的 URL,您可以使用 yii\helpers\Url::to() 辅助方法。以下示例假定使用默认 URL 格式。
步骤 1 − 向 SiteController 添加 actionRoutes() 方法。
public function actionRoutes() {
    return $this->render('routes');
}
此方法仅呈现 routes 视图。
步骤 2 − 在 views/site 目录中,使用以下代码创建一个名为 routes.php 的文件。
<?php
   use yii\helpers\Url;
?>

<h4>
   <b>Url::to(['post/index']):</b>
   <?php
      // 创建到路由的 URL:/index.php?r = post/index
      echo Url::to(['post/index']);
   ?>
</h4>

<h4>
   <b>Url::to(['post/view', 'id' => 100]):</b>
   <?php
      // 创建一个带有参数的路由 URL:/index.php?r = post/view&id=100
      echo Url::to(['post/view', 'id' => 100]);
   ?>
</h4>

<h4>
   <b>Url::to(['post/view', 'id' => 100, '#' => 'content']):</b>
   <?php
      // 创建一个锚定 URL:/index.php?r = post/view&id=100#content
      echo Url::to(['post/view', 'id' => 100, '#' => 'content']);
   ?>
</h4>

<h4>
   <b>Url::to(['post/index'], true):</b>
   <?php
      // 创建一个绝对 URL:http://www.example.com/index.php?r=post/index
      echo Url::to(['post/index'], true);
   ?>
</h4>

<h4>
   <b>Url::to(['post/index'], 'https'):</b>
   <?php
      // 使用 https 方案创建绝对 URL:https://www.example.com/index.php?r=post/index
      echo Url::to(['post/index'], 'https');
   ?>
</h4>
步骤 3 −输入 http://localhost:8080/index.php?r=site/routes,你会看到 to() 函数的一些用法。
传递给 yii\helpers\Url::to() 方法的路由可以是相对的,也可以是绝对的,具体规则如下 −
如果路由为空,则使用当前请求的路由。
如果路由没有前导斜杠,则认为是相对于当前模块的路由。
如果路由不包含斜杠,则认为是当前控制器的操作 ID。
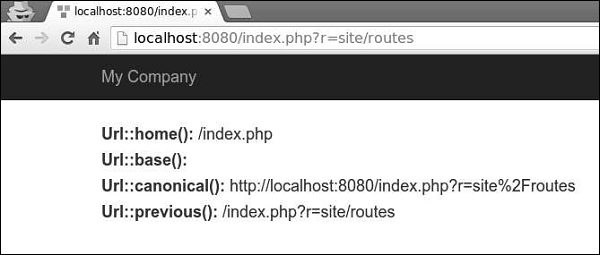
yii\helpers\Url 辅助类还提供了几个有用的方法。
步骤 4 − 修改 routes 视图,如以下代码所示。
<?php
   use yii\helpers\Url;
?>

<h4>
   <b>Url::home():</b>
   <?php
      // 主页网址:/index.php?r=site/index
      echo Url::home();
   ?>
</h4>

<h4>
   <b>Url::base():</b>
   <?php
      // 基本 URL,如果应用程序部署在 Web 根目录的子文件夹中则很有用
      echo Url::base();
   ?>
</h4>

<h4>
   <b>Url::canonical():</b>
   <?php
        // 当前请求的 URL 的规范 URL
        // 请参阅 https://en.wikipedia.org/wiki/Canonical_link_element
      	echo Url::canonical();
   ?>
</h4>

<h4>
   <b>Url::previous():</b>
   <?php
      // 记住当前请求的 URL 并在以后的请求中检索它
      Url::remember();
      echo Url::previous();
   ?>
</h4>
步骤 5 − 如果您在 Web 浏览器中输入地址 http://localhost:8080/index.php?r=site/routes,您将看到以下内容。
Yii - URL 规则
如果 yii\web\UrlRule,则 URL 规则是一个实例。启用漂亮的 URL 格式后,urlManager 组件将使用其 rules 属性中声明的 URL 规则。
要解析请求,URL 管理器将按声明的顺序获取规则并查找第一条规则。
步骤 1 − 修改 config/web.php 文件中的 urlManager 组件。
'urlManager' => [
   'showScriptName' => false,
   'enablePrettyUrl' => true,
   'rules' => [
      'about' => 'site/about',
   ]
],
步骤 2 − 转到您的 Web 浏览器,地址为 http://localhost:8080/about,您将看到关于页面。
URL 规则可以与此模式中的查询参数关联 −
<ParamName:RegExp>,其中 −
ParamName − 参数名称
RegExp − 用于匹配参数值的可选正则表达式
假设,我们声明了以下 URL 规则 −
[
   'articles/<year:\d{4}>/<category>' => 'article/index',
   'articles' => 'article/index',
   'article/<id:\d+>' => 'article/view',
]
当规则用于解析 −
- /index.php/articles 被解析为 article/index
- /index.php/articles/2014/php 被解析为 article/index
- /index.php/article/100 被解析为 article/view
- /index.php/articles/php 被解析为 articles/php
当规则用于创建 URL −
Url::to(['article/index']) 创建 /index.php/articles
Url::to(['article/index', 'year' => 2014, 'category' => 'php']) 创建 /index.php/articles/2014/php
Url::to(['article/view', 'id' => 100]) 创建 /index.php/article/100
Url::to(['article/view', 'id' => 100, 'source' => 'ad']) 创建 /index.php/article/100?source=ad
Url::to(['article/index', 'category' => 'php']) 创建 /index.php/article/index?category=php
要为 URL 添加后缀,您应该配置 yii\web\UrlManager::$suffix属性。
步骤 3 − 修改 config/web.php 文件中的 urlComponent。
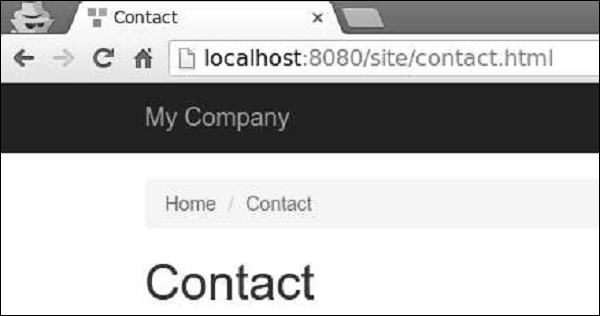
'urlManager' => [
   'showScriptName' => false,
   'enablePrettyUrl' => true,
   'enableStrictParsing' => true,
   'suffix' => '.html'
],
步骤 4 − 在 Web 浏览器的地址栏中输入地址 http://localhost:8080/site/contact.html,您将在屏幕上看到以下内容。请注意 html 后缀。
Yii - HTML 表单
当表单基于模型时,在 Yii 中创建此表单的常用方法是通过 yii\widgets\ActiveForm 类。在大多数情况下,表单具有用于数据验证的相应模型。如果模型表示来自数据库的数据,则该模型应从 ActiveRecord 类派生。如果模型捕获任意输入,则应从 yii\base\Model 类派生。
让我们创建一个注册表单。
步骤 1 − 在 models 文件夹中,使用以下代码创建一个名为 RegistrationForm.php 的文件。
<?php
   namespace app\models;
   use Yii;
   use yii\base\Model;
   class RegistrationForm extends Model {
      public $username;
      public $password;
      public $email;
      public $subscriptions;
      public $photos;
      /**
      * @return array customized attribute labels
      */
      public function attributeLabels() {
         return [
            'username' => 'Username',
            'password' => 'Password',
            'email' => 'Email',
            'subscriptions' => 'Subscriptions',
            'photos' => 'Photos',
         ];
      }
   }
?>
我们已经为我们的注册表单声明了一个模型,该模型具有五个属性:用户名、密码、电子邮件、订阅和照片。
步骤 2 − 要显示此表单,请将 actionRegistration 方法添加到 SiteController。
public function actionRegistration() {
    $mRegistration = new RegistrationForm();
    return $this->render('registration', ['model' => $mRegistration]);
}
我们创建 RegistrationForm 的一个实例并将其传递给注册视图。现在,是时候创建一个视图了。
步骤 3 −在 views/site 文件夹中,添加一个名为 registration.php 的文件,其中包含以下代码。
<?php
   use yii\bootstrap\ActiveForm;
   use yii\bootstrap\Html;
?>
<div class = "row">
   <div class = "col-lg-5">
      <?php $form = ActiveForm::begin(['id' => 'registration-form']); ?>
      <?= $form->field($model, 'username') ?>
      <?= $form->field($model, 'password')->passwordInput() ?>
      <?= $form->field($model, 'email')->input('email') ?>
      <?= $form->field($model, 'photos[]')->fileInput(['multiple'=>'multiple']) ?>
      <?= $form->field($model, 'subscriptions[]')->checkboxList(['a' => 'Item A',
         'b' => 'Item B', 'c' => 'Item C']) ?>
      <div class = "form-group">
         <?= Html::submitButton('Submit', ['class' => 'btn btn-primary',
            'name' => 'registration-button']) ?>
      </div>
      <?php ActiveForm::end(); ?>
   </div>
</div>
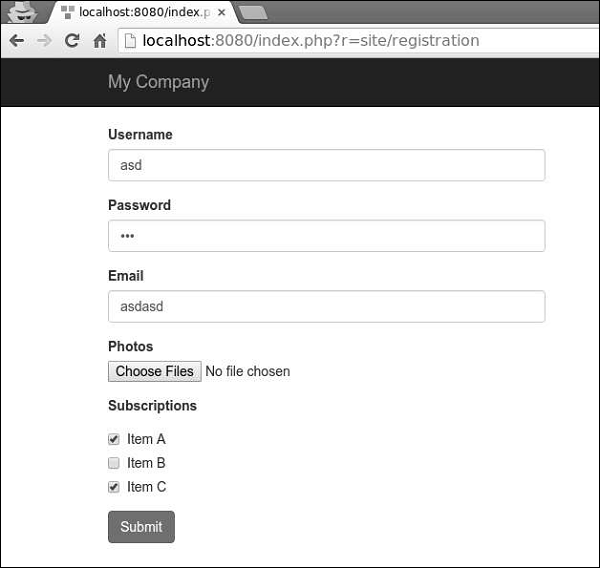
我们观察到以下 −
ActiveForm::begin() 函数标记表单的开始。ActiveForm::begin() 和 ActiveForm::end() 函数之间的所有代码都将包装在 form 标记内。
要在表单中创建字段,您应该调用 ActiveForm::field() 方法。它会创建所有 input 和 label 标记。输入名称会自动确定。
例如,password 属性将是 RegistrationForm[password]。如果您希望属性采用数组,则应在属性名称后附加 [ ]。
步骤 4 − 如果您转到 Web 浏览器的地址栏并输入 http://localhost:8080/index.php?r=site/registration,您将看到我们的表单。
Yii - 验证
您永远不应该相信从用户那里收到的数据。要使用用户输入验证模型,您应该调用 yii\base\Model::validate() 方法。如果验证成功,它将返回一个布尔值。如果有错误,您可以从 yii\base\Model::$errors 属性中获取它们。
使用规则
要使 validate() 函数工作,您应该覆盖 yii\base\Model::rules() 方法。
步骤 1 − rules() 方法返回以下格式的数组。
[
    // 必需,指定应验证哪些属性
    ['attr1', 'attr2', ...],
    // 必需,指定规则的类型。
    'type_of_rule',
    // 可选,定义应在哪些场景中应用此规则
    'on' => ['scenario1', 'scenario2', ...],
    // 可选,定义其他配置
    'property' => 'value', ...
]
对于每条规则,您至少应该定义该规则适用于哪些属性以及所应用的规则类型。
核心验证规则是 − boolean、captcha、compare、date、default、double、each、email、exist、file、filter、image、ip、in、integer、match、number、required、safe、string、trim、unique、url。
步骤 2 − 在 models 文件夹中创建一个新模型。
<?php
   namespace app\models;
   use Yii;
   use yii\base\Model;
   class RegistrationForm extends Model {
      public $username;
      public $password;
      public $email;
      public $country;
      public $city;
      public $phone;
      public function rules() {
         return [
            // the username, password, email, country, city, and phone attributes are
            //required
            [['username' ,'password', 'email', 'country', 'city', 'phone'], 'required'],
            // the email attribute should be a valid email address
            ['email', 'email'],
         ];
      }
   }
?>
我们已经声明了注册表单的模型。该模型有五个属性:用户名、密码、电子邮件、国家/地区、城市和电话。它们都是必需的,并且电子邮件属性必须是有效的电子邮件地址。
步骤 3 − 将 actionRegistration 方法添加到 SiteController,我们在其中创建一个新的 RegistrationForm 模型并将其传递给视图。
public function actionRegistration() {
   $model = new RegistrationForm();
   return $this->render('registration', ['model' => $model]);
}
步骤 4 − 为我们的注册表单添加一个视图。在 views/site 文件夹中,使用以下代码创建一个名为 registration.php 的文件。
<?php
   use yii\bootstrap\ActiveForm;
   use yii\bootstrap\Html;
?>

<div class = "row">
   <div class = "col-lg-5">
      <?php $form = ActiveForm::begin(['id' => 'registration-form']); ?>
         <?= $form->field($model, 'username') ?>
         <?= $form->field($model, 'password')->passwordInput() ?>
         <?= $form->field($model, 'email')->input('email') ?>
         <?= $form->field($model, 'country') ?>
         <?= $form->field($model, 'city') ?>
         <?= $form->field($model, 'phone') ?>
         <div class = "form-group">
            <?= Html::submitButton('Submit', ['class' => 'btn btn-primary',
               'name' => 'registration-button']) ?>
         </div>
      <?php ActiveForm::end(); ?>
   </div>
</div>
我们使用 ActiveForm 小部件来显示我们的注册表单。
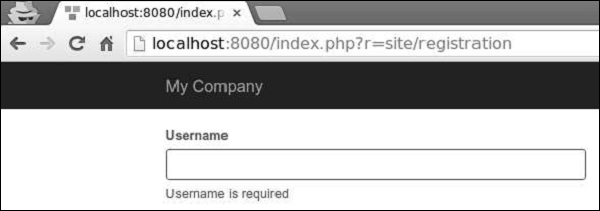
步骤 5 − 如果您转到本地主机 http://localhost:8080/index.php?r=site/registration 并单击提交按钮,您将看到验证规则正在运行。

步骤 6 − 要自定义 username 属性的错误消息,请按以下方式修改 RegistrationForm 的 rules() 方法。
public function rules() {
   return [
      // the username, password, email, country, city, and phone attributes are required
      [['password', 'email', 'country', 'city', 'phone'], 'required'],
      ['username', 'required', 'message' => 'Username is required'],
      // the email attribute should be a valid email address
      ['email', 'email'],
   ];
}
步骤 7 − 转到本地主机 http://localhost:8080/index.php?r=site/registration 并单击提交按钮。您会注意到用户名属性的错误消息已更改。
步骤 8 − 要自定义验证过程,您可以覆盖这些方法。
yii\base\Model::beforeValidate(): triggers a
yii\base\Model::EVENT_BEFORE_VALIDATE event.
yii\base\Model::afterValidate(): triggers a
yii\base\Model::EVENT_AFTER_VALIDATE event.
步骤 9 − 要修剪 country 属性周围的空格并将 city 属性的空输入变为空值,您可以使用 trim 和 default 验证器。
public function rules() {
   return [
      // the username, password, email, country, city, and phone attributes are required
      [['password', 'email', 'country', 'city', 'phone'], 'required'],
      ['username', 'required', 'message' => 'Username is required'],
      ['country', 'trim'],
      ['city', 'default'],
      // the email attribute should be a valid email address
      ['email', 'email'],
   ];
}
步骤 10 − 如果输入为空,您可以为其设置默认值。
public function rules() {
   return [
      ['city', 'default', 'value' => 'Paris'],
   ];
}
如果 city 属性为空,则将使用默认的"巴黎"值。
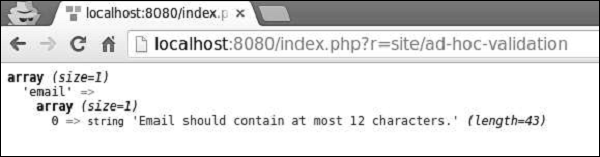
Yii - 临时验证
有时您需要验证未绑定到任何模型的值。您可以使用 yii\base\DynamicModel 类,它支持动态定义属性和规则。
步骤 1 − 将 actionAdHocValidation 方法添加到 SiteController。
public function actionAdHocValidation() {
   $model = DynamicModel::validateData([
      'username' => 'John',
      'email' => 'john@gmail.com'
   ], [
      [['username', 'email'], 'string', 'max' => 12],
      ['email', 'email'],
   ]);

   if ($model->hasErrors()) {
      var_dump($model->errors);
   } else {
      echo "success";
   }
}
在上面的代码中,我们定义了一个"动态"模型,其中包含用户名和电子邮件属性并对其进行验证。
步骤 2 − 在 Web 浏览器的地址栏中输入 http://localhost:8080/index.php?r=site/ad-hoc-validation,您将看到一条错误消息,因为我们的电子邮件长度为 14 个字符。
自定义验证器
自定义验证器有两种类型 −
- 内联验证器
- 独立验证器
内联验证器由模型方法或匿名函数定义。如果属性验证失败,您应该调用 yii\base\Model::addError() 方法来保存错误消息。
以下 RegistrationForm 示例验证了城市属性,因此它只能接受两个值 - 伦敦和巴黎。
<?php
   namespace app\models;
   use Yii;
   use yii\base\Model;
   class RegistrationForm extends Model {
      public $username;
      public $password;
      public $email;
      public $country;
      public $city;
      public $phone;
      public function rules() {
         return [
            ['city', 'validateCity']
         ];
      }
      public function validateCity($attribute, $params) {
         if (!in_array($this->$attribute, ['Paris', 'London'])) {
            $this->addError($attribute, 'The city must be either "London" or "Paris".');
         }
      }
   }
?>
独立验证器扩展了 yii\validators\Validator 类。要实现验证逻辑,您应该重写 yii\validators\Validator::validateAttribute() 方法。
步骤 1 − 要使用独立验证器实现前面的示例,请将 CityValidator.php 文件添加到 components 文件夹。
<?php
   namespace app\components;
   use yii\validators\Validator;
   class CityValidator extends Validator {
      public function validateAttribute($model, $attribute) {
         if (!in_array($model->$attribute, ['Paris', 'London'])) {
            $this->addError($model, $attribute, 'The city must be either "Paris"
               or "London".');
         }
      }
   }
?>
步骤 2 − 然后,按照如下方式修改 RegistrationForm 模型。
<?php
   namespace app\models;
   use app\components\CityValidator;
   use Yii;
   use yii\base\Model;
   class RegistrationForm extends Model {
      public $username;
      public $password;
      public $email;
      public $country;
      public $city;
      public $phone;
      public function rules() {
         return [
            ['city', CityValidator::className()]
         ];
      }
   }
?>
Yii - AJAX 验证
用户名验证应仅在服务器端进行,因为只有服务器才拥有所需的信息。在这种情况下,您可以使用基于 AJAX 的验证。
步骤 1 − 要启用 AJAX 验证,请按此方式修改 注册 视图。
<?php
   use yii\bootstrap\ActiveForm;
   use yii\bootstrap\Html;
?>

<div class = "row">
   <div class = "col-lg-5">

      <?php $form = ActiveForm::begin(['id' => 'registration-form',
         'enableAjaxValidation' => true]); ?>
      <?= $form->field($model, 'username') ?>
      <?= $form->field($model, 'password')->passwordInput() ?>
      <?= $form->field($model, 'email')->input('email') ?>
      <?= $form->field($model, 'country') ?>
      <?= $form->field($model, 'city') ?>
      <?= $form->field($model, 'phone') ?>
      <div class = "form-group">
         <?= Html::submitButton('Submit', ['class' => 'btn btn-primary',
            'name' => 'registration-button']) ?>
      </div>

      <?php ActiveForm::end(); ?>
   </div>
</div>
我们还应该准备服务器,以便它可以处理 AJAX 请求。
步骤 2 − 以这种方式修改 SiteController 的 actionRegistration 方法。
public function actionRegistration() {
   $model = new RegistrationForm();
   if (Yii::$app->request->isAjax && $model->load(Yii::$app->request>post())) {
      Yii::$app->response->format = Response::FORMAT_JSON;
      return ActiveForm::validate($model);
   }
   return $this->render('registration', ['model' => $model]);
}
步骤 3 − 现在,转到 http://localhost:8080/index.php?r=site/registration,您会注意到表单验证是通过 AJAX 请求完成的。

Yii - 会话
会话使数据可以在各个页面之间访问。会话在服务器上的临时目录中创建一个文件,所有会话变量都存储在其中。在特定用户访问期间,此数据可供您网站的所有页面使用。
会话启动时,会发生以下情况 −
PHP 为该特定会话创建一个唯一 ID。
客户端(向浏览器)发送一个名为 PHPSESSID 的 cookie。
服务器在临时文件夹中创建一个文件,所有会话变量都保存在其中。
当服务器想要从会话变量中检索值时,PHP 会自动从 PHPSESSID cookie 中获取唯一会话 ID。然后,它会在临时目录中查找所需的文件。
要启动会话,您应该调用 session_start() 函数。所有会话变量都存储在 $_SESSION 全局变量中。您还可以使用 isset() 函数检查会话变量是否已设置 −
<?php
   session_start();
   if( isset( $_SESSION['number'] ) ) {
      $_SESSION['number'] += 1;
   }else {
      $_SESSION['number'] = 1;
   }
   $msg = "This page was visited ".  $_SESSION['number'];
   $msg .= "in this session.";
   echo $msg;
?>
要销毁会话,应调用 session_destroy() 函数。要销毁单个会话变量,应调用 unset() 函数 −
<?php
   unset($_SESSION['number']);
   session_destroy();
?>
在 Yii 中使用会话
会话允许在用户请求之间持久保存数据。在 PHP 中,您可以通过 $_SESSION 变量访问它们。在 Yii 中,您可以通过会话应用程序组件访问会话。
步骤 1 − 将 actionOpenAndCloseSession 方法添加到 SiteController。
public function actionOpenAndCloseSession() {
    $session = Yii::$app->session;
    // 打开会话
    $session->open();
    // 检查会话是否已打开
    if ($session->isActive) echo "session is active";
    // 关闭会话
    $session->close();
    // 销毁注册到会话的所有数据
    $session->destroy();
}
在上面的代码中,我们获取了 session 应用组件,打开一个 session,检查它是否处于活动状态,关闭 session,最后销毁它。
步骤 2 − 在 Web 浏览器的地址栏中输入 http://localhost:8080/index.php?r=site/open-and-close-session,您将看到以下内容。
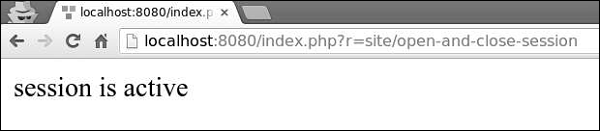
要访问 session 变量,您可以使用 set() 和 get() 方法。
步骤 3 −向 SiteController 添加一个 actionAccessSession 方法。
public function actionAccessSession() {

    $session = Yii::$app->session;

    // 设置会话变量
    $session->set('language', 'ru-RU');

    // 获取会话变量
    $language = $session->get('language');
    var_dump($language);

    // 删除会话变量
    $session->remove('language');

    // 检查会话变量是否存在
    if (!$session->has('language')) echo "language is not set";

    $session['captcha'] = [
    'value' => 'aSBS23',
    'lifetime' => 7200,
    ];
    var_dump($session['captcha']);
}
步骤 4 − 转到 http://localhost:8080/index.php?r=site/access-session,您将看到以下内容。
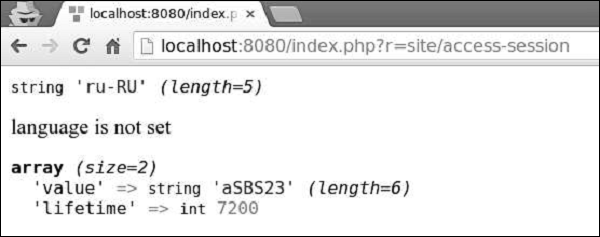
Yii - 使用 Flash 数据
Yii 提供了 Flash 数据的概念。Flash 数据是一种会话数据,它 −
- 在一个请求中设置。
- 仅在下一个请求中可用。
- 之后将自动删除。
步骤 1 − 向 SiteController 添加一个 actionShowFlash 方法。
public function actionShowFlash() {
    $session = Yii::$app->session;
    // 设置一个名为"greeting"的 flash 消息
    $session->setFlash('greeting', 'Hello user!');
    return $this->render('showflash');
}
步骤 2 − 在 views/site 文件夹中,创建一个名为 showflash.php 的视图文件。
<?php
   use yii\bootstrap\Alert;
   echo Alert::widget([
      'options' => ['class' => 'alert-info'],
      'body' => Yii::$app->session->getFlash('greeting'),
   ]);
?>
步骤 3 − 当您在 Web 浏览器的地址栏中输入 http://localhost:8080/index.php?r=site/show-flash 时,您将看到以下内容。

Yii 还提供了以下会话类 −
yii\web\CacheSession − 将会话信息存储在缓存中。
yii\web\DbSession − 将会话信息存储在数据库中。
yii\mongodb\Session −将会话信息存储在 MongoDB 中。
yii\redis\Session − 使用 redis 数据库存储会话信息。
Yii - Cookie
Cookie 是存储在客户端的纯文本文件。您可以使用它们进行跟踪。
识别回访用户有三个步骤 −
服务器向客户端(浏览器)发送一组 cookie。例如,id 或 token。
浏览器存储它。
下次浏览器向 Web 服务器发送请求时,它还会发送这些 cookie,以便服务器可以使用该信息来识别用户。
Cookie 通常在 HTTP 标头中设置,如以下代码所示。
HTTP/1.1 200 OK
Date: Fri, 05 Feb 2015 21:03:38 GMT
Server: Apache/1.3.9 (UNIX) PHP/4.0b3
Set-Cookie: name = myname; expires = Monday, 06-Feb-16 22:03:38 GMT;
   path = /; domain = tutorialspoint.com
Connection: close
Content-Type: text/html
PHP 提供 setcookie() 函数来设置 cookie −
setcookie(name, value, expire, path, domain, security);
其中 −
name − 设置 cookie 的名称,并存储在名为 HTTP_COOKIE_VARS 的环境变量中。
value − 设置命名变量的值。
expiry − 指定自 1970 年 1 月 1 日 00:00:00 GMT 以来的未来时间(以秒为单位)。在此时间之后,cookie 将无法访问。
path −指定 cookie 有效的目录。
domain − 这可用于在非常大的域中定义域名。所有 cookie 仅对创建它们的主机和域有效。
security − 如果设置为,则表示 cookie 只能通过 HTTPS 发送,否则,当设置为 0 时,cookie 可以通过常规 HTTP 发送。
要在 PHP 中访问 cookie,您可以使用 $_COOKIE 或 $HTTP_COOKIE_VARS 变量。
<?php
   echo $_COOKIE["token"]. "<br />";
   /* is equivalent to */
   echo $HTTP_COOKIE_VARS["token"]. "<br />";
   echo $_COOKIE["id"] . "<br />";
   /* is equivalent to */
   echo $HTTP_COOKIE_VARS["id"] . "<br />";
?>
要删除 cookie,您应该将 cookie 设置为已过期的日期。
<?php
   setcookie( "token", "", time()- 60, "/","", 0);
   setcookie( "id", "", time()- 60, "/","", 0);
?>
Yii - 使用 Cookies
Cookies 允许数据在请求之间持久保存。在 PHP 中,您可以通过 $_COOKIE 变量访问它们。Yii 将 cookie 表示为 yii\web\Cookie 类的对象。在本章中,我们描述了几种读取 cookie 的方法。
步骤 1 − 在 SiteController 中创建一个 actionReadCookies 方法。
public function actionReadCookies() {
    // 从"request"组件获取 cookies
    $cookies = Yii::$app->request->cookies;
    // 获取"language"cookie 值
    // 如果 cookie 不存在,则返回"ru"作为默认值
    $language = $cookies->getValue('language', 'ru');
    // 获取"language"cookie 值的另一种方法
    if (($cookie = $cookies->get('language')) !== null) {
    $language = $cookie->value;
    }
    // 您也可以像数组一样使用 $cookies
    if (isset($cookies['language'])) {
        $language = $cookies['language']->value;
    }
    // 检查是否存在"language"cookie
    if ($cookies->has('language')) echo "Current language: $language";
}
步骤 2 − 要查看发送 cookie 的实际操作,请在 SiteController 中创建一个名为 actionSendCookies 的方法。
public function actionSendCookies() {
    // 从"response"组件获取 cookie
    $cookies = Yii::$app->response->cookies;
    // 向要发送的响应添加新的 cookie
    $cookies->add(new \yii\web\Cookie([
      'name' => 'language',
      'value' => 'ru-RU',
   ]));
   $cookies->add(new \yii\web\Cookie([
      'name' => 'username',
      'value' => 'John',
   ]));
   $cookies->add(new \yii\web\Cookie([
      'name' => 'country',
      'value' => 'USA',
   ]));
}
步骤 3 − 现在,如果您转到 http://localhost:8080/index.php?r=site/send-cookies,您会注意到 cookie 已保存在浏览器内。
在 Yii 中,默认情况下启用 cookie 验证。它可以保护 cookie 不被客户端修改。config/web.php 文件中的哈希字符串会签署每个 cookie。
<?php
   $params = require(__DIR__ . '/params.php');
   $config = [
      'id' => 'basic',
      'basePath' => dirname(__DIR__),
      'bootstrap' => ['log'],
      'components' => [
         'request' => [
            // !!! insert a secret key in the following (if it is empty) - this is
            //cookie 验证所需
            'cookieValidationKey' => 'ymoaYrebZHa8gURuolioHGlK8fLXCKjO',
         ],
         'cache' => [
            'class' => 'yii\caching\FileCache',
         ],
         'user' => [
            'identityClass' => 'app\models\User',
            'enableAutoLogin' => true,
         ],
         'errorHandler' => [
            'errorAction' => 'site/error',
         ],
         'mailer' => [
            'class' => 'yii\swiftmailer\Mailer',
            // 默认将所有邮件发送到一个文件。您必须设置
            // 'useFileTransport' 为 false 并配置传输
            // 以便邮件程序发送真实的电子邮件。
            'useFileTransport' => true,
         ],
         'log' => [
            'traceLevel' => YII_DEBUG ? 3 : 0,
            'targets' => [
               [
                  'class' => 'yii\log\FileTarget',
                     'levels' => ['error', 'warning'],
                ],
            ],
         ],
         'urlManager' => [
            //'showScriptName' => false,
            //'enablePrettyUrl' => true,
            //'enableStrictParsing' => true,
            //'suffix' => '/'
         ],
         'db' => require(__DIR__ . '/db.php'),
      ],
      'modules' => [
         'hello' => [
            'class' => 'app\modules\hello\Hello',
         ],
      ],
      'params' => $params,
   ];
   if (YII_ENV_DEV) {
      // 针对"dev"环境的配置调整
      $config['bootstrap'][] = 'debug';
      $config['modules']['debug'] = [
         'class' => 'yii\debug\Module',
      ];
      $config['bootstrap'][] = 'gii';
      $config['modules']['gii'] = [
         'class' => 'yii\gii\Module',
      ];
   }
   return $config;
?>
您可以通过将 yii\web\Request::$enableCookieValidation 属性设置为 false 来禁用 cookie 验证。
Yii - 文件上传
借助 yii\web\UploadedFile、models 和 yii\widgets\ActiveForm,您可以轻松实现文件上传功能。
在根文件夹中创建一个目录 'uploads'。此目录将保存所有上传的图像。要上传单个文件,您需要为上传的文件实例创建一个模型和该模型的一个属性。您还应该验证文件上传。
步骤 1 − 在 models 文件夹中,创建一个名为 UploadImageForm.php 的文件,内容如下。
<?php
   namespace app\models;
   use yii\base\Model;
   class UploadImageForm extends Model {
      public $image;
      public function rules() {
         return [
            [['image'], 'file', 'skipOnEmpty' => false, 'extensions' => 'jpg, png'],
         ];
      }
      public function upload() {
         if ($this->validate()) {
            $this->image->saveAs('../uploads/' . $this->image->baseName . '.' .
               $this->image->extension);
            return true;
         } else {
            return false;
         }
      }
   }
?>
image 属性用于保存文件实例。file 验证规则确保文件具有 png 或 jpg 扩展名。upload 函数验证文件并将其保存在服务器上。
步骤 2 − 现在,将 actionUploadImage 函数添加到 SiteController。
public function actionUploadImage() {
   $model = new UploadImageForm();
   if (Yii::$app->request->isPost) {
      $model->image = UploadedFile::getInstance($model, 'image');
      if ($model->upload()) {
         // file is uploaded successfully
         echo "File successfully uploaded";
         return;
      }
   }
   return $this->render('upload', ['model' => $model]);
}
步骤 3 − 提交表单时,我们调用 yii\web\UploadedFile::getInstance() 函数将上传的文件表示为 UploadedFile 实例。然后,我们验证文件并将其保存在服务器上。
步骤 4 − 接下来,在 views/site 目录中创建一个 upload.php 视图文件。
<?php
   use yii\widgets\ActiveForm;
?>
<?php $form = ActiveForm::begin(['options' => ['enctype' => 'multipart/form-data']])?>
<?= $form->field($model, 'image')->fileInput() ?>
   <button>Submit</button>
<?php ActiveForm::end() ?>
上传文件时,请记住添加 enctype 选项。fileInput() 方法呈现以下 html 代码 −
<input type = "file">
上述 html 代码允许用户选择和上传文件。
步骤 5 − 现在,如果您转到 http://localhost:8080/index.php?r=site/upload-image,您将看到以下内容。
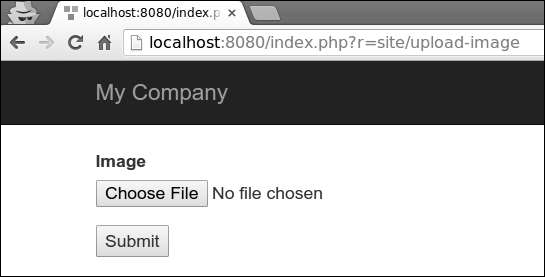
步骤 6 − 选择要上传的图像并单击"提交"按钮。该文件将保存在服务器上的 'uploads' 文件夹中。

Yii - 格式化
要以可读格式显示数据,可以使用 formatter 应用程序组件。
步骤 1 − 将 actionFormatter 方法添加到 SiteController。
public function actionFormatter(){
    return $this->render('formatter');
}
在上面的代码中,我们仅渲染 formatter 视图。
步骤 2 −现在,在 views/site 文件夹 中创建一个 formatter.php 视图文件。
<?php
$formatter = \Yii::$app->formatter;
    // 输出:2016 年 1 月 1 日
    echo $formatter->asDate('2016-01-01', 'long'),"<br>";
    // 输出:51.50%
    echo $formatter->asPercent(0.515, 2),"<br>";
    // 输出:<a href = "mailto:test@test.com">test@test.com</a>
    echo $formatter->asEmail('test@test.com'),"<br>";
    // 输出:Yes
    echo $formatter->asBoolean(true),"<br>";
    // 输出: (Not set)
    echo $formatter->asDate(null),"<br>";
?>
步骤 3 − 转到 http://localhost:8080/index.php?r=site/formatter,您将看到以下输出。
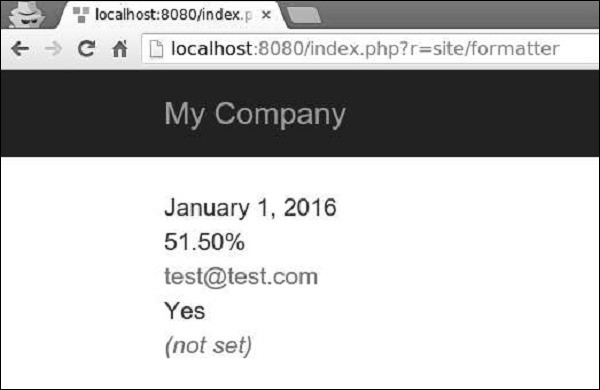
formatter 组件支持以下与日期和时间相关的格式 −
| 输出格式 | 示例 |
|---|---|
| date | January 01, 2016 |
| time | 16:06 |
| datetime | January 01, 2016 16:06 |
| timestamp | 1512609983 |
| relativeTime | 1 hour ago |
| duration | 5 minutes |
步骤 4 − 以此方式修改 formatter 视图。
<?php
   $formatter = \Yii::$app->formatter;
   echo $formatter->asDate(date('Y-m-d'), 'long'),"<br>";
   echo $formatter->asTime(date("Y-m-d")),"<br>";
   echo $formatter->asDatetime(date("Y-m-d")),"<br>";

   echo $formatter->asTimestamp(date("Y-m-d")),"<br>";
   echo $formatter->asRelativeTime(date("Y-m-d")),"<br>";
?>
步骤 5 − 在 Web 浏览器的地址栏中输入 http://localhost:8080/index.php?r=site/formatter,您将看到以下输出。
日期格式
还有四种日期格式快捷方式:短、中、长和全。
步骤 1 − 以这种方式修改 formatter 视图文件。
<?php
   $formatter = \Yii::$app->formatter;
   echo $formatter->asDate(date('Y-m-d'), 'short'),"<br>";
   echo $formatter->asDate(date('Y-m-d'), 'medium'),"<br>";
   echo $formatter->asDate(date('Y-m-d'), 'long'),"<br>";
   echo $formatter->asDate(date('Y-m-d'), 'full'),"<br>";
?>
步骤 2 − 如果您转到 Web 浏览器并输入 http://localhost:8080/index.php?r=site/formatter,您将看到以下输出。
数字格式
formatter 组件支持与数字相关的以下格式 −
| 输出格式 | 示例 |
|---|---|
| integer | 51 |
| decimal | 105.51 |
| percent | 51% |
| scientific | 1.050000E+2 |
| currency | $105 |
| size | 105 bytes |
| shortSize | 105 B |
步骤 1 − 以此方式修改 formatter 视图。
<?php
   $formatter = \Yii::$app->formatter;
   echo Yii::$app->formatter->asInteger(105),"<br>";
   echo Yii::$app->formatter->asDecimal(105.41),"<br>";
   echo Yii::$app->formatter->asPercent(0.51),"<br>";
   echo Yii::$app->formatter->asScientific(105),"<br>";
   echo Yii::$app->formatter->asCurrency(105, "$"),"<br>";
   echo Yii::$app->formatter->asSize(105),"<br>";
   echo Yii::$app->formatter->asShortSize(105),"<br>";
?>
步骤 2 − 转到 http://localhost:8080/index.php?r=site/formatter,您将看到以下输出。
其他格式
Yii 还支持其他格式 −
text − 该值是 HTML 编码的。
raw − 该值按原样输出。
paragraphs − 该值被格式化为 HTML 文本段落,并包装在 p 标签中。
ntext −该值被格式化为 HTML 纯文本,其中换行符被转换为换行符。
html − 该值使用 HtmlPurifier 净化以避免 XSS 攻击。
image − 该值被格式化为图像标签。
boolean − 该值被格式化为布尔值。
url − 该值被格式化为链接。
email − 该值被格式化为 mailto-link。
格式化程序可以使用当前活动的区域设置来确定如何为特定国家/地区格式化值。
以下示例显示如何为不同的区域设置格式化日期。
<?php
   Yii::$app->formatter->locale = 'ru-RU';
   echo Yii::$app->formatter->asDate('2016-01-01'); // output: 1 января 2016 г.
   Yii::$app->formatter->locale = 'de-DE';
   // output: 1. Januar 2016
   echo Yii::$app->formatter->asDate('2016-01-01');
   Yii::$app->formatter->locale = 'en-US';
   // output: January 1, 2016
   echo Yii::$app->formatter->asDate('2016-01-01');
?>
Yii - 分页
当数据太多,无法在一页上显示时,应该在多页上显示。这也称为分页。
要显示分页的实际效果,我们需要数据。
准备数据库
步骤 1 − 创建一个新数据库。数据库可以通过以下两种方式准备。
在终端中运行 mysql -u root -p
通过 CREATE DATABASE helloworld CHARACTER SET utf8 COLLATE utf8_general_ci;
创建一个新数据库
步骤 2 − 在 config/db.php 文件中配置数据库连接。以下配置针对的是当前使用的系统。
<?php
   return [
      'class' => 'yii\db\Connection',
      'dsn' => 'mysql:host = localhost;dbname = helloworld',
      'username' => 'vladimir',
      'password' => '12345',
      'charset' => 'utf8',
   ];
?>
步骤 3 − 在根文件夹中运行 ./yii migration/create test_table。此命令将创建一个数据库迁移来管理我们的数据库。迁移文件应出现在项目根目录的 migrations 文件夹中。
步骤 4 − 以这种方式修改迁移文件(在本例中为 m160106_163154_test_table.php)。
<?php
   use yii\db\Schema;
   use yii\db\Migration;
   class m160106_163154_test_table extends Migration {
      public function safeUp() {
         $this->createTable("user", [
            "id" => Schema::TYPE_PK,
            "name" => Schema::TYPE_STRING,
            "email" => Schema::TYPE_STRING,
         ]);
         $this->batchInsert("user", ["name", "email"], [
            ["User1", "user1@gmail.com"],
            ["User2", "user2@gmail.com"],
            ["User3", "user3@gmail.com"],
            ["User4", "user4@gmail.com"],
            ["User5", "user5@gmail.com"],
            ["User6", "user6@gmail.com"],
            ["User7", "user7@gmail.com"],
            ["User8", "user8@gmail.com"],
            ["User9", "user9@gmail.com"],
            ["User10", "user10@gmail.com"],
            ["User11", "user11@gmail.com"],
         ]);
      }
      public function safeDown() {
         $this->dropTable('user');
      }
   }
?>
上述迁移创建了一个 user 表,其中包含以下字段:id、name 和 email。它还添加了一些演示用户。
步骤 5 − 在项目根目录下 运行 ./yii migration 以将迁移应用于数据库。
步骤 6 − 现在,我们需要为我们的 user 表创建一个模型。为简单起见,我们将使用 Gii 代码生成工具。打开此 url:http://localhost:8080/index.php?r=gii。然后,单击"模型生成器"标题下的"开始"按钮。填写表名("user")和模型类("MyUser"),点击"预览"按钮,最后点击"生成"按钮。
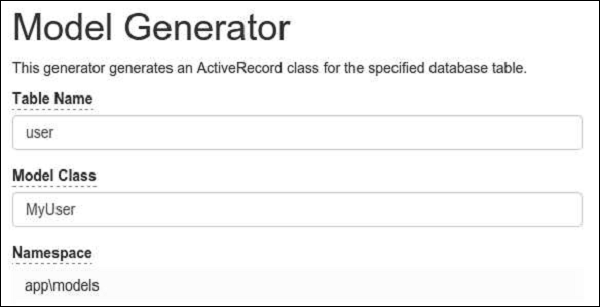
MyUser 模型出现在模型目录中。
分页操作
步骤 1 − 向 SiteController 添加 actionPagination 方法。
public function actionPagination() {
    //准备查询
    $query = MyUser::find();
    //获取用户总数
    $count = $query->count();
    //创建分页对象
    $pagination = new Pagination(['totalCount' => $count, 'defaultPageSize' => 10]);
    //使用分页限制查询并检索用户
   $models = $query->offset($pagination->offset)
      ->limit($pagination->limit)
      ->all();
   return $this->render('pagination', [
      'models' => $models,
      'pagination' => $pagination,
   ]);
}
步骤 2 − 在 views/site 文件夹中创建一个名为 pagination.php 的视图文件。
<?php
   use yii\widgets\LinkPager;
?>
<?php foreach ($models as $model): ?>
   <?= $model->id; ?>
   <?= $model->name; ?>
   <?= $model->email; ?>
   <br/>
<?php endforeach; ?>
<?php
   // display pagination
   echo LinkPager::widget([
      'pagination' => $pagination,
   ]);
?>
现在,通过 Web 浏览器访问本地主机 http://localhost:8080/index.php?r=site/pagination,您将看到一个分页小部件 −
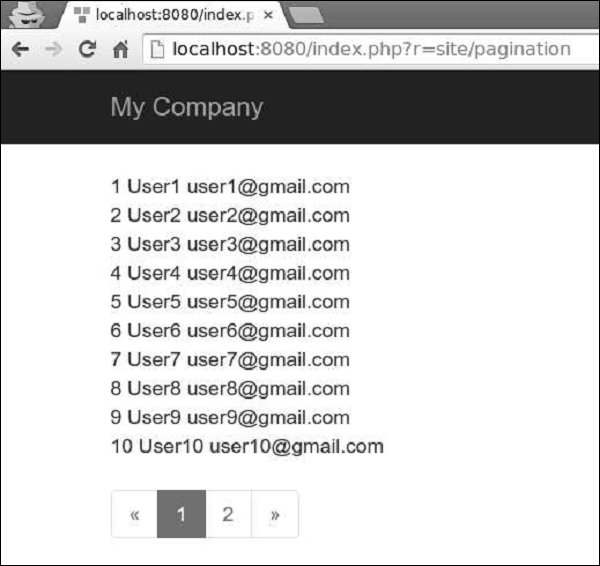
Yii - 排序
当显示大量数据时,我们经常需要对数据进行排序。Yii 使用 yii\data\Sort 对象 来表示排序模式。
要显示排序操作,我们需要数据。
准备数据库
步骤 1 − 创建一个新数据库。数据库可以通过以下两种方式准备。
在终端运行 mysql -u root –p
通过 CREATE DATABASE helloworld CHARACTER SET utf8 COLLATE utf8_general_ci;
创建一个新数据库
步骤 2 −在config/db.php文件中配置数据库连接,以下配置针对的是当前使用的系统。
<?php
   return [
      'class' => 'yii\db\Connection',
      'dsn' => 'mysql:host=localhost;dbname=helloworld',
      'username' => 'vladimir',
      'password' => '12345',
      'charset' => 'utf8',
   ];
?>
步骤 3 − 在根文件夹中运行 ./yii migration/create test_table。此命令将创建一个数据库迁移来管理我们的数据库。迁移文件应出现在项目根目录的 migrations 文件夹中。
步骤 4 − 以这种方式修改迁移文件(在本例中为 m160106_163154_test_table.php)。
<?php
   use yii\db\Schema;
   use yii\db\Migration;
   class m160106_163154_test_table extends Migration {
      public function safeUp() {
         $this->createTable("user", [
            "id" => Schema::TYPE_PK,
            "name" => Schema::TYPE_STRING,
            "email" => Schema::TYPE_STRING,
         ]);
         $this->batchInsert("user", ["name", "email"], [
            ["User1", "user1@gmail.com"],
            ["User2", "user2@gmail.com"],
            ["User3", "user3@gmail.com"],
            ["User4", "user4@gmail.com"],
            ["User5", "user5@gmail.com"],
            ["User6", "user6@gmail.com"],
            ["User7", "user7@gmail.com"],
            ["User8", "user8@gmail.com"],
            ["User9", "user9@gmail.com"],
            ["User10", "user10@gmail.com"],
            ["User11", "user11@gmail.com"],
         ]);
      }
      public function safeDown() {
         $this->dropTable('user');
      }
   }
?>
上述迁移创建了一个 user 表,其中包含以下字段:id、name 和 email。它还添加了一些演示用户。
步骤 5 − 在项目根目录下 运行 ./yii migration 以将迁移应用于数据库。
步骤 6 − 现在,我们需要为我们的 user 表创建一个模型。为简单起见,我们将使用 Gii 代码生成工具。打开此 url:http://localhost:8080/index.php?r=gii。然后,单击"模型生成器"标题下的"开始"按钮。填写表名("user")和模型类("MyUser"),单击"预览"按钮,最后单击"生成"按钮。
MyUser 模型应出现在模型目录中。
操作中的排序
步骤 1 − 向 SiteController 添加 actionSorting 方法。
public function actionSorting() {
    //声明排序对象
    $sort = new Sort([
        'attributes' => ['id', 'name', 'email'],
    ]);
    //检索所有用户
   $models = MyUser::find()
      ->orderBy($sort->orders)
      ->all();
   return $this->render('sorting', [
      'models' => $models,
      'sort' => $sort,
   ]);
}
步骤 2 − 在 views/site 文件夹中创建一个名为 sorting inside 的 View 文件。
<?php
    // 显示指向排序操作的链接
   echo $sort->link('id') . ' | ' . $sort->link('name') . ' | ' . $sort->link('email');
?><br/>
<?php foreach ($models as $model): ?>
   <?= $model->id; ?>
   <?= $model->name; ?>
   <?= $model->email; ?>
   <br/>
<?php endforeach; ?>
步骤 3 − 现在,如果您在 Web 浏览器中输入 http://localhost:8080/index.php?r=site/sorting,您将看到 id、name 和 email 字段是可排序的,如下图所示。
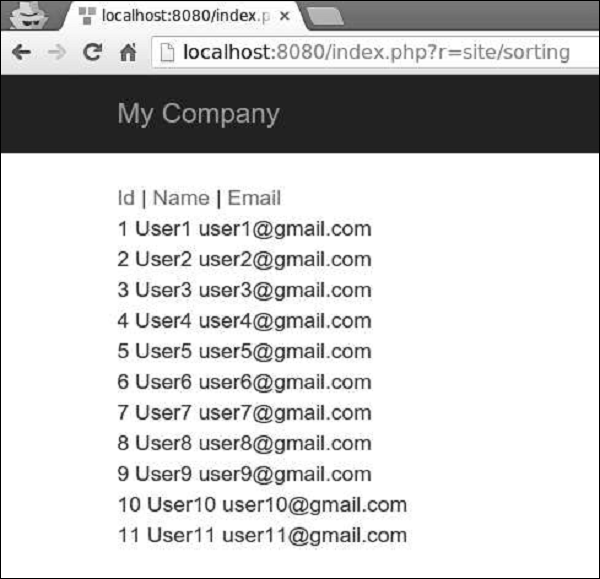
Yii - 属性
PHP 中的类成员变量也称为属性。它们表示类实例的状态。Yii 引入了一个名为yii\base\Object的类。它支持通过getter或setter类方法定义属性。
getter 方法以单词get开头。setter 方法以set开头。您可以像使用类成员变量一样使用由 getter 和 setter 定义的属性。
读取属性时,将调用 getter 方法。分配属性时,将调用 setter 方法。如果未定义 setter,则由 getter 定义的属性为只读。
步骤 1 − 在 components 文件夹中创建一个名为 Taxi.php 的文件。
<?php
   namespace app\components;
   use yii\base\Object;
   class Taxi extends Object {
      private $_phone;
      public function getPhone() {
         return $this->_phone;
      }
      public function setPhone($value) {
         $this->_phone = trim($value);
      }
   }
?>
在上面的代码中,我们定义了从 Object 类派生的 Taxi 类。我们设置了一个 getter – getPhone() 和一个 setter – setPhone()。
步骤 2 − 现在,向 SiteController 添加一个 actionProperties 方法。
public function actionProperties() {
   $object = new Taxi();
   // equivalent to $phone = $object->getPhone();
   $phone = $object->phone;
   var_dump($phone);
   // equivalent to $object->setLabel('abc');
   $object->phone = '79005448877';
   var_dump($object);
}
在上面的函数中,我们创建了一个 Taxi 对象,尝试通过 getter 访问 phone 属性,并通过 setter 设置 phone 属性。
步骤 3 − 在您的 Web 浏览器中,在地址栏中输入 http://localhost:8080/index.php?r=site/properties,您应该会看到以下输出。
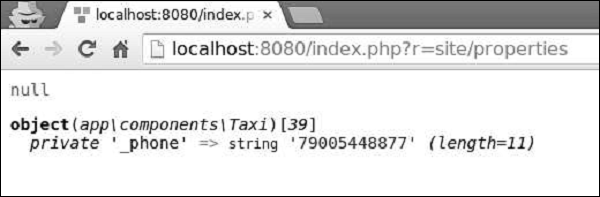
Yii - 数据提供者
Yii 提供了一组封装分页和排序的数据提供者类。数据提供者实现 yii\data\DataProviderInterface。它支持检索已排序和分页的数据。数据提供者通常与数据小部件一起使用。
Yii 包括 −
ActiveDataProvider − 使用 yii\db\ActiveQuery 或 yii\db\Query 从数据库中查询数据。
SqlDataProvider − 执行 SQL 并以数组形式返回数据。
ArrayDataProvider −获取一个大数组并返回其中的一部分。
您可以通过配置数据提供者的 pagination 和 sort 属性来定义其排序和分页行为。数据小部件(例如 yii\grid\GridView)具有一个名为 dataProvider 的属性,该属性获取数据提供者实例并在屏幕上显示数据。
准备数据库
步骤 1 − 创建一个新数据库。数据库的准备可以通过以下两种方式进行。
在终端中运行mysql -u root –p。
通过CREATE DATABASE helloworld CHARACTER SET utf8 COLLATE utf8_general_ci;
创建新数据库
步骤 2 − 在config/db.php文件中配置数据库连接。以下配置适用于当前使用的系统。
<?php
   return [
      'class' => 'yii\db\Connection',
      'dsn' => 'mysql:host = localhost;dbname = helloworld',
      'username' => 'vladimir',
      'password' => '12345',
      'charset' => 'utf8',
   ];
?>
步骤 3 − 在根文件夹中运行 ./yii migration/create test_table。此命令将创建一个数据库迁移来管理我们的数据库。迁移文件应出现在项目根目录的 migrations 文件夹中。
步骤 4 − 以这种方式修改迁移文件(在本例中为 m160106_163154_test_table.php)。
<?php
   use yii\db\Schema;
   use yii\db\Migration;
   class m160106_163154_test_table extends Migration {
      public function safeUp() {
         $this->createTable("user", [
            "id" => Schema::TYPE_PK,
            "name" => Schema::TYPE_STRING,
            "email" => Schema::TYPE_STRING,
         ]);
         $this->batchInsert("user", ["name", "email"], [
            ["User1", "user1@gmail.com"],
            ["User2", "user2@gmail.com"],
            ["User3", "user3@gmail.com"],
            ["User4", "user4@gmail.com"],
            ["User5", "user5@gmail.com"],
            ["User6", "user6@gmail.com"],
            ["User7", "user7@gmail.com"],
            ["User8", "user8@gmail.com"],
            ["User9", "user9@gmail.com"],
            ["User10", "user10@gmail.com"],
            ["User11", "user11@gmail.com"],
         ]);
      }
      public function safeDown() {
         $this->dropTable('user');
      }
   }
?>
上述迁移创建了一个 user 表,其中包含以下字段:id、name 和 email。它还添加了一些演示用户。
步骤 5 − 在项目根目录下 运行 ./yii migration 以将迁移应用于数据库。
步骤 6 − 现在,我们需要为我们的 user 表创建一个模型。为简单起见,我们将使用 Gii 代码生成工具。打开此 url:http://localhost:8080/index.php?r=gii。然后,单击"模型生成器"标题下的"开始"按钮。填写表名称("user")和模型类("MyUser"),单击"预览"按钮,最后单击"生成"按钮。
MyUser 模型应出现在模型目录中。
活动数据提供程序
步骤 1 − 在 SiteController 内创建一个名为 actionDataProvider 的函数。
public function actionDataProvider(){
   $query = MyUser::find();
   $provider = new ActiveDataProvider([
      'query' => $query,
      'pagination' => [
         'pageSize' => 2,
      ],
   ]);
   // 返回用户对象数组
   $users = $provider->getModels();
   var_dump($users);
}
在上面的代码中,我们定义了一个 ActiveDataProvider 类的实例,并从第一页显示用户。yii\data\ActiveDataProvider 类使用 DB 应用程序组件作为 DB 连接。
步骤 2 − 如果您输入本地主机地址 http://localhost:8080/index.php?r=site/dataprovider,您将看到以下输出。
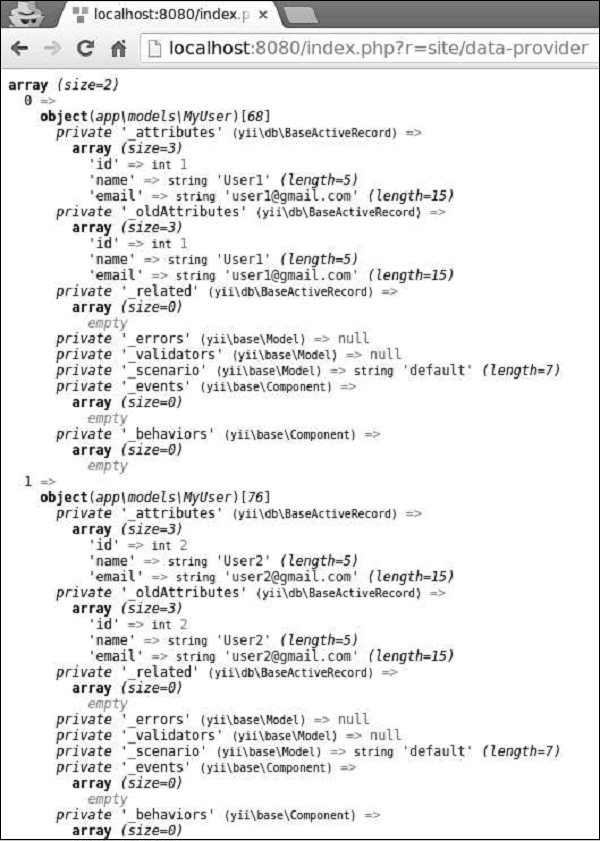
SQL Data Provider
yii\data\SqlDataProvider 类与原始 SQL 语句一起使用。
步骤 1 − 以这种方式修改 actionDataProvider 方法。
public function actionDataProvider() {
   $count = Yii::$app->db->createCommand('SELECT COUNT(*) FROM user')->queryScalar();
   $provider = new SqlDataProvider([
      'sql' => 'SELECT * FROM user',
      'totalCount' => $count,
      'pagination' => [
         'pageSize' => 5,
      ],
      'sort' => [
         'attributes' => [
            'id',
            'name',
            'email',
         ],
      ],
   ]);
   // 返回数据行的数组
   $users = $provider->getModels();
   var_dump($users);
}
步骤 2 − 在 Web 浏览器的地址栏中输入 http://localhost:8080/index.php?r=site/data-provider,您将看到以下输出。
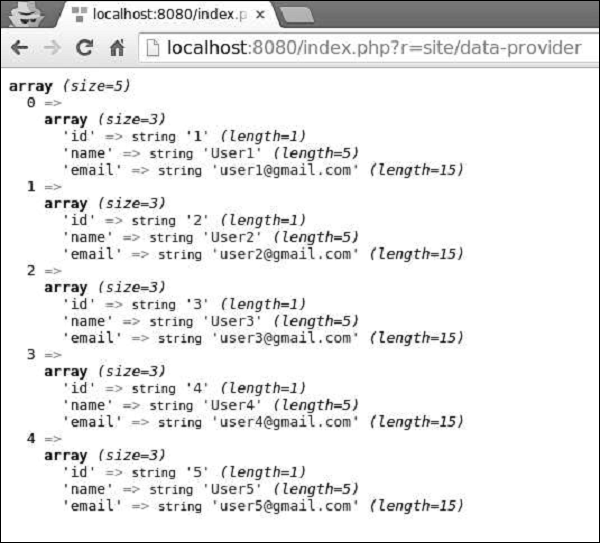
Array Data Provider
yii\data\ArrayDataProvider 类最适合处理大数组。此数组中的元素可以是 DAO 或 Active Record 实例的查询结果。
步骤 1 − 以这种方式修改 actionDataProvider 方法。
public function actionDataProvider() {
   $data = MyUser::find()->asArray()->all();
   $provider = new ArrayDataProvider([
      'allModels' => $data,
      'pagination' => [
         'pageSize' => 3,
      ],
      'sort' => [
         'attributes' => ['id', 'name'],
      ],
   ]);
   // 获取当前请求页面中的行
   $users = $provider->getModels();
   var_dump($users);
}
步骤 2 − 如果您通过 Web 浏览器访问地址 http://localhost:8080/index.php?r=site/data-provider,您将看到以下输出。
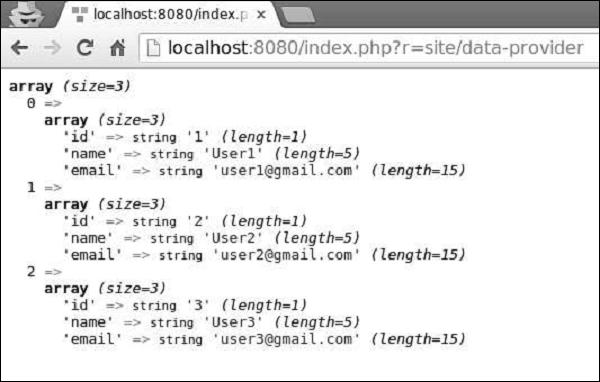
请注意,与 SQL Data Provider 和 Active Data Provider 不同,Array Data Provider 将所有数据加载到内存中,因此效率较低。
Yii - Data 数据小部件
Yii 提供了一组用于显示数据的小部件。您可以使用 DetailView 小部件显示单个记录。ListView 小部件以及 Grid View 可用于显示具有过滤、排序和分页等功能的记录表。
准备数据库
步骤 1 − 创建一个新数据库。数据库可以通过以下两种方式准备。
在终端运行 mysql -u root –p
通过 CREATE DATABASE helloworld CHARACTER SET utf8 COLLATE utf8_general_ci; 创建一个新数据库
步骤 2 −在config/db.php文件中配置数据库连接,以下配置针对的是当前使用的系统。
<?php
   return [
      'class' => 'yii\db\Connection',
      'dsn' => 'mysql:host=localhost;dbname=helloworld',
      'username' => 'vladimir',
      'password' => '12345',
      'charset' => 'utf8',
   ];
?>
步骤 3 − 在根文件夹内 run./yii migration/create test_table。此命令将创建一个数据库迁移来管理我们的数据库。迁移文件应出现在项目根目录的 migrations 文件夹中。
步骤 4 − 以这种方式修改迁移文件(本例中为 m160106_163154_test_table.php)。
<?php
   use yii\db\Schema;
   use yii\db\Migration;
   class m160106_163154_test_table extends Migration {
      public function safeUp() {
         $this->createTable("user", [
            "id" => Schema::TYPE_PK,
            "name" => Schema::TYPE_STRING,
            "email" => Schema::TYPE_STRING,
         ]);
         $this->batchInsert("user", ["name", "email"], [
            ["User1", "user1@gmail.com"],
            ["User2", "user2@gmail.com"],
            ["User3", "user3@gmail.com"],
            ["User4", "user4@gmail.com"],
            ["User5", "user5@gmail.com"],
            ["User6", "user6@gmail.com"],
            ["User7", "user7@gmail.com"],
            ["User8", "user8@gmail.com"],
            ["User9", "user9@gmail.com"],
            ["User10", "user10@gmail.com"],
            ["User11", "user11@gmail.com"],
         ]);
      }
      public function safeDown() {
         $this->dropTable('user');
      }
   }
?>
上述迁移创建了一个 user 表,其中包含以下字段:id、name 和 email。它还添加了一些演示用户。
步骤 5 − 在项目根目录下 run./yii migration 将迁移应用于数据库。
步骤 6 − 现在,我们需要为我们的 user 表创建一个模型。为简单起见,我们将使用 Gii 代码生成工具。打开此 url:http://localhost:8080/index.php?r=gii。然后,单击"模型生成器"标题下的"开始"按钮。填写表名("user")和模型类("MyUser"),单击"预览"按钮,最后单击"生成"按钮。
MyUser 模型应出现在模型目录中。
DetailView 小部件
DetailView 小部件显示单个模型的数据。$attributes 属性定义应显示哪些模型属性。
步骤 1 − 将 actionDataWidget 方法添加到 SiteController。
public function actionDataWidget() {
   $model = MyUser::find()->one();
   return $this->render('datawidget', [
      'model' => $model
   ]);
}
在上面的代码中,我们找到第一个 MyUser 模型并将其传递给 datawidget 视图。
步骤 2 − 在 views/site 文件夹中创建一个名为 datawidget.php 的文件。
<?php
   use yii\widgets\DetailView;
   echo DetailView::widget([
      'model' => $model,
      'attributes' => [
         'id',
         //formatted as html
         'name:html',
         [
            'label' => 'e-mail',
            'value' => $model->email,
         ],
      ],
   ]);
?>
步骤 3 − 如果您访问 http://localhost:8080/index.php?r=site/data-widget,您将看到 DetailView 小部件的典型用法。
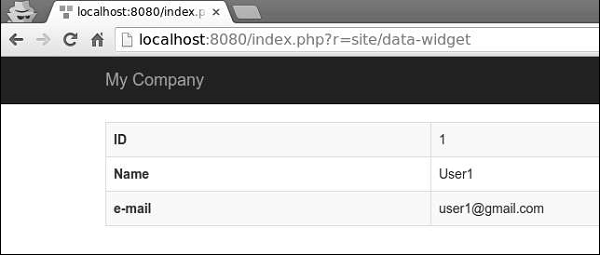
Yii - ListView 小部件
ListView 小部件使用数据提供程序来显示数据。每个模型都使用指定的视图文件进行渲染。
步骤 1 − 以这种方式修改 actionDataWidget() 方法。
public function actionDataWidget() {
   $dataProvider = new ActiveDataProvider([
      'query' => MyUser::find(),
      'pagination' => [
         'pageSize' => 20,
      ],
   ]);
   return $this->render('datawidget', [
      'dataProvider' => $dataProvider
   ]);
}
在上面的代码中,我们创建了一个数据提供程序并将其传递给 datawidget 视图。
步骤 2 − 以这种方式修改 datawidget 视图文件。
<?php
   use yii\widgets\ListView;
   echo ListView::widget([
      'dataProvider' => $dataProvider,
      'itemView' => '_user',
   ]);
?>
我们渲染 ListView 小部件。每个模型都呈现在 _user 视图中。
步骤 3 − 在 views/site 文件夹中创建一个名为 _user.php 的文件。
<?php
   use yii\helpers\Html;
   use yii\helpers\HtmlPurifier;
?>
<div class = "user">
   <?= $model->id ?>
   <?= Html::encode($model->name) ?>
   <?= HtmlPurifier::process($model->email) ?>
</div>
步骤 4 − 在网络浏览器的地址栏中输入 http://localhost:8080/index.php?r=site/data-widget,您将看到以下内容。
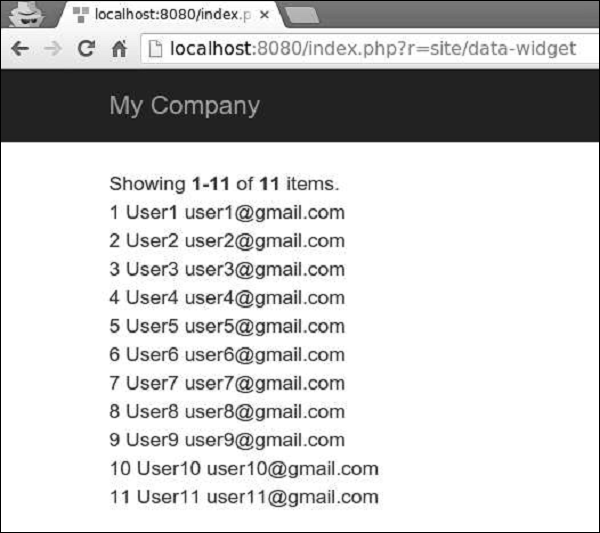
Yii - GridView 小部件
GridView 小部件从数据提供程序获取数据并以表格形式呈现数据。表格的每一行代表一个数据项,每一列代表该项目的一个属性。
步骤 1 − 以这种方式修改 datawidget 视图。
<?php
   use yii\grid\GridView;
   echo GridView::widget([
      'dataProvider' => $dataProvider,
   ]);
?>
步骤 2 − 转到 http://localhost:8080/index.php?r=site/data-widget,您将看到 DataGrid 小部件的典型用法。
DataGrid 小部件的列根据 yii\grid\Column 类进行配置。它代表一个模型属性,可以进行过滤和排序。
步骤 3 − 要向网格添加自定义列,请以这种方式修改 datawidget 视图。
<?php
   yii\grid\GridView;
   echo GridView::widget([
      'dataProvider' => $dataProvider,
      'columns' => [
         'id',
         [
            'class' => 'yii\grid\DataColumn', // 可以省略,因为它是默认的
            'label' => 'Name and email',
            'value' => function ($data) {
               return $data->name . " writes from " . $data->email;
            },
         ],
      ],
   ]);
?>
步骤 4 − 如果您访问地址 http://localhost:8080/index.php?r=site/data-widget, 您将看到如下图所示的输出。
可以使用不同的列类(如 yii\grid\SerialColumn、yii\grid\ActionColumn 和 yii\grid\CheckboxColumn)自定义网格列。
步骤 5 − 按以下方式修改 datawidget 视图。
<?php
   use yii\grid\GridView;
   echo GridView::widget([
      'dataProvider' => $dataProvider,
      'columns' => [
         ['class' => 'yii\grid\SerialColumn'], 'name',
         ['class' => 'yii\grid\ActionColumn'],
         ['class' => 'yii\grid\CheckboxColumn'],
      ],
   ]);
?>
步骤 6 −转到 http://localhost:8080/index.php?r=site/data-widget,您将看到以下内容。

Yii - 事件
您可以使用事件在某些执行点注入自定义代码。您可以将自定义代码附加到事件,当触发事件时,代码就会执行。例如,当新用户在您的网站上注册时,记录器对象可能会触发userRegistered事件。如果某个类需要触发事件,您应该从 yii\base\Component 类扩展它。
事件处理程序是 PHP 回调。您可以使用以下回调 −
以字符串形式指定的全局 PHP 函数。
匿名函数。
类名和方法的数组(以字符串形式),例如 ['ClassName', 'methodName']
对象和方法的数组(以字符串形式),例如 [$obj, 'methodName']
步骤 1 − 要将处理程序附加到事件,您应该调用 yii\base\Component::on() 方法。
$obj = new Obj;
// 此处理程序是一个全局函数
$obj->on(Obj::EVENT_HELLO, 'function_name');
// 此处理程序是一个对象方法
$obj->on(Obj::EVENT_HELLO, [$object, 'methodName']);
// 此处理程序是一个静态类方法
$obj->on(Obj::EVENT_HELLO, ['app\components\MyComponent', 'methodName']);
// 此处理程序是一个匿名函数

$obj->on(Obj::EVENT_HELLO, function ($event) {
// 事件处理逻辑
});
您可以将一个或多个处理程序附加到事件。附加的处理程序按照它们附加到事件的顺序调用。
步骤 2 − 要停止处理程序的调用,您应该将 yii\base\Event::$handled 属性 设置为 true。
$obj->on(Obj::EVENT_HELLO, function ($event) {
    $event->handled = true;
});
步骤 3 − 要将处理程序插入队列的开头,您可以调用 yii\base\Component::on(),并将第四个参数设置为 false。
$obj->on(Obj::EVENT_HELLO, function ($event) {
   // ...
}, $data, false);
步骤 4 − 要触发事件,请调用 yii\base\Component::trigger() 方法。
namespace app\components;
use yii\base\Component;
use yii\base\Event;
class Obj extends Component {
   const EVENT_HELLO = 'hello';
   public function triggerEvent() {
      $this->trigger(self::EVENT_HELLO);
   }
}
步骤 5 − 要从事件中分离处理程序,您应该调用 yii\base\Component::off() 方法。
$obj = new Obj;
// 此处理程序是一个全局函数
$obj->off(Obj::EVENT_HELLO, 'function_name');
// 此处理程序是一个对象方法
$obj->off(Obj::EVENT_HELLO, [$object, 'methodName']);
// 此处理程序是一个静态类方法
$obj->off(Obj::EVENT_HELLO, ['app\components\MyComponent', 'methodName']);
// 此处理程序是一个匿名函数

$obj->off(Obj::EVENT_HELLO, function ($event) {
// 事件处理逻辑
});
Yii - 创建事件
在本章中,我们将了解如何在 Yii 中创建事件。要显示事件的实际操作,我们需要数据。
准备数据库
步骤 1 − 创建一个新数据库。可以通过以下两种方式准备数据库。
在终端中运行 mysql -u root –p
通过 CREATE DATABASE helloworld CHARACTER SET utf8 COLLATE utf8_general_ci;
创建一个新数据库
步骤 2 − 在 config/db.php 文件中配置数据库连接。以下配置适用于当前使用的系统。
<?php
   return [
      'class' => 'yii\db\Connection',
      'dsn' => 'mysql:host=localhost;dbname=helloworld',
      'username' => 'vladimir',
      'password' => '12345',
      'charset' => 'utf8',
   ];
?>
步骤 3 − 在根文件夹中 运行 ./yii migration/create test_table。此命令将创建一个数据库迁移来管理我们的数据库。迁移文件应出现在项目根目录的 migrations 文件夹中。
步骤 4 − 以这种方式修改迁移文件(在本例中为 m160106_163154_test_table.php)。
<?php
   use yii\db\Schema;
   use yii\db\Migration;
   class m160106_163154_test_table extends Migration {
      public function safeUp() {
         $this->createTable("user", [
            "id" => Schema::TYPE_PK,
            "name" => Schema::TYPE_STRING,
            "email" => Schema::TYPE_STRING,
         ]);
         $this->batchInsert("user", ["name", "email"], [
            ["User1", "user1@gmail.com"],
            ["User2", "user2@gmail.com"],
            ["User3", "user3@gmail.com"],
            ["User4", "user4@gmail.com"],
            ["User5", "user5@gmail.com"],
            ["User6", "user6@gmail.com"],
            ["User7", "user7@gmail.com"],
            ["User8", "user8@gmail.com"],
            ["User9", "user9@gmail.com"],
            ["User10", "user10@gmail.com"],
            ["User11", "user11@gmail.com"],
         ]);
      }
      public function safeDown() {
         $this->dropTable('user');
      }
   }
?>
上述迁移创建了一个 user 表,其中包含以下字段:id、name 和 email。它还添加了一些演示用户。
步骤 5 − 在项目根目录下 运行 ./yii migration 以将迁移应用于数据库。
步骤 6 − 现在,我们需要为我们的 user 表创建一个模型。为简单起见,我们将使用 Gii 代码生成工具。打开此 url:http://localhost:8080/index.php?r=gii。然后,单击"模型生成器"标题下的"开始"按钮。填写表名("user")和模型类("MyUser"),单击"预览"按钮,最后单击"生成"按钮。
MyUser 模型应出现在模型目录中。
创建事件
假设我们想在新用户在我们的网站上注册时向管理员发送电子邮件。
步骤 1 − 以这种方式修改 models/MyUser.php 文件。
<?php
   namespace app\models;
   use Yii;
   /**
   * This is the model class for table "user".
   *
   * @property integer $id
   * @property string $name
   * @property string $email
   */
   class MyUser extends \yii\db\ActiveRecord {
      const EVENT_NEW_USER = 'new-user';
      public function init() {
         // first parameter is the name of the event and second is the handler.
         $this->on(self::EVENT_NEW_USER, [$this, 'sendMailToAdmin']);
      }
      /**
      * @inheritdoc
      */
      public static function tableName() {
         return 'user';
      }
      /**
      * @inheritdoc
      */
      public function rules() {
         return [
            [['name', 'email'], 'string', 'max' => 255]
         ];
      }
      /**
      * @inheritdoc
      */
      public function attributeLabels() {
         return [
            'id' => 'ID',
            'name' => 'Name',
            'email' => 'Email',
         ];
      }
      public function sendMailToAdmin($event) {
         echo 'mail sent to admin using the event';
      }
   }
?>
在上面的代码中,我们定义了一个"new-user"事件。然后,在 init() 方法中,我们将 sendMailToAdmin 函数附加到"new-user"事件。现在,我们需要触发此事件。
步骤 2 − 在 SiteController 中创建一个名为 actionTestEvent 的方法。
public function actionTestEvent() {
   $model = new MyUser();
   $model->name = "John";
   $model->email = "john@gmail.com";
   if($model->save()) {
      $model->trigger(MyUser::EVENT_NEW_USER);
   }
}
在上面的代码中,我们创建一个新用户并触发"new-user"事件。
步骤 3 − 现在输入 http://localhost:8080/index.php?r=site/test-event,您将看到以下内容。
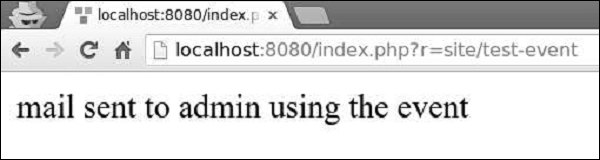
Yii - 行为
行为是 yii\base\Behavior 类的实例。行为将其方法和属性注入到其所附加的组件。行为还可以响应组件触发的事件。
步骤 1 − 要定义行为,请扩展 yii\base\Behavior 类。
namespace app\components;
use yii\base\Behavior;
class MyBehavior extends Behavior {
   private $_prop1;
   public function getProp1() {
      return $this->_prop1;
   }
   public function setProp1($value) {
      $this->_prop1 = $value;
   }
   public function myFunction() {
      // ...
   }
}
上述代码使用一个属性 (prop1) 和一个方法 (myFunction) 定义行为。当此行为附加到组件时,该组件也将具有 prop1 属性和 myFunction 方法。
要访问行为附加到的组件,您可以使用 yii\base\Behavior::$owner 属性。
步骤 2 − 如果您希望行为响应组件事件,则应重写 yii\base\Behavior::events() 方法。
namespace app\components;
use yii\db\ActiveRecord;
use yii\base\Behavior;
class MyBehavior extends Behavior {
   public function events() {
      return [
         ActiveRecord::EVENT_AFTER_VALIDATE => 'afterValidate',
      ];
   }
   public function afterValidate($event) {
      // ...
   }
}
步骤 3 − 要附加行为,您应该重写组件类的 behaviors() 方法。
namespace app\models;
use yii\db\ActiveRecord;
use app\components\MyBehavior;
class MyUser extends ActiveRecord {
   public function behaviors() {
      return [
         // 匿名行为,仅行为类名
         MyBehavior::className(),
         // 命名行为,仅限行为类名
         'myBehavior2' => MyBehavior::className(),
         // 匿名行为,配置数组
         [
            'class' => MyBehavior::className(),
            'prop1' => 'value1',
            'prop2' => 'value2',
            'prop3' => 'value3',
         ],
         // 命名行为,配置数组
         'myBehavior4' => [
            'class' => MyBehavior::className(),
            'prop1' => 'value1'
         ]
      ];
   }
}
步骤 4 − 要分离行为,请调用 yii\base\Component::detachBehavior() 方法。
$component->detachBehavior('myBehavior');
要显示实际行为,我们需要数据。
准备数据库
步骤 1 − 创建一个新数据库。数据库的准备可以通过以下两种方式进行。
在终端中运行mysql -u root –p。
通过CREATE DATABASE helloworld CHARACTER SET utf8 COLLATE utf8_general_ci;创建新数据库
步骤 2 − 在 config/db.php 文件中配置数据库连接。以下配置适用于当前使用的系统。
<?php
   return [
      'class' => 'yii\db\Connection',
      'dsn' => 'mysql:host = localhost;dbname = helloworld',
      'username' => 'vladimir',
      'password' => '12345',
      'charset' => 'utf8',
   ];
?>
步骤 3 − 在根文件夹中运行 ./yii migration/create test_table。此命令将创建一个数据库迁移来管理我们的数据库。迁移文件应出现在项目根目录的 migrations 文件夹中。
步骤 4 − 以这种方式修改迁移文件(在本例中为 m160106_163154_test_table.php)。
<?php
   use yii\db\Schema;
   use yii\db\Migration;
   class m160106_163154_test_table extends Migration {
      public function safeUp() {
         $this->createTable("user", [
            "id" => Schema::TYPE_PK,
            "name" => Schema::TYPE_STRING,
            "email" => Schema::TYPE_STRING,
         ]);
         $this->batchInsert("user", ["name", "email"], [
            ["User1", "user1@gmail.com"],
            ["User2", "user2@gmail.com"],
            ["User3", "user3@gmail.com"],
            ["User4", "user4@gmail.com"],
            ["User5", "user5@gmail.com"],
            ["User6", "user6@gmail.com"],
            ["User7", "user7@gmail.com"],
            ["User8", "user8@gmail.com"],
            ["User9", "user9@gmail.com"],
            ["User10", "user10@gmail.com"],
            ["User11", "user11@gmail.com"],
         ]);
      }
      public function safeDown() {
         $this->dropTable('user');
      }
   }
?>
上述迁移创建了一个 user 表,其中包含以下字段:id、name 和 email。它还添加了一些演示用户。
步骤 5 −在项目根目录中 run./yii migration 将迁移应用于数据库。
步骤 6 −现在,我们需要为我们的 user 表 创建一个模型。为简单起见,我们将使用 Gii 代码生成工具。打开此 url:http://localhost:8080/index.php?r=gii。然后,单击"模型生成器"标题下的"开始"按钮。填写表名("user")和模型类("MyUser"),单击"预览"按钮,最后单击"生成"按钮。
MyUser 模型应出现在模型目录中。
Yii - 创建行为
假设我们要创建一个行为,将行为所附加到的组件的"name"属性改为大写。
步骤 1 − 在 components 文件夹中,使用以下代码创建一个名为 UppercaseBehavior.php 的文件。
<?php
   namespace app\components;
   use yii\base\Behavior;
   use yii\db\ActiveRecord;
   class UppercaseBehavior extends Behavior {
      public function events() {
         return [
            ActiveRecord::EVENT_BEFORE_VALIDATE => 'beforeValidate',
         ];
      }
      public function beforeValidate($event) {
         $this->owner->name = strtoupper($this->owner->name);
     }
   }
?>
在上面的代码中,我们创建了 UppercaseBehavior,当触发"beforeValidate"事件时,它将 name 属性变为大写。
步骤 2 − 要将此行为附加到 MyUser 模型,请按如下方式修改它。
<?php
   namespace app\models;
   use app\components\UppercaseBehavior;
   use Yii;
   /**
   * This is the model class for table "user".
   *
   * @property integer $id
   * @property string $name
   * @property string $email
   */
   class MyUser extends \yii\db\ActiveRecord {
      public function behaviors() {
         return [
            // anonymous behavior, behavior class name only
            UppercaseBehavior::className(),
         ];
      }
      /**
      * @inheritdoc
      */
      public static function tableName() {
         return 'user';
      }
      /**
      * @inheritdoc
      */
      public function rules() {
         return [
            [['name', 'email'], 'string', 'max' => 255]
         ];
      }
      /**
      * @inheritdoc
      */
      public function attributeLabels() {
         return [
            'id' => 'ID',
            'name' => 'Name',
            'email' => 'Email',
         ];
      }
   }
?>
现在,无论何时我们创建或更新用户,其 name 属性都将采用大写形式。
步骤 3 − 向 SiteController 添加 actionTestBehavior 函数。
public function actionTestBehavior() {
   //creating a new user
   $model = new MyUser();
   $model->name = "John";
   $model->email = "john@gmail.com";
   if($model->save()){
      var_dump(MyUser::find()->asArray()->all());
   }
}
步骤 4 − 在地址栏中输入 http://localhost:8080/index.php?r=site/test-behavior,您将看到新创建的 MyUser 模型的 name 属性是大写的。
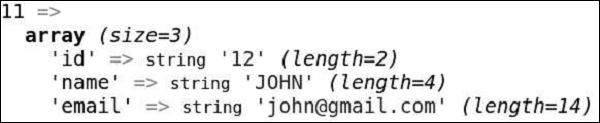
Yii - 配置
配置用于创建新对象或初始化现有对象。配置通常包括类名和初始值列表。它们还可能包括事件处理程序和行为列表。
以下是数据库配置的示例 −
<?php
   $config = [
      'class' => 'yii\db\Connection',
      'dsn' => 'mysql:host = localhost;dbname = helloworld',
      'username' => 'vladimir',
      'password' => '12345',
      'charset' => 'utf8',
   ];
   $db = Yii::createObject($config);
?>
Yii::createObject() 方法接受一个配置数组,并根据配置中指定的类创建一个对象。
配置的格式 −
[
    //正在创建对象的完全限定类名
    'class' => 'ClassName',
    //命名属性的初始值
    'propertyName' => 'propertyValue',
    //指定应将哪些处理程序附加到对象的事件
    'on eventName' => $eventHandler,
    //指定应将哪些行为附加到对象
    'as behaviorName' => $behaviorConfig,
]
基本应用程序模板的配置文件是最复杂的配置文件之一 −
<?php
   $params = require(__DIR__ . '/params.php');
   $config = [
      'id' => 'basic',
      'basePath' => dirname(__DIR__),
      'bootstrap' => ['log'],
      'components' => [
         'request' => [
            // !!! insert a secret key in the following (if it is empty) - this
               //is required by cookie validation
            'cookieValidationKey' => 'ymoaYrebZHa8gURuolioHGlK8fLXCKjO',
         ],
         'cache' => [
            'class' => 'yii\caching\FileCache',
         ],
         'user' => [
            'identityClass' => 'app\models\User',
            'enableAutoLogin' => true,
         ],
         'errorHandler' => [
            'errorAction' => 'site/error',
         ],
         'mailer' => [
            'class' => 'yii\swiftmailer\Mailer',
            // 默认将所有邮件发送到一个文件。您必须设置
            // 'useFileTransport' 为 false 并配置传输
            // 以便邮件程序发送真实的电子邮件。
            'useFileTransport' => true,
         ],
         'log' => [
            'traceLevel' => YII_DEBUG ? 3 : 0,
            'targets' => [
               [
                  'class' => 'yii\log\FileTarget',
                  'levels' => ['error', 'warning'],
               ],
            ],
         ],
         'urlManager' => [
            //'showScriptName' => false,
            //'enablePrettyUrl' => true,
            //'enableStrictParsing' => true,
            //'suffix' => '/'
         ],
         'db' => require(__DIR__ . '/db.php'),
      ],
      'modules' => [
         'hello' => [
            'class' => 'app\modules\hello\Hello',
         ],
      ],
      'params' => $params,
   ];
   if (YII_ENV_DEV) {
      // 针对"dev"环境的配置调整
      $config['bootstrap'][] = 'debug';
      $config['modules']['debug'] = [
         'class' => 'yii\debug\Module',
      ];
      $config['bootstrap'][] = 'gii';
      $config['modules']['gii'] = [
         'class' => 'yii\gii\Module',
      ];
   }
   return $config;
?>
在上面的配置文件中,我们没有定义类名。这是因为我们已经在 index.php 文件中定义了它 −
<?php
    //定义全局常量
    defined('YII_DEBUG') or define('YII_DEBUG', true);
    defined('YII_ENV') or define('YII_ENV', 'dev');
    //注册 composer 自动加载器
    require(__DIR__ . '/../vendor/autoload.php');
    //包含 yii 文件
    require(__DIR__ . '/../vendor/yiisoft/yii2/Yii.php');
    //加载应用程序配置
    $config = require(__DIR__ . '/../config/web.php');
    //创建、配置和处理请求
    (new yii\web\Application($config))->run();
?>
许多小部件也使用配置,如以下代码所示。
<?php
   NavBar::begin([
      'brandLabel' => 'My Company',
      'brandUrl' => Yii::$app->homeUrl,
      'options' => [
         'class' => 'navbar-inverse navbar-fixed-top',
      ],
   ]);
   echo Nav::widget([
      'options' => ['class' => 'navbar-nav navbar-right'],
      'items' => [
         ['label' => 'Home', 'url' => ['/site/index']],
         ['label' => 'About', 'url' => ['/site/about']],
         ['label' => 'Contact', 'url' => ['/site/contact']],
         Yii::$app->user->isGuest ?
         ['label' => 'Login', 'url' => ['/site/login']] :
         [
            'label' => 'Logout (' . Yii::$app->user->identity->username . ')',
            'url' => ['/site/logout'],
            'linkOptions' => ['data-method' => 'post']
         ],
      ],
   ]);
   NavBar::end();
?>
当配置过于复杂时,常见的做法是创建一个 PHP 文件,该文件返回一个数组。请查看 config/console.php 配置文件 −
<?php
   Yii::setAlias('@tests', dirname(__DIR__) . '/tests');

   $params = require(__DIR__ . '/params.php');
   $db = require(__DIR__ . '/db.php');

   return [
      'id' => 'basic-console',
      'basePath' => dirname(__DIR__),
      'bootstrap' => ['log', 'gii'],
      'controllerNamespace' => 'app\commands',
      'modules' => [
         'gii' => 'yii\gii\Module',
      ],
      'components' => [
         'cache' => [
            'class' => 'yii\caching\FileCache',
         ],
         'log' => [
            'targets' => [
               [
                  'class' => 'yii\log\FileTarget',
                  'levels' => ['error', 'warning'],
               ],
            ],
         ],
         'db' => $db,
      ],
      'params' => $params,
   ];
?>
可以通过调用 Yii::$container->set() 方法指定默认配置。它允许您在通过 Yii::createObject() 方法调用指定类的所有实例时应用默认配置。
例如,要自定义 yii\widgets\LinkPager 类,以便所有链接分页器最多显示三个按钮,您可以使用以下代码。
\Yii::$container->set('yii\widgets\LinkPager', [
   'maxButtonCount' => 3,
]);
Yii - 依赖注入
DI(依赖注入)容器是一个知道如何实例化和配置对象的对象。Yii 通过 yii\di\Container 类 提供 DI 容器。
它支持以下类型的 DI −
- Setter 和属性注入
- PHP 可调用注入
- 构造函数注入
- 控制器动作注入
DI 容器借助类型提示支持构造函数注入 −
class Object1 {
    public function __construct(Object2 $object2) {

    }
}
$object1 = $container->get('Object1');
// 相当于以下内容:
$object2 = new Object2;
$object1 = new Object1($object2);
通过配置支持属性和 setter 注入 −
<?php
   use yii\base\Object;
   class MyObject extends Object {
      public $var1;
      private $_var2;
      public function getVar2() {
         return $this->_var2;
      }
      public function setVar2(MyObject2 $var2) {
         $this->_var2 = $var2;
      }
   }
   $container->get('MyObject', [], [
      'var1' => $container->get('MyOtherObject'),
      'var2' => $container->get('MyObject2'),
   ]);
?>
在 PHP 可调用注入的情况下,容器将使用已注册的 PHP 回调来构建类的新实例 −
$container->set('Object1', function () {
    $object1 = new Object1(new Object2);
    return $object1;
});
$object1 = $container->get('Object1');
控制器操作注入是一种 DI,其中依赖项使用类型提示声明。它对于保持 MVC 控制器的轻量级和精简非常有用 −
public function actionSendToAdmin(EmailValidator $validator, $email) {
   if ($validator->validate($email)) {
      // sending email
   }
}
You can use the yii\db\Container::set() method to register dependencies −
<?php
    $container = new \yii\di\Container;
    // 按原样注册一个类名。这可以跳过。
    $container->set('yii\db\Connection');
    // 注册一个别名。您可以使用 $container->get('MyObject')
    // 创建 Connection 的实例
    $container->set('MyObject', 'yii\db\Connection');
    // 注册一个接口
    // 当类依赖于接口时,相应的类
    // 将被实例化为依赖对象
    $container->set('yii\mail\MailInterface', 'yii\swiftmailer\Mailer');
    // 使用类配置注册一个别名
    // 在这种情况下,需要一个"class"元素来指定类
    $container->set('db', [
    'class' => 'yii\db\Connection',
    'dsn' => 'mysql:host=127.0.0.1;dbname = helloworld',
    'username' => 'vladimir',
    'password' => '12345',
    'charset' => 'utf8',
    ]);
    // 使用配置注册一个类。该配置
    // 将在通过 get() 实例化类时应用
    $container->set('yii\db\Connection', [
    'dsn' => 'mysql:host=127.0.0.1;dbname = helloworld',
    'username' => 'vladimir',
    'password' => '12345',
    'charset' => 'utf8',
    ]);
    // 注册一个 PHP 可调用函数
    // 每次调用 $container->get('db') 时,都会执行该可调用函数
    $container->set('db', function ($container, $params, $config) {
    return new \yii\db\Connection($config);
    });
    // 注册一个组件实例
    // $container->get('pageCache') 每次被调用时都会返回相同的实例
    //被调用
    $container->set('pageCache', new FileCache);
?>
使用 DI
步骤 1 − 在 components 文件夹中创建一个名为 MyInterface.php 的文件,并写入以下代码。
<?php
   namespace app\components;
   interface MyInterface {
      public function test();
   }
?>
步骤 2 − 在 components 文件夹中,创建两个文件。
First.php −
<?php
   namespace app\components;
   use app\components\MyInterface;
   class First implements MyInterface {
      public function test() {
         echo "First class <br>";
      }
   }
?>
Second.php −
<?php
   app\components;
   use app\components\MyInterface;
      class Second implements MyInterface {
      public function test() {
         echo "Second class <br>";
      }
   }
?>
步骤 3 −现在,向 SiteController 添加一个 actionTestInterface。
public function actionTestInterface() {
   $container = new \yii\di\Container();
   $container->set
      ("\app\components\MyInterface","\app\components\First");
   $obj = $container->get("\app\components\MyInterface");
   $obj->test(); // print "First class"
   $container->set
      ("\app\components\MyInterface","\app\components\Second");
   $obj = $container->get("\app\components\MyInterface");
   $obj->test(); // print "Second class"
}
步骤 4 − 转到 http://localhost:8080/index.php?r=site/test-interface 您应该会看到以下内容。
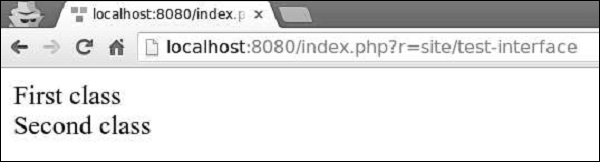
这种方法很方便,因为我们可以在一个地方设置类,其他代码将自动使用新类。
Yii - 数据库访问
Yii DAO(数据库访问对象)提供了用于访问数据库的 API。它也是其他数据库访问方法的基础:活动记录和查询生成器。
Yii DAO 支持以下数据库 −
- MySQL
- MSSQL
- SQLite
- MariaDB
- PostgreSQL
- ORACLE
- CUBRID
创建数据库连接
步骤 1 − 要创建数据库连接,您需要创建 yii\db\Connection 类的实例。
$mydb = new yii\db\Connection([
   'dsn' => 'mysql:host=localhost;dbname=mydb',
   'username' => 'username',
   'password' => 'password',
   'charset' => 'utf8',
]);
一种常见的做法是在应用程序组件内部配置 DB 连接。例如,在基本应用程序模板中,DB 连接配置位于 config/db.php 文件中,如以下代码所示。
<?php
   return [
      'class' => 'yii\db\Connection',
      'dsn' => 'mysql:host = localhost;dbname = helloworld',
      'username' => 'vladimir',
      'password' => '123574896',
      'charset' => 'utf8',
   ];
?>
步骤 2 − 要访问 DB 连接,您可以使用此表达式。
Yii::$app->db
要配置 DB 连接,您应该通过 dsn 属性指定其 DSN(数据源名称)。不同数据库的 DSN 格式不同 −
MySQL、MariaDB − mysql:host = localhost;dbname = mydb
PostgreSQL − pgsql:host = localhost;port = 5432;dbname = mydb
SQLite − sqlite:/path/to/db/file
MS SQL Server(通过 sqlsrv 驱动程序) − sqlsrv:Server = localhost;Database = mydb
MS SQL Server(通过 mssql 驱动程序) − mssql:host = localhost;dbname = mydb
MS SQL Server(通过 dblib 驱动程序) − dblib:host = localhost;dbname = mydb
CUBRID − cubrid:dbname = mydb;host = localhost;port = 33000
Oracle − oci:dbname = //localhost:1521/mydb
要展示数据库查询的实际操作,我们需要数据。
准备数据库
步骤 1 − 创建一个新数据库。可以通过以下两种方式准备数据库。
在终端中运行 mysql -u root –p。
通过 CREATE DATABASE helloworld CHARACTER SET utf8 COLLATE utf8_general_ci;
创建一个新数据库
步骤 2 − 在 config/db.php 文件中配置数据库连接。以下配置适用于当前使用的系统。
<?php
   return [
      'class' => 'yii\db\Connection',
      'dsn' => 'mysql:host = localhost;dbname = helloworld',
      'username' => 'vladimir',
      'password' => '12345',
      'charset' => 'utf8',
   ];
?>
步骤 3 − 在根文件夹中运行 ./yii migration/create test_table。此命令将创建一个数据库迁移来管理我们的数据库。迁移文件应出现在项目根目录的 migrations 文件夹中。
步骤 4 − 以这种方式修改迁移文件(在本例中为 m160106_163154_test_table.php)。
<?php
   use yii\db\Schema;
   use yii\db\Migration;
   class m160106_163154_test_table extends Migration {
      public function safeUp() {
         $this->createTable("user", [
            "id" => Schema::TYPE_PK,
            "name" => Schema::TYPE_STRING,
            "email" => Schema::TYPE_STRING,
         ]);
         $this->batchInsert("user", ["name", "email"], [
            ["User1", "user1@gmail.com"],
            ["User2", "user2@gmail.com"],
            ["User3", "user3@gmail.com"],
            ["User4", "user4@gmail.com"],
            ["User5", "user5@gmail.com"],
            ["User6", "user6@gmail.com"],
            ["User7", "user7@gmail.com"],
            ["User8", "user8@gmail.com"],
            ["User9", "user9@gmail.com"],
            ["User10", "user10@gmail.com"],
            ["User11", "user11@gmail.com"],
         ]);
      }
      public function safeDown() {
         $this->dropTable('user');
      }
   }
?>
上述迁移创建了一个 user 表,其中包含以下字段:id、name 和 email。它还添加了一些演示用户。
步骤 5 − 在项目根目录下 运行 ./yii migration 以将迁移应用于数据库。
步骤 6 − 现在,我们需要为我们的 user 表创建一个模型。为简单起见,我们将使用 Gii 代码生成工具。打开此 url:http://localhost:8080/index.php?r=gii。然后,单击"模型生成器"标题下的"开始"按钮。填写表名("user")和模型类("MyUser"),单击"预览"按钮,最后单击"生成"按钮。
MyUser 模型应出现在模型目录中。
Yii - 数据访问对象
要执行 SQL 查询,您应该遵循以下步骤 −
- 使用 SQL 查询创建 yii\db\Command。
- 绑定参数(非必需)
- 执行命令。
步骤 1 − 在 SiteController 中创建一个名为 actionTestDb 的函数。
public function actionTestDb(){
    // 返回一组行。每行都是列名和值的关联数组。
    // 如果查询没有返回结果,则返回一个空数组
    $users = Yii::$app->db->createCommand('SELECT * FROM user LIMIT 5')
    ->queryAll();
    var_dump($users);
    // 返回一行(第一行)
    // 如果查询没有结果,则返回 false
    $user = Yii::$app->db->createCommand('SELECT * FROM user WHERE id=1')
    ->queryOne();
    var_dump($user);
    // 返回一列(第一列)
    // 如果查询没有返回结果,则返回一个空数组
    $userName = Yii::$app->db->createCommand('SELECT name FROM user')
    ->queryColumn();
    var_dump($userName);
    // 返回标量值
    // 如果查询没有结果,则返回 false
   $count = Yii::$app->db->createCommand('SELECT COUNT(*) FROM user')
      ->queryScalar();
   var_dump($count);
}
以上示例展示了从数据库获取数据的各种方法。
步骤 2 − 转到地址 http://localhost:8080/index.php?r=site/test-db,您将看到以下输出。
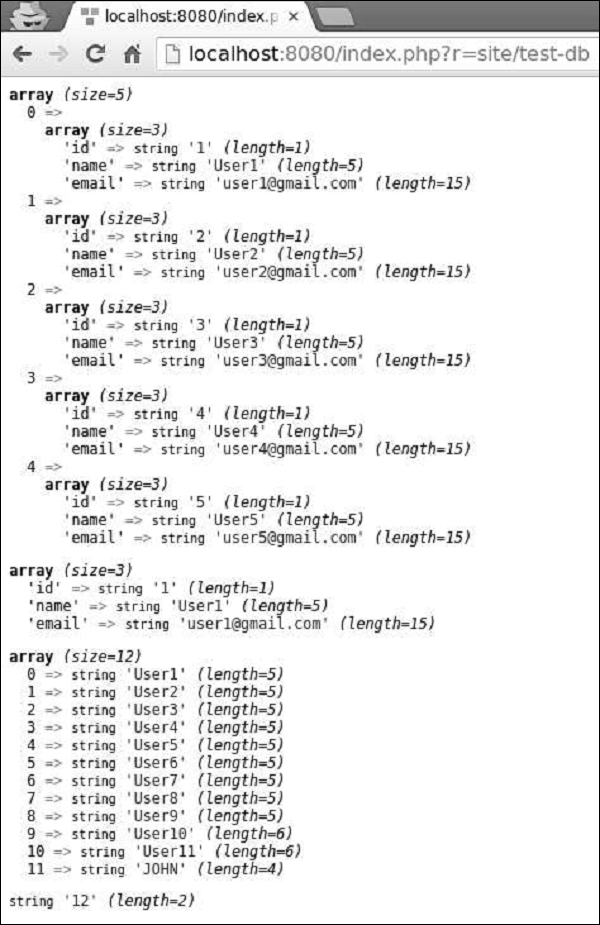
创建 SQL 命令
要创建带参数的 SQL 命令,您应该始终使用绑定参数的方法来防止 SQL 注入。
步骤 1 − 以这种方式修改 actionTestDb 方法。
public function actionTestDb() {
   $firstUser = Yii::$app->db->createCommand('SELECT * FROM user WHERE id = :id')
      ->bindValue(':id', 1)
      ->queryOne();
   var_dump($firstUser);
   $params = [':id' => 2, ':name' => 'User2'];
   $secondUser = Yii::$app->db->createCommand('SELECT * FROM user WHERE
      id = :id AND name = :name')
      ->bindValues($params)
      ->queryOne();
   var_dump($secondUser);
      //another approach
   $params = [':id' => 3, ':name' => 'User3'];
   $thirdUser = Yii::$app->db->createCommand('SELECT * FROM user WHERE
      id = :id AND name = :name', $params)
      ->queryOne();
   var_dump($thirdUser);
}
在上面的代码中 −
bindValue() − 绑定单个参数值。
bindValues() − 绑定多个参数值。
步骤 2 −如果您访问地址 http://localhost:8080/index.php?r=site/test-db,您将看到以下输出。
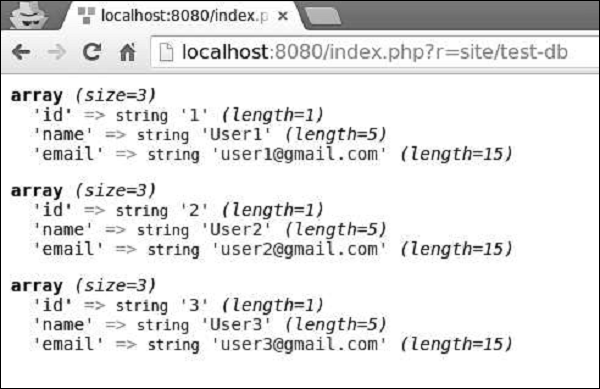
INSERT、UPDATE 和 DELETE 查询
对于 INSERT、UPDATE 和 DELETE 查询,您可以调用 insert()、update() 和 delete() 方法。
步骤 1 − 以这种方式修改 actionTestDb 方法。
public function actionTestDb() {
   public function actionTestDb(){
      // INSERT (table name, column values)
      Yii::$app->db->createCommand()->insert('user', [
         'name' => 'My New User',
         'email' => 'mynewuser@gmail.com',
      ])->execute();
      $user = Yii::$app->db->createCommand('SELECT * FROM user WHERE name = :name')
         ->bindValue(':name', 'My New User')
         ->queryOne();
      var_dump($user);
      // UPDATE (table name, column values, condition)
      Yii::$app->db->createCommand()->update('user', ['name' => 'My New User
         Updated'], 'name = "My New User"')->execute();
      $user = Yii::$app->db->createCommand('SELECT * FROM user WHERE name = :name')
         ->bindValue(':name', 'My New User Updated')
         ->queryOne();
      var_dump($user);
      // DELETE (table name, condition)
      Yii::$app->db->createCommand()->delete('user', 'name = "My New User
         Updated"')->execute();
      $user = Yii::$app->db->createCommand('SELECT * FROM user WHERE name = :name')
         ->bindValue(':name', 'My New User Updated')
         ->queryOne();
      var_dump($user);
   }
}
步骤 2 − 在 Web 浏览器的地址栏中输入 URL http://localhost:8080/index.php?r=site/test-db,您将看到以下输出。
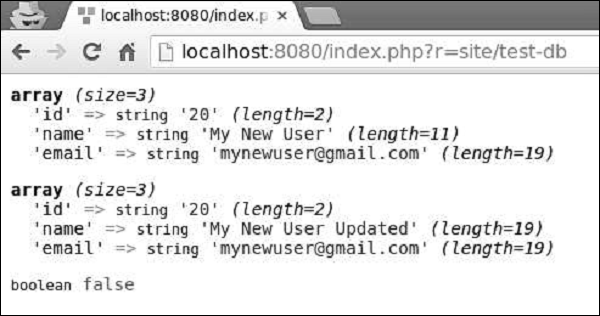
Yii - 查询生成器
查询生成器允许您以编程方式创建 SQL 查询。查询生成器可帮助您编写更易读的 SQL 相关代码。
要使用查询生成器,您应该遵循以下步骤 −
- 构建 yii\db\Query 对象。
- 执行查询方法。
要构建 yii\db\Query 对象,您应该调用不同的查询生成器函数来定义 SQL 查询的不同部分。
步骤 1 −要显示查询生成器的典型用法,请按如下方式修改 actionTestDb 方法。
public function actionTestDb() {
	//generates "SELECT id, name, email FROM user WHERE name = 'User10';"
   $user = (new \yii\db\Query())
      ->select(['id', 'name', 'email'])
      ->from('user')
      ->where(['name' => 'User10'])
      ->one();
   var_dump($user);
}
步骤 2 − 转到 http://localhost:8080/index.php?r=site/test-db,您将看到以下输出。
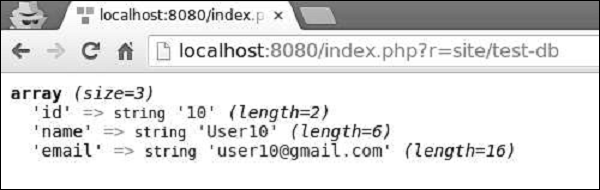
Where() 函数
where() 函数定义查询的 WHERE 片段。要指定 WHERE 条件,您可以使用三种格式。
字符串格式 − 'name = User10'
哈希格式 − ['name' => 'User10', 'email => user10@gmail.com']
运算符格式 − ['like', 'name', 'User']
字符串格式示例
public function actionTestDb() {
   $user = (new \yii\db\Query())
      ->select(['id', 'name', 'email'])
      ->from('user')
      ->where('name = :name', [':name' => 'User11'])
      ->one();
   var_dump($user);
}
以下是输出。
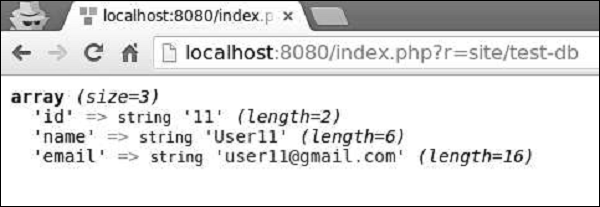
哈希格式示例
public function actionTestDb() {
   $user = (new \yii\db\Query())
      ->select(['id', 'name', 'email'])
      ->from('user')
      ->where([
         'name' => 'User5',
         'email' => 'user5@gmail.com'
      ])
      ->one();
   var_dump($user);
}
以下是输出。
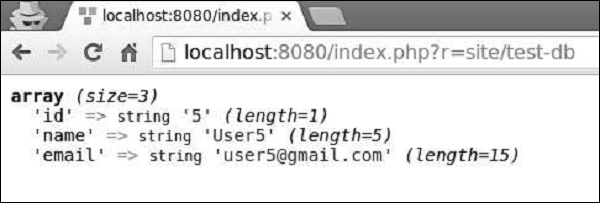
运算符格式允许您以以下格式定义任意条件 −
[operator, operand1, operand2]
运算符可以是 −
and − ['and', 'id = 1', 'id = 2'] 将生成 id = 1 AND id = 2 或:类似于 and 运算符
between − ['between', 'id', 1, 15] 将生成 id BETWEEN 1 AND 15
not between − 类似于 between 运算符,但 BETWEEN 被替换为 NOT BETWEEN
in − ['in', 'id', [5,10,15]] 将生成 id IN (5,10,15)
not in − 类似于 in 运算符,但 IN 被替换为 NOT IN
like − ['like', 'name', 'user'] 将生成 name LIKE '%user%'
or like −类似于 like 运算符,但使用 OR 来拆分 LIKE 谓词
not like − 类似于 like 运算符,但 LIKE 被替换为 NOT LIKE
or not like − 类似于 not like 运算符,但使用 OR 来连接 NOT LIKE 谓词
exists − 需要一个操作数,该操作数必须是 yii\db\Query 类的实例
not exist −类似于exists运算符,但构建NOT EXISTS(子查询)表达式
<, <=, >, >=,或任何其他DB运算符:['<', 'id', 10]将生成id<10
运算符格式示例
public function actionTestDb() {
   $users = (new \yii\db\Query())
      ->select(['id', 'name', 'email'])
      ->from('user')
      ->where(['between', 'id', 5, 7])
      ->all();
   var_dump($users);
}
以下是输出。
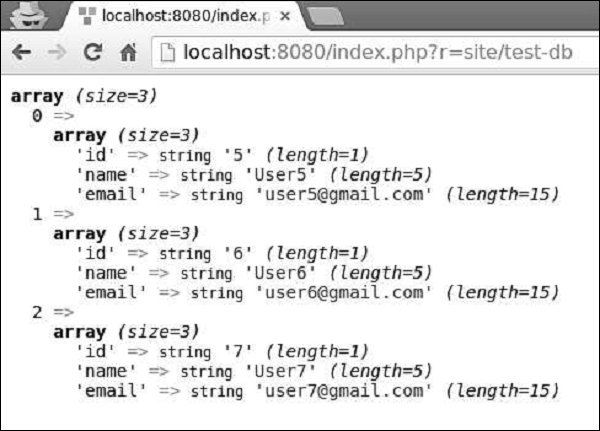
OrderBy() 函数
orderBy() 函数定义 ORDER BY 片段。
示例 −
public function actionTestDb() {
   $users = (new \yii\db\Query())
      ->select(['id', 'name', 'email'])
      ->from('user')
      ->orderBy('name DESC')
      ->all();
   var_dump($users);
}
以下是输出。
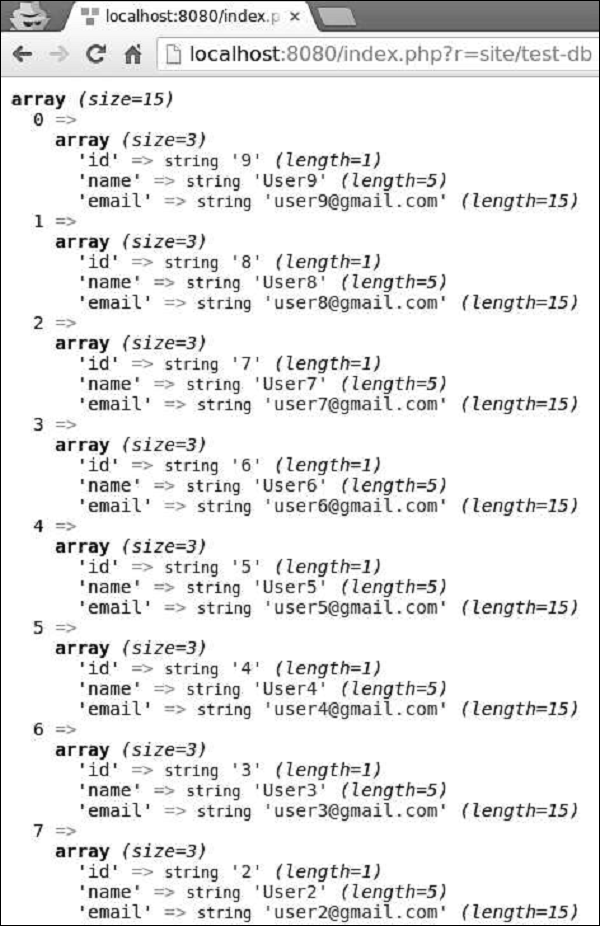
groupBy() 函数
groupBy() 函数定义 GROUP BY 片段,而 having() 方法指定 HAVING 片段。
示例 −
public function actionTestDb() {
   $users = (new \yii\db\Query())
      ->select(['id', 'name', 'email'])
      ->from('user')
      ->groupBy('name')
      ->having('id < 5')
      ->all();
   var_dump($users);
}
以下是输出。
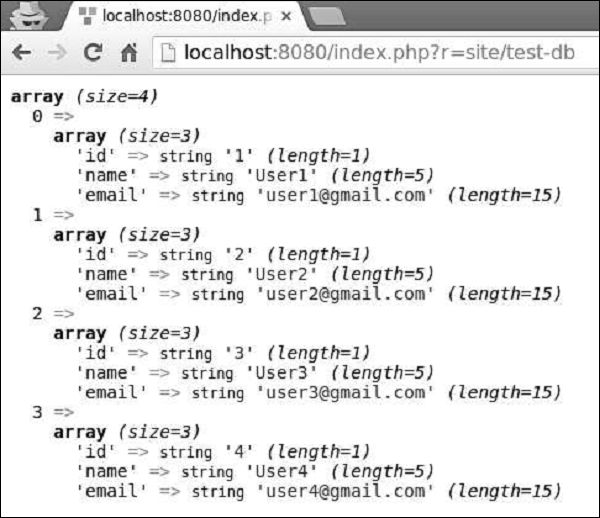
limit() 和 offset() 方法定义了 LIMIT 和 OFFSET 片段。
示例 −
public function actionTestDb() {
   $users = (new \yii\db\Query())
      ->select(['id', 'name', 'email'])
      ->from('user')
      ->limit(5)
      ->offset(5)
      ->all();
   var_dump($users);
}
您可以看到以下输出 −
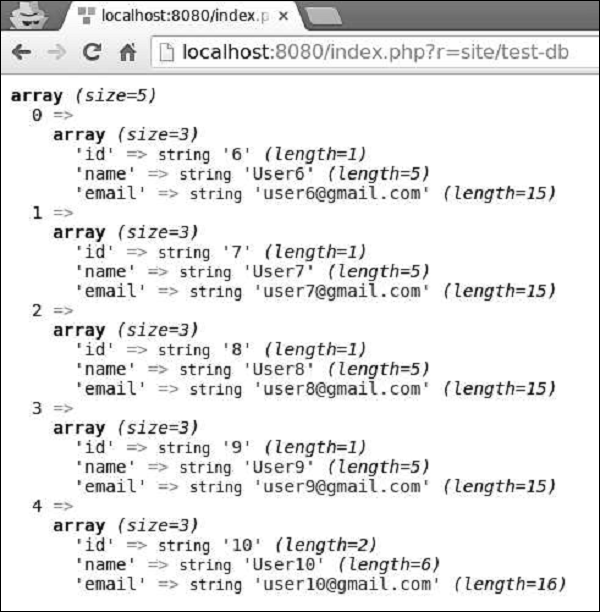
yii\db\Query 类提供了一组用于不同目的的方法 −
all() − 返回名称-值对行的数组。
one() − 返回第一行。
column() − 返回第一列。
scalar() − 从结果的第一行和第一列返回一个标量值。
exists() −返回一个值,指示查询是否包含任何结果
count() 返回 COUNT 查询的结果
其他聚合查询方法 − 包括 sum($q)、average($q)、max($q)、min($q)。$q 参数可以是列名或 DB 表达式。
Yii - Active Record
Active Record 提供了用于访问数据的面向对象 API。一个 Active Record 类与一个数据库表相关联。
Yii 为以下关系数据库提供 Active Record 支持 −
- MySQL 4.1 或更高版本
- SQLite 2 和 3:
- PostgreSQL 7.3 或更高版本
- Microsoft SQL Server 2008 或更高版本
- CUBRID 9.3 或更高版本
- Oracle
- ElasticSearch
- Sphinx
此外,Active Record 类还支持以下 NoSQL 数据库 −
- Redis 2.6.12 或更高版本
- MongoDB 1.3.0 或更高版本
声明 Active Record 后class(本例中为 MyUser 模型)作为单独的数据库表,则应按照以下步骤从中查询数据 −
- 使用 yii\db\ActiveRecord::find() 方法创建一个新的查询对象。
- 构建查询对象。
- 调用查询方法来检索数据。
步骤 1 − 以这种方式修改 actionTestDb() 方法。
public function actionTestDb() {
    // 返回 ID 为 1 的单个用户
    // SELECT * FROM `user` WHERE `id` = 1
   $user = MyUser::find()
      ->where(['id' => 1])
      ->one();
   var_dump($user);
   // return the number of users
   // SELECT COUNT(*) FROM `user`
   $users = MyUser::find()
      ->count();
   var_dump($users);
   // return all users and order them by their IDs
   // SELECT * FROM `user` ORDER BY `id`
   $users = MyUser::find()
      ->orderBy('id')
      ->all();
   var_dump($users);
}
上面给出的代码展示了如何使用 ActiveQuery 查询数据。
步骤 2 − 转到 http://localhost:8080/index.php?r=site/test-db,您将看到以下输出。
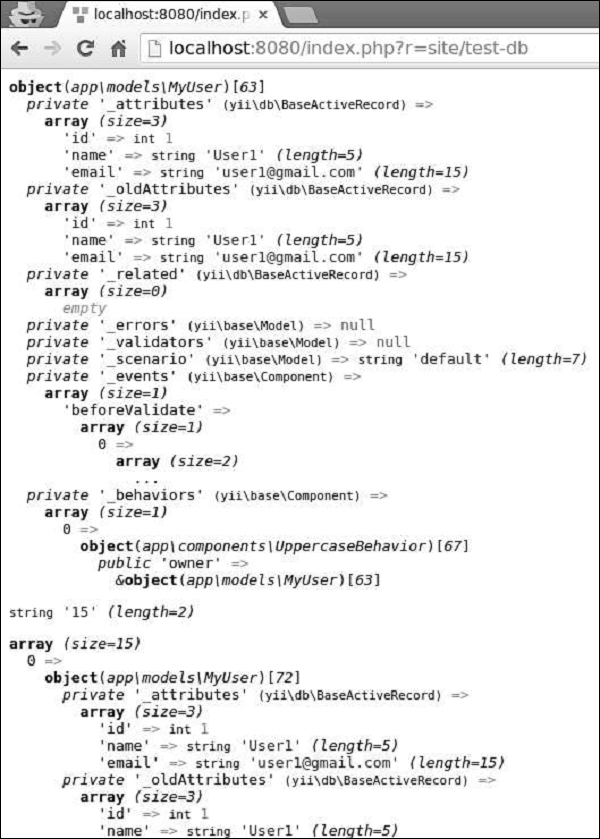
通过主键值或一组列值进行查询是一项常见任务,这就是 Yii 提供以下方法的原因 −
yii\db\ActiveRecord::findOne() − 返回单个 Active Record 实例
yi\db\ActiveRecord::findAll() − 返回 Active Record 实例数组
Example −
public function actionTestDb() {
    // 返回 ID 为 1 的单个客户
    // SELECT * FROM `user` WHERE `id` = 1
    $user = MyUser::findOne(1);
    var_dump($user);
    // 返回 ID 为 1、2、3 或 4 的客户
    // SELECT * FROM `user` WHERE `id` IN (1,2,3,4)
    $users = MyUser::findAll([1, 2, 3, 4]);
    var_dump($users);
    // 返回 ID 为 5 的用户
    // SELECT * FROM `user` WHERE `id` = 5
    $user = MyUser::findOne([
    'id' => 5
    ]);
    var_dump($user);
}
将数据保存到数据库
要将数据保存到数据库,您应该调用 yii\db\ActiveRecord::save() 方法。
步骤 1 − 以这种方式修改 actionTestDb() 方法。
public function actionTestDb() {
   // 插入一行新数据
   $user = new MyUser();
   $user->name = 'MyCustomUser2';
   $user->email = 'mycustomuser@gmail.com';
   $user->save();
   var_dump($user->attributes);

   // 更新现有行的数据
   $user = MyUser::findOne(['name' => 'MyCustomUser2']);
   $user->email = 'newemail@gmail.com';
   $user->save();
   var_dump($user->attributes);
}
步骤 2 − 转到 http://localhost:8080/index.php?r=site/test-db,您将看到以下输出。
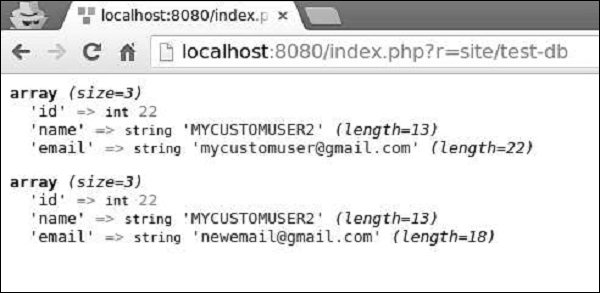
要删除一行数据,您应该 −
检索 Active Record 实例
调用 yii\db\ActiveRecord::delete() 方法
步骤 1 − 以这种方式修改 actionTestDb() 方法。
public function actionTestDb() {
   $user = MyUser::findOne(2);
   if($user->delete()) {
      echo "deleted";
   }
}
步骤 2 − 在 Web 浏览器的地址栏中输入 http://localhost:8080/index.php?r=site/test-db,您将看到以下输出。
步骤 3 − 您还可以调用 yii\db\ActiveRecord::deleteAll() 方法来删除多行数据。
public function actionTestDb() {
    MyUser::deleteAll('id >= 20');
}
Yii - 数据库迁移
在开发数据库驱动的应用程序时,数据库结构会随着源代码而演变。Yii 提供了数据库迁移功能,可让您跟踪数据库更改。
Yii 提供了以下迁移命令行工具 −
- 创建新迁移
- 还原迁移
- 应用迁移
- 重新应用迁移
- 显示迁移状态和历史记录
创建迁移
让我们创建一个新的数据库迁移。
步骤 1 −在基本应用程序模板的项目根目录中打开控制台窗口并运行。
./yii migration/create add_news_table
上述命令将在 migrations 文件夹中创建一个新的迁移文件(本例中为 m160113_102634_add_news_table.php)。
该文件包含以下代码 −
<?php
   use yii\db\Schema;
   use yii\db\Migration;
   class m160113_102634_add_news_table extends Migration {
      public function up() {

      }
      public function down() {
         echo "m160113_102634_add_news_table cannot be reverted.";
         return false;
      }
      /*
      // 使用 safeUp/safeDown 在事务中运行迁移代码
      public function safeUp() {

      }
      public function safeDown() {

      }
      */
   }
?>
每个数据库迁移都是一个扩展 yii\db\Migration 类的 PHP 类。类名以以下格式生成 −
m<YYMMDD_HHMMSS>_<Name>
其中 <YYMMDD_HMMSS> 是执行迁移命令的 UTC 日期时间,<Name> 是您在控制台命令中提供的参数。
升级数据库时会调用 up() 方法,降级数据库时会调用 down() 方法。
步骤 2 − 要向数据库添加新表,请以这种方式修改迁移文件。
<?php
   use yii\db\Schema;
   use yii\db\Migration;
   class m160113_102634_add_news_table extends Migration {
      public function up() {
         $this->createTable("news", [
            "id" => Schema::TYPE_PK,
            "title" => Schema::TYPE_STRING,
            "content" => Schema::TYPE_TEXT,
         ]);
      }
      public function down() {
         $this->dropTable('news');
      }
      /*
      // 使用 safeUp/safeDown 在事务中运行迁移代码
      public function safeUp() {

      }
      public function safeDown() {

      }
      */
   }
?>
在上面的代码中,我们在 up() 方法中创建了一个名为 news 的新表,并在 down() 方法中删除了此表。
news 表包含三个字段:id、title 和 content。创建表或列时,我们应使用抽象类型,以便迁移独立于数据库类型。例如,在 MySQL 的情况下,TYPE_PK 将转换为 int(11) NOT NUL AUTO_INCREMETN PRIMARY KEY。
步骤 3 − 要升级数据库,请运行此命令。
./yii migrate
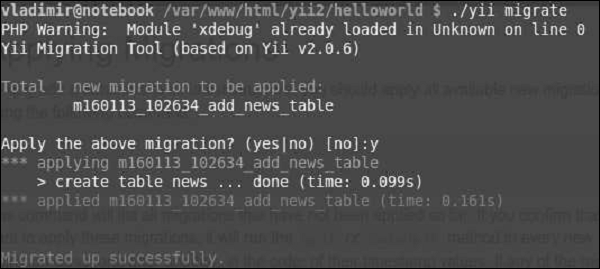
上述命令将列出所有尚未应用的可用迁移。然后,如果您确认应用迁移,它将在所有新的迁移类中运行 safeUp() 或 up()。
步骤 4 − 要仅应用三个可用迁移,您可以运行。
./yii move 3
步骤 5 −您还可以定义数据库应迁移到的特定迁移。
# 使用时间戳指定迁移
yii move/to 160202_195501
# 使用可由 strtotime() 解析的字符串
yii move/to "2016-01-01 19:55:01"
# 使用全名
yii move/to m160202_195501_create_news_table
# 使用 UNIX 时间戳
yii move/to 1393964718
步骤 6 − 要恢复迁移(执行 down() 或 safeDown() 方法),请运行。
./yii move/down
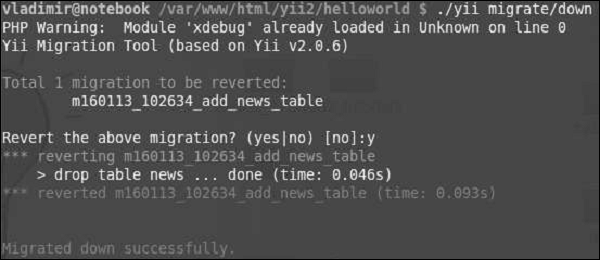
步骤 7 − 要恢复最近应用的五个迁移,您可以运行。
./yii move/down 5
步骤 8 −要重做(恢复然后再次应用)迁移,请运行。
./yii move/redo
要列出已应用的迁移,请使用以下命令 −
yii move/new # 显示前 10 个新迁移
yii move/new 3 # 显示前 3 个新迁移
yii move/new all # 显示所有新迁移迁移
yii move/history # 显示最后 10 次应用的迁移
yii move/history 20 # 显示最后 20 次应用的迁移
yii move/history all # 显示所有应用的迁移
有时您需要从特定表中添加或删除列。您可以使用 addColumn() 和 dropColumn() 方法。
步骤 1 −创建新的迁移。
./yii migration/create add_category_to_news
步骤 2 − 以这种方式修改新创建的迁移文件。
<?php
   use yii\db\Schema;
   use yii\db\Migration;
   class m160113_110909_add_category_to_news extends Migration {
      public function up() {
         $this->addColumn('news', 'category', $this->integer());
      }
      public function down() {
         $this->dropColumn('news', 'category');
      }
   }
?>
现在,如果您运行 ./yii move,则类别列应添加到新闻表中。相反,如果您运行 ./yii move/down 1,则类别列应被删除。
执行数据库迁移时,确保每次迁移成功或失败非常重要。建议将数据库操作包含在事务中。要实现事务迁移,您应该将迁移代码放在 safeUp() 和 safeDown() 方法中。如果这些方法中的任何操作失败,所有先前的操作都将回滚。
前面的"事务方式"示例将是 −
<?php
   use yii\db\Schema;
   use yii\db\Migration;
   class m160113_110909_add_category_to_news extends Migration {
      public function safeUp() {
         $this->addColumn('news', 'category', $this->integer());
      }
      public function safeDown() {
         $this->dropColumn('news', 'category');
      }
   }
?>
yii\db\Migration 类提供了以下方法来操作数据库 −
execute() − 执行原始 SQL 语句
createTable() − 创建表
renameTable() − 重命名表
insert() − 插入单行
batchInsert() − 插入多行
update() − 更新行
delete() −删除行
addColumn() − 添加一列
renameColumn() − 重命名一列
dropColumn() − 删除一列
alterColumn() − 更改一列
dropTable() − 删除表
truncateTable() − 删除表中的所有行
createIndex() − 创建索引
dropIndex() −删除索引
addPrimaryKey() − 添加主键
dropPrimaryKey() − 删除主键
addForeignKey() − 添加外键
dropForeignKey() − 删除外键
Yii - 主题
主题可以帮助您将一组视图替换为另一组视图,而无需修改原始视图文件。您应该设置视图应用程序组件的 theme 属性以使用主题。
您还应该定义以下属性 −
yii\base\Theme::$basePath − 定义 CSS、JS、图像等的基本目录。
yii\base\Theme::$baseUrl − 定义主题资源的基本 URL。
yii\base\Theme::$pathMap −定义替换规则。
例如,如果您在 UserController 中调用 $this->render('create'),则将呈现 @app/views/user/create.php 视图文件。但是,如果您像以下应用程序配置中一样启用主题,则将呈现视图文件 @app/themes/basic/user/create.php。
步骤 1 − 以这种方式修改 config/web.php 文件。
<?php
   $params = require(__DIR__ . '/params.php');
   $config = [
      'id' => 'basic',
      'basePath' => dirname(__DIR__),
      'bootstrap' => ['log'],
      'components' => [
         'request' => [
            // !!! insert a secret key in the following (if it is empty) - this
               //is required by cookie validation
            'cookieValidationKey' => 'ymoaYrebZHa8gURuolioHGlK8fLXCKjO',
         ],
         'cache' => [
            'class' => 'yii\caching\FileCache',
         ],
         'user' => [
            'identityClass' => 'app\models\User',
            'enableAutoLogin' => true,
         ],
         'errorHandler' => [
            'errorAction' => 'site/error',
         ],
         'mailer' => [
            'class' => 'yii\swiftmailer\Mailer',
            // 默认将所有邮件发送到一个文件。您必须设置
            // 'useFileTransport' 为 false 并配置传输
            // 以便邮件程序发送真实的电子邮件。
            'useFileTransport' => true,
         ],
         'log' => [
            'traceLevel' => YII_DEBUG ? 3 : 0,
            'targets' => [
               [
                  'class' => 'yii\log\FileTarget',
                  'levels' => ['error', 'warning'],
               ],
            ],
         ],
         'view' => [
            'theme' => [
               'basePath' => '@app/themes/basic',
               'baseUrl' => '@web/themes/basic',
               'pathMap' => [
                  '@app/views' => '@app/themes/basic',
               ],
            ],
         ],
         'db' => require(__DIR__ . '/db.php'),
      ],
      'modules' => [
         'hello' => [
            'class' => 'app\modules\hello\Hello',
         ],
      ],
      'params' => $params,
   ];
   if (YII_ENV_DEV) {
      // 针对"dev"环境的配置调整
      $config['bootstrap'][] = 'debug';
      $config['modules']['debug'] = [
         'class' => 'yii\debug\Module',
      ];
      $config['bootstrap'][] = 'gii';
      $config['modules']['gii'] = [
         'class' => 'yii\gii\Module',
      ];
   }
   return $config;
?>
我们已添加视图应用程序组件。
步骤 2 − 现在创建 web/themes/basic 目录结构和 themes/basic/site。在 themes/basic/site 文件夹中创建一个名为 about.php 的文件,其中包含以下代码。
<?php
/* @var $this yii\web\View */
use yii\helpers\Html;
$this->title = 'About';
$this->params['breadcrumbs'][] = $this->title;
$this->registerMetaTag(['name' => 'keywords', 'content' => 'yii, developing,
views, meta, tags']);
$this->registerMetaTag(['name' => 'description', 'content' => 'This is the
description of this page!'], 'description');
?>
<div class = "site-about">
<h1><?= Html::encode($this->title) ?></h1>
<p style = "color: red;">
This is the About page. You may modify the following file to customize its content:
</p>
</div>
步骤 3 − 现在,转到 http://localhost:8080/index.php?r=site/about,将呈现 themes/basic/site/about.php 文件,而不是 views/site/about.php。
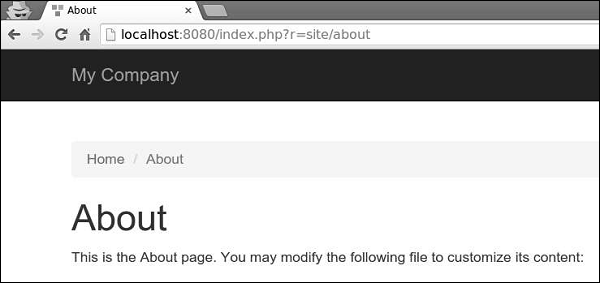
步骤 4 − 要主题模块,请按此方式配置 yii\base\Theme::$pathMap 属性。
'pathMap' => [ '@app/views' => '@app/themes/basic', '@app/modules' => '@app/themes/basic/modules', ],
步骤 5 − 要主题化小部件,请按此方式配置 yii\base\Theme::$pathMap 属性。
'pathMap' => [ '@app/views' => '@app/themes/basic', '@app/widgets' => '@app/themes/basic/widgets', // <-- !!! ],
有时您需要指定一个包含应用程序基本外观的基本主题。要实现此目标,您可以使用主题继承。
步骤 6 − 以这种方式修改视图应用程序组件。
'view' => [
'theme' => [
'basePath' => '@app/themes/basic',
'baseUrl' => '@web/themes/basic',
'pathMap' => [
'@app/views' => [
'@app/themes/christmas',
'@app/themes/basic',
],
]
],
],
在上述配置中,@app/views/site/index.php 视图文件将被主题化为 @app/themes/christmas/site/index.php 或 @app/themes/basic/site/index.php,具体取决于哪个文件存在。如果两个文件都存在,则将使用第一个文件。
步骤 7 − 创建 themes/christmas/site 目录结构。
步骤 8 − 现在,在 themes/christmas/site 文件夹中,使用以下代码创建一个名为 about.php 的文件。
<?php
/* @var $this yii\web\View */
use yii\helpers\Html;
$this->title = 'About';
$this->params['breadcrumbs'][] = $this->title;
$this->registerMetaTag(['name' => 'keywords', 'content' => 'yii, developing,
views, meta, tags']);
$this->registerMetaTag(['name' => 'description', 'content' => 'This is the
description of this page!'], 'description');
?>
<div class = "site-about">
<h2>Christmas theme</h2>
<img src = "http://pngimg.com/upload/fir_tree_PNG2514.png" alt = ""/>
<p style = "color: red;">
This is the About page. You may modify the following file to customize its content:
</p>
</div>
步骤 9 − 如果您访问 http://localhost:8080/index.php?r=site/about,您将看到使用圣诞主题更新的关于页面。
Yii - RESTful API
Yii 提供以下有用的功能来实现 RESTful API −
- 快速原型设计
- 可自定义的对象序列化
- 响应格式(默认支持 JSON 和 XML)
- 集合数据和验证错误的格式化
- 高效路由
- 支持 HATEOAS
- 内置对 OPTIONS 和 HEAD 动词的支持
- 数据缓存和 HTTP 缓存
- 身份验证和授权
- 速率限制
要展示 RESTful API 的实际效果,我们需要数据。
准备数据库
步骤 1 −创建新数据库。数据库可以通过以下两种方式准备。
在终端中运行mysql -u root –p。
通过CREATE DATABASE helloworld CHARACTER SET utf8 COLLATE utf8_general_ci;创建新数据库
步骤 2 − 在 config/db.php 文件中配置数据库连接。以下配置适用于当前使用的系统。
<?php
return [
'class' => 'yii\db\Connection',
'dsn' => 'mysql:host = localhost;dbname = helloworld',
'username' => 'vladimir',
'password' => '12345',
'charset' => 'utf8',
];
?>
步骤 3 − 在根文件夹中运行 ./yii migration/create test_table。此命令将创建一个数据库迁移来管理我们的数据库。迁移文件应出现在项目根目录的 migrations 文件夹中。
步骤 4 − 以这种方式修改迁移文件(在本例中为 m160106_163154_test_table.php)。
<?php
use yii\db\Schema;
use yii\db\Migration;
class m160106_163154_test_table extends Migration {
public function safeUp() {
$this->createTable("user", [
"id" => Schema::TYPE_PK,
"name" => Schema::TYPE_STRING,
"email" => Schema::TYPE_STRING,
]);
$this->batchInsert("user", ["name", "email"], [
["User1", "user1@gmail.com"],
["User2", "user2@gmail.com"],
["User3", "user3@gmail.com"],
["User4", "user4@gmail.com"],
["User5", "user5@gmail.com"],
["User6", "user6@gmail.com"],
["User7", "user7@gmail.com"],
["User8", "user8@gmail.com"],
["User9", "user9@gmail.com"],
["User10", "user10@gmail.com"],
["User11", "user11@gmail.com"],
]);
}
public function safeDown() {
$this->dropTable('user');
}
}
?>
上述迁移创建了一个 user 表,其中包含以下字段:id、name 和 email。它还添加了一些演示用户。
步骤 5 − 在项目根目录下 运行 ./yii migration 以将迁移应用于数据库。
步骤 6 − 现在,我们需要为我们的 user 表创建一个模型。为简单起见,我们将使用 Gii 代码生成工具。打开此 url:http://localhost:8080/index.php?r=gii。然后,单击"模型生成器"标题下的"开始"按钮。填写表名("user")和模型类("MyUser"),点击"预览"按钮,最后点击"生成"按钮。
MyUser 模型应该出现在模型目录中。
安装 Postman
Postman 是开发 RESTful 服务时的一个方便的工具。它提供了一个用于构建请求的有用界面。
您可以在 https://chrome.google.com/webstore/detail/postman/fhbjgbiflinjbdggehcddcbncdddomop?hl=en 找到此工具。
要安装它,请按"添加到 Chrome"按钮。
Yii - RESTful API 实际应用
控制器类从 yii est\ActiveController 类扩展而来,该类实现了常见的 RESTful 操作。我们指定 $modelClass 属性,以便控制器知道使用哪个模型来操作数据。
步骤 1 − 在 controllers 文件夹中创建一个名为 UserController.php 的文件。
<?php
namespace app\controllers;
use yii
est\ActiveController;
class UserController extends ActiveController {
public $modelClass = 'app\models\MyUser';
}
?>
接下来,我们需要设置 urlManager 组件,以便可以使用有意义的 HTTP 动词和漂亮的 URL 访问和操作用户数据。为了让 API 访问 JSON 中的数据,我们应该配置 request 应用程序组件的 parsers 属性。
步骤 2 − 以这种方式修改 config/web.php 文件 −
<?php
$params = require(__DIR__ . '/params.php');
$config = [
'id' => 'basic',
'basePath' => dirname(__DIR__),
'bootstrap' => ['log'],
'components' => [
'request' => [
// !!! insert a secret key in the following (if it is empty) - this is
//cookie 验证所需
'cookieValidationKey' => 'ymoaYrebZHa8gURuolioHGlK8fLXCKjO',
],
'cache' => [
'class' => 'yii\caching\FileCache',
],
'user' => [
'identityClass' => 'app\models\User',
'enableAutoLogin' => true,
],
'errorHandler' => [
'errorAction' => 'site/error',
],
'mailer' => [
'class' => 'yii\swiftmailer\Mailer',
// 默认将所有邮件发送到一个文件。您必须设置
// 'useFileTransport' 为 false 并配置传输
// 以便邮件程序发送真实的电子邮件。
'useFileTransport' => true,
],
'log' => [
'traceLevel' => YII_DEBUG ? 3 : 0,
'targets' => [
[
'class' => 'yii\log\FileTarget',
'levels' => ['error', 'warning'],
],
],
],
'urlManager' => [
'enablePrettyUrl' => true,
'enableStrictParsing' => true,
'showScriptName' => false,
'rules' => [
['class' => 'yii
est\UrlRule', 'controller' => 'user'],
],
],
'request' => [
'parsers' => [
'application/json' => 'yii\web\JsonParser',
]
],
'db' => require(__DIR__ . '/db.php'),
],
'modules' => [
'hello' => [
'class' => 'app\modules\hello\Hello',
],
],
'params' => $params,
];
if (YII_ENV_DEV) {
// 针对"dev"环境的配置调整
$config['bootstrap'][] = 'debug';
$config['modules']['debug'] = [
'class' => 'yii\debug\Module',
];
$config['bootstrap'][] = 'gii';
$config['modules']['gii'] = [
'class' => 'yii\gii\Module',
];
}
return $config;
?>
只需付出最少的努力,我们就构建了一个用于访问用户数据的 RESTful API。这些 API 包括 −
GET /users − 逐页列出所有用户
HEAD /users − 显示用户列表的概览信息
POST /users − 创建新用户
GET /users/20 − 返回用户 20 的详细信息
HEAD /users/20 − 显示用户 20 的概览信息
PATCH /users/ 20 和 PUT /users/20 −更新用户 20
DELETE /users/20 − 删除用户 20
OPTIONS /users − 显示有关端点 /users 支持的动词
OPTIONS /users/20 − 显示有关端点 /users/ 20 支持的动词
请注意,Yii 会自动将控制器名称复数化。
步骤 3 − 现在,打开 Postman,输入 http://localhost:8080/users,然后单击"发送"。您将看到以下内容。
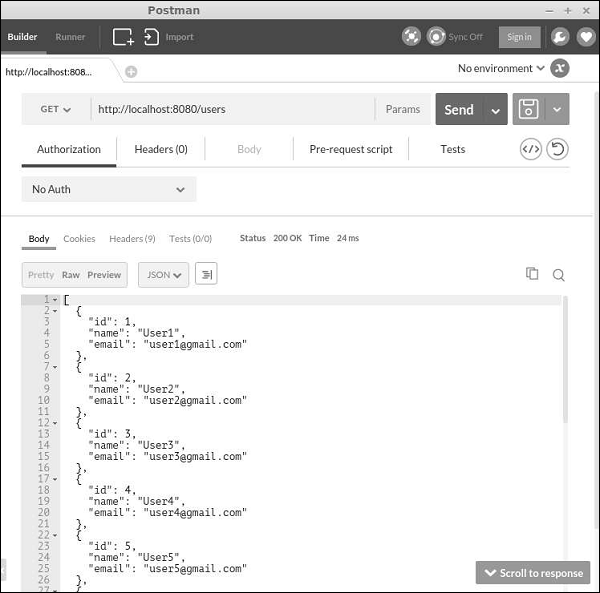
步骤 4 − 要创建新用户,请将请求类型更改为 POST,添加两个正文参数:name 和 email,然后单击"发送"。
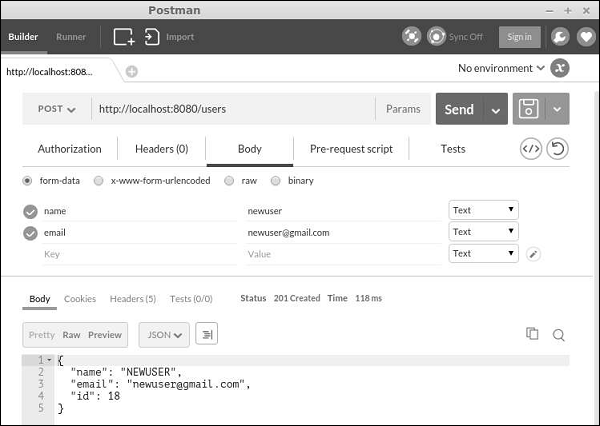
步骤 5 − 您可以使用 fields 参数指定结果中应包含哪些字段。例如,URL http://localhost:8080/users?fields=id, name 将仅返回 id 和 name 字段,如以下屏幕截图所示。
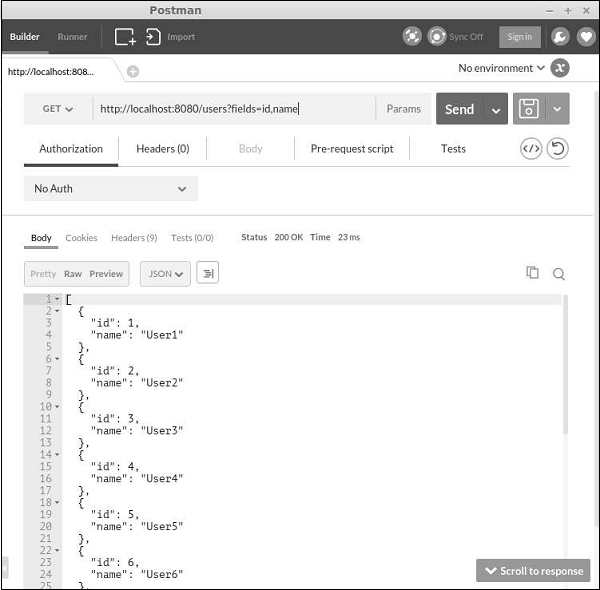
Yii - 字段
通过重写 fields() 和 extraFields() 方法,您可以定义哪些数据可以放入响应中。这两种方法的区别在于,前者定义默认字段集,这些字段应包含在响应中,而后者定义附加字段,如果最终用户通过 expand 查询参数请求这些字段,则这些字段可能包含在响应中。
步骤 1 − 以这种方式修改 MyUser 模型。
<?php
namespace app\models;
use app\components\UppercaseBehavior;
use Yii;
/**
* This is the model class for table "user".
*@property integer $id
* @property string $name
* @property string $email
*/
class MyUser extends \yii\db\ActiveRecord {
public function fields() {
return [
'id',
'name',
//PHP callback
'datetime' => function($model) {
return date("d:m:Y H:i:s");
}
];
}
/**
* @inheritdoc
*/
public static function tableName() {
return 'user';
}
/**
* @inheritdoc
*/
public function rules() {
return [
[['name', 'email'], 'string', 'max' => 255]
];
}
/**
* @inheritdoc
*/
public function attributeLabels() {
return [
'id' => 'ID',
'name' => 'Name',
'email' => 'Email',
];
}
}
?>
除了默认字段:id 和 name,我们还添加了自定义字段 - datetime。
步骤 2 − 在 Postman 中,运行 URL http://localhost:8080/users。
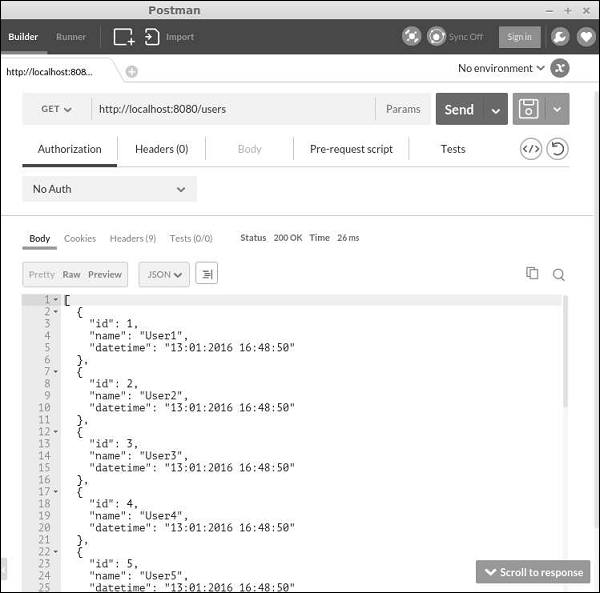
步骤 3 − 现在,以这种方式修改 MyUser 模型。
<?php
namespace app\models;
use app\components\UppercaseBehavior;
use Yii;
/**
* This is the model class for table "user".
*
* @property integer $id
* @property string $name
* @property string $email
*/
class MyUser extends \yii\db\ActiveRecord {
public function fields() {
return [
'id',
'name',
];
}
public function extraFields() {
return ['email'];
}
/**
* @inheritdoc
*/
public static function tableName() {
return 'user';
}
/**
* @inheritdoc
*/
public function rules() {
return [
[['name', 'email'], 'string', 'max' => 255]
];
}
/**
* @inheritdoc
*/
public function attributeLabels() {
return [
'id' => 'ID',
'name' => 'Name',
'email' => 'Email',
];
}
}
?>
请注意,电子邮件字段由 extraFields() 方法返回。
步骤 4 − 要获取此字段的数据,请运行 http://localhost:8080/users?expand=email。
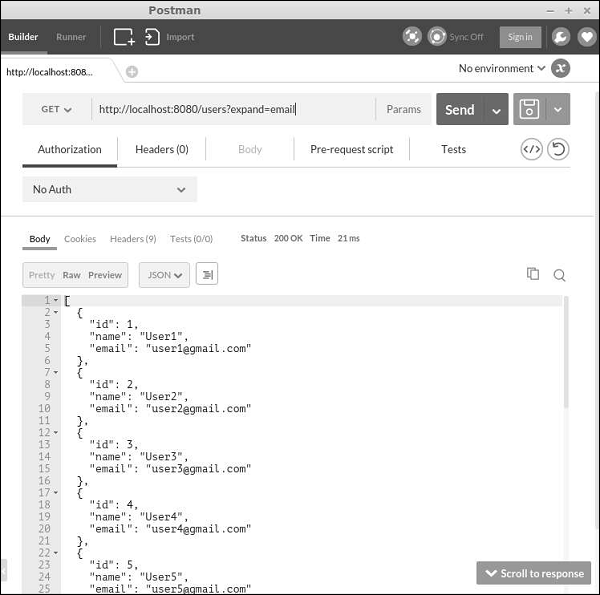
自定义操作
yii est\ActiveController 类提供以下操作 −
Index − 逐页列出资源
View − 返回指定资源的详细信息
Create −创建新资源
Update − 更新现有资源
Delete − 删除指定资源
Options − 返回支持的 HTTP 方法
以上所有操作均在actions方法中声明。
要禁用"删除"和"创建"操作,请按如下方式修改UserController −
<?php
namespace app\controllers;
use yii
est\ActiveController;
class UserController extends ActiveController {
public $modelClass = 'app\models\MyUser';
public function actions() {
$actions = parent::actions();
// disable the "delete" and "create" actions
unset($actions['delete'], $actions['create']);
return $actions;
}
}
?>
处理错误
获取 RESTful API 请求时,如果请求中有错误或者服务器上发生了意外情况,您可以简单地抛出异常。如果您可以确定错误的原因,则应该抛出异常以及正确的 HTTP 状态代码。Yii REST 使用以下状态 −
200 − 正常。
201 − 已成功创建资源以响应 POST 请求。Location 标头包含指向新创建资源的 URL。
204 − 请求已成功处理,响应不包含任何内容。
304 −资源未被修改。
400 − 错误请求。
401 − 身份验证失败。
403 − 经过身份验证的用户无权访问指定的 API 端点。
404 − 资源不存在。
405 − 方法不允许。
415 − 不支持的媒体类型。
422 − 数据验证失败。
429 −请求过多。
500 − 内部服务器错误。
Yii - 测试
当我们编写 PHP 类时,我们会逐步调试它,或者使用 die 或 echo 语句来验证它是如何工作的。如果我们开发一个 Web 应用程序,我们会在表单中输入测试数据,以确保页面按预期工作。这个测试过程可以自动化。
自动测试方法适用于长期项目,即 −
- 复杂且庞大
- 不断增长
- 失败成本太高
如果您的项目并不复杂,而且相对简单,或者只是一次性项目,那么自动化测试可能有点过头了。
准备测试
步骤 1 − 安装 Codeception 框架。运行以下代码。
composer global require "codeception/codeception = 2.0.*" composer global require "codeception/specify = *" composer global require "codeception/verify = *"
步骤 2 − 运行以下命令。
composer global status
输出为"将当前目录更改为 <directory>"。您应将"<directory>/vendor/bin"添加到 PATH 变量中。在本例中,运行以下代码 −
export PATH = $PATH:~/.composer/vendor/bin
步骤 3 −创建一个名为 'yii2_basic_tests' 的新数据库。
步骤 4 − 在 tests 目录中运行。
codeception/bin/yii migration
数据库配置可以在 tests/codeception/config/config.php 中找到。
步骤 5 − 通过以下方式构建测试套件。
codecept build
Fixtures
Fixtures 的主要目的是将环境设置为未知状态,以便您的测试以预期的方式运行。Yii 提供了一个近似的 Fixture 框架。Yii Fixture 框架的一个关键概念是 Fixture 对象。它代表测试环境的一个特定方面。 Fixture 对象是 yii est\Fixture 类的一个实例。
要定义 Fixture,您应该创建一个新类并从 yii est\Fixture 或 yii est\ActiveFixture 扩展它。前者更适合通用 Fixture,而后者专门设计用于与数据库和 ActiveRecord 配合使用。
单元测试
单元测试可帮助您测试单个函数。例如,模型函数或组件类。
步骤 1 − 在 tests/codeception/fixtures 目录下名为 ExampleFixture.php 的文件中创建一个新 Fixture。
<?php
namespace app ests\codeception\fixtures;
use yii est\ActiveFixture;
class ExampleFixture extends ActiveFixture {
public $modelClass = 'app⊨'MyUser';
}
?>
步骤 2 − 然后,在 tests/codeception/unit/models 文件夹中创建一个名为 ExampleTest.php 的新测试文件。
<?php
namespace tests\codeception\unit\models;
use app\models\MyUser;
use yii\codeception\TestCase;
class ExampleTest extends TestCase {
public function testCreateMyUser() {
$m = new MyUser();
$m->name = "myuser";
$m->email = "myser@email.com";
$this->assertTrue($m->save());
}
public function testUpdateMyUser() {
$m = new MyUser();
$m->name = "myuser2";
$m->email = "myser2@email.com";
$this->assertTrue($m->save());
$this->assertEquals("myuser2", $m->name);
}
public function testDeleteMyUser() {
$m = MyUser::findOne(['name' => 'myuser2']);
$this->assertNotNull($m);
MyUser::deleteAll(['name' => $m->name]);
$m = MyUser::findOne(['name' => 'myuser2']);
$this->assertNull($m);
}
}
?>
在上面的代码中,我们定义了三个测试 −
- testCreateMyUser、
- testUpdateMyUser 和
- testDeleteMyUser。
我们刚刚创建了一个新用户,更新了他的姓名,并试图删除他。我们根据 yii2_basic_tests 数据库管理 MyUser 模型,该数据库是我们真实数据库的完整副本。
步骤 3 − 要启动 测试,请移至 tests 文件夹并运行。
codecept run unit models/ExampleTest
它应该通过所有测试。您将看到以下 −
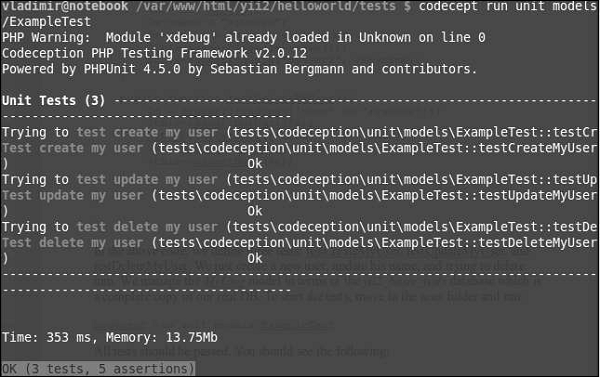
功能测试
功能测试可帮助您 −
- 使用浏览器模拟器测试应用程序
- 验证功能是否正常工作
- 与数据库交互
- 将数据提交到服务器端脚本
在 tests 文件夹中运行 −
generate:cept functional AboutPageCept
上述命令在 tests/codeception/function 文件夹下创建 AboutPageCept.php 文件。在本次功能测试中,我们将检查我们的about页面是否存在。
步骤 1 − 修改 AboutPageCept.php 文件。
<?php
$I = new FunctionalTester($scenario);
$I->wantTo('perform actions and see result');
$I->amOnPage('site/about');
$I->see('about');
$I->dontSee('apple');
?>
在上面给出的代码中,我们检查了我们是否在 about 页面上。显然,我们应该在页面上看到单词 'about' 而不是 'apple'。
步骤 2 − 通过运行测试。
run functional AboutPageCept
您将看到以下输出 −
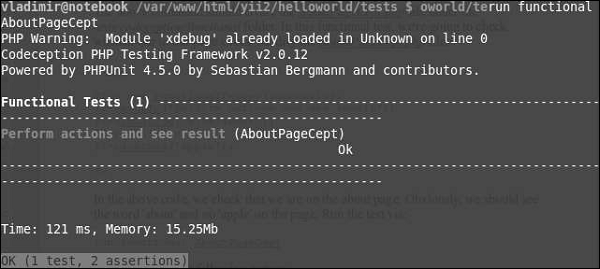
Yii - 缓存
缓存是提高应用程序性能的有效方法。缓存机制将静态数据存储在缓存中,并在请求时从缓存中获取。在服务器端,您可以使用缓存来存储基本数据,例如最新新闻列表。您还可以存储页面片段或整个网页。在客户端,您可以使用 HTTP 缓存将最近访问的页面保存在浏览器缓存中。
准备数据库
步骤 1 − 创建一个新数据库。数据库的准备可以通过以下两种方式进行。
在终端中运行mysql -u root –p
。通过CREATE DATABASE helloworld CHARACTER SET utf8 COLLATE utf8_general_ci;
创建新数据库
步骤 2 − 在 config/db.php 文件中配置数据库连接。以下配置适用于当前使用的系统。
<?php
return [
'class' => 'yii\db\Connection',
'dsn' => 'mysql:host=localhost;dbname=helloworld',
'username' => 'vladimir',
'password' => '12345',
'charset' => 'utf8',
];
?>
步骤 3 − 在根文件夹中运行 ./yii migration/create test_table。此命令将创建一个数据库迁移来管理我们的数据库。迁移文件应出现在项目根目录的 migrations 文件夹中。
步骤 4 − 以这种方式修改迁移文件(在本例中为 m160106_163154_test_table.php)。
<?php
use yii\db\Schema;
use yii\db\Migration;
class m160106_163154_test_table extends Migration {
public function safeUp()\ {
$this->createTable("user", [
"id" => Schema::TYPE_PK,
"name" => Schema::TYPE_STRING,
"email" => Schema::TYPE_STRING,
]);
$this->batchInsert("user", ["name", "email"], [
["User1", "user1@gmail.com"],
["User2", "user2@gmail.com"],
["User3", "user3@gmail.com"],
["User4", "user4@gmail.com"],
["User5", "user5@gmail.com"],
["User6", "user6@gmail.com"],
["User7", "user7@gmail.com"],
["User8", "user8@gmail.com"],
["User9", "user9@gmail.com"],
["User10", "user10@gmail.com"],
["User11", "user11@gmail.com"],
]);
}
public function safeDown() {
$this->dropTable('user');
}
}
?>
上述迁移创建了一个 user 表,其中包含以下字段:id、name 和 email。它还添加了一些演示用户。
步骤 5 − 在项目根目录下 运行 ./yii migration 以将迁移应用于数据库。
步骤 6 − 现在,我们需要为我们的 user 表创建一个模型。为简单起见,我们将使用 Gii 代码生成工具。打开此 url:http://localhost:8080/index.php?r=gii。然后,单击"模型生成器"标题下的"开始"按钮。填写表名("user")和模型类("MyUser"),点击"预览"按钮,最后点击"生成"按钮。
MyUser 模型应该出现在模型目录中。
数据缓存
数据缓存可帮助您将 PHP 变量存储在缓存中并在以后检索它们。数据缓存依赖于缓存组件,这些组件通常注册为应用程序组件。要访问应用程序组件,您可以调用 Yii::$app → cache。您可以注册多个缓存应用程序组件。
Yii 支持以下缓存存储 −
yii\caching\DbCache − 使用数据库表存储缓存数据。您必须按照 yii\caching\DbCache::$cacheTable 中指定的方式创建一个表。
yii\caching\ApcCache − 使用 PHP APC 扩展。
yii\caching\FileCache − 使用文件存储缓存数据。
yii\caching\DummyCache − 用作缓存占位符,不执行任何实际缓存。此组件的目的是简化需要检查缓存可用性的代码。
yii\caching\MemCache − 使用 PHP memcache 扩展。
yii\caching\WinCache −使用 PHP WinCache 扩展。
yii\redis\Cache − 实现基于 Redis 数据库的缓存组件。
yii\caching\XCache − 使用 PHP XCache 扩展。
所有缓存组件都支持以下 API −
get() − 使用指定的键从缓存中检索数据值。如果数据值已过期/无效或未找到,则返回 false 值。
add() − 如果在缓存中未找到键,则将由键标识的数据值存储在缓存中。
set() − 将由键标识的数据值存储在缓存中。
multiGet() − 使用指定的键从缓存中检索多个数据值。
multiAdd() − 将多个数据值存储在缓存中。每个项目都由一个键标识。如果缓存中已存在某个键,则将跳过该数据值。
multiSet() − 在缓存中存储多个数据值。每个项目都由一个键标识。
exists() − 返回一个值,指示是否在缓存中找到指定的键。
flush() − 从缓存中删除所有数据值。
delete() − 从缓存中删除由键标识的数据值。
存储在缓存中的数据值将永远保留在那里,除非它被删除。要更改此行为,可以在调用 set() 方法存储数据值时设置过期参数。
缓存的数据值也可能因缓存依赖项的更改而失效 −
yii\caching\DbDependency − 如果指定 SQL 语句的查询结果发生更改,则依赖项会更改。
yii\caching\ChainedDependency − 如果链上的任何依赖项发生更改,则依赖项会更改。
yii\caching\FileDependency − 如果文件的最后修改时间发生更改,则依赖项会更改。
yii\caching\ExpressionDependency −如果指定 PHP 表达式的结果发生变化,则依赖关系也会发生变化。
现在,将 cache 应用程序组件添加到您的应用程序中。
步骤 1 − 修改 config/web.php 文件。
<?php
$params = require(__DIR__ . '/params.php');
$config = [
'id' => 'basic',
'basePath' => dirname(__DIR__),
'bootstrap' => ['log'],
'components' => [
'request' => [
// !!! insert a secret key in the following (if it is empty) - this
//is required by cookie validation
'cookieValidationKey' => 'ymoaYrebZHa8gURuolioHGlK8fLXCKjO',
],
'cache' => [
'class' => 'yii\caching\FileCache',
],
'user' => [
'identityClass' => 'app\models\User',
'enableAutoLogin' => true,
],
'errorHandler' => [
'errorAction' => 'site/error',
],
'mailer' => [
'class' => 'yii\swiftmailer\Mailer',
// 默认将所有邮件发送到一个文件。您必须设置
// 'useFileTransport' 为 false 并配置传输
// 以便邮件程序发送真实的电子邮件。
'useFileTransport' => true,
],
'log' => [
'traceLevel' => YII_DEBUG ? 3 : 0,
'targets' => [
[
'class' => 'yii\log\FileTarget',
'levels' => ['error', 'warning'],
],
],
],
'db' => require(__DIR__ . '/db.php'),
],
'modules' => [
'hello' => [
'class' => 'app\modules\hello\Hello',
],
],
'params' => $params,
];
if (YII_ENV_DEV) {
// 针对"dev"环境的配置调整
$config['bootstrap'][] = 'debug';
$config['modules']['debug'] = [
'class' => 'yii\debug\Module',
];
$config['bootstrap'][] = 'gii';
$config['modules']['gii'] = [
'class' => 'yii\gii\Module',
];
}
return $config;
?>
步骤 2 − 向 SiteController 添加一个名为 actionTestCache() 的新函数。
public function actionTestCache() {
$cache = Yii::$app->cache;
// 尝试从缓存中检索 $data
$data = $cache->get("my_cached_data");
if ($data === false) {
// 在缓存中找不到 $data,从头开始计算
$data = date("d.m.Y H:i:s");
// 将 $data 存储在缓存中,以便下次检索
$cache->set("my_cached_data", $data, 30);
}
// $data 在此处可用
var_dump($data);
}
步骤 3 − 在 Web 浏览器的地址栏中输入 http://localhost:8080/index.php?r=site/test-cache,您将看到以下内容。
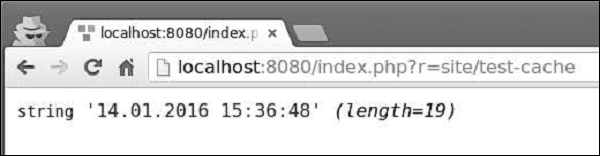
步骤 4 − 如果您重新加载页面,您应该注意到日期没有改变。日期值已被缓存,缓存将在 30 秒内过期。30 秒后重新加载页面。
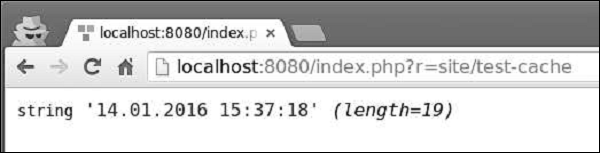
查询缓存
查询缓存为您提供缓存数据库查询的结果。查询缓存需要 DB 连接和缓存应用程序组件。
步骤 1 − 向 SiteController 添加一个名为 actionQueryCaching() 的新方法。
public function actionQueryCaching() {
$duration = 10;
$result = MyUser::getDb()->cache(function ($db) {
return MyUser::find()->count();
}, $duration);
var_dump($result);
$user = new MyUser();
$user->name = "cached user name";
$user->email = "cacheduseremail@gmail.com";
$user->save();
echo "==========";
var_dump(MyUser::find()->count());
}
在上面的代码中,我们缓存了数据库查询,添加了一个新用户,并显示用户数量。
步骤 2 − 转到 URL http://localhost:8080/index.php?r=site/query-caching 并重新加载页面。
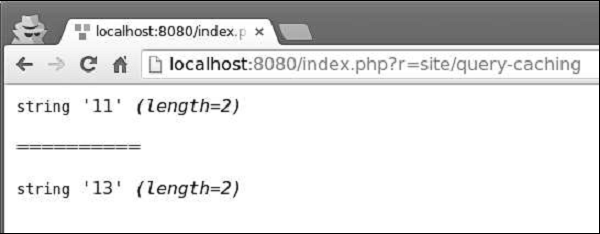
当我们第一次打开页面时,我们缓存了数据库查询并显示所有用户数量。当我们重新加载页面时,缓存的数据库查询的结果与之前相同,因为数据库查询已被缓存。
您可以使用以下命令从控制台刷新缓存 −
yii cache −显示可用的缓存组件。
yii cache/flush cache1 cache2 cache3 − 刷新缓存组件 cache1、cache2 和 cache3。
yii cache/flush-all − 刷新所有缓存组件。
步骤 3 − 在应用程序的项目根目录中运行 ./yii cache/flush-all。

Yii - 片段缓存
片段缓存提供网页片段的缓存。
步骤 1 − 向 SiteController 添加一个名为 actionFragmentCaching() 的新函数。
public function actionFragmentCaching() {
$user = new MyUser();
$user->name = "cached user name";
$user->email = "cacheduseremail@gmail.com";
$user->save();
$models = MyUser::find()->all();
return $this->render('cachedview', ['models' => $models]);
}
在上面的代码中,我们创建了一个新用户并显示了一个 cachedview 视图文件。
步骤 2 − 现在,在 views/site 文件夹中创建一个名为 cachedview.php 的新文件。
<?php if ($this->beginCache('cachedview')) { ?>
<?php foreach ($models as $model): ?>
<?= $model->id; ?>
<?= $model->name; ?>
<?= $model->email; ?>
<br/>
<?php endforeach; ?>
<?php $this->endCache(); } ?>
<?php echo "Count:", \app\models\MyUser::find()->count(); ?>
我们在 beginCache() 和 endCache() 方法中封装了内容生成逻辑。如果在缓存中找到内容,beginCache() 方法将呈现它。
步骤 3 − 转到 URL http://localhost:8080/index.php?r=site/fragment-caching 并重新加载页面。以下是输出。
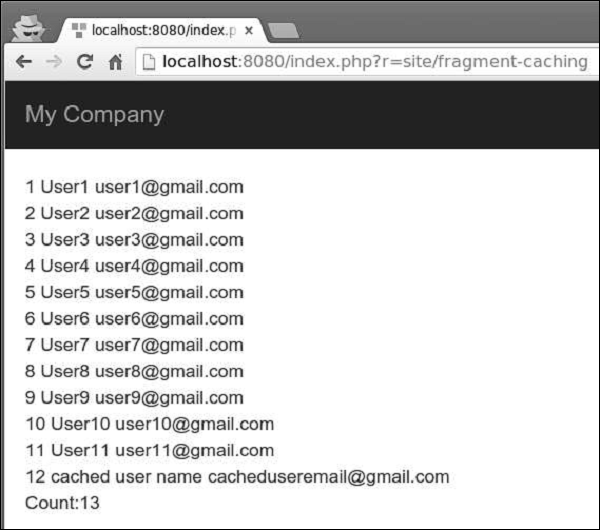
请注意,beginCache() 和 endCache() 方法之间的内容已被缓存。在数据库中,我们有 13 个用户,但只显示了 12 个。
页面缓存
页面缓存提供对整个网页内容的缓存。 yii\filter\PageCache 支持页面缓存。
步骤 1 − 修改 SiteController 的 behaviors() 函数。
public function behaviors() {
return [
'access' => [
'class' => AccessControl::className(),
'only' => ['logout'],
'rules' => [
[
'actions' => ['logout'],
'allow' => true,
'roles' => ['@'],
],
],
],
'verbs' => [
'class' => VerbFilter::className(),
'actions' => [
'logout' => ['post'],
],
],
[
'class' => 'yii\filters\PageCache',
'only' => ['index'],
'duration' => 60
],
];
}
上述代码将索引页缓存 60 秒。
步骤 2 − 转到 URL http://localhost:8080/index.php?r=site/index。然后,修改索引视图文件的祝贺消息。如果重新加载页面,您将不会注意到任何变化,因为页面已被缓存。等一分钟,然后再次重新加载页面。
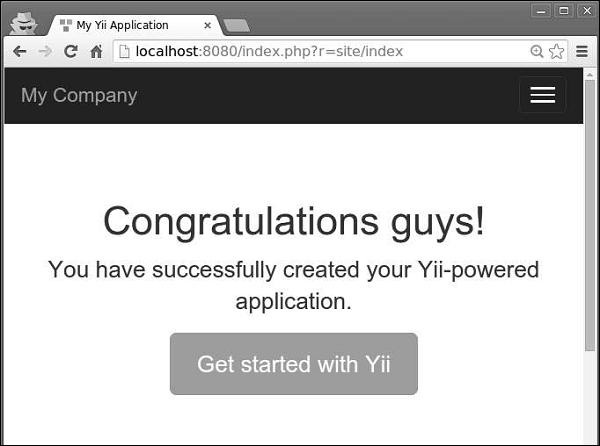
HTTP 缓存
Web 应用程序也可以使用客户端缓存。要使用它,您可以为控制器操作配置 yii\filter\HttpCache 过滤器。
Last-Modified 标头使用时间戳来指示页面是否已被修改。
步骤 1 −要启用发送 Last-Modified 标头,请配置 yii\filter\HttpCache::$lastModified 属性。
public function behaviors() {
return [
[
'class' => 'yii\filters\HttpCache',
'only' => ['index'],
'lastModified' => function ($action, $params) {
$q = new \yii\db\Query();
return $q->from('news')->max('created_at');
},
],
];
}
在上面的代码中,我们只为索引页启用了 HTTP 缓存。当浏览器第一次打开索引页时,页面在服务器端生成并发送到浏览器。第二次,如果没有创建新闻,服务器将不会重新生成页面。
Etag 标头提供了一个表示页面内容的哈希值。如果页面发生变化,哈希值也会改变。
步骤 2 − 要启用发送 Etag 标头,请配置 yii\filters\HttpCache::$etagSeed 属性。
public function behaviors() {
return [
[
'class' => 'yii\filters\HttpCache',
'only' => ['index'],
'etagSeed' => function ($action, $params) {
$user = $this->findModel(\Yii::$app->request->get('id'));
return serialize([$user->name, $user->email]);
},
],
];
}
在上面的代码中,我们仅为 index 操作启用了 HTTP 缓存。它应根据用户的姓名和电子邮件生成 Etag HTTP 标头。当浏览器第一次打开索引页时,该页面在服务器端生成并发送到浏览器。第二次,如果姓名或电子邮件没有更改,服务器将不会重新生成该页面。
Yii - 别名
别名可帮助您避免在项目中硬编码绝对路径或 URL。别名以 @ 字符开头。
要定义别名,您应该调用 Yii::setAlias() 方法 −
// 文件路径的别名
Yii::setAlias('@alias', '/path/to/alias');
// URL 的别名
Yii::setAlias('@urlAlias', 'http://www.google.com');
您还可以从现有别名派生出新别名 −
Yii::setAlias('@pathToSomewhere', '@alias/path/to/somewhere');
您可以在入口脚本中或在应用程序配置中名为 aliases 的可写属性中调用 Yii::setAlias() 方法 −
$config = [
'id' => 'basic',
'basePath' => dirname(__DIR__),
'bootstrap' => ['log'],
'components' => [
'aliases' => [
'@alias' => '/path/to/somewhere',
'@urlAlias' => 'http://www.google.com',
],
//other components...
]
]
要解析别名,您应该调用 Yii::getAlias() 方法。
Yii 预定义了以下别名 −
@app − 应用程序的基本路径。
@yii − BaseYii.php 文件所在的文件夹。
@webroot − 应用程序的 Web 根目录。
@web − 应用程序的基本 URL。
@runtime − 应用程序的运行时路径。默认为 @app/runtime。
@vendor − Composer 供应商目录。默认为 @app/vendor。
@npm − npm 包的根目录。默认为 @vendor/npm。
@bower − bower 包的根目录。默认为 @vendor/bower。
现在,向 SiteController 添加一个名为 actionAliases() 的新函数−
public function actionAliases() {
Yii::setAlias("@components", "@app/components");
Yii::setAlias("@imagesUrl", "@web/images");
var_dump(Yii::getAlias("@components"));
var_dump(Yii::getAlias("@imagesUrl"));
}
在上面的代码中,我们创建了两个别名:@components 用于应用程序组件,@imagesUrl 用于存储所有应用程序图像的 URL。
输入 http://localhost:8080/index.php?r=site/aliases,您将看到以下输出 −
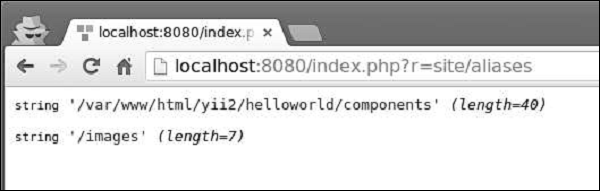
Yii - 日志记录
Yii 提供了一个高度可定制和可扩展的框架。借助此框架,您可以轻松记录各种类型的消息。
要记录消息,您应该调用以下方法之一 −
Yii::error() − 记录致命错误消息。
Yii::warning() − 记录警告消息。
Yii::info() − 记录包含一些有用信息的消息。
Yii::trace() − 记录一条消息来跟踪一段代码的运行方式。
上述方法以各种类别记录日志消息。它们共享以下函数签名 −
function ($message, $category = 'application')
其中 −
$message − 要记录的日志消息
$category − 日志消息的类别
一种简单方便的命名方案是使用 PHP __METHOD__ 魔法常量。例如 −
Yii::info('this is a log message', __METHOD__);
日志目标是 yii\log\Target 类的一个实例。它按类别过滤所有日志消息,并将其导出到文件、数据库和/或电子邮件。
步骤 1 − 您也可以注册多个日志目标,例如。
return [
// "log"组件在引导期间加载
'bootstrap' => ['log'],
'components' => [
'log' => [
'targets' => [
[
'class' => 'yii\log\DbTarget',
'levels' => ['error', 'warning', 'trace', 'info'],
],
[
'class' => 'yii\log\EmailTarget',
'levels' => ['error', 'warning'],
'categories' => ['yii\db\*'],
'message' => [
'from' => ['log@mydomain.com'],
'to' => ['admin@mydomain.com', 'developer@mydomain.com'],
'subject' => 'Application errors at mydomain.com',
],
],
],
],
],
];
上面的代码中注册了两个目标。第一个目标选择所有错误、警告、跟踪和信息消息并将它们保存在数据库中。第二个目标将所有错误和警告消息发送到管理员电子邮件。
Yii 提供以下内置日志目标 −
yii\log\DbTarget − 将日志消息存储在数据库中。
yii\log\FileTarget − 将日志消息保存在文件中。
yii\log\EmailTarget − 将日志消息发送到预定义的电子邮件地址。
yii\log\SyslogTarget −通过调用 PHP 函数 syslog() 将日志消息保存到 syslog。
默认情况下,日志消息的格式如下 −
Timestamp [IP address][User ID][Session ID][Severity Level][Category] Message Text
步骤 2 − 要自定义此格式,您应该配置 yii\log\Target::$prefix 属性。例如。
[
'class' => 'yii\log\FileTarget',
'prefix' => function ($message) {
$user = Yii::$app->has('user', true) ? Yii::$app->get('user') :
'undefined user';
$userID = $user ? $user->getId(false) : 'anonym';
return "[$userID]";
}
]
上述代码片段配置了一个日志目标,以当前用户 ID 为所有日志消息添加前缀。
默认情况下,日志消息包含来自以下全局 PHP 变量的值:$_GET、$_POST、$_SESSION、$_COOKIE、$_FILES 和 $_SERVER。要修改此行为,您应该使用要包含的变量名称配置 yii\log\Target::$logVars 属性。
所有日志消息都由记录器对象保存在一个数组中。每次数组累积一定数量的消息(默认值为 1000)时,记录器对象都会将记录的消息刷新到日志目标。
步骤 3 − 要自定义此数字,您应该调用 flushInterval 属性。
return [
'bootstrap' => ['log'],
'components' => [
'log' => [
'flushInterval' => 50, // 默认值为 1000
'targets' => [...],
],
],
];
即使记录器对象将日志消息刷新到日志目标,它们也不会立即导出。当日志目标累积一定数量的消息时(默认值为 1000),就会发生导出。
步骤 4 − 要自定义此数字,您应该配置 exportInterval 属性。
[
'class' => 'yii\log\FileTarget',
'exportInterval' => 50, // 默认值为 1000
]
步骤 5 − 现在,以这种方式修改 config/web.php 文件。
<?php
$params = require(__DIR__ . '/params.php');
$config = [
'id' => 'basic',
'basePath' => dirname(__DIR__),
'bootstrap' => ['log'],
'components' => [
'request' => [
// !!! insert a secret key in the following (if it is empty) - this
//is required by cookie validation
'cookieValidationKey' => 'ymoaYrebZHa8gURuolioHGlK8fLXCKjO',
],
'cache' => [
'class' => 'yii\caching\FileCache',
],
'user' => [
'identityClass' => 'app\models\User',
'enableAutoLogin' => true,
],
'errorHandler' => [
'errorAction' => 'site/error',
],
'mailer' => [
'class' => 'yii\swiftmailer\Mailer',
// 默认将所有邮件发送到一个文件。您必须设置
// 'useFileTransport' 为 false 并配置传输
// 以便邮件程序发送真实的电子邮件。
'useFileTransport' => true,
],
'log' => [
'flushInterval' => 1,
'traceLevel' => YII_DEBUG ? 3 : 0,
'targets' => [
[
'class' => 'yii\log\FileTarget',
'exportInterval' => 1,
'logVars' => []
],
],
],
'db' => require(__DIR__ . '/db.php'),
],
'modules' => [
'hello' => [
'class' => 'app\modules\hello\Hello',
],
],
'params' => $params,
];
if (YII_ENV_DEV) {
// 针对"dev"环境的配置调整
$config['bootstrap'][] = 'debug';
$config['modules']['debug'] = [
'class' => 'yii\debug\Module',
];
$config['bootstrap'][] = 'gii';
$config['modules']['gii'] = [
'class' => 'yii\gii\Module',
];
}
return $config;
?>
在上面的代码中,我们定义了日志应用程序组件,将 flushInterval 和 exportInteval 属性设置为 1,以便所有日志消息立即出现在日志文件中。我们还省略了日志目标的 levels 属性。这意味着所有类别(错误、警告、信息、跟踪)的日志消息都将出现在日志文件中。
步骤 6 − 然后,在 SiteController 中创建一个名为 actionLog() 的函数。
public function actionLog() {
Yii::trace('trace log message');
Yii::info('info log message');
Yii::warning('warning log message');
Yii::error('error log message');
}
在上面的代码中,我们只是将四个不同类别的日志消息写入日志文件。
步骤 7 − 在 Web 浏览器的地址栏中输入 URL http://localhost:8080/index.php?r=site/log。日志消息应出现在 app.log 文件的 app/runtime/logs 目录下。
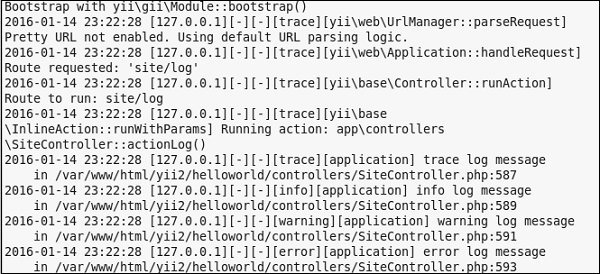
Yii - 错误处理
Yii 包含一个内置错误处理程序。Yii 错误处理程序执行以下操作 −
- 将所有非致命 PHP 错误转换为可捕获的异常。
- 显示所有错误和异常以及详细的调用堆栈。
- 支持不同的错误格式。
- 支持使用控制器操作显示错误。
要禁用错误处理程序,您应该在入口脚本中将 YII_ENABLE_ERROR_HANDLER 常量定义为 false。错误处理程序已注册为应用程序组件。
步骤 1 − 您可以按以下方式配置它。
return [
'components' => [
'errorHandler' => [
'maxSourceLines' => 10,
],
],
];
上述配置将要显示的源代码行数设置为 10。错误处理程序将所有非致命 PHP 错误转换为可捕获的异常。
步骤 2 − 向 SiteController 添加一个名为 actionShowError() 的新函数。
public function actionShowError() {
try {
5/0;
} catch (ErrorException $e) {
Yii::warning("Ooops...division by zero.");
}
// execution continues...
}
步骤 3 − 转到 URL http://localhost:8080/index.php?r=site/show-error。您将看到一条警告消息。
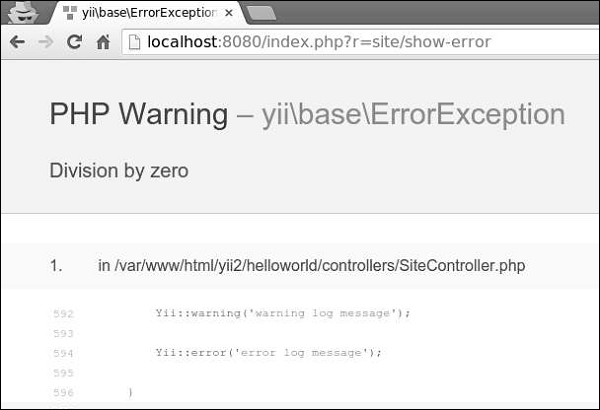
如果您想向用户显示他的请求无效,您可以抛出 yii\web\NotFoundHttpException。
步骤 4 − 修改 actionShowError() 函数。
public function actionShowError() {
throw new NotFoundHttpException("Something expected happened");
}
步骤 5 −在地址栏中输入地址 http://localhost:8080/index.php?r=site/show-error。您将看到以下 HTTP 错误。
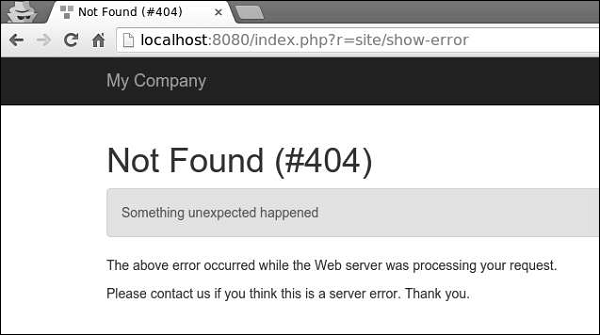
当 YII_DEBUG 常量为 true 时,错误处理程序将显示错误以及详细的调用堆栈。当常量为 false 时,将仅显示错误消息。默认情况下,错误处理程序使用这些视图显示错误 −
@yii/views/errorHandler/exception.php − 当应使用调用堆栈信息显示错误时,将使用视图文件。
@yii/views/errorHandler/error.php −当需要显示错误而不需要调用堆栈信息时,将使用视图文件。
您可以使用专用的错误操作来自定义错误显示。
步骤 6 − 修改 config/web.php 文件中的 errorHandler 应用程序组件。
<?php
$params = require(__DIR__ . '/params.php');
$config = [
'id' => 'basic',
'basePath' => dirname(__DIR__),
'bootstrap' => ['log'],
'components' => [
'request' => [
// !!! insert a secret key in the following (if it is empty) - this
//is required by cookie validation
'cookieValidationKey' => 'ymoaYrebZHa8gURuolioHGlK8fLXCKjO',
],
'cache' => [
'class' => 'yii\caching\FileCache',
],
'user' => [
'identityClass' => 'app\models\User',
'enableAutoLogin' => true,
],
'errorHandler' => [
'errorAction' => 'site/error',
],
//other components...
'db' => require(__DIR__ . '/db.php'),
],
'modules' => [
'hello' => [
'class' => 'app\modules\hello\Hello',
],
],
'params' => $params,
];
if (YII_ENV_DEV) {
// 针对"dev"环境的配置调整
$config['bootstrap'][] = 'debug';
$config['modules']['debug'] = [
'class' => 'yii\debug\Module',
];
$config['bootstrap'][] = 'gii';
$config['modules']['gii'] = [
'class' => 'yii\gii\Module',
];
}
return $config;
?>
上述配置定义了当需要显示错误而不需要调用堆栈时,将执行 site/error 动作。
步骤 7 − 修改 SiteController 的 actions() 方法。
public function actions() {
return [
'error' => [
'class' => 'yii\web\ErrorAction',
],
];
}
上述代码定义,当发生错误时,将呈现错误视图。
步骤 8 − 在 views/site 目录下创建一个名为 error.php 的文件。
<?php
/* @var $this yii\web\View */
/* @var $name string */
/* @var $message string */
/* @var $exception Exception */
use yii\helpers\Html;
$this->title = $name;
?>
<div class = "site-error">
<h2>customized error</h2>
<h1><?= Html::encode($this->title) ?></h1>
<div class = "alert alert-danger">
<?= nl2br(Html::encode($message)) ?>
</div>
<p>
The above error occurred while the Web server was processing your request.
</p>
<p>
Please contact us if you think this is a server error. Thank you.
</p>
</div>
步骤 9 − 访问地址 http://localhost:8080/index.php?r=site/show-error,您将看到自定义的错误视图。
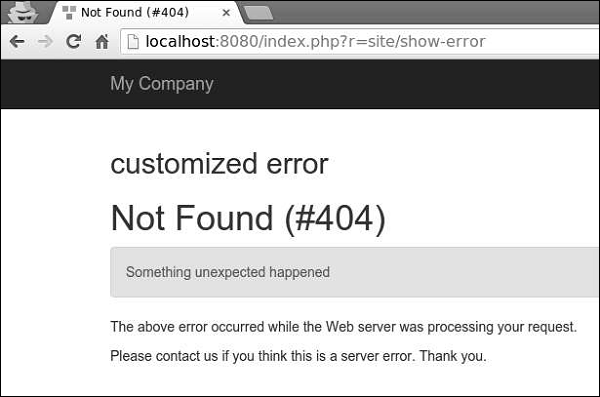
Yii - 身份验证
验证用户身份的过程称为身份验证。它通常使用用户名和密码来判断用户是否是他所声称的人。
要使用 Yii 身份验证框架,您需要 −
- 配置用户应用程序组件。
- 实现 yii\web\IdentityInterface 接口。
基本应用程序模板带有内置身份验证系统。它使用用户应用程序组件,如以下代码所示 −
<?php
$params = require(__DIR__ . '/params.php');
$config = [
'id' => 'basic',
'basePath' => dirname(__DIR__),
'bootstrap' => ['log'],
'components' => [
'request' => [
// !!! insert a secret key in the following (if it is empty) - this
//is required by cookie validation
'cookieValidationKey' => 'ymoaYrebZHa8gURuolioHGlK8fLXCKjO',
],
'cache' => [
'class' => 'yii\caching\FileCache',
],
'user' => [
'identityClass' => 'app\models\User',
'enableAutoLogin' => true,
],
//other components...
'db' => require(__DIR__ . '/db.php'),
],
'modules' => [
'hello' => [
'class' => 'app\modules\hello\Hello',
],
],
'params' => $params,
];
if (YII_ENV_DEV) {
// 针对"dev"环境的配置调整
$config['bootstrap'][] = 'debug';
$config['modules']['debug'] = [
'class' => 'yii\debug\Module',
];
$config['bootstrap'][] = 'gii';
$config['modules']['gii'] = [
'class' => 'yii\gii\Module',
];
}
return $config;
?>
在上述配置中,用户的身份类配置为 app\models\User。
身份类必须实现 yii\web\IdentityInterface,并具有以下方法 −
findIdentity() − 使用指定的用户 ID 查找身份类的实例。
findIdentityByAccessToken() − 使用指定的访问令牌查找身份类的实例。
getId() − 返回用户的 ID。
getAuthKey() − 返回用于验证基于 cookie 的登录的密钥。
validateAuthKey() −实现验证基于 cookie 的登录密钥的逻辑。
基本应用程序模板中的 User 模型实现了上述所有功能。用户数据存储在 $users 属性中 −
<?php
namespace app\models;
class User extends \yii\base\Object implements \yii\web\IdentityInterface {
public $id;
public $username;
public $password;
public $authKey;
public $accessToken;
private static $users = [
'100' => [
'id' => '100',
'username' => 'admin',
'password' => 'admin',
'authKey' => 'test100key',
'accessToken' => '100-token',
],
'101' => [
'id' => '101',
'username' => 'demo',
'password' => 'demo',
'authKey' => 'test101key',
'accessToken' => '101-token',
],
];
/**
* @inheritdoc
*/
public static function findIdentity($id) {
return isset(self::$users[$id]) ? new static(self::$users[$id]) : null;
}
/**
* @inheritdoc
*/
public static function findIdentityByAccessToken($token, $type = null) {
foreach (self::$users as $user) {
if ($user['accessToken'] === $token) {
return new static($user);
}
}
return null;
}
/**
* Finds user by username
*
* @param string $username
* @return static|null
*/
public static function findByUsername($username) {
foreach (self::$users as $user) {
if (strcasecmp($user['username'], $username) === 0) {
return new static($user);
}
}
return null;
}
/**
* @inheritdoc
*/
public function getId() {
return $this->id;
}
/**
* @inheritdoc
*/
public function getAuthKey() {
return $this->authKey;
}
/**
* @inheritdoc
*/
public function validateAuthKey($authKey) {
return $this->authKey === $authKey;
}
/**
* Validates password
*
* @param string $password password to validate
* @return boolean if password provided is valid for current user
*/
public function validatePassword($password) {
return $this->password === $password;
}
}
?>
步骤 1 − 转到 URL http://localhost:8080/index.php?r=site/login 并使用管理员登录网站,输入登录名和密码。
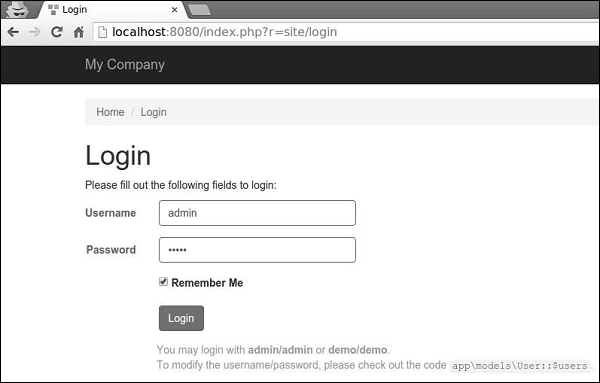
步骤 2 − 然后,向 SiteController 添加一个名为 actionAuth() 的新函数。
public function actionAuth(){
// 当前用户身份。如果用户未通过身份验证,则为 Null。
$identity = Yii::$app->user->identity;
var_dump($identity);
// 当前用户的 ID。如果用户未通过身份验证,则为 Null。
$id = Yii::$app->user->id;
var_dump($id);
// 当前用户是否为访客(未经过身份验证)
$isGuest = Yii::$app->user->isGuest;
var_dump($isGuest);
}
步骤 3 − 在 Web 浏览器中输入地址 http://localhost:8080/index.php?r=site/auth,您将看到有关 admin 用户的详细信息。
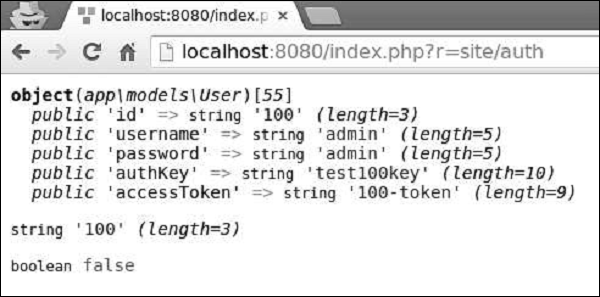
步骤 4 − 要登录和注销用户,您可以使用以下代码。
public function actionAuth() {
// 当前用户是否为访客(未经身份验证)
var_dump(Yii::$app->user->isGuest);
// 查找具有指定用户名的用户身份。
// 请注意,您可能需要在需要时检查密码
$identity = User::findByUsername("admin");
// 登录用户
Yii::$app->user->login($identity);
// 当前用户是否为访客(未认证)
var_dump(Yii::$app->user->isGuest);
Yii::$app->user->logout();
// 当前用户是否为访客(未认证)
var_dump(Yii::$app->user->isGuest);
}
首先,我们检查用户是否已登录。如果值返回 false,则我们通过 Yii::$app → user → login() 调用登录用户,并使用 Yii::$app → user → 注销用户logout() 方法。
步骤 5 − 转到 URL http://localhost:8080/index.php?r=site/auth,您将看到以下内容。
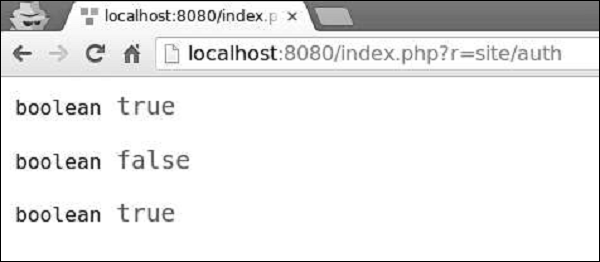
yii\web\User 类引发以下事件 −
EVENT_BEFORE_LOGIN − 在 yii\web\User::login()
开始时引发
EVENT_AFTER_LOGIN −成功登录后引发
EVENT_BEFORE_LOGOUT − 在 yii\web\User::logout()
开始时引发
EVENT_AFTER_LOGOUT − 成功注销后引发
Yii - 授权
验证用户是否具有足够的权限执行某项操作的过程称为授权。Yii 提供了 ACF(访问控制过滤器),这是一种实现为 yii\filters\AccessControl 的授权方法。修改 SiteController 的 behaviors() 函数 −
public function behaviors() {
return [
'access' => [
'class' => AccessControl::className(),
'only' => ['about', 'contact'],
'rules' => [
[
'allow' => true,
'actions' => ['about'],
'roles' => ['?'],
],
[
'allow' => true,
'actions' => ['contact', 'about'],
'roles' => ['@'],
],
],
],
];
}
在上面的代码中,ACF 被附加为一个行为。only 属性指定 ACF 应仅应用于 about 和 contact 操作。所有其他操作不受访问控制。rules 属性列出了访问规则。所有访客(具有"?"角色)都将被允许访问 about 操作。所有经过身份验证的用户(具有"@"角色)都将被允许访问 contact 和 about 操作。
如果您转到 URL http://localhost:8080/index.php?r=site/about,您将看到该页面,但如果您打开 URL http://localhost:8080/index.php?r=site/contact,您将被重定向到登录页面,因为只有经过身份验证的用户才能访问 contact 操作。
访问规则支持许多选项 −
allow −定义这是"允许"还是"拒绝"规则。
actions − 定义此规则匹配的操作。
controllers − 定义此规则匹配的控制器。
roles − 定义此规则匹配的用户角色。可识别两种特殊角色 −
? − 匹配访客用户。
@ − 匹配经过身份验证的用户。
ips − 定义此规则匹配的 IP 地址。
verbs −定义此规则匹配的请求方法(POST、GET、PUT 等)。
matchCallback − 定义一个 PHP 可调用函数,应调用该函数来检查是否应应用此规则。
denyCallback − 定义一个 PHP 可调用函数,应在该规则拒绝访问时调用该函数。
密码
步骤 1 − Yii 提供了以下用于处理密码的便捷方法。
public function actionAuth() {
$password = "asd%#G3";
//生成密码哈希
$hash = Yii::$app->getSecurity()->generatePasswordHash($password);
var_dump($hash);
//验证密码哈希
if (Yii::$app->getSecurity()->validatePassword($password, $hash)) {
echo "正确密码";
} else {
echo "密码错误";
}
//生成令牌
$key = Yii::$app->getSecurity()->generateRandomString();
var_dump($key);
//使用密钥加密数据
$encryptedData = Yii::$app->getSecurity()->encryptByPassword("mydata", $key);
var_dump($encryptedData);
//使用密钥解密数据
$data = Yii::$app->getSecurity()->decryptByPassword($encryptedData, $key);
var_dump($data);
//使用密钥哈希数据
$data = Yii::$app->getSecurity()->hashData("mygenuinedata", $key);
var_dump($data);
//使用密钥验证数据
$data = Yii::$app->getSecurity()->validateData($data, $key);
var_dump($data);
}
步骤 2 − 输入 URL http://localhost:8080/index.php?r=site/auth,您将看到以下内容。
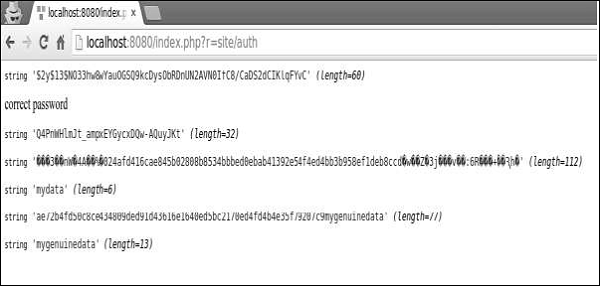
Yii - 本地化
I18N(国际化)是设计可适应各种语言的应用程序的过程。Yii 提供全方位的 I18N 功能。
区域设置是一组指定用户语言和国家/地区的参数。例如,en-US 代表英语区域设置和美国。Yii 提供两种类型的语言:源语言和目标语言。源语言是应用程序中所有文本消息的编写语言。目标语言是应该用来向最终用户显示内容的语言。
消息翻译组件将文本消息从源语言翻译成目标语言。要翻译消息,消息翻译服务必须在消息源中查找它。
要使用消息翻译服务,您应该 −
- 在 Yii::t() 方法中包装要翻译的文本消息。
- 配置消息源。
- 将消息存储在消息源中。
步骤 1 − Yii::t() 方法可以这样使用。
echo \Yii::t('app', 'This is a message to translate!');
在上面的代码片段中,"app"代表消息类别。
步骤 2 −现在,修改 config/web.php 文件。
<?php
$params = require(__DIR__ . '/params.php');
$config = [
'id' => 'basic',
'basePath' => dirname(__DIR__),
'bootstrap' => ['log'],
'components' => [
'request' => [
// !!! insert a secret key in the following (if it is empty) - this
//is required by cookie validation
'cookieValidationKey' => 'ymoaYrebZHa8gURuolioHGlK8fLXCKjO',
],
'cache' => [
'class' => 'yii\caching\FileCache',
],
'i18n' => [
'translations' => [
'app*' => [
'class' => 'yii\i18n\PhpMessageSource',
'fileMap' => [
'app' => 'app.php'
],
],
],
],
'user' => [
'identityClass' => 'app\models\User',
'enableAutoLogin' => true,
],
'errorHandler' => [
'errorAction' => 'site/error',
],
'mailer' => [
'class' => 'yii\swiftmailer\Mailer',
// 默认将所有邮件发送到一个文件。您必须设置
// 'useFileTransport' 为 false 并配置传输
// 以便邮件程序发送真实的电子邮件。
'useFileTransport' => true,
],
'log' => [
'flushInterval' => 1,
'traceLevel' => YII_DEBUG ? 3 : 0,
'targets' => [
[
'class' => 'yii\log\FileTarget',
'exportInterval' => 1,
'logVars' => [],
],
],
],
'db' => require(__DIR__ . '/db.php'),
],
// set target language to be Russian
'language' => 'ru-RU',
// set source language to be English
'sourceLanguage' => 'en-US',
'modules' => [
'hello' => [
'class' => 'app\modules\hello\Hello',
],
],
'params' => $params,
];
if (YII_ENV_DEV) {
// 针对"dev"环境的配置调整
$config['bootstrap'][] = 'debug';
$config['modules']['debug'] = [
'class' => 'yii\debug\Module',
];
$config['bootstrap'][] = 'gii';
$config['modules']['gii'] = [
'class' => 'yii\gii\Module',
];
}
return $config;
?>
在上面的代码中,我们定义了源语言和目标语言。我们还指定了 yii\i18n\PhpMessageSource 支持的消息源。app* 模式表示所有以 app 开头的消息类别都必须使用此特定消息源进行翻译。在上述配置中,所有俄语翻译都将位于 messages/ru-RU/app.php 文件中。
步骤 3 − 现在,创建 messages/ru-RU 目录结构。在 ru-RU 文件夹中创建一个名为 app.php 的文件。这将存储所有 EN → RU 翻译。
<?php
return [
'This is a string to translate!' => 'Эта строка для перевода!'
];
?>
步骤 4 − 在 SiteController 中创建一个名为 actionTranslation() 的函数。
public function actionTranslation() {
echo \Yii::t('app', 'This is a string to Translation!');
}
步骤 5 − 在 Web 浏览器中输入 URL http://localhost:8080/index.php?r=site/translation,您将看到以下内容。

由于我们将目标语言设置为 ru-RU,因此该消息被翻译成俄语。我们可以动态更改应用程序的语言。
步骤 6 − 修改 actionTranslation() 方法。
public function actionTranslation() {
\Yii::$app->language = 'en-US';
echo \Yii::t('app', 'This is a string to translate!');
}
现在,消息以英文显示 −
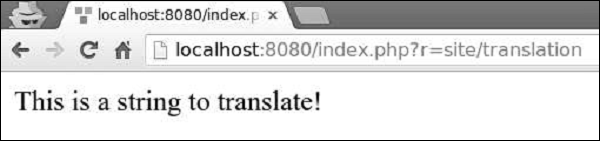
步骤 7 − 在翻译的消息中,您可以插入一个或多个参数。
public function actionTranslation() {
$username = 'Vladimir';
// 显示用户名为"Vladimir"的翻译消息
echo \Yii::t('app', 'Hello, {username}!', [
'username' => $username,
]), "<br>";
$username = 'John';
// 显示用户名为"John"的翻译消息
echo \Yii::t('app', 'Hello, {username}!', [
'username' => $username,
]), "<br>";
$price = 150;
$count = 3;
$subtotal = 450;
echo \Yii::t('app', 'Price: {0}, Count: {1}, Subtotal: {2}', [$price, $count, $subtotal]);
}
以下是输出。
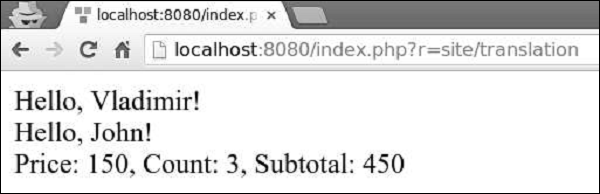
您可以翻译整个视图脚本,而不是翻译单个文本消息。例如,如果目标语言是 ru-RU,并且您想要翻译 views/site/index.php 视图文件,则应翻译该视图并将其保存在 views/site/ru-RU 目录下。
步骤 8 − 创建 views/site/ru-RU 目录结构。然后,在 ru-RU 文件夹中使用以下代码创建一个名为 index.php 的文件。
<?php
/* @var $this yii\web\View */
$this->title = 'My Yii Application';
?>
<div class = "site-index">
<div class = "jumbotron">
<h1>Добро пожаловать!</h1>
</div>
</div>
步骤 9 − 目标语言是 ru-RU,因此如果您输入 URL http://localhost:8080/index.php?r=site/index,您将看到包含俄语翻译的页面。
Yii - Gii
Gii 是一个扩展,它提供了一个基于 Web 的代码生成器,用于生成模型、表单、模块、CRUD 等。
默认情况下,以下生成器可用 −
模型生成器 − 为指定的数据库表生成一个 ActiveRecord 类。
CRUD 生成器 − 为指定的模型生成实现 CRUD(创建、读取、更新、删除)操作的控制器和视图。
控制器生成器 − 生成具有一个或多个控制器操作及其相应视图的新控制器类。
表单生成器 −生成一个视图脚本文件,该文件显示一个表单来收集指定模型类的输入。
模块生成器 − 生成 Yii 模块所需的框架代码。
扩展生成器 − 生成 Yii 扩展所需的文件。
要打开 gii 生成工具,请在 Web 浏览器的地址栏中输入 http://localhost:8080/index.php?r=gii:。
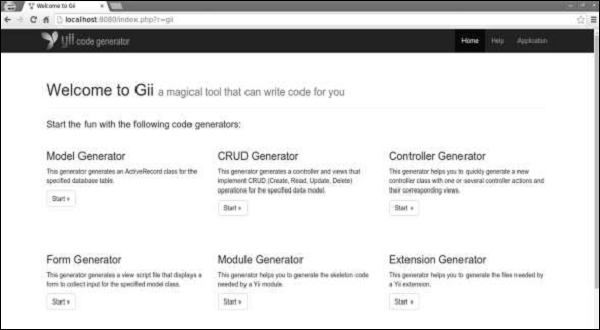
准备数据库
步骤 1 − 创建一个新数据库。数据库可以通过以下两种方式准备 −
在终端运行 mysql -u root –p
通过 CREATE DATABASE helloworld CHARACTER SET utf8 COLLATE utf8_general_ci;
创建新数据库
步骤 2 − 在 config/db.php 文件中配置数据库连接。以下配置针对当前使用的系统。
<?php
return [
'class' => 'yii\db\Connection',
'dsn' => 'mysql:host=localhost;dbname=helloworld',
'username' => 'vladimir',
'password' => '12345',
'charset' => 'utf8',
];
?>
步骤 3 − 在根文件夹中运行 ./yii migration/create test_table。此命令将创建一个数据库迁移来管理我们的数据库。迁移文件应出现在项目根目录的 migrations 文件夹中。
步骤 4 − 以这种方式修改迁移文件(在本例中为 m160106_163154_test_table.php)。
<?php
use yii\db\Schema;
use yii\db\Migration;
class m160106_163154_test_table extends Migration {
public function safeUp() {
$this->createTable("user", [
"id" => Schema::TYPE_PK,
"name" => Schema::TYPE_STRING,
"email" => Schema::TYPE_STRING,
]);
$this->batchInsert("user", ["name", "email"], [
["User1", "user1@gmail.com"],
["User2", "user2@gmail.com"],
["User3", "user3@gmail.com"],
["User4", "user4@gmail.com"],
["User5", "user5@gmail.com"],
["User6", "user6@gmail.com"],
["User7", "user7@gmail.com"],
["User8", "user8@gmail.com"],
["User9", "user9@gmail.com"],
["User10", "user10@gmail.com"],
["User11", "user11@gmail.com"],
]);
}
public function safeDown() {
$this->dropTable('user');
}
}
?>
上述迁移创建了一个 user 表,其中包含以下字段:id、name 和 email。它还添加了一些演示用户。
步骤 5 − 在项目根目录下 运行 ./yii migration 以将迁移应用于数据库。
步骤 6 − 现在,我们需要为我们的 user 表创建一个模型。为简单起见,我们将使用 Gii 代码生成工具。打开此 url:http://localhost:8080/index.php?r=gii。然后,单击"模型生成器"标题下的"开始"按钮。填写表名("user")和模型类("MyUser"),点击"预览"按钮,最后点击"生成"按钮。
MyUser 模型应该出现在模型目录中。
Gii - 创建模型
在 Gii 中创建模型 −
<?php
namespace app\models;
use app\components\UppercaseBehavior;
use Yii;
/**
* This is the model class for table "user".
*
* @property integer $id
* @property string $name
* @property string $email
*/
class MyUser extends \yii\db\ActiveRecord {
/**
* @inheritdoc
*/
public static function tableName() {
return 'user';
}
/**
* @inheritdoc
*/
public function rules() {
return [
[['name', 'email'], 'string', 'max' => 255]
];
}
/**
* @inheritdoc
*/
public function attributeLabels() {
return [
'id' => 'ID',
'name' => 'Name',
'email' => 'Email',
];
}
}
?>
生成 CRUD
让我们为 MyUser 模型生成 CRUD。
步骤 1 − 打开 CRUD 生成器界面,填写表单。

步骤 2 − 然后,点击"预览"按钮和"生成"。转到 URL http://localhost:8080/index.php?r=my-user,您将看到所有用户的列表。
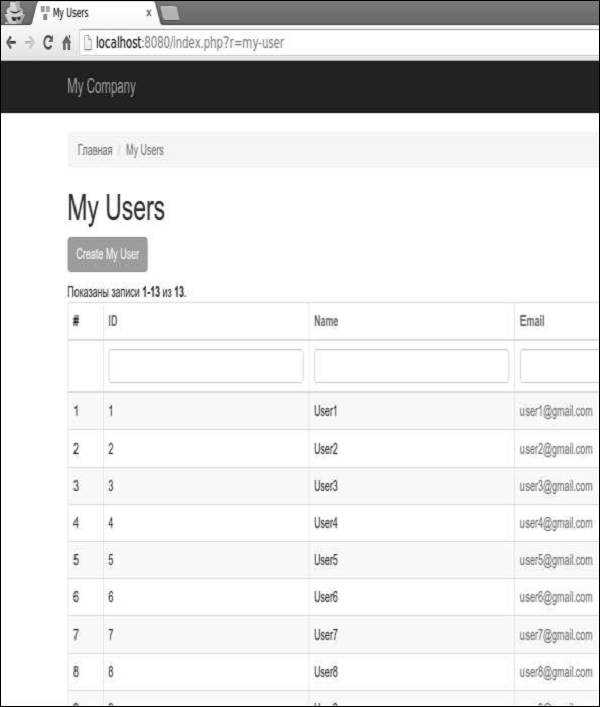
步骤 3 −打开 URL http://localhost:8080/index.php?r=my-user/create。您应该会看到一个用户创建表单。
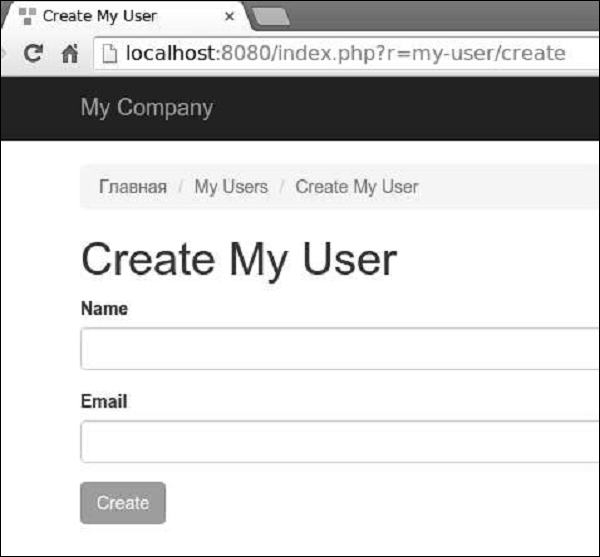
Gii - 生成控制器
让我们看看如何生成控制器。
步骤 1 − 要生成具有多个操作的控制器,请打开控制器生成器界面并填写表单。
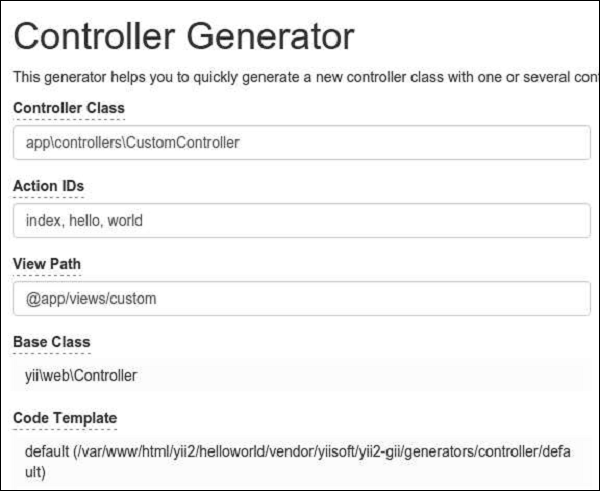
步骤 2 − 然后,单击"预览"按钮并"生成"。将在 controllers 文件夹中生成具有 index、hello 和 world 操作的 CustomController.php 文件。
<?php
namespace app\controllers;
class CustomController extends \yii\web\Controller {
public function actionHello() {
return $this->render('hello');
}
public function actionIndex() {
return $this->render('index');
}
public function actionWorld() {
return $this->render('world');
}
}
?>
表单生成
步骤 1 − 要从现有模型生成视图文件,请打开表单生成界面并填写表单。
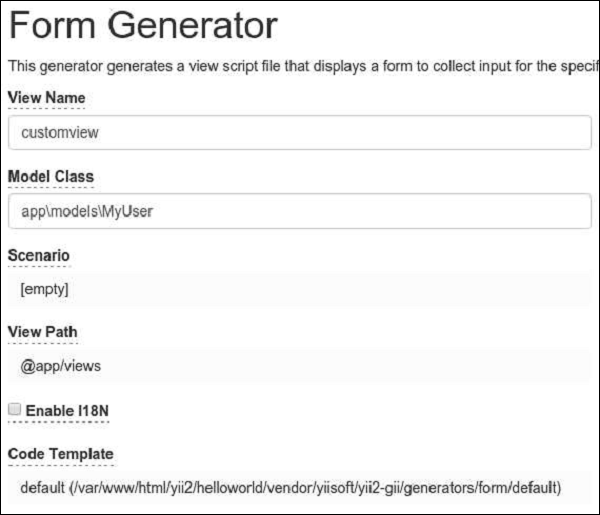
然后,单击"预览"按钮和"生成"。自定义视图文件将在视图文件夹中生成。
步骤 2 − 要显示它,请向 CustomController 添加一个新方法。
public function actionView() {
$model = new MyUser();
return $this->render('/customview', [
'model' => $model,
]);
}
步骤 3 − 要查看生成的视图文件,请打开 URL http://localhost:8080/index.php?r=custom/view。
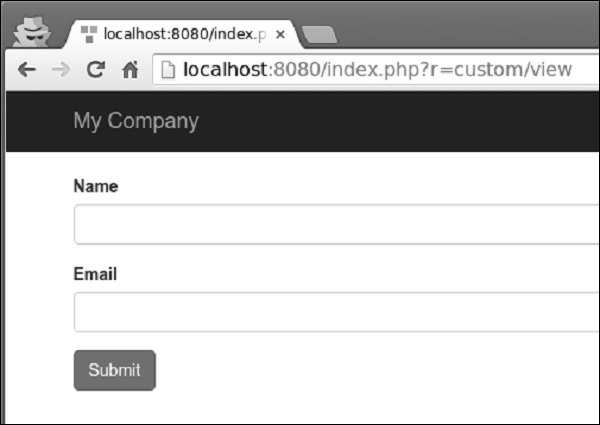
Gii - 生成模块
让我们看看如何生成模块。
步骤 1 − 要生成模块,请打开模块生成界面并填写表单。
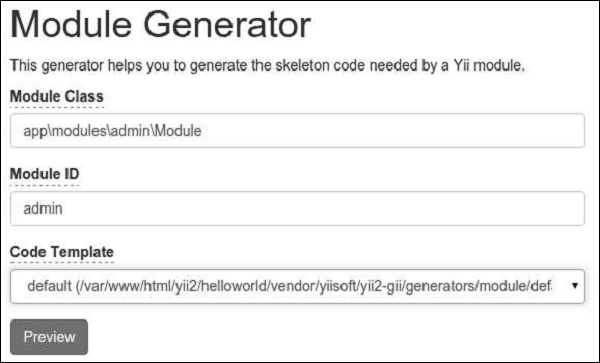
步骤 2 − 然后,单击"预览"按钮并"生成"。
步骤 3 − 我们需要激活模块。修改 config/web.php 文件中的 modules 应用程序组件。
'modules' => [
'admin' => [
'class' => 'app\modules\admin\Module',
],
],
步骤 4 − 要检查我们新生成的模块是否有效,请在 Web 浏览器中输入 UR http://localhost:8080/index.php?r=admin/default/index。