Yii - 缓存
缓存是提高应用程序性能的有效方法。缓存机制将静态数据存储在缓存中,并在请求时从缓存中获取。在服务器端,您可以使用缓存来存储基本数据,例如最新新闻列表。您还可以存储页面片段或整个网页。在客户端,您可以使用 HTTP 缓存将最近访问的页面保存在浏览器缓存中。
准备数据库
步骤 1 − 创建一个新数据库。数据库的准备可以通过以下两种方式进行。
在终端中运行mysql -u root –p
。通过CREATE DATABASE helloworld CHARACTER SET utf8 COLLATE utf8_general_ci;
创建新数据库
步骤 2 − 在 config/db.php 文件中配置数据库连接。以下配置适用于当前使用的系统。
<?php
   return [
      'class' => 'yii\db\Connection',
      'dsn' => 'mysql:host=localhost;dbname=helloworld',
      'username' => 'vladimir',
      'password' => '12345',
      'charset' => 'utf8',
   ];
?>
步骤 3 − 在根文件夹中运行 ./yii migration/create test_table。此命令将创建一个数据库迁移来管理我们的数据库。迁移文件应出现在项目根目录的 migrations 文件夹中。
步骤 4 − 以这种方式修改迁移文件(在本例中为 m160106_163154_test_table.php)。
<?php
   use yii\db\Schema;
   use yii\db\Migration;
   class m160106_163154_test_table extends Migration {
      public function safeUp()\ {
         $this->createTable("user", [
            "id" => Schema::TYPE_PK,
            "name" => Schema::TYPE_STRING,
            "email" => Schema::TYPE_STRING,
         ]);
         $this->batchInsert("user", ["name", "email"], [
            ["User1", "user1@gmail.com"],
            ["User2", "user2@gmail.com"],
            ["User3", "user3@gmail.com"],
            ["User4", "user4@gmail.com"],
            ["User5", "user5@gmail.com"],
            ["User6", "user6@gmail.com"],
            ["User7", "user7@gmail.com"],
            ["User8", "user8@gmail.com"],
            ["User9", "user9@gmail.com"],
            ["User10", "user10@gmail.com"],
            ["User11", "user11@gmail.com"],
         ]);
      }
      public function safeDown() {
         $this->dropTable('user');
      }
   }
?>
上述迁移创建了一个 user 表,其中包含以下字段:id、name 和 email。它还添加了一些演示用户。
步骤 5 − 在项目根目录下 运行 ./yii migration 以将迁移应用于数据库。
步骤 6 − 现在,我们需要为我们的 user 表创建一个模型。为简单起见,我们将使用 Gii 代码生成工具。打开此 url:http://localhost:8080/index.php?r=gii。然后,单击"模型生成器"标题下的"开始"按钮。填写表名("user")和模型类("MyUser"),点击"预览"按钮,最后点击"生成"按钮。
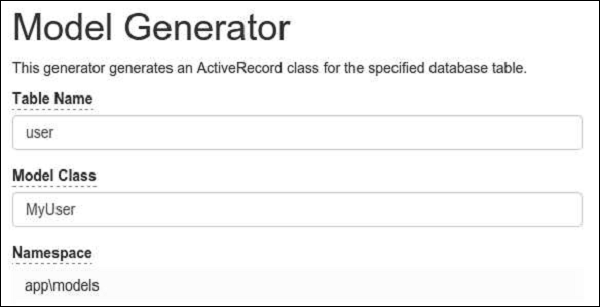
MyUser 模型应该出现在模型目录中。
数据缓存
数据缓存可帮助您将 PHP 变量存储在缓存中并在以后检索它们。数据缓存依赖于缓存组件,这些组件通常注册为应用程序组件。要访问应用程序组件,您可以调用 Yii::$app → cache。您可以注册多个缓存应用程序组件。
Yii 支持以下缓存存储 −
yii\caching\DbCache − 使用数据库表存储缓存数据。您必须按照 yii\caching\DbCache::$cacheTable 中指定的方式创建一个表。
yii\caching\ApcCache − 使用 PHP APC 扩展。
yii\caching\FileCache − 使用文件存储缓存数据。
yii\caching\DummyCache − 用作缓存占位符,不执行任何实际缓存。此组件的目的是简化需要检查缓存可用性的代码。
yii\caching\MemCache − 使用 PHP memcache 扩展。
yii\caching\WinCache −使用 PHP WinCache 扩展。
yii\redis\Cache − 实现基于 Redis 数据库的缓存组件。
yii\caching\XCache − 使用 PHP XCache 扩展。
所有缓存组件都支持以下 API −
get() − 使用指定的键从缓存中检索数据值。如果数据值已过期/无效或未找到,则返回 false 值。
add() − 如果在缓存中未找到键,则将由键标识的数据值存储在缓存中。
set() − 将由键标识的数据值存储在缓存中。
multiGet() − 使用指定的键从缓存中检索多个数据值。
multiAdd() − 将多个数据值存储在缓存中。每个项目都由一个键标识。如果缓存中已存在某个键,则将跳过该数据值。
multiSet() − 在缓存中存储多个数据值。每个项目都由一个键标识。
exists() − 返回一个值,指示是否在缓存中找到指定的键。
flush() − 从缓存中删除所有数据值。
delete() − 从缓存中删除由键标识的数据值。
存储在缓存中的数据值将永远保留在那里,除非它被删除。要更改此行为,可以在调用 set() 方法存储数据值时设置过期参数。
缓存的数据值也可能因缓存依赖项的更改而失效 −
yii\caching\DbDependency − 如果指定 SQL 语句的查询结果发生更改,则依赖项会更改。
yii\caching\ChainedDependency − 如果链上的任何依赖项发生更改,则依赖项会更改。
yii\caching\FileDependency − 如果文件的最后修改时间发生更改,则依赖项会更改。
yii\caching\ExpressionDependency −如果指定 PHP 表达式的结果发生变化,则依赖关系也会发生变化。
现在,将 cache 应用程序组件添加到您的应用程序中。
步骤 1 − 修改 config/web.php 文件。
<?php
   $params = require(__DIR__ . '/params.php');
   $config = [
      'id' => 'basic',
      'basePath' => dirname(__DIR__),
      'bootstrap' => ['log'],
      'components' => [
         'request' => [
            // !!! insert a secret key in the following (if it is empty) - this
               //is required by cookie validation
            'cookieValidationKey' => 'ymoaYrebZHa8gURuolioHGlK8fLXCKjO',
         ],
         'cache' => [
            'class' => 'yii\caching\FileCache',
         ],
         'user' => [
            'identityClass' => 'app\models\User',
            'enableAutoLogin' => true,
         ],
         'errorHandler' => [
            'errorAction' => 'site/error',
         ],
         'mailer' => [
            'class' => 'yii\swiftmailer\Mailer',
            // 默认将所有邮件发送到一个文件。您必须设置
            // 'useFileTransport' 为 false 并配置传输
            // 以便邮件程序发送真实的电子邮件。
            'useFileTransport' => true,
         ],
         'log' => [
            'traceLevel' => YII_DEBUG ? 3 : 0,
            'targets' => [
               [
                  'class' => 'yii\log\FileTarget',
                  'levels' => ['error', 'warning'],
               ],
            ],
         ],
         'db' => require(__DIR__ . '/db.php'),
      ],
      'modules' => [
         'hello' => [
            'class' => 'app\modules\hello\Hello',
         ],
      ],
      'params' => $params,
   ];
   if (YII_ENV_DEV) {
      // 针对"dev"环境的配置调整
      $config['bootstrap'][] = 'debug';
      $config['modules']['debug'] = [
         'class' => 'yii\debug\Module',
      ];
      $config['bootstrap'][] = 'gii';
      $config['modules']['gii'] = [
         'class' => 'yii\gii\Module',
      ];
   }
   return $config;
?>
步骤 2 − 向 SiteController 添加一个名为 actionTestCache() 的新函数。
public function actionTestCache() {
    $cache = Yii::$app->cache;
    // 尝试从缓存中检索 $data
    $data = $cache->get("my_cached_data");
    if ($data === false) {
        // 在缓存中找不到 $data,从头开始计算
        $data = date("d.m.Y H:i:s");
        // 将 $data 存储在缓存中,以便下次检索
        $cache->set("my_cached_data", $data, 30);
    }
    // $data 在此处可用
    var_dump($data);
}
步骤 3 − 在 Web 浏览器的地址栏中输入 http://localhost:8080/index.php?r=site/test-cache,您将看到以下内容。
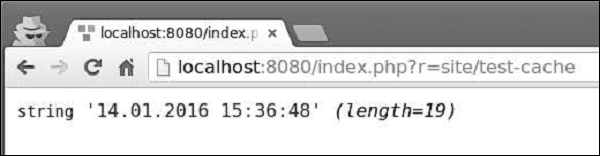
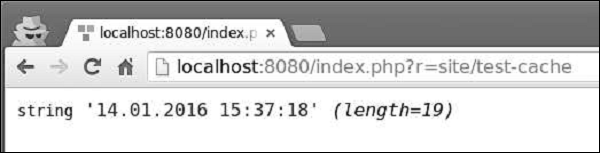
步骤 4 − 如果您重新加载页面,您应该注意到日期没有改变。日期值已被缓存,缓存将在 30 秒内过期。30 秒后重新加载页面。
查询缓存
查询缓存为您提供缓存数据库查询的结果。查询缓存需要 DB 连接和缓存应用程序组件。
步骤 1 − 向 SiteController 添加一个名为 actionQueryCaching() 的新方法。
public function actionQueryCaching() {
   $duration = 10;
   $result = MyUser::getDb()->cache(function ($db) {
      return MyUser::find()->count();
   }, $duration);
   var_dump($result);
   $user = new MyUser();
   $user->name = "cached user name";
   $user->email = "cacheduseremail@gmail.com";
   $user->save();
   echo "==========";
   var_dump(MyUser::find()->count());
}
在上面的代码中,我们缓存了数据库查询,添加了一个新用户,并显示用户数量。
步骤 2 − 转到 URL http://localhost:8080/index.php?r=site/query-caching 并重新加载页面。
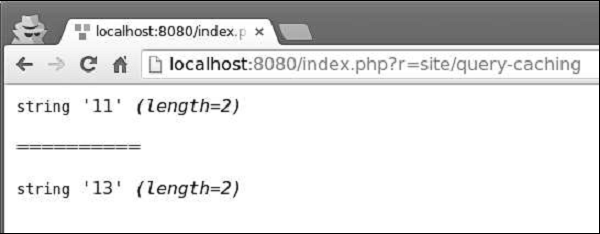
当我们第一次打开页面时,我们缓存了数据库查询并显示所有用户数量。当我们重新加载页面时,缓存的数据库查询的结果与之前相同,因为数据库查询已被缓存。
您可以使用以下命令从控制台刷新缓存 −
yii cache −显示可用的缓存组件。
yii cache/flush cache1 cache2 cache3 − 刷新缓存组件 cache1、cache2 和 cache3。
yii cache/flush-all − 刷新所有缓存组件。
步骤 3 − 在应用程序的项目根目录中运行 ./yii cache/flush-all。


