Fetch API - 请求
在Fetch API中,Request 接口用于创建资源请求。 这是除 fetch() 函数之外创建请求的另一种方法。 它还提供了我们可以应用于请求的各种属性和方法。 因此,我们首先了解Request()构造函数,然后了解如何发送请求,最后了解Request接口提供的方法和属性。
构造函数
要创建请求对象,我们可以使用 Request() 构造函数和 new 关键字。 该构造函数包含一个强制参数,即资源的 URL,另一个参数是可选的。
语法
const newRequest = new Request(resourceURL)
Or
const newRequest = new Request(resourceURL, optional)
Request()构造函数有以下参数 −
resourceURL − 我们要获取的资源。 它的值可以是资源 URL 或 Request 对象。
optional − 为请求提供附加设置的对象,自定义选项如下 −
method − 代表GET、POST、PUT、DELETE等请求方法。
headers − 为请求设置标头。
body − 将数据添加到请求中。 GET 或 HEAD 方法不使用此参数。
mode − 设置请求的模式,例如 cors、同源、no-cors 或导航。 默认情况下,mode 参数的值为 cors。
credentials − 它设置您要用于请求的凭据,例如省略、同源或包含。 该参数默认为同源。
cache − 设置您的请求所需的缓存模式。
redirect − 用于重定向模式,例如跟随、错误或手动。 默认情况下,该参数设置为跟随值。
referrer − 表示请求的引用者的字符串,例如客户端、URL 或无引用者。 该参数的默认值与客户端有关。
referrerPolicy − 用于设置引荐来源网址策略。
integrity − 用于设置给定请求的子资源完整性值。
keepalive − 用于检查是否为多个请求/响应创建持久连接。
signal − 表示一个 AbortSignal 对象,用于与请求通信或中止请求。
priority − 用于设置请求相对于其他请求的优先级。 该参数的可能值为:
high − 与其他请求相比,将当前获取请求的优先级设置为高。
low − 与其他请求相比,将当前获取请求的优先级设置为较低。
auto − 自动查找当前获取请求的优先级。
发送请求
要发送请求,我们必须首先使用 Request 构造函数创建一个 Request 对象,并附加一些参数,如 header、body、method、资源 URL 等。然后将这个对象传递到 fetch() 函数中,将请求发送到 服务器。 现在 fetch() 函数返回一个promise ,该promise 将使用响应对象进行解析。 如果遇到错误,则执行 catch 块。
示例
在下面的程序中,我们创建一个脚本来使用 Request 对象发送数据。 为此,我们使用 Request() 构造函数以及类似参数创建一个请求对象 −
URL − 表示资源 URL。
method − 这里我们使用 POST 方法,表示我们正在向服务器发送数据。
body − 包含我们要发送的数据。
header − 它表明该数据是 JSON 数据。
现在我们在 fetch() 函数中传递 request 对象来发送请求并处理服务器返回的响应,并在发生错误时进行处理。
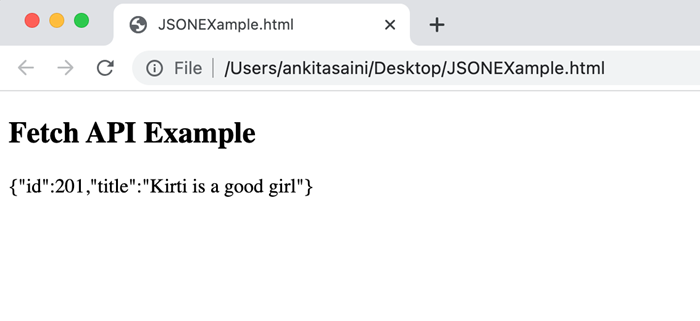
<!DOCTYPE html>
<html>
<body>
<script>
   // Creating request object
   const myRequest = new Request("https://jsonplaceholder.typicode.com/todos", {
      // Setting POST request
      method: "POST",

      // Add body which contains data
      body: JSON.stringify({
      id: 321,
      title: "Kirti is a good girl",
      }),

      // Setting header
      headers:{"Content-type": "application/json; charset=UTF-8"}
   });
   fetch(myRequest)

   // Handling response
   .then(response => response.json())
   .then(myData => {
      console.log("Data Sent Successfully");
      // Display output
      document.getElementById("sendData").innerHTML = JSON.stringify(myData);
   })

   // Handling error
   .catch(err=>{
      console.error("We get an error:", err);
   });
</script>
   <h2>Fetch API Example</h2>
   <div>
      <!-- Displaying retrieved data-->
      <p id="sendData"></p>
   </div>
</body>
</html>
输出
实例属性
请求接口提供的属性是只读属性。 所以常用的属性有 −
| Sr.No. | 属性和描述 |
|---|---|
| 1 | Request.url 此属性包含给定请求的 URL。 |
| 2 | Request.body 此属性包含给定请求的正文。 |
| 3 | Request.bodyUsed 该属性用于判断是否使用请求中存在的正文。 它的值为布尔值。 |
| 4 | Request.destination 该属性用于告知请求的目的地。 |
| 5 | Request.method 该属性包含 GET、POST、PUT 和 DELETE 等请求方法。 |
| 6 | Request.headers 该属性包含请求的标头对象。 |
| 7 | Request.cache 此属性包含给定请求的缓存模式。 |
| 8 | Request.credentials 此属性包含给定请求的凭据。 |
| 9 | Request.mode 该属性包含给定请求的模式。 |
示例
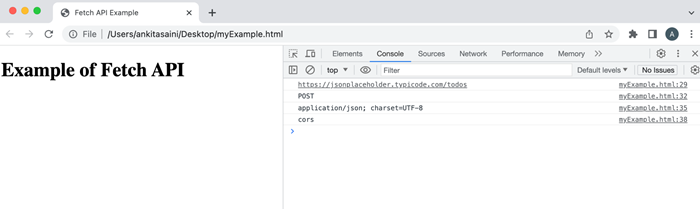
在下面的程序中,我们使用Request接口提供的属性(例如url、方法、标头和模式)。
<!DOCTYPE html>
<html>
<head>
   <title>Fetch API Example</title>
</head>
<body>
   <h1>Example of Fetch API</h1>
<script>
   // Creating request object
   const myRequest = new Request("https://jsonplaceholder.typicode.com/todos", {
      // Setting POST request
      method: "POST",

      // Add body which contains data
      body: JSON.stringify({
         id: 321,
         title: "Kirti is a good girl",
      }),
      // Setting header
      headers:{"Content-type": "application/json; charset=UTF-8"},
      mode: "cors"
   });
   // Display url of the request
   console.log(myRequest.url);

   // Display request method
   console.log(myRequest.method);

   // Display header of the request
   console.log(myRequest.headers.get('content-Type'));

   // Display mode of the request
   console.log(myRequest.mode);
</script>
</body>
</html>
输出
方法
以下是Request接口的常用方法 −
| Sr.No. | 方法及说明 |
|---|---|
| 1 | Request.arrayBuffer() 此方法用于解析具有请求正文的 ArrayBuffer 表示形式的promise 。 |
| 2 | Request.blob() 此方法用于解析带有请求正文的 blob 表示形式的 Promise。 |
| 3 | Request.clone() 该方法用于创建当前请求的副本。 |
| 4 | Request.json() 此方法用于将请求正文解析为 JSON,并使用解析结果解析 Promise。 |
| 5 | Request.text() 此方法用于解析带有请求正文文本表示形式的promise 。 |
| 6 | Request.formData() 此方法用于解析具有请求正文的 formData 表示形式的 Promise。 |
示例
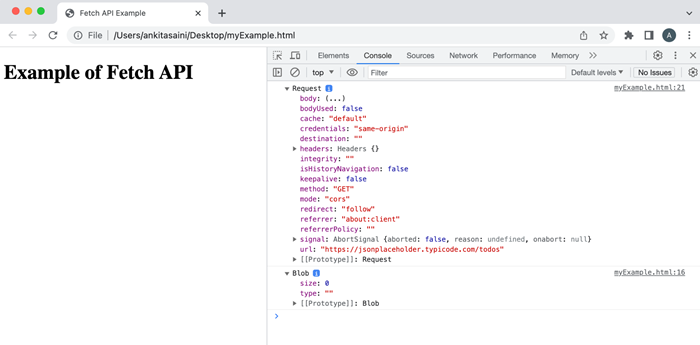
在下面的程序中,我们使用了Request接口提供的方法(例如blob、clone等)。
<!DOCTYPE html>
<html>
<head>
   <title>Fetch API Example</title>
</head>
<body>
   <h1>Example of Fetch API</h1>
<script>
   // Creating request object
   const myRequest = new Request("https://jsonplaceholder.typicode.com/todos");

   // Using blob() method
   myRequest.blob()
   .then(data =>{
      console.log(data)
   });

   // Creating a copy of the request using the clone() method
   const duplicate = myRequest.clone();
   console.log(duplicate);
</script>
</body>
</html>
输出
结论
这就是 Fetch API 中 Request 接口的工作原理。 它提供了多种构建和定制请求的方法。 或者我们可以说它提供了灵活性以及对请求的更多控制。 现在在下一篇文章中,我们将看到如何在 Fetch API 中使用 Response 接口。


