XAML - 模板
模板描述控件的整体外观和视觉效果。对于每个控件,都有一个与之关联的默认模板,该模板赋予该控件外观。
在 XAML 中,当您想要自定义控件的视觉行为和视觉效果时,您可以轻松创建自己的模板。逻辑和模板之间的连接可以通过数据绑定实现。
样式和模板之间的主要区别是 −
样式只能使用控件的默认属性更改控件的外观。
使用模板,您可以访问控件的更多部分,而使用样式则不行。您还可以指定控件的现有行为和新行为。
有两种类型的模板最常用。
- 控件模板
- 数据模板
控件模板
控件模板定义或指定控件的视觉外观和结构。所有 UI 元素都具有某种外观和行为,例如,按钮具有外观和行为。单击事件或鼠标悬停事件是响应单击和悬停而触发的行为,并且按钮还有默认外观,可以通过控件模板进行更改。
让我们再看一个简单的示例,其中创建了两个具有一些属性的按钮。一个使用 template,另一个使用 default 按钮。
<Window x:Class = "TemplateDemo.MainWindow"
   xmlns = "http://schemas.microsoft.com/winfx/2006/xaml/presentation"
   xmlns:x = "http://schemas.microsoft.com/winfx/2006/xaml"
   Title = "MainWindow" Height = "350" Width = "604">

   <Window.Resources>
      <ControlTemplate x:Key = "ButtonTemplate" TargetType = "Button">
         <Grid>
            <Ellipse x:Name = "ButtonEllipse" Height = "100" Width = "150" >
               <Ellipse.Fill>
                  <LinearGradientBrush StartPoint = "0,0.2" EndPoint = "0.2,1.4">
                     <GradientStop Offset = "0" Color = "Red"/>
                     <GradientStop Offset = "1" Color = "Orange"/>
                  </LinearGradientBrush>
               </Ellipse.Fill>
            </Ellipse>
            <ContentPresenter Content = "{TemplateBinding Content}"
               HorizontalAlignment = "Center" VerticalAlignment = "Center" />
         </Grid>
         <ControlTemplate.Triggers>
            <Trigger Property = "IsMouseOver" Value = "True">
               <Setter TargetName = "ButtonEllipse" Property = "Fill" >
                  <Setter.Value>
                     <LinearGradientBrush StartPoint = "0,0.2" EndPoint="0.2,1.4">
                        <GradientStop Offset = "0" Color = "YellowGreen"/>
                        <GradientStop Offset = "1" Color = "Gold"/>
                     </LinearGradientBrush>
                  </Setter.Value>
               </Setter>
            </Trigger>

            <Trigger Property = "IsPressed" Value = "True">
               <Setter Property = "RenderTransform">
                  <Setter.Value>
                     <ScaleTransform ScaleX = "0.8" ScaleY = "0.8" CenterX = "0" CenterY = "0" />
                  </Setter.Value>
               </Setter>

               <Setter Property = "RenderTransformOrigin" Value = "0.5,0.5" />
            </Trigger>
         </ControlTemplate.Triggers>
      </ControlTemplate>
   </Window.Resources>

   <StackPanel>
      <Button Content = "Round Button!" Template = "{StaticResource ButtonTemplate}"
         Width = "150" Margin = "50" />
      <Button Content = "Default Button!" Height = "40" Width = "150" Margin = "5" />
   </StackPanel>

</Window>
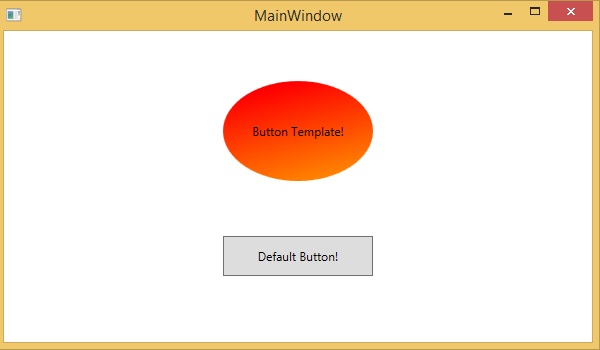
当编译并执行上述代码时,它将生成以下 MainWindow −

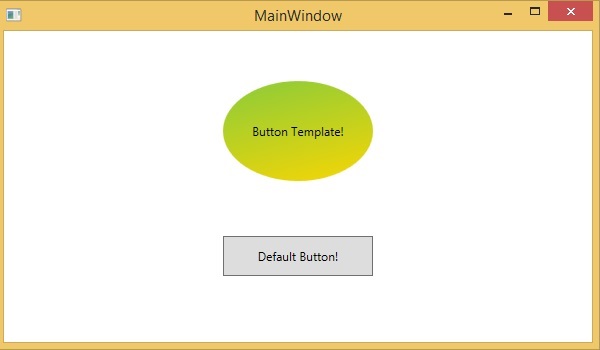
当您将鼠标悬停在具有自定义模板的按钮上时,它也会改变颜色,如下所示 −

数据模板
数据模板定义并指定数据集合的外观和结构。它提供了格式化和定义任何 UI 元素上数据呈现的灵活性。它主要用于与数据相关的项目控件,例如 ComboBox、ListBox 等。
让我们看一个简单的数据模板示例。以下 XAML 代码使用数据模板和文本块创建一个组合框。
<Window x:Class = "XAMLDataTemplate.MainWindow"
   xmlns = "http://schemas.microsoft.com/winfx/2006/xaml/presentation"
   xmlns:x = "http://schemas.microsoft.com/winfx/2006/xaml"
   Title = "MainWindow" Height = "350" Width = "604">

   <Grid VerticalAlignment = "Top">
      <ComboBox Name = "Presidents" ItemsSource = "{Binding}" Height = "30" Width = "400">
         <ComboBox.ItemTemplate>
            <DataTemplate>
               <StackPanel Orientation = "Horizontal" Margin = "2">
                  <TextBlock Text = "Name: " Width = "95" Background = "Aqua" Margin = "2" />
                  <TextBlock Text = "{Binding Name}" Width = "95" Background = "AliceBlue" Margin = "2" />
                  <TextBlock Text = "Title: " Width = "95" Background = "Aqua" Margin = "10,2,0,2" />
                  <TextBlock Text = "{Binding Title}" Width = "95" Background = "AliceBlue" Margin = "2" />
               </StackPanel>
            </DataTemplate>
         </ComboBox.ItemTemplate>
      </ComboBox>
   </Grid>

</Window>
以下是 C# 中的实现,其中将员工对象分配给 DataContext −
using System;
using System.Windows;
using System.Windows.Controls;

namespace XAMLDataTemplate {
   /// <summary>
      /// Interaction logic for MainWindow.xaml
   /// </summary>

   public partial class MainWindow : Window {
      public MainWindow() {
         InitializeComponent();
         DataContext = Employee.GetEmployees();
      }
   }
}
以下是 Employee 类的 C# 实现 −
using System;
using System.Collections.Generic;
using System.Collections.ObjectModel;
using System.ComponentModel;
using System.Linq;
using System.Runtime.CompilerServices;
using System.Text;
using System.Threading.Tasks;

namespace XAMLDataTemplate {
   public class Employee : INotifyPropertyChanged {
      private string name; public string Name {
         get { return name; }
         set { name = value; RaiseProperChanged(); }
      }
      private string title; public string Title {
         get { return title; }
         set { title = value; RaiseProperChanged(); }
      }
      public static Employee GetEmployee() {
         var emp = new Employee() {
            Name = "Waqas", Title = "Software Engineer" };
         return emp;
      }
      public event PropertyChangedEventHandler PropertyChanged;
      private void RaiseProperChanged( [CallerMemberName] string caller = ""){
         if (PropertyChanged != null) {
            PropertyChanged(this, new PropertyChangedEventArgs(caller));
         }
      }
      public static ObservableCollection<Employee> GetEmployees() {
         var employees = new ObservableCollection<Employee>();
         employees.Add(new Employee() { Name = "Ali", Title = "Developer" });
         employees.Add(new Employee() { Name = "Ahmed", Title = "Programmer" });
         employees.Add(new Employee() { Name = "Amjad", Title = "Desiner" });
         employees.Add(new Employee() { Name = "Waqas", Title = "Programmer" });
         employees.Add(new Employee() { Name = "Bilal", Title = "Engineer" });
         employees.Add(new Employee() { Name = "Waqar", Title = "Manager" });
         return employees;
      }
   }
}
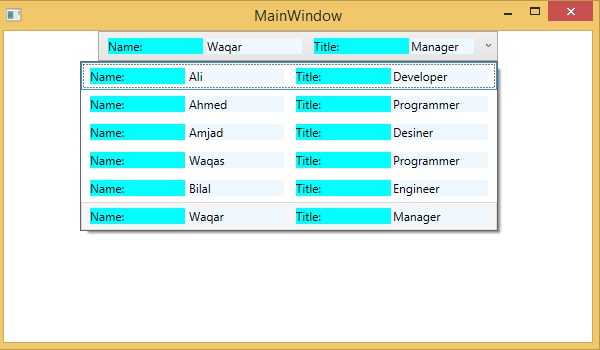
当上述代码被编译并执行时,它将产生以下输出。它包含一个组合框,当您单击组合框时,您会看到在 Employee 类中创建的数据集合被列为组合框项。

我们建议您执行上述代码并进行试验。


