Angular 4 - 指令
Angular 中的
Directives 是一个 js 类,声明为 @directive。 我们在 Angular 中有 3 个指令。 下面列出了指令 −
Component 组件指令
这些构成了主类,其中包含如何在运行时处理、实例化和使用组件的详细信息。
Structural 结构指令
Structural 结构指令主要处理 dom 元素的操作。 结构指令在指令前有一个 * 符号。 例如,*ngIf 和 *ngFor。
Attribute 属性指令
Attribute 属性指令用于更改 dom 元素的外观和行为。 您可以创建自己的指令,如下所示。
如何创建自定义指令?
在本节中,我们将讨论在组件中使用的自定义指令。 自定义指令由我们创建,不是标准的。
让我们看看如何创建自定义指令。 我们将使用命令行创建指令。 使用命令行创建指令的命令是 −
ng g directive nameofthedirective

e.g

ng g directive changeText
这就是它在命令行中的显示方式
C:\projectA4\Angular 4-app>ng g directive changeText
installing directive
   create src\app\change-text.directive.spec.ts
   create src\app\change-text.directive.ts
   update src\app\app.module.ts
创建上述文件,即 change-text.directive.spec.ts 和 change-text.directive.ts,并更新 app.module.ts 文件。
app.module.ts
import { BrowserModule } from '@angular/platform-browser';
import { NgModule } from '@angular/core';
import { AppComponent } from './app.component';

import { NewCmpComponent } from './new-cmp/new-cmp.component';
import { ChangeTextDirective } from './change-text.directive';

@NgModule({
   declarations: [
      AppComponent,
      NewCmpComponent,
      ChangeTextDirective
   ],

   imports: [
      BrowserModule
   ],

   providers: [],
   bootstrap: [AppComponent]
})

export class AppModule { }
ChangeTextDirective 类包含在上述文件的声明中。 该类也是从下面给出的文件导入的。
changeText 指令
import { Directive } from '@angular/core';
@Directive({
   selector: '[changeText]'
})

export class ChangeTextDirective {
   constructor() { }
}
上面的文件有一个指令,它还有一个选择器属性。 无论我们在选择器中定义什么,它都必须在我们分配自定义指令的视图中匹配。
在 app.component.html 视图中,我们添加如下指令 −
<div style="text-align:center">
   <span changeText >Welcome to {{title}}.</span>
</div>
我们将在 change-text.directive.ts 文件中写入更改,如下所示 −
change-text.directive.ts
import { Directive, ElementRef} from '@angular/core';
@Directive({
   selector: '[changeText]'
})

export class ChangeTextDirective {
   constructor(Element: ElementRef) {
      console.log(Element);
      Element.nativeElement.innerText="Text is changed by changeText Directive. ";
   }
}
在上面的文件中,有一个名为 ChangeTextDirective 的类和一个构造函数,该构造函数采用 ElementRef 类型的元素,这是必需的。 该元素包含应用 Change Text 指令的所有详细信息。
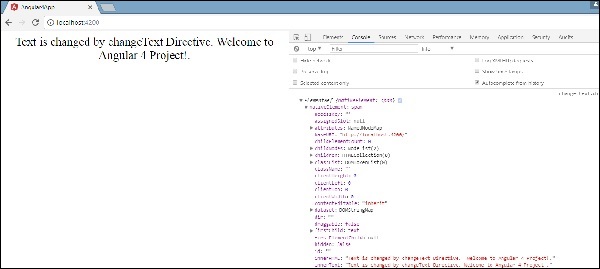
我们添加了 console.log 元素。 可以在浏览器控制台中看到相同的输出。 元素的文本也发生了更改,如上所示。
现在,浏览器将显示以下内容。


