Three.js - 纹理
纹理是添加到材质中的图像或颜色,用于提供更多细节或美感。纹理是 Three.js 中的一个重要主题。在本节中,我们将了解如何将基本纹理应用于我们的材质。
基本纹理
首先,您应该创建一个加载器。Three.js 有一个内置函数 TextureLoader(),用于将纹理加载到您的 Three.js 项目中。然后,您可以通过在 load() 函数中指定其路径来加载任何纹理或图像。
const loader = new THREE.TextureLoader()
texture.load('/path/to/the/image')
然后,将材质的 map 属性设置为此纹理。就是这样;您已将纹理应用于平面几何体。
纹理具有用于重复、偏移和旋转纹理的设置。默认情况下,three.js 中的纹理不会重复。有两个属性,wrapS(水平环绕)和 wrapT(垂直环绕)用于设置纹理是否重复。并将重复模式设置为 THREE.ReaptWrapping。
texture.wrapS = THREE.RepeatWrapping
texture.wrapT = THREE.RepeatWrapping
texture.magFilter = THREE.NearestFilter
在 Three.js 中,您可以选择当纹理绘制得大于其原始尺寸时发生的情况以及当纹理绘制得小于其原始尺寸时发生的情况。
对于设置滤镜,当纹理大于其原始尺寸时,您可以将 Texture.magFilter 属性设置为 THREE.NearestFilter 或 THREE.LinearFilter。
NearestFilter −此滤镜使用它能找到的最近的纹素的颜色。
LinearFilter − 此滤镜更高级,使用四个相邻纹素的颜色值来确定正确的颜色。
并且,您可以添加重复纹理的次数。
const timesToRepeatHorizontally = 4
const timesToRepeatVertically = 2
texture.repeat.set(timesToRepeatHorizontally, timesToRepeatVertically)
示例
查看以下示例。
texture.html
<!DOCTYPE html>
<html lang="en">
   <head>
      <meta charset="UTF-8" />
      <meta http-equiv="X-UA-Compatible" content="ie=edge" />
      <meta name="viewport" content="width=device-width, initial-scale=1.0" />
      <title>Three.js - Checker Board</title>
      <style>
         * {
            margin: 0;
            padding: 0;
            box-sizing: border-box;
            font-family: -applesystem, BlinkMacSystemFont, 'Segoe UI', Roboto, Oxygen, Ubuntu,
            Cantarell, 'Open Sans', 'Helvetica Neue', sans-serif;
         }
         html,
         body {
            height: 100vh;
            width: 100vw;
         }
         #threejs-container {
            position: block;
            width: 100%;
            height: 100%;
         }
      </style>
      <script src="https://cdnjs.cloudflare.com/ajax/libs/three.js/r128/three.min.js"></script>
      <script src="https://cdnjs.cloudflare.com/ajax/libs/dat-gui/0.7.7/dat.gui.js"></script>
   </head>
   <body>
      <div id="threejs-container"></div>
      <script type="module">
         // Creating a checker-board using Textures
         // applying the texture to 2d plane geometry
         // GUI
         const gui = new dat.GUI()
         // 尺寸
         let width = window.innerWidth
         let height = window.innerHeight
         // 场景
         const scene = new THREE.Scene()
         scene.background = new THREE.Color(0x262626)
         // 相机
         const camera = new THREE.PerspectiveCamera(75, width / height, 0.1, 100)
         camera.position.set(0, 0, 10)
         const camFolder = gui.addFolder('Camera')
         camFolder.add(camera.position, 'z').min(10).max(60).step(10)
         camFolder.open()
         // 灯光
         const ambientLight = new THREE.AmbientLight(0xffffff, 1)
         scene.add(ambientLight)
         // texture
         const planeSize = 10
         const loader = new THREE.TextureLoader()
         const texture = loader.load(' https://cloud-nfpbfxp6x-hack-clubbot.vercel.app/0height.png ')
         texture.wrapS = THREE.RepeatWrapping
         texture.wrapT = THREE.RepeatWrapping
         texture.magFilter = THREE.NearestFilter
         const repeats = planeSize / 2
         texture.repeat.set(repeats, repeats)
         class StringToNumberHelper {
            constructor(obj, prop) {
               this.obj = obj
               this.prop = prop
            }
            get value() {
               return this.obj[this.prop]
            }
            set value(v) {
               this.obj[this.prop] = parseFloat(v)
            }
         }
         const wrapModes = {
            ClampToEdgeWrapping: THREE.ClampToEdgeWrapping,
            RepeatWrapping: THREE.RepeatWrapping,
            MirroredRepeatWrapping: THREE.MirroredRepeatWrapping
         }
         function updateTexture() {
            texture.needsUpdate = true
         }
         gui
            .add(new StringToNumberHelper(texture, 'wrapS'), 'value', wrapModes)
            .name('texture.wrapS')
            .onChange(updateTexture)
         gui
            .add(new StringToNumberHelper(texture, 'wrapT'), 'value', wrapModes)
            .name('texture.wrapT')
            .onChange(updateTexture)
         gui.add(texture.repeat, 'x', 0, 5, 0.01).name('texture.repeat.x')
         gui.add(texture.repeat, 'y', 0, 5, 0.01).name('texture.repeat.y')
         // plane for board
         const geometry = new THREE.PlaneGeometry(planeSize, planeSize)
         const material = new THREE.MeshPhongMaterial({
            map: texture,
            side: THREE.DoubleSide
         })
         const board = new THREE.Mesh(geometry, material)
         board.position.set(0, 0, 0)
         scene.add(board)
         // 响应性
         window.addEventListener('resize', () => {
            width = window.innerWidth
            height = window.innerHeight
            camera.aspect = width / height
            camera.updateProjectionMatrix()
            renderer.setSize(window.innerWidth, window.innerHeight)
            renderer.render(scene, camera)
         })
         // 渲染器
         const renderer = new THREE.WebGL1Renderer()
         renderer.setSize(width, height)
         renderer.setPixelRatio(Math.min(window.devicePixelRatio, 2))
         // 动画
         function animate() {
            requestAnimationFrame(animate)
            renderer.render(scene, camera)
         }
         // 渲染场景
         const container = document.querySelector('#threejs-container')
         container.append(renderer.domElement)
         renderer.render(scene, camera)
         console.log(scene.children)
         animate()
      </script>
   </body>
</html>
输出
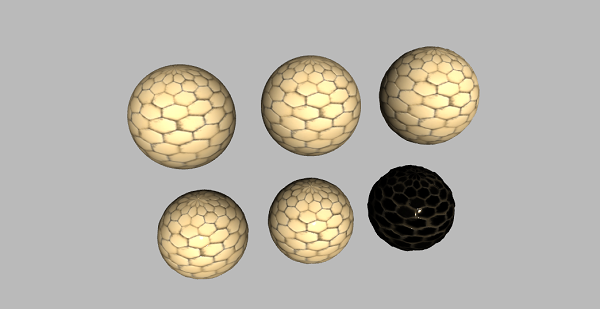
纹理映射
基本颜色映射
这是您添加到对象纹理的基本彩色图像。使用基本颜色映射,我们可以将颜色添加到表面。
const TextureMap = new THREE.TextureLoader().load('/path/to/texture-map')
material.map = TextureMap
您可以使用凹凸贴图、法线贴图或距离贴图添加深度效果。
凹凸贴图
凹凸贴图是灰度图像,其中每个像素的强度决定高度。您只需将材质的 BumpMap 属性设置为纹理即可。它为纹理添加了精细的细节。
const TextureBumpMap = new THREE.TextureLoader().load('/path/to/bump-map')
material.bumpMap = TextureBumpMap
法线贴图
法线贴图描述了每个像素的法线向量,该法线向量应用于计算光线如何影响几何图形中使用的材质。它为平坦表面创造了一种深度感。
const TextureNormalMap = new THREE.TextureLoader().load('/path/to/normal-map')
material.normalMap = TextureNormalMap
位移贴图
虽然法线贴图给人一种深度感,但我们会根据纹理信息使用位移贴图来改变模型的形状。
const textureDisplacementMap = new THREE.TextureLoader().load(
   '/path/to/displacement-map'
)
material.displacemetMap = textureDisplacementMap
粗糙度图
粗糙度图定义哪些区域是粗糙的,并且会影响表面的反射锐度。
const TextureRoughnessMap = new THREE.TextureLoader().load(
    '/path/to/roughness-map'
)
material.roughnessMap = TextureRoughnessMap
环境光遮蔽图
它突出显示了对象的阴影区域。它需要第二组 UV。
const TextureAmbientOcclusionMap = new THREE.TextureLoader().load(
    '/path/to/AmbientOcclusion-map'
)
material.aoMap = TextureAmbientOcclusionMap
// 第二个 UV
mesh.geometry.attributes.uv2 = mesh.geometry.attributes.uv
如果将对象与粗糙度图和环境光遮蔽图进行比较,可以观察到使用 aoMap 后阴影更加突出。
金属度图
它定义了材料像金属的程度。
const TextureMetalnessMap = new THREE.TextureLoader().load(
    '/path/to/metalness-map'
)
material.metalnessMap = TextureMetalnessMap
示例
现在,查看以下示例
texture-maps.html
<!DOCTYPE html>
<html lang="en">
   <head>
      <meta charset="UTF-8" />
      <meta http-equiv="X-UA-Compatible" content="ie=edge" />
      <meta name="viewport" content="width=device-width, initial-scale=1.0" />
      <title>Three.js - Texture Mapping</title>
      <style>
         * {
            margin: 0;
            padding: 0;
            box-sizing: border-box;
            font-family: -applesystem, BlinkMacSystemFont, 'Segoe UI', Roboto, Oxygen, Ubuntu,
            Cantarell, 'Open Sans', 'Helvetica Neue', sans-serif;
         }
         html,
         body {
            height: 100vh;
            width: 100vw;
         }
         #threejs-container {
            position: block;
            width: 100%;
            height: 100%;
         }
      </style>
      <script src="https://cdnjs.cloudflare.com/ajax/libs/three.js/r128/three.min.js"></script>
      <script src="https://cdnjs.cloudflare.com/ajax/libs/dat-gui/0.7.7/dat.gui.js"></script>
   </head>
   <body>
      <div id="threejs-container"></div>
      <script type="module">
         // 使用不同类型的纹理贴图
         import { OrbitControls } from "https://threejs.org/examples/jsm/controls/OrbitControls.js"

         // 尺寸
         let width = window.innerWidth
         let height = window.innerHeight
         // 场景
         const scene = new THREE.Scene()
         scene.background = new THREE.Color(0xffffff)
         // lights
         const ambientLight = new THREE.AmbientLight(0xffffff, 0.5)
         scene.add(ambientLight)
         const light = new THREE.DirectionalLight(0xffffff, 4.0)
         light.position.set(0, 10, 20)
         light.castShadow = true
         light.shadow.mapSize.width = 512
         light.shadow.mapSize.height = 512
         light.shadow.camera.near = 0.5
         light.shadow.camera.far = 100
         scene.add(light)
         // 相机
         const camera = new THREE.PerspectiveCamera(45, width / height, 0.1, 100)
         camera.position.set(0, 0, 10)
         // textures
         const loader = new THREE.TextureLoader()
         const texture = loader.load('https://cloud-nfpbfxp6x-hack-clubbot.vercel.app/5basecolor.jpg')
         const normalmap = loader.load('https://cloud-nfpbfxp6x-hack-clubbot.vercel.app/2normal.jpg')
         const heightmap = loader.load('https://cloud-nfpbfxp6x-hack-clubbot.vercel.app/0height.png')
         const roughmap = loader.load('https://cloud-nfpbfxp6x-hack-clubbot.vercel.app/3roughness.jpg')
         const ambientOcclusionmap = loader.load('https://cloud-nfpbfxp6x-hackclub-bot.vercel.app/4ambientocclusion.jpg')
         const metallicmap = loader.load('https://cloud-nfpbfxp6x-hack-clubbot.vercel.app/1metallic.jpg')
         // plane
         const planeGeometry = new THREE.PlaneGeometry(100, 100)
         const plane = new THREE.Mesh(
            planeGeometry,
            new THREE.MeshPhongMaterial({ color: 0xffffff, side: THREE.DoubleSide })
         )
         plane.rotateX(-Math.PI / 2)
         plane.position.y = -2.75
         plane.receiveShadow = true
         scene.add(plane)
         // object
         const geometry = new THREE.SphereGeometry(1, 64, 64)
         const material1 = new THREE.MeshStandardMaterial({
            map: texture,
            side: THREE.DoubleSide
         })
         const object1 = new THREE.Mesh(geometry, material1)
         object1.position.set(-2.5, 1.5, 0)
         object1.castShadow = true
         scene.add(object1)
         // normal map
         const material2 = new THREE.MeshStandardMaterial({
            color: 0xffffff,
            map: texture,
            side: THREE.DoubleSide,
            normalMap: normalmap
         })
         const object2 = new THREE.Mesh(geometry, material2)
         object2.position.set(0, 1.5, 0)
         object2.castShadow = true
         scene.add(object2)
         // displacement map
         const material3 = new THREE.MeshStandardMaterial({
            color: 0xffffff,
            map: texture,
            side: THREE.DoubleSide,
            normalMap: normalmap,
            displacementMap: heightmap,
            displacementScale: 0.05
         })
         const object3 = new THREE.Mesh(geometry, material3)
         object3.position.set(2.5, 1.5, 0)
         object3.castShadow = true
         scene.add(object3)
         console.log(object3)
         // roughness map
         const material4 = new THREE.MeshStandardMaterial({
            color: 0xffffff,
            map: texture,
            side: THREE.DoubleSide,
            normalMap: normalmap,
            displacementMap: heightmap,
            displacementScale: 0.05,
            roughnessMap: roughmap,
            roughness: 0.5
         })
         const object4 = new THREE.Mesh(geometry, material4)
         object4.position.set(-2.5, -1.5, 0)
         object4.castShadow = true
         scene.add(object4)
         console.log(object4)
         // ambient occlusion map
         const material5 = new THREE.MeshStandardMaterial({
            color: 0xffffff,
            map: texture,
            side: THREE.DoubleSide,
            normalMap: normalmap,
            displacementMap: heightmap,
            displacementScale: 0.05,
            roughnessMap: roughmap,
            roughness: 0.1,
            aoMap: ambientOcclusionmap
         })
         const object5 = new THREE.Mesh(geometry, material5)
         object5.position.set(0, -1.5, 0)
         object5.geometry.attributes.uv2 = object5.geometry.attributes.uv
         object5.castShadow = true
         scene.add(object5)
         console.log(object5)
         // 用于环境映射
         const cubeRenderTarget = new THREE.WebGLCubeRenderTarget(128, {
            format: THREE.RGBFormat,
            generateMipMaps: true,
            minFilter: THREE.LinearMipmapLinearFilter,
            encoding: THREE.sRGBEncoding
         })
         const cubeCamera = new THREE.CubeCamera(1, 10000, cubeRenderTarget)
         cubeCamera.position.set(0, 100, 0)
         scene.add(cubeCamera)
         // metallic map
         const material6 = new THREE.MeshStandardMaterial({
            color: 0xffffff,
            map: texture,
            side: THREE.DoubleSide,
            normalMap: normalmap,
            displacementMap: heightmap,
            displacementScale: 0.15,
            roughnessMap: roughmap,
            roughness: 0.1,
            aoMap: ambientOcclusionmap,
            metalnessMap: metallicmap,
            metalness: 1,
            envMap: cubeRenderTarget.texture
         })
         const object6 = new THREE.Mesh(geometry, material6)
         object6.position.set(2.5, -1.5, 0)
         object6.geometry.attributes.uv2 = object6.geometry.attributes.uv
         object6.castShadow = true
         scene.add(object6)
         console.log(object6)
         cubeCamera.position.copy(object6.position)
         // 响应性
         window.addEventListener('resize', () => {
            width = window.innerWidth
            height = window.innerHeight
            camera.aspect = width / height
            camera.updateProjectionMatrix()
            renderer.setSize(window.innerWidth, window.innerHeight)
            renderer.render(scene, camera)
         })
         // renderer - anti-aliasing
         const renderer = new THREE.WebGLRenderer({ antialias: true })
         renderer.physicallyCorrectLights = true
         renderer.setSize(width, height)
         renderer.setPixelRatio(Math.min(window.devicePixelRatio, 2))
         const controls = new OrbitControls(camera, renderer.domElement)
         // 动画
         function animate() {
            requestAnimationFrame(animate)
            let objects = [object1, object2, object3, object4, object5, object6]
            objects.forEach((i) => {
               //i.rotation.x += 0.005
               i.rotation.y += 0.01
            })
            controls.update()
            cubeCamera.update(renderer, scene)
            renderer.render(scene, camera)
         }
         // 渲染场景
         const container = document.querySelector('#threejs-container')
         container.append(renderer.domElement)
         renderer.render(scene, camera)
         animate()
      </script>
   </body>
</html>
输出
还有一些其他贴图可用于在计算机图形中创建真实世界模型。您可以在此处了解更多信息。


