Three.js - 渲染器和响应性
场景的基本功能
您知道场景是摄像机、灯光和我们想要在屏幕上渲染的对象的容器。让我们看一下 Scene 对象的一些基本功能 −
添加对象
函数 add(object) 用于将对象添加到场景中。
const scene = THREE.Scene()
scene.add(cube) // 添加立方体
scene.add(sphere) // 添加球体
移除对象
函数 remove(object) 从场景中移除对象。
scene.remove(cube) // 移除最后添加的立方体
scene.remove(sphere) // 移除球体
子对象
在 scene.children 中返回场景中所有对象的数组,包括相机和灯光。
console.log(scene.children) // 输出场景中的所有对象
console.log(scene.children.length) // 输出场景中的元素数量
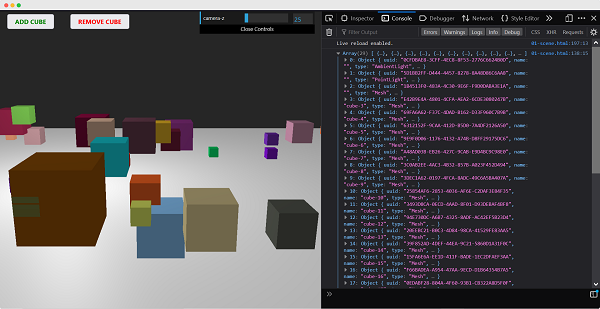
注意 − 我们可以使用其 name 属性为任何对象命名。名称对于调试目的很方便,但也可以直接从场景中访问对象。
查看以下示例。
scene.html
<!DOCTYPE html>
<html lang="en">
   <head>
      <meta charset="UTF-8" />
      <meta http-equiv="X-UA-Compatible" content="ie=edge" />
      <meta name="viewport" content="width=device-width, initial-scale=1.0" />
      <title>Three.js – The scene
      <style>
         * {
            margin: 0;
            padding: 0;
            box-sizing: border-box;
            font-family: -applesystem, BlinkMacSystemFont, 'Segoe UI', Roboto, Oxygen, Ubuntu,
               Cantarell, 'Open Sans', 'Helvetica Neue', sans-serif;
         }
         html,
         body {
            height: 100vh;
            width: 100vw;
            background-color: #262626;
            overflow: hidden;
         }
         #btn-conatiner {
            position: absolute;
            top: 0;
            left: 0;
            height: 10vh;
            width: 100%;
         }
         @media screen and (max-width:600px){
            #btn-container{
               display: flex;
               flex-direction: column;
            }
         }
         .btn {
            padding: 5px 15px;
            margin: 5px 15px;
            font-weight: bold;
            text-transform: uppercase;
         }
         .add {
            color: green;
         }
         .rem {
            color: red;
         }
         #threejs-container {
            position: block;
            width: 100%;
            height: 100%;
         }
      </style>
      <script src="https://cdnjs.cloudflare.com/ajax/libs/three.js/r128/three.min.js"></script>
      <script src="https://cdnjs.cloudflare.com/ajax/libs/dat-gui/0.7.7/dat.gui.js"></script>
   </head>
   <body>
      <div id="btn-conatiner">
         <button class="btn add">Add Cube</button>
         <button class="btn rem">Remove Cube</button>
      </div>
      <div id="threejs-container"></div>
      <script type="module">
         // Experimenting with different methods of scene
         // add, remove, children, getElementById
         // 尺寸
         let width = window.innerWidth
         let height = window.innerHeight
         const gui = new dat.GUI()
         // 场景
         const scene = new THREE.Scene()
         scene.background = new THREE.Color(0x262626)
         // lights
         const ambientLight = new THREE.AmbientLight(0xffffff, 0.5)
         scene.add(ambientLight)
         const light = new THREE.PointLight(0xffffff, 0.5)
         light.position.set(-10, 10, -10)
         // 对于阴影
         light.castShadow = true
         light.shadow.mapSize.width = 1024
         light.shadow.mapSize.height = 1024
         light.shadow.camera.near = 0.1
         light.shadow.camera.far = 1000
         scene.add(light)
         // 相机
         const camera = new THREE.PerspectiveCamera(45, width / height, 0.1, 1000)
         camera.position.set(0, 10, 40)
         camera.lookAt(0, 0, 0)
         gui.add(camera.position, 'z', 10, 200, 1).name('camera-z')
         // plane
         const planeGeometry = new THREE.PlaneGeometry(100, 100)
         const plane = new THREE.Mesh(
            planeGeometry,
            new THREE.MeshPhongMaterial({ color: 0xffffff, side: THREE.DoubleSide })
         )
         plane.rotateX(Math.PI / 2)
         plane.position.y = -1.75
         plane.receiveShadow = true
         scene.add(plane)
         // scene.add
         function addCube() {
            const cubeSize = Math.ceil(Math.random() * 3)
            const cubeGeometry = new THREE.BoxGeometry(cubeSize, cubeSize, cubeSize)const cubeMaterial = new THREE.MeshLambertMaterial({
               color: Math.random() * 0xffffff
            })
            const cube = new THREE.Mesh(cubeGeometry, cubeMaterial)
            cube.castShadow = true
            cube.name = 'cube-' + scene.children.length
            cube.position.x = -30 + Math.round(Math.random() * 50)
            cube.position.y = Math.round(Math.random() * 5)
            cube.position.z = -20 + Math.round(Math.random() * 50)
            scene.add(cube)
         }
         const add = document.querySelector('.add')
         add.addEventListener('click', () => {
            addCube()
            console.log('cube added')
         })
         // scene.remove
         function removeCube() {
            const allChildren = scene.children
            const lastObject = allChildren[allChildren.length - 1]
            if (lastObject.name) {
               scene.remove(lastObject)
            }
         }
         const remove = document.querySelector('.rem')
         remove.addEventListener('click', () => {
            removeCube()
            console.log('cube removed')
         })
         // scene.children
         console.log(scene.children)
         // responsivenesswindow.addEventListener('resize', () => {
            width = window.innerWidth
            height = window.innerHeight
            camera.aspect = width / height
            camera.updateProjectionMatrix()
            renderer.setSize(window.innerWidth, window.innerHeight)
            renderer.render(scene, camera)
         })
         // 渲染器
         const renderer = new THREE.WebGL1Renderer()
         renderer.setSize(width, height)
         renderer.setPixelRatio(Math.min(window.devicePixelRatio, 2))
         // 动画
         function animate() {
            requestAnimationFrame(animate)
            renderer.render(scene, camera)
         }
         // 渲染场景
         const container = document.querySelector('#threejs-container')
         container.append(renderer.domElement)
         renderer.render(scene, camera)
         animate()
      </script>
   </body>
</html>
打开控制台查看场景中的元素。
使用 name 属性
函数 scene.getObjectByName(name) 直接从场景中按特定名称返回对象。
您还可以添加另一个参数 - recursive。
scene.getObjectByName(name, recursive)
如果将 recursive 参数设置为 true,Three.js 将搜索完整的对象树以找到具有指定名称的事物。
向场景添加雾
此属性允许您为场景设置雾。雾会渲染出一种薄雾,遮盖住远处的物体。
scene.fog = new THREE.Fog(0xffffff, 0.015, 100)
这行代码定义了白色雾 (0xffffff)。您可以使用前面的两个属性来调整雾的显示方式。0.015 值设置 near 属性,100 值设置 far 属性。使用这些属性,您可以确定雾从哪里开始以及雾变浓的速度。
使用 THREE.Fog 对象,雾会线性增加。还有一种不同的方法来设置场景的雾;为此,请使用以下定义 −
scene.fog = new THREE.FogExp2(0xffffff, 0.01)
这次,我们不指定近和远,而只指定颜色 (0xffffff) 和雾的密度 (0.01)。最好对这些属性进行一些实验,以获得所需的效果。
使用 override 材质属性
overrideMaterial 属性强制场景中的所有对象使用相同的材质。
scene.overrideMaterial = new THREE.MeshLambertMaterial({ color: 0xffffff })
这里,场景中的所有对象都使用相同的材质,即 MeshLambertMaterial。
注意 − THREE.Scene 是一种有时也称为 Scenegraph 的结构。场景图是一种可以容纳图形场景所有必要信息的结构。在 Three.js 中,这意味着 THREE.Scene 包含渲染所需的所有对象、灯光和其他对象。

渲染器
渲染器使用摄像头和场景中的信息在屏幕上绘制输出,即 <canvas> 元素。
在 Hello cube 应用中,我们使用了 WebGLRenderer。还有一些其他渲染器可用,但 WebGLRenderer 是迄今为止最强大的渲染器,通常也是您唯一需要的渲染器。
注意 −有基于画布的渲染器、基于 CSS 的渲染器和基于 SVG的渲染器。尽管它们可以工作并且可以渲染简单的场景,但我不建议使用它们。它们没有得到积极的开发,非常占用 CPU,并且缺乏良好的材质支持和阴影等功能。


