GWT - JUnit 集成
GWT 使用 JUnit 测试框架为客户端代码的自动测试提供了出色的支持。在本文中,我们将演示 GWT 和 JUNIT 集成。
下载 Junit 存档
JUnit 官方网站 − https://www.junit.org
下载 Junit-4.10.jar
| 操作系统 | 存档名称 |
|---|---|
| Windows | junit4.10.jar |
| Linux | junit4.10.jar |
| Mac | junit4.10.jar |
将下载的 jar 文件存储到计算机上的某个位置。我们将其存储在 C:/ > JUNIT
找到 GWT 安装文件夹
| OS | GWT 安装文件夹 |
|---|---|
| Windows | C:\GWT\gwt-2.1.0 |
| Linux | /usr/local/GWT/gwt-2.1.0 |
| Mac | /Library/GWT/gwt-2.1.0 |
GWTTestCase 类
GWT 提供了 GWTTestCase 基类,该基类提供 JUnit 集成。运行在 JUnit 下扩展 GWTTestCase 的编译类将启动 HtmlUnit 浏览器,该浏览器用于在测试执行期间模拟应用程序行为。
GWTTestCase 是从 JUnit 的 TestCase 派生的类,可以使用 JUnit TestRunner 运行。
使用 webAppCreator
GWT 提供了一个特殊的命令行工具 webAppCreator,它可以为我们生成一个启动测试用例,以及用于在开发模式和生产模式下进行测试的 ant 目标和 eclipse 启动配置。
打开命令提示符并转到 C:\ > GWT_WORKSPACE > 您想要在其中创建具有测试支持的新项目。运行以下命令
C:\GWT_WORKSPACE>C:\GWT\gwt-2.1.0\webAppCreator
   -out HelloWorld
   -junit C:\JUNIT\junit-4.10.jar
   com.tutorialspoint.HelloWorld
值得注意的点
- 我们正在执行 webAppCreator 命令行实用程序。
- HelloWorld 是要创建的项目的名称
- -junit 选项指示 webAppCreator 向项目添加 junit 支持
- com.tutorialspoint.HelloWorld 是模块的名称
验证输出。
Created directory HelloWorld\src
Created directory HelloWorld\war
Created directory HelloWorld\war\WEB-INF
Created directory HelloWorld\war\WEB-INF\lib
Created directory HelloWorld\src\com	utorialspoint
Created directory HelloWorld\src\com	utorialspoint\client
Created directory HelloWorld\src\com	utorialspoint\server
Created directory HelloWorld\src\com	utorialspoint\shared
Created directory HelloWorld	est\com	utorialspoint
Created directory HelloWorld	est\com	utorialspoint\client
Created file HelloWorld\src\com	utorialspoint\HelloWorld.gwt.xml
Created file HelloWorld\war\HelloWorld.html
Created file HelloWorld\war\HelloWorld.css
Created file HelloWorld\war\WEB-INF\web.xml
Created file HelloWorld\src\com	utorialspoint\client\HelloWorld.java
Created file
HelloWorld\src\com	utorialspoint\client\GreetingService.java
Created file
HelloWorld\src\com	utorialspoint\client\GreetingServiceAsync.java
Created file
HelloWorld\src\com	utorialspoint\server\GreetingServiceImpl.java
Created file HelloWorld\src\com	utorialspoint\shared\FieldVerifier.java
Created file HelloWorld\build.xml
Created file HelloWorld\README.txt
Created file HelloWorld	est\com	utorialspoint\HelloWorldJUnit.gwt.xml
Created file HelloWorld	est\com	utorialspoint\client\HelloWorldTest.java
Created file HelloWorld\.project
Created file HelloWorld\.classpath
Created file HelloWorld\HelloWorld.launch
Created file HelloWorld\HelloWorldTest-dev.launch
Created file HelloWorld\HelloWorldTest-prod.launch
了解测试类:HelloWorldTest.java
package com.tutorialspoint.client;

import com.tutorialspoint.shared.FieldVerifier;
import com.google.gwt.core.client.GWT;
import com.google.gwt.junit.client.GWTTestCase;
import com.google.gwt.user.client.rpc.AsyncCallback;
import com.google.gwt.user.client.rpc.ServiceDefTarget;

/**
 * GWT JUnit 测试必须扩展 GWTTestCase。
 */
public class HelloWorldTest extends GWTTestCase {

   /**
    * 必须引用提供此类的有效模块。
    */
   public String getModuleName() {
      return "com.tutorialspoint.HelloWorldJUnit";
   }

   /**
    * 测试 FieldVerifier。
    */
   public void testFieldVerifier() {
      assertFalse(FieldVerifier.isValidName(null));
      assertFalse(FieldVerifier.isValidName(""));
      assertFalse(FieldVerifier.isValidName("a"));
      assertFalse(FieldVerifier.isValidName("ab"));
      assertFalse(FieldVerifier.isValidName("abc"));
      assertTrue(FieldVerifier.isValidName("abcd"));
   }

   /**
    * 此测试将使用greetServer向服务器发送请求
    * GreetingService 中的方法并验证响应。
    */
   public void testGreetingService() {
      /* 创建我们将要测试的服务。 */
      GreetingServiceAsync greetingService =
      GWT.create(GreetingService.class);
      ServiceDefTarget target = (ServiceDefTarget) greetingService;
      target.setServiceEntryPoint(GWT.getModuleBaseURL()
      + "helloworld/greet");

      /* since RPC calls are asynchronous, we will need to wait
       for a response after this test method returns. This line
       tells the test runner to wait up to 10 seconds
       before timing out. */
      delayTestFinish(10000);

      /* 向服务器发送请求。 */
      greetingService.greetServer("GWT User",
         new AsyncCallback<String>() {
         public void onFailure(Throwable caught) {
            /* 请求导致意外错误。 */
            fail("Request failure: " + caught.getMessage());
         }

         public void onSuccess(String result) {
            /* 验证响应是否正确。 */
            assertTrue(result.startsWith("Hello, GWT User!"));

            /* now that we have received a response, we need to
             tell the test runner that the test is complete.
             You must call finishTest() after an asynchronous test
             finishes successfully, or the test will time out.*/
            finishTest();
         }
      });
   }
}
值得注意的要点
| Sr.No. | 说明 |
|---|---|
| 1 | HelloWorldTest 类是在 HelloWorld/test 目录下的 com.tutorialspoint.client 包中生成的。 |
| 2 | HelloWorldTest 类将包含 HelloWorld 的单元测试用例。 |
| 3 | HelloWorldTest 类扩展了 com.google.gwt.junit.client 包中的 GWTTestCase 类。 |
| 4 | HelloWorldTest 类有一个抽象方法 (getModuleName),该方法必须返回 GWT 模块的名称。对于 HelloWorld,此名称为 com.tutorialspoint.HelloWorldJUnit。 |
| 5 | HelloWorldTest 类由两个示例测试用例 testFieldVerifier、testSimple 生成。我们添加了 testGreetingService。 |
| 6 | 这些方法使用它从 JUnit Assert 类继承的众多 assert* 函数之一,该类是 GWTTestCase 的祖先。 |
| 7 | assertTrue(boolean) 函数断言传入的布尔参数的计算结果为 true。如果不是,则在 JUnit 中运行时测试将失败。 |
GWT - JUnit 集成完整示例
此示例将带您完成简单的步骤,展示 GWT 中 JUnit 集成的示例。
按照以下步骤更新我们上面创建的 GWT 应用程序 −
| 步骤 | 描述 |
|---|---|
| 1 | 使用导入现有项目向导 (文件 → 导入 → 常规 → 将现有项目放入工作区) 在 eclipse 中导入名为 HelloWorld 的项目。 |
| 2 | 按照以下说明修改 HelloWorld.gwt.xml、HelloWorld.css、HelloWorld.html 和 HelloWorld.java。保持其余文件不变。 |
| 3 | 编译并运行应用程序以验证实施逻辑的结果。 |
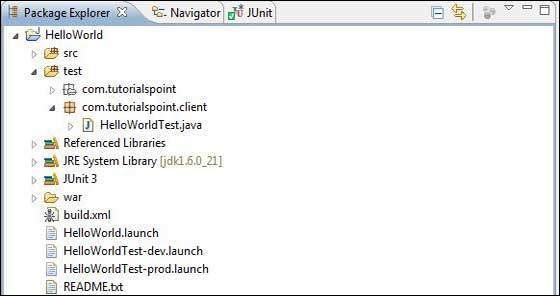
以下是 eclipse 中的项目结构。

以下是修改后的模块描述符 src/com.tutorialspoint/HelloWorld.gwt.xml 的内容。
<?xml version = "1.0" encoding = "UTF-8"?>
<module rename-to = 'helloworld'>
   <!-- Inherit the core Web Toolkit stuff.                        -->
   <inherits name = 'com.google.gwt.user.User'/>

   <!-- Inherit the default GWT style sheet.                       -->
   <inherits name = 'com.google.gwt.user.theme.clean.Clean'/>
   <!-- Inherit the UiBinder module.                               -->
   <inherits name = "com.google.gwt.uibinder.UiBinder"/>
   <!-- Specify the app entry point class.                         -->
   <entry-point class = 'com.tutorialspoint.client.HelloWorld'/>

   <!-- Specify the paths for translatable code                    -->
   <source path = 'client'/>
   <source path = 'shared'/>

</module>
以下是修改后的样式表文件war/HelloWorld.css的内容。
body {
   text-align: center;
   font-family: verdana, sans-serif;
}

h1 {
   font-size: 2em;
   font-weight: bold;
   color: #777777;
   margin: 40px 0px 70px;
   text-align: center;
}
以下是修改后的 HTML 主机文件 war/HelloWorld.html 的内容。
<html>
   <head>
      <title>Hello World</title>
      <link rel = "stylesheet" href = "HelloWorld.css"/>
      <script language = "javascript" src = "helloworld/helloworld.nocache.js">
      </script>
   </head>

   <body>
      <h1>JUnit Integration Demonstration</h1>
      <div id = "gwtContainer"></div>
   </body>
</html>
将 src/com.tutorialspoint/client 包中的 HelloWorld.java 内容替换为以下内容
package com.tutorialspoint.client;

import com.google.gwt.core.client.EntryPoint;

import com.google.gwt.core.client.GWT;
import com.google.gwt.event.dom.client.ClickEvent;
import com.google.gwt.event.dom.client.ClickHandler;
import com.google.gwt.event.dom.client.KeyCodes;
import com.google.gwt.event.dom.client.KeyUpEvent;
import com.google.gwt.event.dom.client.KeyUpHandler;

import com.google.gwt.user.client.Window;
import com.google.gwt.user.client.rpc.AsyncCallback;
import com.google.gwt.user.client.ui.Button;
import com.google.gwt.user.client.ui.DecoratorPanel;
import com.google.gwt.user.client.ui.HasHorizontalAlignment;
import com.google.gwt.user.client.ui.HorizontalPanel;
import com.google.gwt.user.client.ui.Label;
import com.google.gwt.user.client.ui.RootPanel;
import com.google.gwt.user.client.ui.TextBox;
import com.google.gwt.user.client.ui.VerticalPanel;

public class HelloWorld implements EntryPoint {

   public void onModuleLoad() {
      /*create UI */
      final TextBox txtName = new TextBox();
      txtName.setWidth("200");
      txtName.addKeyUpHandler(new KeyUpHandler() {
         @Override
         public void onKeyUp(KeyUpEvent event) {
            if(event.getNativeKeyCode() == KeyCodes.KEY_ENTER){
               Window.alert(getGreeting(txtName.getValue()));
            }
         }
      });
      Label lblName = new Label("Enter your name: ");

      Button buttonMessage = new Button("Click Me!");

      buttonMessage.addClickHandler(new ClickHandler() {
         @Override
         public void onClick(ClickEvent event) {
            Window.alert(getGreeting(txtName.getValue()));
         }
      });

      HorizontalPanel hPanel = new HorizontalPanel();
      hPanel.add(lblName);
      hPanel.add(txtName);
      hPanel.setCellWidth(lblName, "130");

      VerticalPanel vPanel = new VerticalPanel();
      vPanel.setSpacing(10);
      vPanel.add(hPanel);
      vPanel.add(buttonMessage);
      vPanel.setCellHorizontalAlignment(buttonMessage,
      HasHorizontalAlignment.ALIGN_RIGHT);

      DecoratorPanel panel = new DecoratorPanel();
      panel.add(vPanel);

      // 将小部件添加到根面板。
      RootPanel.get("gwtContainer").add(panel);
   }

   public String getGreeting(String name){
      return "Hello "+name+"!";
   }
}
将 test/com.tutorialspoint/client 包中的 HelloWorldTest.java 内容替换为以下内容
package com.tutorialspoint.client;

import com.tutorialspoint.shared.FieldVerifier;
import com.google.gwt.core.client.GWT;
import com.google.gwt.junit.client.GWTTestCase;
import com.google.gwt.user.client.rpc.AsyncCallback;
import com.google.gwt.user.client.rpc.ServiceDefTarget;

/**
 * GWT JUnit 测试必须扩展 GWTTestCase。
 */
public class HelloWorldTest extends GWTTestCase {

   /**
    * 必须引用提供此类的有效模块。
    */
   public String getModuleName() {
      return "com.tutorialspoint.HelloWorldJUnit";
   }

   /**
    * 测试 FieldVerifier。
    */
   public void testFieldVerifier() {
      assertFalse(FieldVerifier.isValidName(null));
      assertFalse(FieldVerifier.isValidName(""));
      assertFalse(FieldVerifier.isValidName("a"));
      assertFalse(FieldVerifier.isValidName("ab"));
      assertFalse(FieldVerifier.isValidName("abc"));
      assertTrue(FieldVerifier.isValidName("abcd"));
   }

   /**
      * 此测试将使用greetServer向服务器发送请求
      * GreetingService 中的方法并验证响应。
   */
   public void testGreetingService() {
      /* 创建我们将要测试的服务。 */
      GreetingServiceAsync greetingService =
      GWT.create(GreetingService.class);
      ServiceDefTarget target = (ServiceDefTarget) greetingService;
      target.setServiceEntryPoint(GWT.getModuleBaseURL()
      + "helloworld/greet");

      /* since RPC calls are asynchronous, we will need to wait
       for a response after this test method returns. This line
       tells the test runner to wait up to 10 seconds
       before timing out. */
      delayTestFinish(10000);

      /* 向服务器发送请求。 */
      greetingService.greetServer("GWT User",
         new AsyncCallback<String>() {
         public void onFailure(Throwable caught) {
            /* 请求导致意外错误。 */
            fail("Request failure: " + caught.getMessage());
         }

         public void onSuccess(String result) {
            /* 验证响应是否正确。 */
            assertTrue(result.startsWith("Hello, GWT User!"));

            /* now that we have received a response, we need to
             tell the test runner that the test is complete.
             You must call finishTest() after an asynchronous test
             finishes successfully, or the test will time out.*/
            finishTest();
         }
      });

      /**
         * 测试 getGreeting 方法。
      */
      public void testGetGreeting() {
         HelloWorld helloWorld = new HelloWorld();
         String name = "Robert";
         String expectedGreeting = "Hello "+name+"!";
         assertEquals(expectedGreeting,helloWorld.getGreeting(name));
      }
   }
}
使用生成的启动配置在 Eclipse 中运行测试用例
我们将使用 webAppCreator 为开发模式和生产模式生成的启动配置在 Eclipse 中运行单元测试。
在开发模式下运行 JUnit 测试
- 从 Eclipse 菜单栏中选择"运行"→运行配置...
- 在 JUnit 部分下,选择 HelloWorldTest-dev
- 要保存对参数的更改,请按应用
- 要运行测试,请按运行
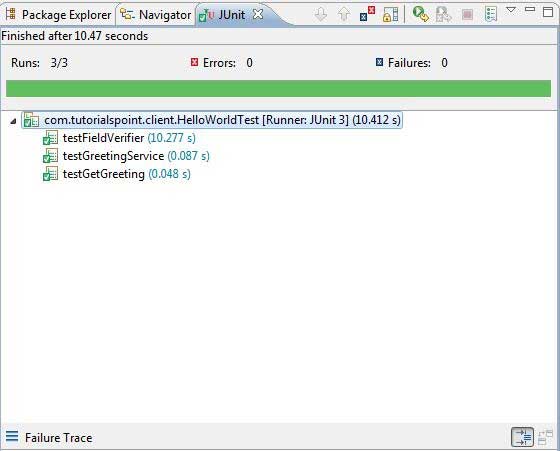
如果您的应用程序一切正常,这将产生以下结果 −

在生产模式下运行 JUnit 测试
- 从 Eclipse 菜单栏中,选择运行 →运行配置...
- 在 JUnit 部分下,选择 HelloWorldTest-prod
- 要保存对参数的更改,请按应用
- 要运行测试,请按运行
如果您的应用程序一切正常,这将产生以下结果 −


