GWT - FileUpload 小部件
简介
FileUpload 小部件包装 HTML <input type = 'file'> 元素。如果要将此小部件提交给服务器,则必须将其与 FormPanel 一起使用。
类声明
以下是 com.google.gwt.user.client.ui.FileUpload 类的声明 −
public class FileUpload
   extends Widget
      implements HasName, HasChangeHandlers
CSS 样式规则
以下默认 CSS 样式规则将应用于所有 TextBox 小部件。您可以根据需要覆盖它。
.gwt-FileUpload {}
类构造函数
| Sr.No. | 构造函数 &描述 |
|---|---|
| 1 |
FileUpload() 构造一个新的文件上传小部件。 |
| 2 |
FileUpload(Element element) 子类可以使用此构造函数来明确使用现有元素。 |
类方法
| Sr.No. | 函数名称 &描述 |
|---|---|
| 1 |
HandlerRegistration addChangeHandler(ChangeHandler handler) 添加 ChangeEvent 处理程序。 |
| 2 |
java.lang.String getFilename() 获取用户选择的文件名。 |
| 3 |
java.lang.String getName() 获取小部件的名称。 |
| 4 |
布尔值isEnabled() 获取此小部件是否已启用。 |
| 5 |
void onBrowserEvent(Event event) 每当收到浏览器事件时触发。 |
| 6 |
void setEnabled(boolean enabled) 设置此小部件是否已启用。 |
| 7 |
void setName(java.lang.String name) 设置小部件的名称。 |
| 8 |
static FileUpload wrap(Element element) 创建一个包装现有 <input type='file'> 元素的 FileUpload 小部件。 |
继承的方法
该类继承了以下类的方法 −
com.google.gwt.user.client.ui.UIObject
com.google.gwt.user.client.ui.Widget
java.lang.Object
FileUpload 小部件示例
此示例将带您通过简单的步骤展示如何在 GWT 中使用 FileUpload 小部件。按照以下步骤更新我们在 GWT - 创建应用程序 一章中创建的 GWT 应用程序 −
| 步骤 | 描述 |
|---|---|
| 1 | 在 com.tutorialspoint 包下创建一个名为 HelloWorld 的项目,如 GWT - 创建应用程序 一章中所述。 |
| 2 | 修改 HelloWorld.gwt.xml、HelloWorld.css、HelloWorld.html 和 HelloWorld.java,如下所述。其余文件保持不变。 |
| 3 | 编译并运行应用程序以验证实现逻辑的结果。 |
以下是修改后的模块描述符src/com.tutorialspoint/HelloWorld.gwt.xml的内容。
<?xml version = "1.0" encoding = "UTF-8"?>
<module rename-to = 'helloworld'>
   <!-- Inherit the core Web Toolkit stuff.                        -->
   <inherits name = 'com.google.gwt.user.User'/>

   <!-- Inherit the default GWT style sheet.                       -->
   <inherits name = 'com.google.gwt.user.theme.clean.Clean'/>

   <!-- Specify the app entry point class.                         -->
   <entry-point class = 'com.tutorialspoint.client.HelloWorld'/>

   <!-- Specify the paths for translatable code                    -->
   <source path = 'client'/>
   <source path = 'shared'/>

</module>
以下是修改后的样式表文件war/HelloWorld.css的内容。
body {
   text-align: center;
   font-family: verdana, sans-serif;
}

h1 {
   font-size: 2em;
   font-weight: bold;
   color: #777777;
   margin: 40px 0px 70px;
   text-align: center;
}

.gwt-FileUpload {
   color: green;
}
以下是修改后的 HTML 主机文件 war/HelloWorld.html 的内容。
<html>
   <head>
      <title>Hello World</title>
      <link rel = "stylesheet" href = "HelloWorld.css"/>
      <script language = "javascript" src = "helloworld/helloworld.nocache.js">
      </script>
   </head>

   <body>
      <h1>FileUpload Widget Demonstration</h1>
      <div id = "gwtContainer"></div>
   </body>
</html>
让我们来看看 Java 文件 src/com.tutorialspoint/HelloWorld.java 的以下内容,它将演示如何使用 FileUpload 小部件。
package com.tutorialspoint.client;

import com.google.gwt.core.client.EntryPoint;
import com.google.gwt.event.dom.client.ClickEvent;
import com.google.gwt.event.dom.client.ClickHandler;
import com.google.gwt.user.client.Window;
import com.google.gwt.user.client.ui.Button;
import com.google.gwt.user.client.ui.FileUpload;
import com.google.gwt.user.client.ui.FormPanel;
import com.google.gwt.user.client.ui.FormPanel.SubmitCompleteEvent;
import com.google.gwt.user.client.ui.Label;
import com.google.gwt.user.client.ui.RootPanel;
import com.google.gwt.user.client.ui.VerticalPanel;

public class HelloWorld implements EntryPoint {
   public void onModuleLoad() {
    VerticalPanel panel = new VerticalPanel();
    //创建一个 FormPanel
    final FormPanel form = new FormPanel();
    //创建一个文件上传小部件
    final FileUpload fileUpload = new FileUpload();
    //创建标签
    Label selectLabel = new Label("选择一个文件:");
    //创建上传按钮
    Button uploadButton = new Button("上传文件");
    //将操作传递给表单以指向服务处理文件
    //接收操作。
    form.setAction("http://www.tutorialspoint.com/gwt/myFormHandler");
    //设置表单以使用 POST 方法和多部分 MIME 编码。
    form.setEncoding(FormPanel.ENCODING_MULTIPART);
    form.setMethod(FormPanel.METHOD_POST);

    //添加标签
    panel.add(selectLabel);
    //添加文件上传小部件
    panel.add(fileUpload);
    //添加一个按钮来上传文件
    panel.add(uploadButton);
    uploadButton.addClickHandler(new ClickHandler() {
         @Override
         public void onClick(ClickEvent event) {
            //获取要上传的文件名
            String filename = fileUpload.getFilename();
            if (filename.length() == 0) {
               Window.alert("No File Specified!");
            } else {
               //submit the form
               form.submit();
            }
         }
      });

      form.addSubmitCompleteHandler(new FormPanel.SubmitCompleteHandler() {
         @Override
         public void onSubmitComplete(SubmitCompleteEvent event) {
            // 当表单提交成功完成时,将触发此
            //事件。假设服务返回了 text/html 类型的响应
            //,我们可以在此处获取结果文本
            Window.alert(event.getResults());
         }
      });
      panel.setSpacing(10);

      // Add form to the root panel.
      form.add(panel);

      RootPanel.get("gwtContainer").add(form);
   }
}
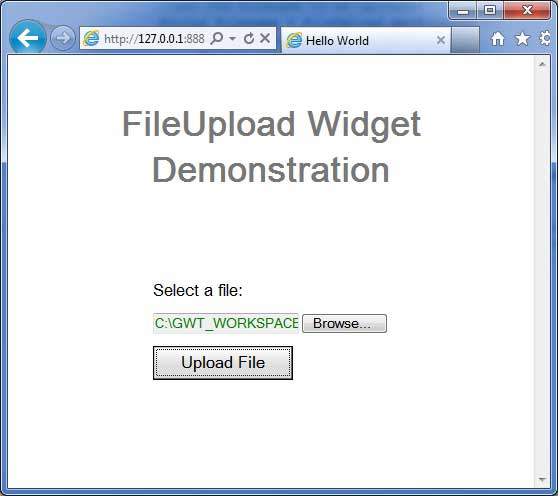
完成所有更改后,让我们像在 GWT - 创建应用程序 一章中一样,在开发模式下编译并运行应用程序。如果您的应用程序一切正常,将产生以下结果 −

以下是 Java 服务器页面代码片段,演示了服务器端的文件上传功能。我们正在使用 Common IO 和 Commons FileUpload 库为服务器端页面添加文件上传功能。文件将上传到与服务器端 upload.jsp 所在位置相关的 uploadFiles 文件夹。
<%@page import = "org.apache.commons.fileupload.FileItemFactory"%>
<%@page import = "org.apache.commons.fileupload.disk.DiskFileItemFactory"%>
<%@page import = "org.apache.commons.fileupload.servlet.ServletFileUpload"%>
<%@page import = "org.apache.commons.fileupload.FileItem"%>
<%@page import = "org.apache.commons.io.FilenameUtils"%>
<%@page import = "java.util.List"%>
<%@page import = "java.util.Iterator"%>
<%@page import = "java.io.File"%>
<%@page import = "java.io.FileOutputStream"%>
<%@page import = "java.io.InputStream"%>

<%
    // 为基于磁盘的文件项创建工厂
    FileItemFactory factory = new DiskFileItemFactory();
    // 创建一个新的文件上传处理程序
    ServletFileUpload upload = new ServletFileUpload(factory);
    try {
        // 解析请求
        List items = upload.parseRequest(request);

        // 处理上传的项目
        Iterator iter = items.iterator();

      while (iter.hasNext()) {
         FileItem item = (FileItem) iter.next();

         //handling a normal form-field
         if(item.isFormField()) {
            System.out.println("Got a form field");
            String name = item.getFieldName();
            String value = item.getString();
            System.out.print("Name:"+name+",Value:"+value);

         } else {

            //handling file loads
            System.out.println("Not form field");
            String fieldName = item.getFieldName();
            String fileName = item.getName();
            if (fileName != null) {
               fileName = FilenameUtils.getName(fileName);
            }

            String contentType = item.getContentType();
            boolean isInMemory = item.isInMemory();
            long sizeInBytes = item.getSize();
            System.out.print("Field Name:"+fieldName +",File Name:"+fileName);
            System.out.print("Content Type:"+contentType
               +",Is In Memory:"+isInMemory+",Size:"+sizeInBytes);

            byte[] data = item.get();
            fileName = getServletContext()
               .getRealPath( "/uploadedFiles/" + fileName);
            System.out.print("File name:" +fileName);
            FileOutputStream fileOutSt = new FileOutputStream(fileName);
            fileOutSt.write(data);
            fileOutSt.close();
            out.print("File Uploaded Successfully!");
         }
      }
   } catch(Exception e){
      out.print("File Uploading Failed!" + e.getMessage());
   }
%>
 gwt_form_widgets.html

