Flexbox - 快速指南
Flexbox - 概述
CSS(层叠样式表)是一种简单的设计语言,旨在简化网页的呈现过程。CSS 处理网页的外观和感觉部分。
使用 CSS,您可以控制文本的颜色、字体的样式、段落之间的间距、列的大小和布局方式、使用的背景图像或颜色、布局设计、不同设备和屏幕尺寸的显示变化以及各种其他效果。
要确定框的位置和尺寸,在 CSS 中,您可以使用可用的布局模式之一 −
块布局 −此模式用于布局文档。
内联布局 − 此模式用于布局文本。
表格布局 − 此模式用于布局表格。
表格布局 − 此模式用于定位元素。
所有这些模式都用于对齐特定元素,如文档、文本、表格等,但是,这些模式都无法提供布局复杂网站的完整解决方案。最初,这通常使用浮动元素、定位元素和表格布局的组合来完成。但是浮动只允许水平放置盒子。
什么是 Flexbox?
除了上述模式之外,CSS3 还提供了另一种布局模式 Flexible Box,通常称为 Flexbox。
使用此模式,您可以轻松为复杂的应用程序和网页创建布局。与浮动不同,Flexbox 布局可以完全控制盒子的方向、对齐、顺序和大小。
Flexbox 的功能
以下是 Flexbox 布局的显著特点 −
方向 − 您可以按任意方向排列网页上的项目,例如从左到右、从右到左、从上到下和从下到上。
顺序 −使用 Flexbox,您可以重新排列网页内容的顺序。
换行 − 如果网页内容的空间不一致(单行),您可以将其换行到多行(水平)和垂直。
对齐 − 使用 Flexbox,您可以根据其容器对齐网页内容。
调整大小 − 使用 Flexbox,您可以增加或减少页面中项目的大小以适应可用空间。
支持的浏览器
以下是支持 Flexbox 的浏览器。
- Chrome 29+
- Firefox 28+
- Internet Explorer 11+
- Opera 17+
- Safari 6.1+
- Android 4.4+
- iOS 7.1+
Flexbox - 弹性容器
要在应用程序中使用 Flexbox,您需要使用 display 属性创建/定义弹性容器。
用法 −
display: flex | inline-flex
此属性接受两个值
flex − 生成块级弹性容器。
inline-flex − 生成内联弹性容器框。
现在,我们将通过示例了解如何使用 display 属性。
弹性
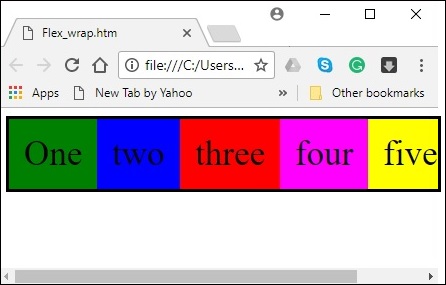
将此值传递给 display 属性后,将创建一个块级弹性容器。它占据父容器(浏览器)的整个宽度。
以下示例演示了如何创建块级弹性容器。在这里,我们创建了六个不同颜色的框,并使用弹性容器来容纳它们。
<!doctype html>
<html lang = "en">
   <style>
      .box1{background:green;}
      .box2{background:blue;}
      .box3{background:red;}
      .box4{background:magenta;}
      .box5{background:yellow;}
      .box6{background:pink;}

      .container{
         display:flex;
      }
      .box{
         font-size:35px;
         padding:15px;
      }
   </style>

   <body>
      <div class = "container">
         <div class = "box box1">One</div>
         <div class = "box box2">two</div>
         <div class = "box box3">three</div>
         <div class = "box box4">four</div>
         <div class = "box box5">five</div>
         <div class = "box box6">six</div>
      </div>
   </body>
</html>
它将产生以下结果 −
由于我们已将值 flex 赋给 display 属性,因此容器使用容器(浏览器)的宽度。
您可以通过向容器添加边框来观察这一点,如下所示。
.container {
   display:inline-flex;
   border:3px solid black;
}
它将产生以下结果 −
内联弹性
将此值传递给 display 属性后,将创建一个内联级弹性容器。它只占用内容所需的位置。
以下示例演示了如何创建内联弹性容器。在这里,我们创建了六个具有不同颜色的框,并使用了内联弹性容器来容纳它们。
<!doctype html>
<html lang = "en">
   <style>
      .box1{background:green;}
      .box2{background:blue;}
      .box3{background:red;}
      .box4{background:magenta;}
      .box5{background:yellow;}
      .box6{background:pink;}

      .container{
         display:inline-flex;
         border:3px solid black;
      }
      .box{
         font-size:35px;
         padding:15px;
      }
   </style>

   <body>
      <div class = "container">
         <div class = "box box1">One</div>
         <div class = "box box2">two</div>
         <div class = "box box3">three</div>
         <div class = "box box4">four</div>
         <div class = "box box5">five</div>
         <div class = "box box6">six</div>
      </div>
   </body>
</html>
它将产生以下结果 −
由于我们使用了内联弹性容器,它只占用了包裹其元素所需的空间。
弹性框 - flex-direction
flex-direction属性用于指定需要放置弹性容器元素(弹性项目)的方向。
用法 −
flex-direction:row | row-reverse | column | column-reverse
此属性接受四个值 −
row − 从左到右水平排列容器元素。
row-reverse −从右到左水平排列容器的元素。
column − 从左到右垂直排列容器的元素。
column-reverse −从右到左垂直排列容器元素。
现在,我们将举几个例子来演示 direction 属性的使用。
row
将此值传递给 direction 属性后,容器元素将水平排列,从左到右,如下所示。

以下示例演示了将值 row 传递给 flex-direction 属性的结果。在这里,我们使用 flex-direction 值 row 创建六个不同颜色的框。
<!doctype html>
<html lang = "en">
   <style>
      .box1{background:green;}
      .box2{background:blue;}
      .box3{background:red;}
      .box4{background:magenta;}
      .box5{background:yellow;}
      .box6{background:pink;}

      .box{
         font-size:35px;
         padding:15px;
      }
      .container{
         display:inline-flex;
         border:3px solid black;
         flex-direction:row;
      }
   </style>

   <body>
      <div class = "container">
         <div class = "box box1">One</div>
         <div class = "box box2">two</div>
         <div class = "box box3">three</div>
         <div class = "box box4">four</div>
         <div class = "box box5">five</div>
         <div class = "box box6">six</div>
      </div>
   </body>
</html>
它将产生以下结果 −
row-reverse
将此值传递给 direction 属性后,容器的元素将从右到左水平排列,如下所示。
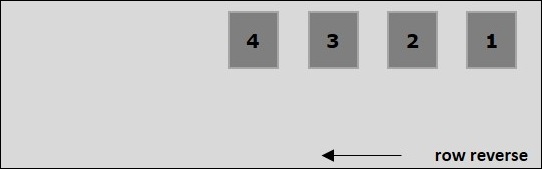
以下示例演示了将值 row-reverse 传递给 flex-direction 属性的结果。在这里,我们使用 flex-direction 值 row-reverse 创建六个具有不同颜色的框。
<!doctype html>
<html lang = "en">
   <style>
      .box1{background:green;}
      .box2{background:blue;}
      .box3{background:red;}
      .box4{background:magenta;}
      .box5{background:yellow;}
      .box6{background:pink;}

      .box{
         font-size:35px;
         padding:15px;
      }
      .container{
         display:inline-flex;
         border:3px solid black;
         flex-direction:row-reverse;
      }
   </style>

   <body>
      <div class = "container">
         <div class = "box box1">One</div>
         <div class = "box box2">two</div>
         <div class = "box box3">three</div>
         <div class = "box box4">four</div>
         <div class = "box box5">five</div>
         <div class = "box box6">six</div>
      </div>
   </body>
</html>
它将产生以下结果 −
column
将此值传递给 direction 属性后,容器的元素将从上到下垂直排列,如下所示。
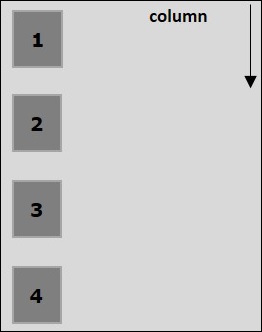
以下示例演示了将值 column 传递给 flex-direction 属性的结果。在这里,我们使用 flex-direction 值 column 创建六个具有不同颜色的框。
<!doctype html>
<html lang = "en">
   <style>
      .box1{background:green;}
      .box2{background:blue;}
      .box3{background:red;}
      .box4{background:magenta;}
      .box5{background:yellow;}
      .box6{background:pink;}

      .box{
         font-size:35px;
         padding:15px;
      }
      .container{
         display:inline-flex;
         border:3px solid black;
         flex-direction:column;
      }
   </style>
   <body>
      <div class = "container">
         <div class = "box box1">One</div>
         <div class = "box box2">two</div>
         <div class = "box box3">three</div>
         <div class = "box box4">four</div>
         <div class = "box box5">five</div>
         <div class = "box box6">six</div>
      </div>
   </body>
</html>
它将产生以下结果 −
column-reverse
将此值传递给 direction 属性后,容器的元素将从下到上垂直排列,如下所示。
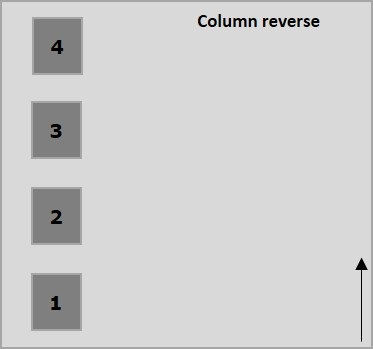
以下示例演示了将值 column-reverse 传递给 flex-direction 属性的结果。在这里,我们使用 flex-direction 值 column-reverse 创建六个具有不同颜色的框。
<!doctype html>
<html lang = "en">
   <style>
      .box1{background:green;}
      .box2{background:blue;}
      .box3{background:red;}
      .box4{background:magenta;}
      .box5{background:yellow;}
      .box6{background:pink;}

      .box{
         font-size:35px;
         padding:15px;
      }
      .container{
         display:inline-flex;
         border:3px solid black;
         flex-direction:column-reverse;
      }
   </style>

   <body>
      <div class = "container">
         <div class = "box box1">One</div>
         <div class = "box box2">two</div>
         <div class = "box box3">three</div>
         <div class = "box box4">four</div>
         <div class = "box box5">five</div>
         <div class = "box box6">six</div>
      </div>
   </body>
</html>
它将产生以下结果 −
Flexbox - Flex-Wrap
一般情况下,当容器空间不足时,其余的弹性项目将被隐藏,如下所示。
flex-wrap 属性用于指定控制弹性容器是单行还是多行。
用法 −
flex-wrap: nowrap | wrap | wrap-reverse
flex-direction: column | column-reverse
此属性接受以下值 −
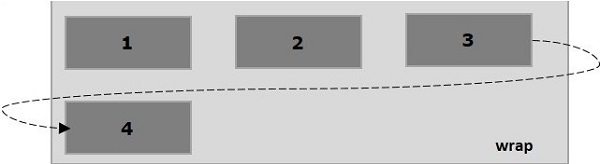
wrap −如果空间不足,容器元素(弹性项目)将从上到下换行到额外的弹性行中。
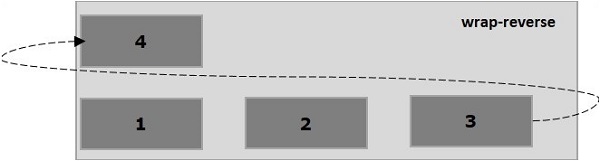
wrap-reverse −如果空间不足,容器元素(弹性项目)将从下到上换行到额外的弹性行中。
现在,我们将通过示例了解如何使用 wrap 属性。
wrap
将值 wrap 传递给属性 flex-wrap 后,容器元素将从左到右水平排列,如下所示。
以下示例演示了将值 wrap 传递给 flex-wrap 属性的结果。在这里,我们使用 flex-direction 值 row 创建六个不同颜色的框。
<!doctype html>
<html lang = "en">
   <style>
      .box1{background:green;}
      .box2{background:blue;}
      .box3{background:red;}
      .box4{background:magenta;}
      .box5{background:yellow;}
      .box6{background:pink;}

      .box{
         font-size:35px;
         padding:15px;
         width:100px;
      }
      .container{
         display:flex;
         border:3px solid black;
         flex-direction:row;
         flex-wrap:wrap;
      }
   </style>

   <body>
      <div class = "container">
         <div class = "box box1">One</div>
         <div class = "box box2">two</div>
         <div class = "box box3">three</div>
         <div class = "box box4">four</div>
         <div class = "box box5">five</div>
         <div class = "box box6">six</div>
      </div>
   </body>
</html>
它将产生以下结果 −
wrap-reverse
将值 wrap-reverse 传递给属性 flex-wrap 后,容器的元素将从左到右水平排列,如下所示。
以下示例演示了将值 wrap-reverse 传递给 flex-wrap 属性的结果。在这里,我们创建了六个具有不同颜色的框,其 flex-direction 值为 row。
<!doctype html>
<html lang = "en">
   <style>
      .box1{background:green;}
      .box2{background:blue;}
      .box3{background:red;}
      .box4{background:magenta;}
      .box5{background:yellow;}
      .box6{background:pink;}

      .box{
         font-size:35px;
         padding:15px;
         width:100px;
      }
      .container{
         display:flex;
         border:3px solid black;
         flex-direction:row;
         flex-wrap:wrap-reverse;
      }
   </style>
   <body>
      <div class = "container">
         <div class = "box box1">One</div>
         <div class = "box box2">two</div>
         <div class = "box box3">three</div>
         <div class = "box box4">four</div>
         <div class = "box box5">five</div>
         <div class = "box box6">six</div>
      </div>
   </body>
</html>
它将产生以下结果 −
wrap (column)
将值 wrap 传递给属性 flex-wrap 并将值 column 传递给属性 flex-direction 后,容器的元素将从左到右水平排列,如下所示。
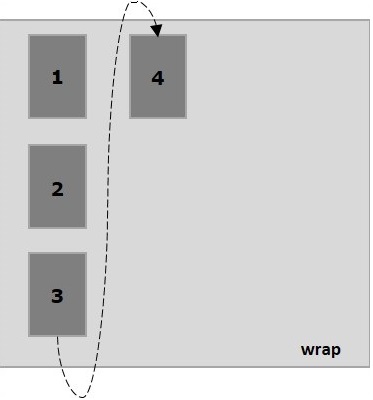
以下示例演示了将值 wrap 传递给 flex-wrap 属性的结果。在这里,我们使用 flex-direction 值 column 创建六个具有不同颜色的框。
<!doctype html>
<html lang = "en">
   <style>
      .box1{background:green;}
      .box2{background:blue;}
      .box3{background:red;}
      .box4{background:magenta;}
      .box5{background:yellow;}
      .box6{background:pink;}

      .box{
         font-size:35px;
         padding:15px;
         width:100px;
      }
      .container{
         display:flex;
         border:3px solid black;
         flex-direction:column;
         flex-wrap:wrap;
         height:100vh;
      }
   </style>

   <body>
      <div class = "container">
         <div class = "box box1">One</div>
         <div class = "box box2">two</div>
         <div class = "box box3">three</div>
         <div class = "box box4">four</div>
         <div class = "box box5">five</div>
         <div class = "box box6">six</div>
      </div>
   </body>
</html>
它将产生以下结果 −
wrap-reverse (column)
将值 wrap-reverse 传递给属性 flex-wrap 并将值 column 传递给属性 flex-direction 后,容器的元素将从左到右水平排列,如下所示。
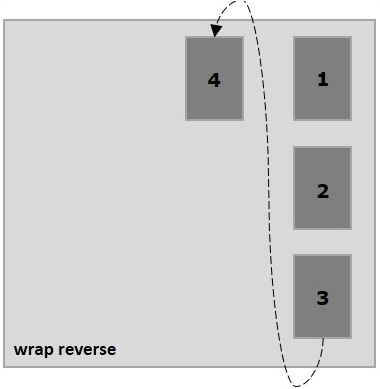
以下示例演示了将值 wrap-reverse 传递给 flex-wrap 属性的结果。在这里,我们创建了六个具有不同颜色的框,并且 flex-direction 值为 column。
<!doctype html>
<html lang = "en">
   <style>
      .box1{background:green;}
      .box2{background:blue;}
      .box3{background:red;}
      .box4{background:magenta;}
      .box5{background:yellow;}
      .box6{background:pink;}

      .box{
         font-size:35px;
         padding:15px;
         width:100px;
      }
      .container{
         display:flex;
         border:3px solid black;
         flex-direction:column;
         flex-wrap:wrap-reverse;
         height:100vh;
      }
   </style>

   <body>
      <div class = "container">
         <div class = "box box1">One</div>
         <div class = "box box2">two</div>
         <div class = "box box3">three</div>
         <div class = "box box4">four</div>
         <div class = "box box5">five</div>
         <div class = "box box6">six</div>
      </div>
   </body>
</html>
它将产生以下结果 −
Flexbox - 对齐内容
通常,在排列 flex 项目后,您可以观察到容器中剩余的额外空间,如下所示。
使用属性 justify-content,您可以按预期分配额外空间,从而沿主轴对齐内容。您还可以调整 flexitems 的对齐方式,以防它们溢出行。
用法 −
justify-content: flex-start | flex-end | center | space-between | space-around| space-evenly;
此属性接受以下值 −
flex-start − 弹性项目放置在容器的开始处。
flex-end − 弹性项目放置在容器的末尾。
center − 弹性项目放置在容器的中心,其中额外的空间均匀分布在弹性项目的开始和末尾。
space-between − 额外的空间均匀分布在弹性项目之间。
space-around −额外的空间在弹性项目之间均匀分布,使得容器边缘与其内容之间的空间是弹性项目之间空间的一半。
现在,我们将通过示例了解如何使用 justify-content 属性。
flex-start
将此值传递给属性 justify-content 后,弹性项目将放置在容器的开始处。
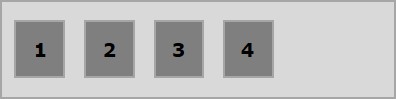
以下示例演示了将值 flex-start 传递给 justify-content 属性的结果。
<!doctype html>
<html lang = "en">
   <style>
      .box1{background:green;}
      .box2{background:blue;}
      .box3{background:red;}
      .box4{background:magenta;}
      .box5{background:yellow;}
      .box6{background:pink;}

      .box{
         font-size:35px;
         padding:15px;
      }
      .container{
         display:flex;
         border:3px solid black;
         justify-content:flex-start;
      }
   </style>

   <body>
      <div class = "container">
         <div class = "box box1">One</div>
         <div class = "box box2">two</div>
         <div class = "box box3">three</div>
         <div class = "box box4">four</div>
         <div class = "box box5">five</div>
         <div class = "box box6">six</div>
      </div>
   </body>
</html>
它将产生以下结果 −
flex-end
将此值传递给属性 justify-content 后,弹性项目将放置在容器的末尾。
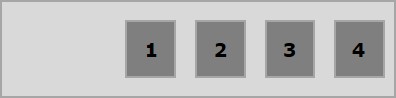
以下示例演示了将值 flex-end 传递给 justify-content 属性的结果。
<!doctype html>
<html lang = "en">
   <style>
      .box1{background:green;}
      .box2{background:blue;}
      .box3{background:red;}
      .box4{background:magenta;}
      .box5{background:yellow;}
      .box6{background:pink;}

      .box{
         font-size:35px;
         padding:15px;
      }
      .container{
         display:flex;
         border:3px solid black;
         justify-content:flex-end;
      }
   </style>

   <body>
      <div class = "container">
         <div class = "box box1">One</div>
         <div class = "box box2">two</div>
         <div class = "box box3">three</div>
         <div class = "box box4">four</div>
         <div class = "box box5">five</div>
         <div class = "box box6">six</div>
      </div>
   </body>
</html>
它将产生以下结果 −
center
将此值传递给属性 justify-content 后,弹性项目将放置在容器的中心,其中额外的空间均匀分布在弹性项目的开始和结束处。

以下示例演示了将值 center 传递给 justify-content 属性的结果。
<!doctype html>
<html lang = "en">
   <style>
      .box1{background:green;}
      .box2{background:blue;}
      .box3{background:red;}
      .box4{background:magenta;}
      .box5{background:yellow;}
      .box6{background:pink;}

      .box{
         font-size:35px;
         padding:15px;
      }
      .container{
         display:flex;
         border:3px solid black;
         justify-content:center;
      }
   </style>

   <body>
      <div class = "container">
         <div class = "box box1">One</div>
         <div class = "box box2">two</div>
         <div class = "box box3">three</div>
         <div class = "box box4">four</div>
         <div class = "box box5">five</div>
         <div class = "box box6">six</div>
      </div>
   </body>
</html>
它将产生以下结果 −
space-between
将此值传递给属性 justify-content 后,额外的空间将在弹性项目之间平均分配,这样,任何两个弹性项目之间的空间都相同,并且弹性项目的开始和结束都接触容器的边缘。
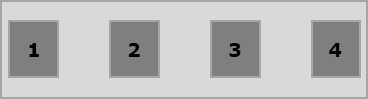
以下示例演示了将值 space-between 传递给 justify-content 属性的结果。
<!doctype html>
<html lang = "en">
   <style>
      .box1{background:green;}
      .box2{background:blue;}
      .box3{background:red;}
      .box4{background:magenta;}
      .box5{background:yellow;}
      .box6{background:pink;}

      .box{
         font-size:35px;
         padding:15px;
      }
      .container{
         display:flex;
         border:3px solid black;
         justify-content:space-between;
      }
   </style>

   <body>
      <div class = "container">
         <div class = "box box1">One</div>
         <div class = "box box2">two</div>
         <div class = "box box3">three</div>
         <div class = "box box4">four</div>
         <div class = "box box5">five</div>
         <div class = "box box6">six</div>
      </div>
   </body>
</html>
它将产生以下结果 −
space-around
将此值传递给属性 justify-content 后,额外的空间将在弹性项目之间平均分配,这样任何两个弹性项目之间的空间都是相同的。但是,容器边缘与其内容(弹性项目的开始和结束)之间的空间是弹性项目之间空间的一半。
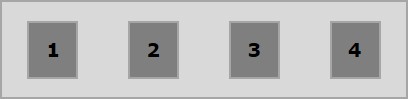
以下示例演示了将值 space-around 传递给 justify-content 属性的结果。
<!doctype html>
<html lang = "en">
   <style>
      .box1{background:green;}
      .box2{background:blue;}
      .box3{background:red;}
      .box4{background:magenta;}
      .box5{background:yellow;}
      .box6{background:pink;}

      .box{
         font-size:35px;
         padding:15px;
      }
      .container{
         display:flex;
         border:3px solid black;
         justify-content:space-around;
      }
   </style>

   <body>
      <div class = "container">
         <div class = "box box1">One</div>
         <div class = "box box2">two</div>
         <div class = "box box3">three</div>
         <div class = "box box4">four</div>
         <div class = "box box5">five</div>
         <div class = "box box6">six</div>
      </div>
   </body>
</html>
它将产生以下结果 −
space-evenly
将此值传递给属性 justify-content 后,额外的空间将在弹性项目之间平均分配,这样任何两个弹性项目之间的空间都是相同的(包括边缘的空间)。
以下示例演示了将值 space-evenly 传递给 justify-content 属性的结果。
<!doctype html>
<html lang = "en">
   <style>
      .box1{background:green;}
      .box2{background:blue;}
      .box3{background:red;}
      .box4{background:magenta;}
      .box5{background:yellow;}
      .box6{background:pink;}

      .box{
         font-size:35px;
         padding:15px;
      }
      .container{
         display:flex;
         border:3px solid black;
         justify-content:space-evenly;
      }
   </style>

   <body>
      <div class = "container">
         <div class = "box box1">One</div>
         <div class = "box box2">two</div>
         <div class = "box box3">three</div>
         <div class = "box box4">four</div>
         <div class = "box box5">five</div>
         <div class = "box box6">six</div>
      </div>
   </body>
</html>
它将产生以下结果 −
Flexbox - 对齐项目
align-items 属性与 justify content 相同。但此处,项目在交叉访问中对齐(垂直)。
用法 −
align-items: flex-start | flex-end | center | baseline | stretch;
此属性接受以下值 −
flex-start − 弹性项目在容器顶部垂直对齐。
flex-end − 弹性项目在容器底部垂直对齐。
flex-center −弹性项目垂直对齐在容器的中心。
stretch − 弹性项目垂直对齐,使其填满容器的整个垂直空间。
baseline − 弹性项目对齐,使其文本的基线沿水平线对齐。
flex-start
将此值传递给属性 align-items 后,弹性项目垂直对齐在容器的顶部。
以下示例演示了将值 flex-start 传递给 align-items 属性的结果。
<!doctype html>
<html lang = "en">
   <style>
      .box1{background:green;}
      .box2{background:blue;}
      .box3{background:red;}
      .box4{background:magenta;}
      .box5{background:yellow;}
      .box6{background:pink;}

      .box{
         font-size:35px;
         padding:15px;
      }
      .container{
         display:flex;
         height:100vh;
         align-items:flex-start;
      }
   </style>

   <body>
      <div class = "container">
         <div class = "box box1">One</div>
         <div class = "box box2">two</div>
         <div class = "box box3">three</div>
         <div class = "box box4">four</div>
         <div class = "box box5">five</div>
         <div class = "box box6">six</div>
      </div>
   </body>
</html>
它将产生以下结果 −
flex-end
将此值传递给属性 align-items 后,弹性项目将在容器底部垂直对齐。
以下示例演示了将值 flex-end 传递给 align-items 属性的结果。
<!doctype html>
<html lang = "en">
   <style>
      .box1{background:green;}
      .box2{background:blue;}
      .box3{background:red;}
      .box4{background:magenta;}
      .box5{background:yellow;}
      .box6{background:pink;}

      .box{
         font-size:35px;
         padding:15px;
      }
      .container{
         display:flex;
         height:100vh;
         align-items:flex-end;
      }
   </style>

   <body>
      <div class = "container">
         <div class = "box box1">One</div>
         <div class = "box box2">two</div>
         <div class = "box box3">three</div>
         <div class = "box box4">four</div>
         <div class = "box box5">five</div>
         <div class = "box box6">six</div>
      </div>
   </body>
</html>
它将产生以下结果 −
center
将此值传递给属性 align-items 后,弹性项目将在容器的中心垂直对齐。
以下示例演示了将值 flex-center 传递给 align-items 属性的结果。
<!doctype html>
<html lang = "en">
   <style>
      .box1{background:green;}
      .box2{background:blue;}
      .box3{background:red;}
      .box4{background:magenta;}
      .box5{background:yellow;}
      .box6{background:pink;}

      .box{
         font-size:35px;
         padding:15px;
      }
      .container{
         display:flex;
         height:100vh;
         align-items:center;
      }
   </style>

   <body>
      <div class = "container">
         <div class = "box box1">One</div>
         <div class = "box box2">two</div>
         <div class = "box box3">three</div>
         <div class = "box box4">four</div>
         <div class = "box box5">five</div>
         <div class = "box box6">six</div>
      </div>
   </body>
</html>
它将产生以下结果 −
stretch
将此值传递给属性 align-items 后,弹性项目将垂直对齐,从而填满容器的整个垂直空间。

以下示例演示了将值 stretch 传递给 align-items 属性的结果。
<!doctype html>
<html lang = "en">
   <style>
      .box1{background:green;}
      .box2{background:blue;}
      .box3{background:red;}
      .box4{background:magenta;}
      .box5{background:yellow;}
      .box6{background:pink;}

      .box{
         font-size:35px;
         padding:15px;
      }
      .container{
         display:flex;
         height:100vh;
         align-items:stretch;
      }
   </style>

   <body>
      <div class = "container">
         <div class = "box box1">One</div>
         <div class = "box box2">two</div>
         <div class = "box box3">three</div>
         <div class = "box box4">four</div>
         <div class = "box box5">five</div>
         <div class = "box box6">six</div>
      </div>
   </body>
</html>
它将产生以下结果 −
baseline
将此值传递给属性 align-items 后,弹性项目将对齐,使得其文本的基线沿水平线对齐。
以下示例演示了将值 baseline 传递给 align-items 属性的结果。
<!doctype html>
<html lang = "en">
   <style>
      .box1{background:green;}
      .box2{background:blue;}
      .box3{background:red;}
      .box4{background:magenta;}
      .box5{background:yellow;}
      .box6{background:pink;}

      .box{
         font-size:35px;
         padding:15px;
      }
      .container{
         display:flex;
         height:100vh;
         align-items:baseline;
      }
   </style>

   <body>
      <div class = "container">
      <div class = "box box1">One</div>
      <div class = "box box2">two</div>
      <div class = "box box3">three</div>
      <div class = "box box4">four</div>
      <div class = "box box5">five</div>
      <div class = "box box6">six</div>
      </div>
   </body>
</html>
它将产生以下结果 −
Flexbox - 对齐内容
如果 flex-container 有多行(即 flex-wrap: wrap),align-content 属性将定义容器内每行的对齐方式。
用法 −
align-content: flex-start | flex-end | center | space-between | space-around | stretch;
此属性接受以下值 −
stretch − 内容中的行将拉伸以填满剩余空间。
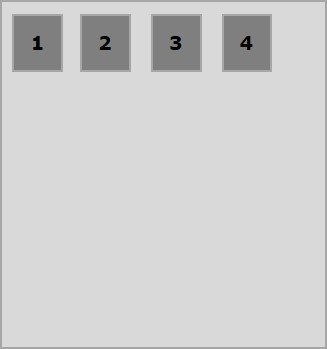
flex-start − 内容中的所有行都打包在容器的开头。
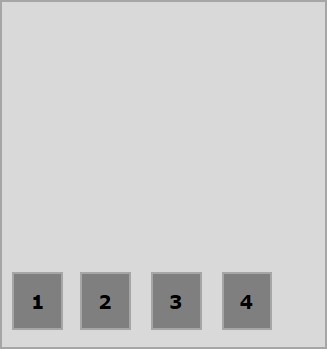
flex-end −内容中的所有行都打包在容器的末尾。
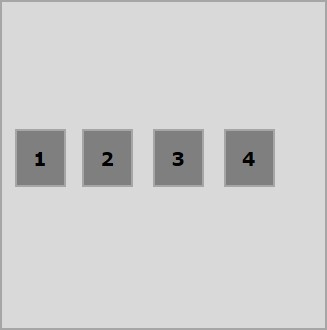
center − 内容中的所有行都打包在容器的中心。
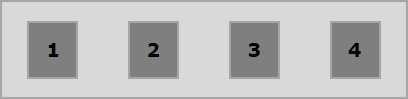
space-between − 额外的空间均匀分布在行之间。
space-around −额外的空间均匀分布在行之间,每行(包括第一行和最后一行)周围的空间相等
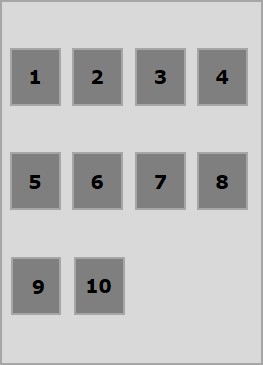
center
将此值传递给属性 align-content 后,所有行都会挤在容器的中心。
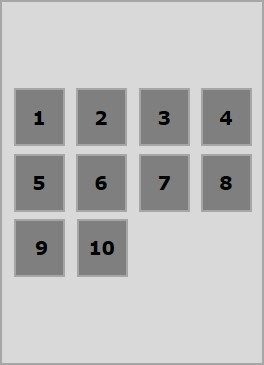
以下示例演示了将值 center 传递给 align-content 属性的结果。
<!doctype html>
<html lang = "en">
   <style>
      .box1{background:green;}
      .box2{background:blue;}
      .box3{background:red;}
      .box4{background:magenta;}
      .box5{background:yellow;}
      .box6{background:pink;}

      .box{
         font-size:25px;
         padding:15px;
         width:43%;
      }
      .container{
         display:flex;
         height:100vh;
         flex-wrap:wrap;
         align-content:center;
      }
   </style>

   <body>
      <div class = "container">
         <div class = "box box1">One</div>
         <div class = "box box2">two</div>
         <div class = "box box3">three</div>
         <div class = "box box4">four</div>
         <div class = "box box5">five</div>
         <div class = "box box6">six</div>
      </div>
   </body>
</html>
它将产生以下结果 −
flex-start
将此值传递给属性 align-content 后,所有行都将打包在容器的开头。
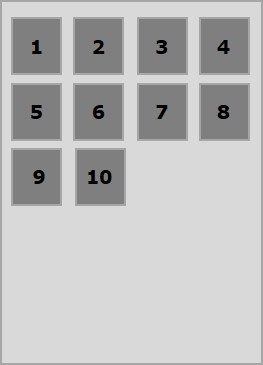
以下示例演示了将值 flex-start 传递给 align-content 属性的结果。
<!doctype html>
<html lang = "en">
   <style>
      .box1{background:green;}
      .box2{background:blue;}
      .box3{background:red;}
      .box4{background:magenta;}
      .box5{background:yellow;}
      .box6{background:pink;}

      .box{
         font-size:25px;
         padding:15px;
         width:40%;
      }
      .container{
         display:flex;
         height:100vh;
         flex-wrap:wrap;
         align-content:flex-start;
      }
   </style>

   <body>
      <div class = "container">
         <div class = "box box1">One</div>
         <div class = "box box2">two</div>
         <div class = "box box3">three</div>
         <div class = "box box4">four</div>
         <div class = "box box5">five</div>
         <div class = "box box6">six</div>
      </div>
   </body>
</html>
它将产生以下结果 −
flex-end
将此值传递给属性 align-content 后,所有行都会被打包到容器的末尾。
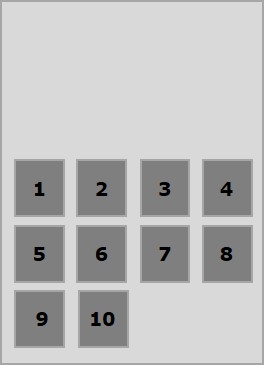
以下示例演示了将值 flex-end 传递给 align-content 属性的结果。
<!doctype html>
<html lang = "en">
   <style>
      .box1{background:green;}
      .box2{background:blue;}
      .box3{background:red;}
      .box4{background:magenta;}
      .box5{background:yellow;}
      .box6{background:pink;}

      .box{
         font-size:25px;
         padding:15px;
         width:40%;
      }
      .container{
         display:flex;
         height:100vh;
         flex-wrap:wrap;
         align-content:flex-end;
      }
   </style>

   <body>
      <div class = "container">
         <div class = "box box1">One</div>
         <div class = "box box2">two</div>
         <div class = "box box3">three</div>
         <div class = "box box4">four</div>
         <div class = "box box5">five</div>
         <div class = "box box6">six</div>
      </div>
   </body>
</html>
它将产生以下结果 −
stretch
将此值传递给属性 align-content 后,线条将拉伸以填满剩余空间。
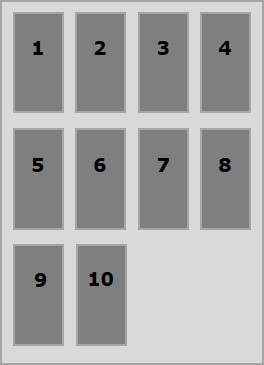
以下示例演示了将值 stretch 传递给 align-content 属性的结果。
<!doctype html>
<html lang = "en">
   <style>
      .box1{background:green;}
      .box2{background:blue;}
      .box3{background:red;}
      .box4{background:magenta;}
      .box5{background:yellow;}
      .box6{background:pink;}

      .box{
         font-size:25px;
         padding:15px;
         width:40;
      }
      .container{
         display:flex;
         height:100vh;
         flex-wrap:wrap;
         align-content:stretch;
      }
   </style>

   <body>
      <div class = "container">
         <div class = "box box1">One</div>
         <div class = "box box2">two</div>
         <div class = "box box3">three</div>
         <div class = "box box4">four</div>
         <div class = "box box5">five</div>
         <div class = "box box6">six</div>
      </div>
   </body>
</html>
它将产生以下结果 −
space-around
将此值传递给属性 align-content 后,额外的空间将均匀分布在行之间,每行周围的空间相等(包括第一行和最后一行)。
以下示例演示了将值 space-around 传递给 align-content 属性的结果。
<!doctype html>
<html lang = "en">
   <style>
      .box1{background:green;}
      .box2{background:blue;}
      .box3{background:red;}
      .box4{background:magenta;}
      .box5{background:yellow;}
      .box6{background:pink;}

      .box{
         font-size:25px;
         padding:15px;
         width:40%;
      }
      .container{
         display:flex;
         height:100vh;
         flex-wrap:wrap;
         align-content:space-around;
      }
   </style>

   <body>
      <div class = "container">
         <div class = "box box1">One</div>
         <div class = "box box2">two</div>
         <div class = "box box3">three</div>
         <div class = "box box4">four</div>
         <div class = "box box5">five</div>
         <div class = "box box6">six</div>
      </div>
   </body>
</html>
它将产生以下结果 −
space-between
将此值传递给属性 align-content 后,额外的空间将均匀分布在行之间,其中第一行将位于容器的顶部,最后一行将位于容器的底部。
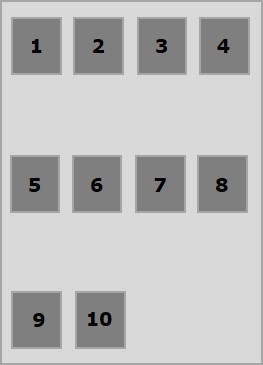
以下示例演示了将值 space-between 传递给 align-content 属性的结果。
<!doctype html>
<html lang = "en">
   <style>
      .box1{background:green;}
      .box2{background:blue;}
      .box3{background:red;}
      .box4{background:magenta;}
      .box5{background:yellow;}
      .box6{background:pink;}

      .box{
         font-size:25px;
         padding:15px;
         width:40%;
      }
      .container{
         display:flex;
         height:100vh;
         flex-wrap:wrap;
         align-content:space-between;
      }
   </style>

   <body>
      <div class = "container">
         <div class = "box box1">One</div>
         <div class = "box box2">two</div>
         <div class = "box box3">three</div>
         <div class = "box box4">four</div>
         <div class = "box box5">five</div>
         <div class = "box box6">six</div>
      </div>
   </body>
</html>
它将产生以下结果 −
Flexbox - Flex-Order
flex-order 属性用于定义弹性框项目的顺序。
以下示例演示了 order 属性。这里我们创建了六个彩色框,标签分别为一、二、三、四、五、六,以相同的顺序排列,然后我们使用 flex-order 属性按一、二、五、六、三、四的顺序重新排列它们。
<!doctype html>
<html lang = "en">
   <style>
      .box{
         font-size:35px;
         padding:15px;
      }
      .box1{background:green;}
      .box2{background:blue;}
      .box3{background:red; order:1}
      .box4{background:magenta; order:2}
      .box5{background:yellow;}
      .box6{background:pink;}

      .container{
         display:inline-flex;
         border:3px solid black;
         flex-direction:rows;
         flex-wrap:wrap;
      }
   </style>

   <body>
      <div class = "container">
         <div class = "box box1">One</div>
         <div class = "box box2">two</div>
         <div class = "box box3">three</div>
         <div class = "box box4">four</div>
         <div class = "box box5">five</div>
         <div class = "box box6">six</div>
      </div>
   </body>
</html>
它将产生以下结果 −
- ve ordering
您还可以为订单分配 –ve 值,如下所示。
<!doctype html>
<html lang = "en">
   <style>
      .box{
         font-size:35px;
         padding:15px;
      }
      .box1{background:green;}
      .box2{background:blue;}
      .box3{background:red; order:-1}
      .box4{background:magenta; order:-2}
      .box5{background:yellow;}
      .box6{background:pink;}

      .container{
         display:inline-flex;
         border:3px solid black;
         flex-direction:row;
         flex-wrap:wrap;
      }
   </style>

   <body>
      <div class = "container">
         <div class = "box box1">One</div>
         <div class = "box box2">two</div>
         <div class = "box box3">three</div>
         <div class = "box box4">four</div>
         <div class = "box box5">five</div>
         <div class = "box box6">six</div>
      </div>
   </body>
</html>
它将产生以下结果 −
Flexbox - 灵活性
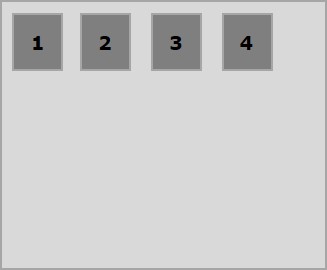
flex-basis
我们使用 flex-basis 属性来定义在分配空间之前 flex-item 的默认大小。
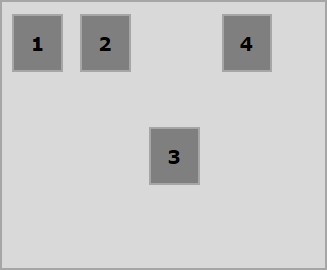
以下示例演示了 flex-basis 属性的用法。这里我们创建了 3 个彩色框,并将它们的大小固定为 150 像素。
<!doctype html>
<html lang = "en">
   <style>
      .box{
         font-size:15px;
         padding:15px;
      }
      .box1{background:green; flex-basis:150px; }
      .box2{background:blue; flex-basis:150px;}
      .box3{background:red; flex-basis:150px;}

      .container{
         display:flex;
         height:100vh;
         align-items:flex-start;
      }
   </style>

   <body>
      <div class = "container">
         <div class = "box box1">One</div>
         <div class = "box box2">two</div>
         <div class = "box box3">three</div>
      </div>
   </body>
</html>
它将产生以下结果 −
flex-grow
我们使用 flex-grow 属性来设置 flex-grow 因子。如果容器中有多余的空间,它指定特定弹性项目应增长多少。
<!doctype html>
<html lang = "en">
   <style>
      .box{
         font-size:15px;
         padding:15px;
      }
      .box1{background:green; flex-grow:10; flex-basis:100px; }
      .box2{background:blue; flex-grow:1; flex-basis:100px; }
      .box3{background:red; flex-grow:1; flex-basis:100px; }

      .container{
         display:flex;
         height:100vh;
         align-items:flex-start;
      }
   </style>

   <body>
      <div class = "container">
         <div class = "box box1">One</div>
         <div class = "box box2">two</div>
         <div class = "box box3">three</div>
      </div>
   </body>
</html>
它将产生以下结果 −
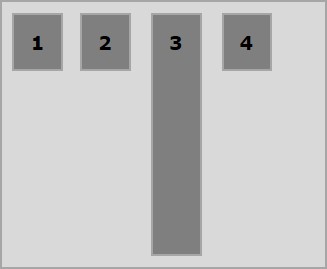
flex-shrink
我们使用 flex-shrink 属性来设置 flex shrink-factor。如果容器中没有足够的空间,它会指定 flex-item 应收缩多少。
<!doctype html>
<html lang = "en">
   <style>
      .box{
         font-size:15px;
         padding:15px;
      }
      .box1{background:green; flex-basis:200px; flex-shrink:10}
      .box2{background:blue; flex-basis:200px; flex-shrink:1}
      .box3{background:red; flex-basis:200px; flex-shrink:1}

      .container{
         display:flex;
         height:100vh;
         align-items:flex-start;
      }
   </style>

   <body>
      <div class = "container">
         <div class = "box box1">One</div>
         <div class = "box box2">two</div>
         <div class = "box box3">three</div>
      </div>
   </body>
</html>
它将产生以下结果 −
flex
有一种简写方法可以同时为这三个属性设置值;它被称为 flex。使用此属性,您可以同时为 flex-grow、flex-shrink 和 flex-basis 值设置值。以下是此属性的语法。
.item {
   flex: none | [ <'flex-grow'> <'flex-shrink'>? || <'flex-basis'> ]
}
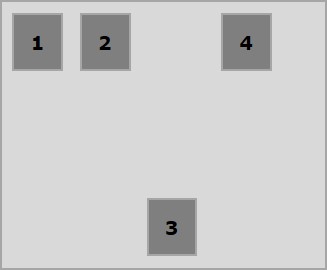
Flexbox - 自身对齐
此属性与 align-items 类似,但此处,它应用于单个 flex 项目。
用法 −
align-self: auto | flex-start | flex-end | center | baseline | stretch;
此属性接受以下值 −
flex-start − flex 项目将垂直对齐在容器顶部。
flex-end − flex 项目将垂直对齐在容器底部。
flex-center −弹性项目将垂直对齐在容器的中心。
Stretch − 弹性项目将垂直对齐,使其填满容器的整个垂直空间。
baseline − 弹性项目将与横轴的基线对齐。
flex-start
将此值传递给属性 align-self 后,特定弹性项目将垂直对齐在容器的顶部。
以下示例演示了将值 flex-start 传递给 align-self 属性的结果。
<!doctype html>
<html lang = "en">
   <style>
      .box1{background:green;}
      .box2{background:blue;}
      .box3{background:red;}
      .box4{background:magenta; align-self:start;}
      .box5{background:yellow;}
      .box6{background:pink;}
      .box{
         font-size:35px;
         padding:15px;
      }
      .container{
         display:flex;
         height:100vh;
         border:3px solid black;
         align-items:flex-start;
      }
   </style>

   <body>
      <div class = "container">
         <div class = "box box1">One</div>
         <div class = "box box2">two</div>
         <div class = "box box3">three</div>
         <div class = "box box4">four</div>
         <div class = "box box5">five</div>
         <div class = "box box6">six</div>
      </div>
   </body>
</html>
它将产生以下结果 −
flex-end
将此值传递给属性 align-self 后,特定的 flex-item 将在容器底部垂直对齐。
以下示例演示了将值 flex-end 传递给 align-self 属性的结果。
<!doctype html>
<html lang = "en">
   <style>
      .box1{background:green;}
      .box2{background:blue;}
      .box3{background:red;}
      .box4{background:magenta; align-self:flex-end;}
      .box5{background:yellow;}
      .box6{background:pink;}
      .box{
         font-size:35px;
         padding:15px;
      }
      .container{
         display:flex;
         height:100vh;
         border:3px solid black;
         align-items:flex-start;
      }
   </style>

   <body>
      <div class = "container">
         <div class = "box box1">One</div>
         <div class = "box box2">two</div>
         <div class = "box box3">three</div>
         <div class = "box box4">four</div>
         <div class = "box box5">five</div>
         <div class = "box box6">six</div>
      </div>
   </body>
</html>
它将产生以下结果 −
center
将值 center 传递给属性 align-self 后,特定的 flex-item 将在容器的中心垂直对齐。
以下示例演示了将值 center 传递给 align-self 属性的结果。
<!doctype html>
<html lang = "en">
   <style>
      .box1{background:green;}
      .box2{background:blue;}
      .box3{background:red;}
      .box4{background:magenta; align-self:center;}
      .box5{background:yellow;}
      .box6{background:pink;}
      .box{
         font-size:35px;
         padding:15px;
      }
      .container{
         display:flex;
         height:100vh;
         border:3px solid black;
         align-items:flex-start;
      }
   </style>

   <body>
      <div class = "container">
         <div class = "box box1">One</div>
         <div class = "box box2">two</div>
         <div class = "box box3">three</div>
         <div class = "box box4">four</div>
         <div class = "box box5">five</div>
         <div class = "box box6">six</div>
      </div>
   </body>
</html>
它将产生以下结果 −
stretch
将此值传递给属性 align-self 后,特定的弹性项目将垂直对齐,从而填满容器的整个垂直空间。
以下示例演示了将值 stretch 传递给 align-self 属性的结果。
<!doctype html>
<html lang = "en">
   <style>
      .box1{background:green;}
      .box2{background:blue;}
      .box3{background:red;}
      .box4{background:magenta; align-self:stretch;}
      .box5{background:yellow;}
      .box6{background:pink;}
      .box{
         font-size:35px;
         padding:15px;
      }
      .container{
         display:flex;
         height:100vh;
         border:3px solid black;
         align-items:flex-start;
      }
   </style>

   <body>
      <div class = "container">
         <div class = "box box1">One</div>
         <div class = "box box2">two</div>
         <div class = "box box3">three</div>
         <div class = "box box4">four</div>
         <div class = "box box5">five</div>
         <div class = "box box6">six</div>
      </div>
   </body>
</html>
它将产生以下结果 −


