Angular7 - 事件绑定
在本章中,我们将讨论事件绑定在 Angular 7 中的工作原理。当用户以键盘移动、鼠标单击或鼠标悬停的形式与应用程序交互时,它会生成一个事件。 需要处理这些事件才能执行某种操作。 这就是事件绑定发挥作用的地方。
让我们考虑一个例子来更好地理解这一点。
app.component.html
<!--以下内容只是占位符,可以替换。-->
<div style = "text-align:center">
   <h1>Welcome to {{title}}.</h1>
</div>

<div> Months :
   <select>
      <option *ngFor = "let i of months">{{i}}</option>
   </select>
</div>
<br/>

<div>
   <span *ngIf = "isavailable; then condition1 else condition2">
      Condition is valid.
   </span>
   <ng-template #condition1>Condition is valid</ng-template>
   <ng-template #condition2>Condition is invalid</ng-template>
</div>
<button (click) = "myClickFunction($event)">
   Click Me
</button>
在app.component.html文件中,我们定义了一个按钮并使用点击事件向其添加了一个函数。
以下是定义按钮并向其添加功能的语法。
(click) = "myClickFunction($event)"
The function is defined in :app.component.ts
import { Component } from '@angular/core';
@Component({
   selector: 'app-root',
   templateUrl: './app.component.html',
   styleUrls: ['./app.component.css']
})
export class AppComponent {
   title = 'Angular 7';

   // declared array of months.
   months = ["January", "February", "March", "April", "May","June", "July",
      "August", "September", "October", "November", "December"];

   isavailable = true; //variable is set to true
   myClickFunction(event) {
      //刚刚添加了 console.log,单击按钮将在浏览器中显示事件详细信息。
      alert("Button is clicked");
      console.log(event);
   }
}
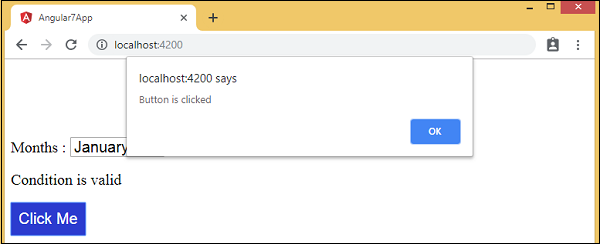
点击按钮后,控件会来到函数myClickFunction,并出现一个对话框,显示Button is clicked,如下图所示 −
按钮的样式已添加到 add.component.css 中 −
button {
   background-color: #2B3BCF;
   border: none;
   color: white;
   padding: 10px 10px;
   text-align: center;
   text-decoration: none;
   display: inline-block;
   font-size: 20px;
}
现在让我们将 onchange 事件添加到下拉列表中。
以下代码行将帮助您将更改事件添加到下拉列表中 −
app.component.html
<!--以下内容只是占位符,可以替换。-->
<div style = "text-align:center">
   <h1>Welcome to {{title}}.</h1>
</div>

<div> Months :
   <select (change) = "changemonths($event)">
      <option *ngFor = "let i of months">{{i}}</option>
   </select>
</div>
<br/>

<div>
   <span *ngIf = "isavailable; then condition1 else condition2">
      Condition is valid.
   </span>
   <ng-template #condition1>Condition is valid</ng-template>
   <ng-template #condition2>Condition is invalid</ng-template>
</div>
<br/>

<button (click) = "myClickFunction($event)">
   Click Me
</button>
该函数在 app.component.ts 文件中声明 −
import { Component } from '@angular/core';
@Component({
   selector: 'app-root',
   templateUrl: './app.component.html',
   styleUrls: ['./app.component.css']
})
export class AppComponent {
   title = 'Angular 7';

   // declared array of months.
   months = ["January", "Feburary", "March", "April", "May", "June", "July",
      "August", "September", "October", "November", "December"];

   isavailable = true; //variable is set to true
   myClickFunction(event) {
      //刚刚添加了 console.log,单击按钮将在浏览器中显示事件详细信息。
      alert("Button is clicked");
      console.log(event);
   }
   changemonths(event) {
      console.log("Changed month from the Dropdown");
      console.log(event);
   }
}
从下拉列表中选择月份,您会看到控制台消息"Changed month from the Dropdown(从下拉列表中更改月份)"与事件一起显示在控制台中。

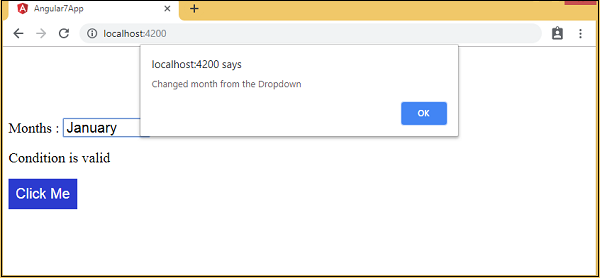
当下拉列表中的值发生更改时,让我们在 app.component.ts 中添加一条警报消息,如下所示 −
import { Component } from '@angular/core';
@Component({
   selector: 'app-root',
   templateUrl: './app.component.html',
   styleUrls: ['./app.component.css']
})
export class AppComponent {
   title = 'Angular 7';

   // declared array of months.
   months = ["January", "February", "March", "April", "May", "June", "July",
      "August", "September", "October", "November", "December"];

   isavailable = true; //variable is set to true
   myClickFunction(event) {
      //刚刚添加了 console.log,单击按钮将在浏览器中显示事件详细信息。
      alert("Button is clicked"); console.log(event);
   }
   changemonths(event) {
      alert("Changed month from the Dropdown");
   }
}
当下拉列表中的值更改时,将出现一个对话框并显示以下消息 −
“Changed month from the Dropdown”.