WML - 模板
<template> 用于将<do> 和 <onevent>元素应用于一个deck中的所有卡片。 该元素为一个deck中的所有卡片定义了一个模板,并且 <template> 标签中的代码将添加到该deck中的每张卡片中。
您可以通过在 WML 卡中定义具有相同 name 属性值的另一个 <do> 元素来覆盖模板的<do>元素。
<template> 元素支持以下属性:
| 属性 | 值 | 描述 |
|---|---|---|
| onenterbackward | URL | 当用户使用"上一个"任务导航到卡片时发生 |
| onenterforward | URL | 当用户使用"go"任务导航到卡片时发生 |
| ontimer | URL | "计时器"到期时发生 |
| class | class data | 设置元素的类名。 |
| id | element ID | 元素的唯一 ID。 |
以下是显示 <go> 元素用法的示例。
<?xml version="1.0"?>
<!DOCTYPE wml PUBLIC "-//WAPFORUM//DTD WML 1.3//EN"
"http://www.wapforum.org/DTD/wml13.dtd">

<wml>
  <template>
    <do name="main_menu" type="accept" label="Chapters">
      <go href="chapters"/>
    </do>
    <do name="menu_1" type="accept" label="Chapter 1">
      <go href="#chapter1"/>
    </do>
    <do name="menu_2" type="accept" label="Chapter 2">
      <go href="#chapter2"/>
    </do>
    <do name="menu_3" type="accept" label="Chapter 3">
      <go href="#chapter3"/>
    </do>
    <do name="menu_4" type="accept" label="Chapter 4">
      <go href="#chapter4"/>
    </do>
  </template>

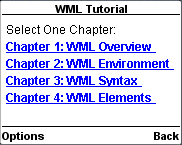
  <card id="chapters" title="WML Tutorial">
    <p>
      Select One Chapter:<br/>
      <anchor>
        <go href="#chapter1"/>
        Chapter 1: WML Overview
      </anchor><br />

      <anchor>
        <go href="#chapter2"/>
        Chapter 2: WML Environment
      </anchor><br />

      <anchor>
        <go href="#chapter3"/>
        Chapter 3: WML Syntax
      </anchor><br />

      <anchor>
        <go href="#chapter4"/>
        Chapter 4: WML Elements
      </anchor><br />
    </p>
  </card>

  <card id="chapter1" title="WML Tutorial Ch1">
    <p>
      <em>Chapter 1: WML Introduction</em><br/>
      ...
    </p>
  </card>

  <card id="chapter2" title="WML Tutorial Ch2">
    <p>
      <em>Chapter 2: WML Environment</em><br/>
      ...
    </p>
  </card>

  <card id="chapter3" title="WML Tutorial Ch3">
    <p>
      <em>Chapter 3: WML Syntax</em><br/>
      ...
    </p>
  </card>

  <card id="chapter4" title="WML Tutorial Ch4">
    <p>
      <em>Chapter 4: WML Elements</em><br/>
      ...
    </p>
  </card>
</wml>
这将产生以下菜单,现在您可以浏览所有章节:


