Spring Boot - 谷歌云平台
Google Cloud Platform 提供云计算服务,在云环境中运行 Spring Boot 应用程序。 在本章中,我们将了解如何在 GCP 应用引擎平台上部署 Spring Boot 应用程序。
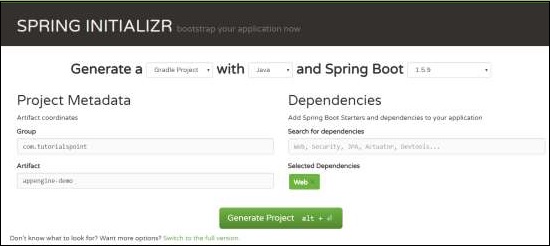
首先,从 Spring Initializer 页面 www.start.spring.io 下载 Gradle 构建 Spring Boot 应用程序。 观察以下屏幕截图。
现在,在 build.gradle 文件中,添加 Google Cloud appengine 插件和 appengine 类路径依赖项。
build.gradle 文件的代码如下 −
buildscript {
   ext {
      springBootVersion = '1.5.9.RELEASE'
   }
   repositories {
      mavenCentral()
   }
   dependencies {
      classpath("org.springframework.boot:spring-boot-gradle-plugin:${springBootVersion}")
      classpath 'com.google.cloud.tools:appengine-gradle-plugin:1.3.3'
   }
}

apply plugin: 'java'
apply plugin: 'eclipse'
apply plugin: 'org.springframework.boot'
apply plugin: 'com.google.cloud.tools.appengine'

group = 'com.tutorialspoint'
version = '0.0.1-SNAPSHOT'
sourceCompatibility = 1.8

repositories {
   mavenCentral()
}
dependencies {
   compile('org.springframework.boot:spring-boot-starter-web')
   testCompile('org.springframework.boot:spring-boot-starter-test')
}
现在,编写一个简单的 HTTP 端点,它返回字符串成功,如图所示 −
package com.tutorialspoint.appenginedemo;

import org.springframework.boot.SpringApplication;
import org.springframework.boot.autoconfigure.SpringBootApplication;
import org.springframework.web.bind.annotation.RequestMapping;
import org.springframework.web.bind.annotation.RestController;

@SpringBootApplication
@RestController
public class AppengineDemoApplication {
   public static void main(String[] args) {
      SpringApplication.run(AppengineDemoApplication.class, args);
   }
   @RequestMapping(value = "/")
   public String success() {
      return "APP Engine deployment success";
   }
}
接下来,在 src/main/appengine 目录下添加 app.yml 文件,如图 −
runtime: java
env: flex

handlers:
- url: /.*
   script: this field is required, but ignored
现在,转到 Google Cloud 控制台并单击页面顶部的激活 Google 云外壳。

现在,使用 google cloud shell 将您的源文件和 Gradle 文件移动到您的 google cloud 机器的主目录中。

现在,执行命令 gradle appengineDeploy,它会将您的应用程序部署到 Google Cloud appengine 中。
注意 − GCP 应启用计费功能,并且在将应用程序部署到 appengine 之前,您应该在 GCP 中创建 appengine 平台。
将您的应用程序部署到 GCP appengine 平台需要几分钟时间。
构建成功后,您可以在控制台窗口中看到服务 URL。
现在,点击服务 URL 并查看输出。

谷歌云 SQL
要将 Google Cloud SQL 连接到 Spring Boot 应用程序,您应该将以下属性添加到 application.properties 文件中。
JDBC URL 格式
jdbc:mysql://google/<DATABASE-NAME>?cloudSqlInstance = <GOOGLE_CLOUD_SQL_INSTANCE_NAME> &socketFactory = com.google.cloud.sql.mysql.SocketFactory&user = <USERNAME>&password = <PASSWORD>
注意 − Spring Boot 应用程序和 Google Cloud SQL 应该在同一个 GCP 项目中。
application.properties 文件如下所示。
spring.dbProductService.driverClassName = com.mysql.jdbc.Driver
spring.dbProductService.url = jdbc:mysql://google/PRODUCTSERVICE?cloudSqlInstance = springboot-gcp-cloudsql:asia-northeast1:springboot-gcp-cloudsql-instance&socketFactory = com.google.cloud.sql.mysql.SocketFactory&user = root&password = rootspring.dbProductService.username = root

spring.dbProductService.password = root
spring.dbProductService.testOnBorrow = true
spring.dbProductService.testWhileIdle = true
spring.dbProductService.timeBetweenEvictionRunsMillis = 60000
spring.dbProductService.minEvictableIdleTimeMillis = 30000
spring.dbProductService.validationQuery = SELECT 1
spring.dbProductService.max-active = 15
spring.dbProductService.max-idle = 10
spring.dbProductService.max-wait = 8000
YAML 文件用户可以将以下属性添加到您的 application.yml 文件中。
spring:
   datasource:
      driverClassName: com.mysql.jdbc.Driver
      url: "jdbc:mysql://google/PRODUCTSERVICE?cloudSqlInstance=springboot-gcp-cloudsql:asia-northeast1:springboot-gcp-cloudsql-instance&socketFactory=com.google.cloud.sql.mysql.SocketFactory&user=root&password=root"
      password: "root"
      username: "root"
      testOnBorrow: true
      testWhileIdle: true
      validationQuery: SELECT 1

      max-active: 15
      max-idle: 10
      max-wait: 8000


