如何在 OpenCV Python 中在图像上绘制箭头线?
opencvpythonserver side programmingprogramming
OpenCV 提供函数 cv2.arrowedLine() 在图像上绘制箭头线。此函数采用不同的参数来绘制线条。请参阅下面的语法。
cv2.arrowedLine(img, start, end, color, thicken, line_type, shift, tip_length)
img − 要在其上绘制线条的输入图像。
Start − 线条的起始坐标,格式为 (width, height)。
End − 线条的结束坐标,格式为 (width, height)。
Color − 线条的颜色。对于 BGR 格式的红色,我们传递 (0, 0, 255)
Thickness − 线条的粗细(以像素为单位)。
line_type − 线条的类型。
shift − 小数位数。
tip_length − 箭头尖端的长度(相对于箭头长度)。
输出 − 返回带有线条的图像。
步骤
按照下面给出的步骤在图像上绘制箭头线 −
导入所需的库。在以下所有 Python 示例中,所需的 Python 库均为 OpenCV。确保您已经安装了它。
import cv2
使用 cv2.imread() 读取输入图像。
image = cv2.imread('cabinet.jpg')
使用 cv2.arrowedLine() 传递所需参数,在图像上绘制箭头线。
cv2.arrowedLine(image, (50, 100), (300, 450), (0,0,255), 3, 5, 0, 0.1)
显示带有箭头线的图像。
cv2.imshow("ArrowedLine",image)
cv2.waitKey(0)
cv2.destroyAllWindows()
让我们看一些例子,以便清楚地了解它是如何完成的。
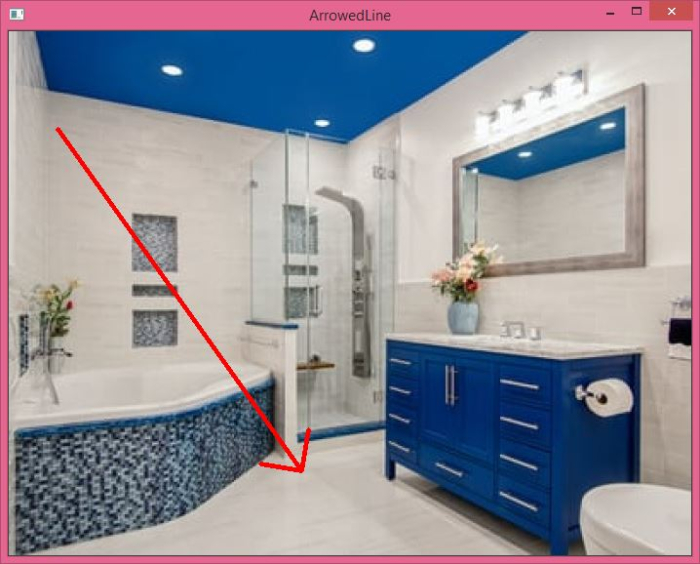
示例 1
在这个程序中,我们在图像上绘制一条红线,具有以下线条属性 -
start_point = (50, 100),
end_point = (300, 450),
color = (0,0,255),
thickness = 3,
line_type = 5,
shift = 0, and
tip_length = 0.1
# import required libraries
import cv2

# read the input image
image=cv2.imread('cabinet.jpg')

# Draw the arrowed line passing the arguments
cv2.arrowedLine(image, (50, 100), (300, 450), (0,0,255), 3, 5, 0, 0.1)

cv2.imshow("ArrowedLine",image)
cv2.waitKey(0)
cv2.destroyAllWindows()
输出
当您运行上述程序时,它将产生以下输出 -
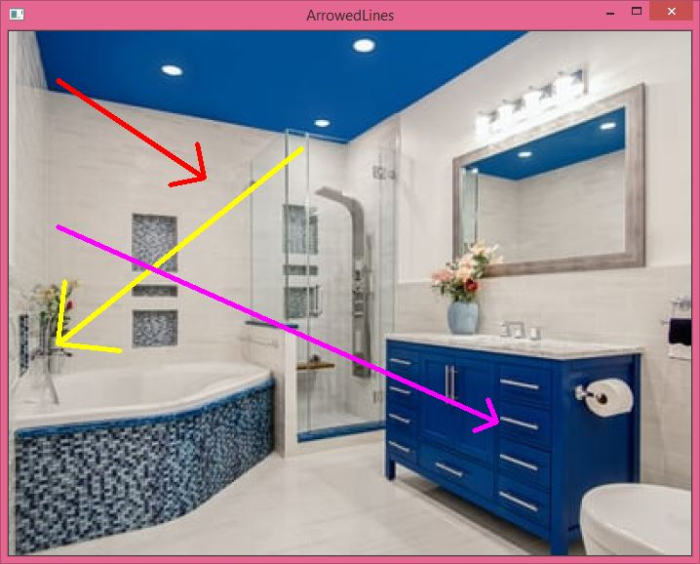
示例 2
在此程序中,我们绘制三条具有不同线条属性的不同线条 −
import cv2
image=cv2.imread('cabinet.jpg')

cv2.arrowedLine(image, (50, 50), (200, 150), (0,0,255), 3, 7, 0, 0.2)
cv2.arrowedLine(image, (300, 120), (50, 320), (0,255,255), 3, 7, 0, 0.2)
cv2.arrowedLine(image, (50, 200), (500, 400), (255,0,255), 3, 7, 0, 0.05)

cv2.imshow("ArrowedLines",image)
cv2.waitKey(0)
cv2.destroyAllWindows()
输出
执行时,它将产生以下输出窗口 -