如何使用 OpenCV Python 近似图像中的轮廓形状?
opencvpythonserver side programmingprogramming
函数 cv2.approxPolyDP() 将轮廓形状近似为具有较少顶点的另一个形状。它接受以下参数 −
cnt − 轮廓点的数组。
epsilon − 从轮廓到近似轮廓的最大距离。需要明智地选择 epsilon 才能获得正确的输出。
语法
以下语法用于近似轮廓形状
epsilon = 0.01*cv2.arcLength(cnt,True)
approx = cv2.approxPolyDP(cnt,epsilon,True)
步骤
您可以使用以下步骤来近似图像中的轮廓形状 −
导入所需的库。在以下所有 Python 示例中,所需的 Python 库是 OpenCV。确保您已经安装了它。
import cv2
使用 cv2.imread() 读取输入图像并将其转换为灰度。
img = cv2.imread('approx1.png')
gray = cv2.cvtColor(img, cv2.COLOR_BGR2GRAY)
对灰度图像应用阈值以创建二值图像。调整第二个参数以获得更好的轮廓检测。
ret,thresh = cv2.threshold(gray,150,255,0)
使用 cv2.findContours() 函数在图像中查找轮廓。
contours, _ = cv2.findContours(thresh, cv2.RETR_TREE, cv2.CHAIN_APPROX_SIMPLE)
从轮廓列表中选择一个轮廓(例如第一个轮廓)cnt。
cnt = contours[0]
定义精度,即 epsilon。这一步非常重要。轮廓的正确近似取决于 epsilon 的选择。
epsilon = 0.01*cv2.arcLength(cnt,True)
使用 cv2.approxPolyDP() 函数计算近似轮廓点。
approx = cv2.approxPolyDP(cnt,epsilon,True)
在输入图像上使用不同的颜色绘制轮廓和近似轮廓。
cv2.drawContours(img, [cnt], -1, (0,255,255), 3)
cv2.drawContours(img, [approx], -1, (0,0,255), 3)
显示已绘制轮廓和近似轮廓的图像。
cv2.imshow("Approximate Contour", img)
cv2.waitKey(0)
cv2.destroyAllWindows()
示例
在下面的 Python 代码中,我们在输入图像中找到一个对象的近似轮廓。我们还在输入图像上绘制了近似轮廓。
import cv2
import numpy as np

# Read the input image
img = cv2.imread('approx1.png')

# convert the image to grayscale
gray = cv2.cvtColor(img, cv2.COLOR_BGR2GRAY)

# apply thresholding to convert the grayscale image to a binary image
ret,thresh = cv2.threshold(gray,150,255,0)

# find the contours
contours,hierarchy = cv2.findContours(thresh, cv2.RETR_TREE,cv2.CHAIN_APPROX_SIMPLE)
print("Number of contours detected:",len(contours))

# take first contour
cnt = contours[0]

# define the precision
epsilon = 0.01*cv2.arcLength(cnt,True)

# approximate the contour
approx = cv2.approxPolyDP(cnt,epsilon,True)

# draw the contour on the input image
cv2.drawContours(img, [cnt], -1, (0,255,255), 3)

# draw the approximate contour on the input image
cv2.drawContours(img, [approx], -1, (0,0,255), 3)

# display the image with drawn contours and approximate contours
cv2.imshow("Approximate Contour", img)
cv2.waitKey(0)
cv2.destroyAllWindows()
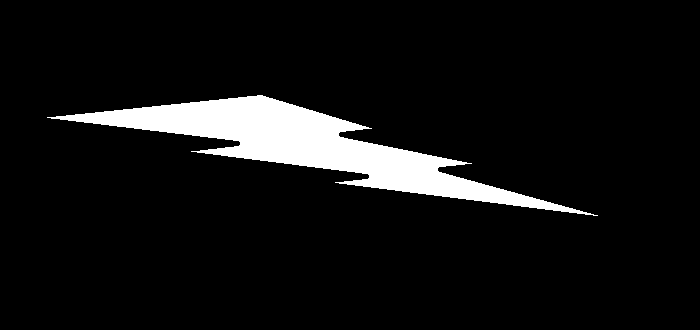
我们将使用以下图像作为上述程序代码中的输入文件。
输出
执行上述代码时,将产生以下输出。
Number of contours detected: 1
我们得到以下窗口,显示输出−
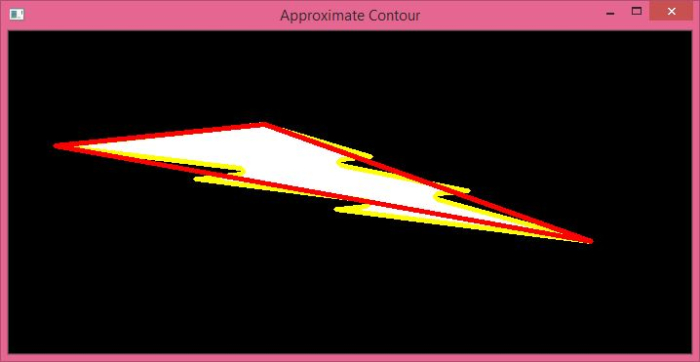
在上面的输出图像中,物体的轮廓显示为黄色,物体的近似轮廓显示为物体以红色显示。注意两个轮廓之间的差异。


