Symfony - 表单
Symfony 提供各种内置标签,以便轻松安全地处理 HTML 表单。Symfony 的 Form 组件执行表单创建和验证过程。它连接模型和视图层。它提供了一组表单元素,用于从预定义模型创建完整的 html 表单。本章详细介绍了表单。
表单字段
Symfony 框架 API 支持大量字段类型。让我们详细了解每种字段类型。
FormType
它用于在 Symfony 框架中生成表单。其语法如下 −
use Symfony\Component\Form\Extension\Core\Type\TextType;
use Symfony\Component\Form\Extension\Core\Type\EmailType;
use Symfony\Component\Form\Extension\Core\Type\FormType;
// ...

$builder = $this->createFormBuilder($studentinfo);
$builder
   ->add('title', TextType::class);
此处,$studentinfo 是 Student 类型的实体。createFormBuilder 用于创建 HTML 表单。add 方法用于在表单内添加输入元素。title 指学生标题属性。TextType::class 指 html 文本字段。Symfony 为所有 html 元素提供类。
TextType
TextType 字段表示最基本的输入文本字段。其语法如下 −
use Symfony\Component\Form\Extension\Core\Type\TextType;
$builder->add('name', TextType::class);
此处,名称与实体映射。
TextareaType
呈现文本区域 HTML 元素。其语法如下 −
use Symfony\Component\Form\Extension\Core\Type\TextareaType;
$builder->add('body', TextareaType::class, array(
   'attr' => array('class' => 'tinymce'),
));
EmailType
EmailType 字段是使用 HTML5 email 标签呈现的文本字段。其语法如下 −
use Symfony\Component\Form\Extension\Core\Type\EmailType;
$builder->add('token', EmailType::class, array(
    'data' => 'abcdef', ));
PasswordType
PasswordType 字段呈现输入密码的文本框。其语法如下 −
use Symfony\Component\Form\Extension\Core\Type\PasswordType;
$bulder->add('password', PasswordType::class);
RangeType
RangeType 字段是使用 HTML5 range 标签呈现的滑块。其语法如下 −
use Symfony\Component\Form\Extension\Core\Type\RangeType;
// ...
$builder->add('name', RangeType::class, array(
   'attr' => array(
      'min' => 100,
      'max' => 200
   )
));
PercentType
PercentType 渲染输入文本字段,专门处理百分比数据。其语法如下 −
use Symfony\Component\Form\Extension\Core\Type\PercentType;
// ...
$builder->add('token', PercentType::class, array(
   'data' => 'abcdef',
));
DateType
呈现日期格式。其语法如下 −
use Symfony\Component\Form\Extension\Core\Type\DateType;
// ...
$builder->add('joined', DateType::class, array(
    'widget' => 'choice',
));
此处,Widget 是呈现字段的基本方式。
它执行以下功能。
choice − 呈现三个选择输入。选择的顺序在格式选项中定义。
text −呈现三字段文本类型输入(月、日、年)。
single_text − 呈现日期类型的单个输入。根据格式选项验证用户的输入。
CheckboxType
创建单个输入复选框。这应始终用于具有布尔值的字段。其语法如下 −
use Symfony\Component\Form\Extension\Core\Type\CheckboxType;
// ...
$builder-<add(‘sports’, CheckboxType::class, array(
   'label'    =< ‘Are you interested in sports?’,
   'required' =< false,
));
RadioType
创建一个单选按钮。如果单选按钮被选中,该字段将被设置为指定的值。其语法如下 −
use Symfony\Component\Form\Extension\Core\Type\RadioType;
// ...
$builder->add('token', RadioType::class, array(
'data' => 'abcdef',
));
请注意,单选按钮不能取消选中,只有当另一个同名单选按钮被选中时,其值才会更改。
RepeatedType
这是一个特殊的字段"组",它创建两个相同的字段,其值必须匹配。其语法如下 −
use Symfony\Component\Form\Extension\Core\Type\RepeatedType;
use Symfony\Component\Form\Extension\Core\Type\PasswordType;

// ...
$builder->add('password', RepeatedType::class, array(
   'type' => PasswordType::class,
   'invalid_message' => 'The password fields must match.',
   'options' => array('attr' => array('class' => 'password-field')),
   'required' => true,
   'first_options'  => array('label' => 'Password'),
   'second_options' => array('label' => 'Repeat Password'),
));
这主要用于检查用户的密码或电子邮件。
ButtonType
一个简单的可点击按钮。其语法如下 −
use Symfony\Component\Form\Extension\Core\Type\ButtonType;
// ...
$builder->add('save', ButtonType::class, array(
'attr' => array('class' => 'save'),
));
ResetType
一个将所有字段重置为其初始值的按钮。其语法如下 −
use Symfony\Component\Form\Extension\Core\Type\ResetType;
// ...
$builder->add('save', ResetType::class, array(
'attr' => array('class' => 'save'),
));
ChoiceType
多用途字段用于允许用户"选择"一个或多个选项。它可以呈现为选择标签、单选按钮或复选框。其语法如下 −
use Symfony\Component\Form\Extension\Core\Type\ChoiceType;
// ...
$builder->add(‘gender’, ChoiceType::class, array(
   'choices'  => array(
      ‘Male’ => true,
      ‘Female’ => false,
   ),
));
SubmitType
提交按钮用于提交表单数据。其语法如下 −
use Symfony\Component\Form\Extension\Core\Type\SubmitType;
// ...
$builder->add('save', SubmitType::class, array(
   'attr' => array('class' => 'save'),
))
表单辅助函数
表单辅助函数是用于在模板中轻松创建表单的分支函数。
form_start
返回指向有效操作、路由或 URL 的 HTML 表单标记。其语法如下 −
{{ form_start(form, {'attr': {'id': 'form_person_edit'}}) }}
form_end
关闭使用 form_start 创建的 HTML 表单标记。其语法如下 −
{{ form_end(form) }}
textarea
返回一个 textarea 标签,可选择使用内联富文本 JavaScript 编辑器进行包装。
checkbox
返回一个符合 XHTML 规范的输入标签,类型为"checkbox"。其语法如下 −
echo checkbox_tag('choice[]', 1);
echo checkbox_tag('choice[]', 2);
echo checkbox_tag('choice[]', 3);
echo checkbox_tag('choice[]', 4);
input_password_tag
返回一个符合 XHTML 规范的 type ="password"的输入标签。其语法如下 −
echo input_password_tag('password');
echo input_password_tag('password_confirm');
input_tag
返回一个符合 XHTML 规范的 type ="text"的输入标签。其语法如下 −
echo input_tag('name');
label
返回一个带有指定参数的 label 标签。
radiobutton
返回一个符合 XHTML 规范的 type ="radio"的输入标签。其语法如下 −
echo ' Yes '.radiobutton_tag('true', 1);
echo ' No '.radiobutton_tag('false', 0);
reset_tag
返回一个符合 XHTML 规范的输入标签,其类型为"reset"。其语法如下 −
echo reset_tag('Start Over');
select
返回一个包含世界上所有国家/地区的 select 标签。其语法如下 −
echo select_tag(
   'url', options_for_select($url_list),
   array('onChange' => 'Javascript:this.form.submit();'));
submit
返回一个符合 XHTML 规范的输入标签,其类型为"submit"。其语法如下 −
echo submit_tag('Update Record');
在下一节中,我们将学习如何使用表单字段创建表单。
Student 学生表单应用程序
让我们使用 Symfony 表单字段创建一个简单的学生详细信息表单。为此,我们应遵循以下步骤 −
步骤 1:创建 Symfony 应用程序
使用以下命令创建 Symfony 应用程序 formsample。
symfony new formsample
实体通常在"src/AppBundle/Entity/"目录下创建。
步骤 2:创建实体
在"src/AppBundle/Entity/"目录下创建文件"StudentForm.php"。在文件中添加以下更改。
StudentForm.php
<?php
namespace AppBundle\Entity;

class StudentForm {
   private $studentName;
   private $studentId;
   public $password;
   private $address;
   public $joined;
   public $gender;
   private $email;
   private $marks;
   public $sports;

   public function getStudentName() {
      return $this->studentName;
   }
   public function setStudentName($studentName) {
      $this->studentName = $studentName;
   }
   public function getStudentId() {
      return $this->studentId;
   }
   public function setStudentId($studentid) {
      $this->studentid = $studentid;
   }
   public function getAddress() {
      return $this->address;
   }
   public function setAddress($address) {
      $this->address = $address;
   }
   public function getEmail() {
      return $this->email;
   }
   public function setEmail($email) {
      $this->email = $email;
   }
   public function getMarks() {
      return $this->marks;
   }
   public function setMarks($marks) {
      $this->marks = $marks;
   }
}
步骤 3:添加 StudentController
移至目录"src/AppBundle/Controller",创建"StudentController.php"文件,并在其中添加以下代码。
StudentController.php
<?php
namespace AppBundle\Controller;

use AppBundle\Entity\StudentForm;
use AppBundle\Form\FormValidationType;

use Symfony\Bundle\FrameworkBundle\Controller\Controller;
use Symfony\Component\HttpFoundation\Request;
use Sensio\Bundle\FrameworkExtraBundle\Configuration\Route;

use Symfony\Component\HttpFoundation\Response;
use Symfony\Component\Form\Extension\Core\Type\TextType;
use Symfony\Component\Form\Extension\Core\Type\DateType;
use Symfony\Component\Form\Extension\Core\Type\SubmitType;
use Symfony\Component\Form\Extension\Core\Type\ChoiceType;
use Symfony\Component\Form\Extension\Core\Type\PasswordType;
use Symfony\Component\Form\Extension\Core\Type\RangeType;
use Symfony\Component\Form\Extension\Core\Type\EmailType;
use Symfony\Component\Form\Extension\Core\Type\CheckboxType;
use Symfony\Component\Form\Extension\Core\Type\ButtonType;
use Symfony\Component\Form\Extension\Core\Type\TextareaType;
use Symfony\Component\Form\Extension\Core\Type\PercentType;
use Symfony\Component\Form\Extension\Core\Type\RepeatedType;

class StudentController extends Controller {
   /**
      * @Route("/student/new")
   */
   public function newAction(Request $request) {
      $stud = new StudentForm();
      $form = $this->createFormBuilder($stud)
         ->add('studentName', TextType::class)
         ->add('studentId', TextType::class)
         ->add('password', RepeatedType::class, array(
            'type' => PasswordType::class,
            'invalid_message' => 'The password fields
            must match.', 'options' => array('attr' => array('class' => 'password-field')),
            'required' => true, 'first_options'  => array('label' => 'Password'),
            'second_options' => array('label' => 'Re-enter'),
         ))

         ->add('address', TextareaType::class)
         ->add('joined', DateType::class, array(
               'widget' => 'choice',
         ))

         ->add('gender', ChoiceType::class, array(
            'choices'  => array(
               'Male' => true,
               'Female' => false,
            ),
         ))

         ->add('email', EmailType::class)
         ->add('marks', PercentType::class)
         ->add('sports', CheckboxType::class, array(
            'label'    => 'Are you interested in sports?', 'required' => false,
         ))

         ->add('save', SubmitType::class, array('label' => 'Submit'))
         ->getForm();
         return $this->render('student/new.html.twig', array(
            'form' => $form->createView(),
         ));
   }
}
步骤 4:渲染视图
移至目录"app/Resources/views/student/",创建"new.html.twig"文件并在其中添加以下更改。
{% extends 'base.html.twig' %}
{% block stylesheets %}
<style>
   #simpleform {
      width:600px;
      border:2px solid grey;
      padding:14px;
   }
   #simpleform label {
      font-size:14px;
      float:left;
      width:300px;
      text-align:right;
      display:block;
   }
   #simpleform span {
      font-size:11px;
      color:grey;
      width:100px;
      text-align:right;
      display:block;
   }
   #simpleform input {
      border:1px solid grey;
      font-family:verdana;
      font-size:14px;
      color:light blue;
      height:24px;
      width:250px;
      margin: 0 0 10px 10px;
   }
   #simpleform textarea {
      border:1px solid grey;
      font-family:verdana;
      font-size:14px;
      color:light blue;
      height:120px;
      width:250px;
      margin: 0 0 20px 10px;
   }
   #simpleform select {
      margin: 0 0 20px 10px;
   }
   #simpleform button {
      clear:both;
      margin-left:250px;
      background: grey;
      color:#FFFFFF;
      border:solid 1px #666666;
      font-size:16px;
   }
</style>

{% endblock %}
   {% block body %}
   <h3>Student details:</h3>
   <div id="simpleform">
      {{ form_start(form) }}
      {{ form_widget(form) }}
      {{ form_end(form) }}
   </div>
{% endblock %}
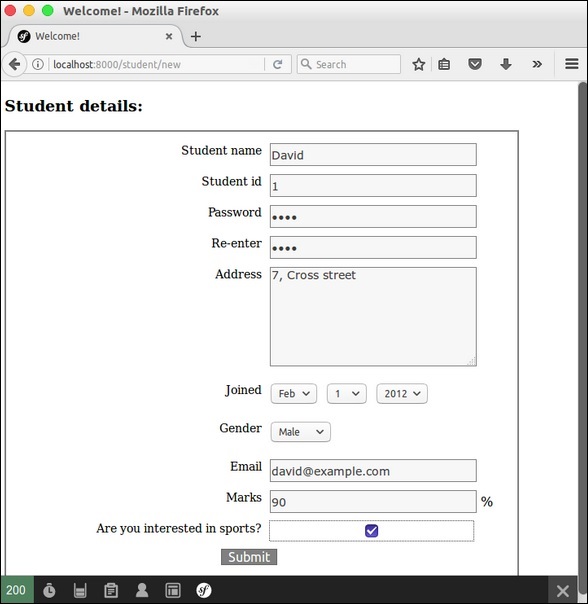
现在请求 URL"http://localhost:8000/student/new",它会产生以下结果。
结果