NativeScript - 布局容器
NativeScript 提供容器组件集合,其唯一目的是布局 UI 小部件组件。布局容器充当父组件,可以有一个或多个子组件。布局容器的所有子组件都可以根据其父布局容器提供的技术进行排列。
NativeScript 支持六种布局容器,它们如下 −
绝对布局容器
停靠布局容器
网格布局容器
堆栈布局容器
包裹布局容器
FlexBox 布局容器
让我们在本章中详细了解所有布局容器概念。
绝对布局
AbsoluteLayout 容器是 NativeScript 中最简单的布局容器。 AbsoluteLayout 不会对其子项施加任何约束,而是使用以左上角为原点的二维坐标系将其子项放置在其中。
AbsoluteLayout 使用其子项的四个属性来定位它们,它们如下 −
top − 定义子项从原点沿 y 方向向下移动的位置。
left − 定义子项从原点沿 x 方向向侧面移动的位置。
width − 定义子项的宽度。
height − 定义子项的高度。
让我们在应用程序的主页中添加 AbsoluteLayout 容器,如下所示 −
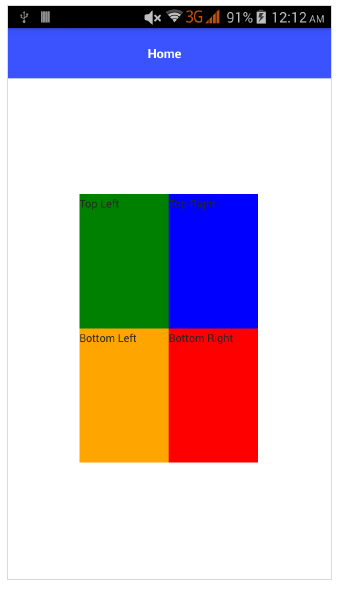
<ActionBar>
   <Label text="Home"></Label>
</ActionBar>

<AbsoluteLayout width="200" height="300" backgroundColor="blue">
   <Label text="Top Left" left="0" top="0" width="100" height="150" backgroundColor="green">
   </Label>
   <Label text="Top Right" left="100" top="0" width="100" height="150" backgroundColor="blue"></Label>
   <Label text="Bottom Left" left="0" top="150" width="100" height="150" backgroundColor="orange">
   </Label>
   <Label text="Bottom Right" left="100" top="150" width="100" height="150" backgroundColor="red"></Label>
</AbsoluteLayout>
输出
AbsoluteLayout 的输出如下所示 −
DockLayout
Docklayout 容器组件使其子组件能够停靠在其中。容器的每一侧(顶部、底部、左侧、右侧)都可以停靠一个子组件。DockLayout 容器使用其子组件的 dock 属性来正确停靠它们。
dock 属性的可能值如下 −
top − 布局容器将子组件停靠在顶角。
bottom − 布局容器将子组件停靠在底角。
left −布局容器将子组件停靠在左角。
right − 布局容器将子组件停靠在右角。
默认情况下,DockLayout 容器停靠其最后一个子组件。可以通过将其 stretchLastChild 属性设置为零来覆盖。
让我们在应用程序的主页中添加 DockLayout 容器,如下所示 −
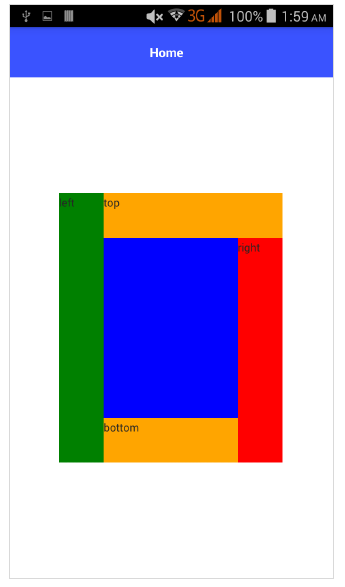
<ActionBar>
   <Label text="Home"></Label>
</ActionBar>
<DockLayout width="250" height="300" backgroundColor="blue" stretchLastChild="false">
   <Label text="left" dock="left" width="50" backgroundColor="green"></Label>
   <Label text="top" dock="top" height="50" backgroundColor="orange"></Label>
   <Label text="right" dock="right" width="50" backgroundColor="red"></Label<
   <Label text="bottom" dock="bottom" height="50"
   backgroundColor="orange"></Label>
</DockLayout>
输出
以下是 DockLayout − 的输出
GridLayout
GridLayout 容器组件是复杂布局容器之一,以行和列的表格格式排列子元素。默认情况下,它有一行和一列。它具有以下属性 −
columns − 用于表示以 , 分隔的每列的默认宽度。可能的值是数字、* 和 auto 关键字。
其中,
number 表示绝对列宽。
表示一列相对于其他列的宽度。它可以在前面加上数字,以指示列宽相对于其他列的多少倍。例如,2* 表示列的宽度应为最小列宽度的 2 倍。
auto 表示列的宽度与其最宽的子列一样宽。
例如,*,2* 表示两列,第二列的大小是第一列的两倍。
rows − 用于表示以 , 分隔的每行的默认高度。值表示类似于列。
GridLayout 使用其子项的以下指定属性来布局它们 −
row − 行号
rowSpan − 子内容在布局中跨越的总行数。
colSpan −子内容在布局中跨越的总列数。
让我们在应用程序的主页中添加 GridLayout 容器,如下所示 −
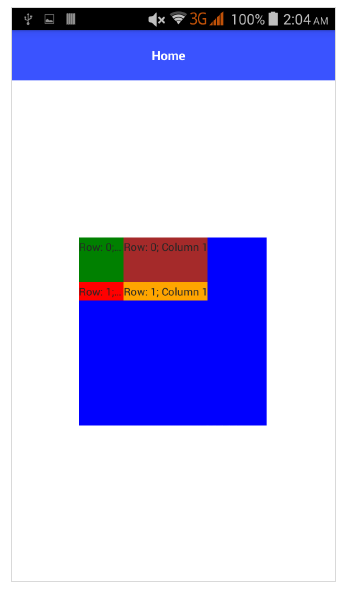
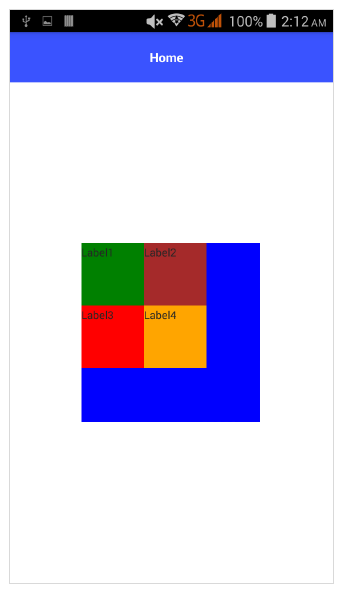
<ActionBar>
   <Label text="Home"></Label>
</ActionBar>
<GridLayout columns="50, auto, *" rows="50, auto, *" width="210" height="210"
   backgroundColor="blue">
   <Label text="Row: 0; Column 0" row="0" col="0" backgroundColor="green"></Label>
   <Label text="Row: 0; Column 1" row="0" col="1" colSpan="1" backgroundColor="brown"></Label>
   <Label text="Row: 1; Column 0" row="1" col="0" rowSpan="1" backgroundColor="red"></Label>
   <Label text="Row: 1; Column 1" row="1" col="1" backgroundColor="orange"></Label>
</GridLayout>
输出
以下是 GridLayout − 的输出
StackLayout
StackLayout 将其子元素水平或垂直排列在一维线上。可以使用布局选项根据布局中的空间调整其大小。它具有 orientation 属性,可用于指定方向,水平或垂直。
让我们在应用程序的主页中添加 StackLayout 容器,如下所示 −
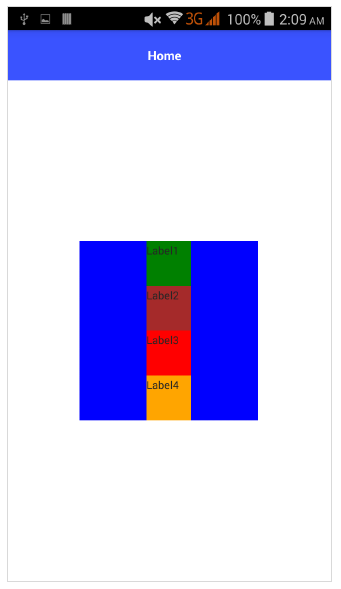
<ActionBar>
   <Label text="Home"></Label>
</ActionBar>
<StackLayout orientation="vertical" width="200" height="200" backgroundColor="blue">
   <Label text="Label1" width="50" height="50" backgroundColor="green"></Label>
   <Label text="Label2" width="50" height="50" backgroundColor="brown"></Label>
   <Label text="Label3" width="50" height="50" backgroundColor="red"></Label>
   <Label text="Label4" width="50" height="50" backgroundColor="orange"></Label>
</StackLayout>
输出
StackLayout 的输出如下所示 −
WrapLayout
WrapLayout 用于将内容包装在新行或新列上。
它具有以下三个属性 −
orientation − 水平或垂直显示。
itemWidth − 每个子项的布局宽度。
itemHeight − 每个子项的布局高度。
让我们在应用程序的主页中添加 WrapLayout 容器,如下所示 −
<ActionBar>
   <Label text="Home"></Label>
</ActionBar> <WrapLayout orientation="horizontal" width="200" height="200" backgroundColor="blue">
   <Label text="Label1" width="70" height="70" backgroundColor="green"></Label>
   <Label text="Label2" width="70" height="70" backgroundColor="brown"></Label
   <Label text="Label3" width="70" height="70" backgroundColor="red"></Label>
   <Label text="Label4" width="70" height="70" backgroundColor="orange"></Label>
</WrapLayout>
输出
Flexbox 布局
FlexboxLayout 容器组件是一种高级布局容器。它提供了将简单布局渲染为非常复杂和精致的布局的选项。它基于 CSS Flexbox。
FlexboxLayout 组件具有许多属性,如下所示 −
flexDirection
它表示子组件排列的方向。flexDirection 的可能值如下 −
row − 子组件并排排列。
row-reverse − 子组件并排排列,但方向相反。
column −子组件一个接一个地排列。
column-reverse − 子组件一个接一个地排列,但方向相反。
让我们在应用程序的主页中添加 FlexLayout 容器,如下所示 −
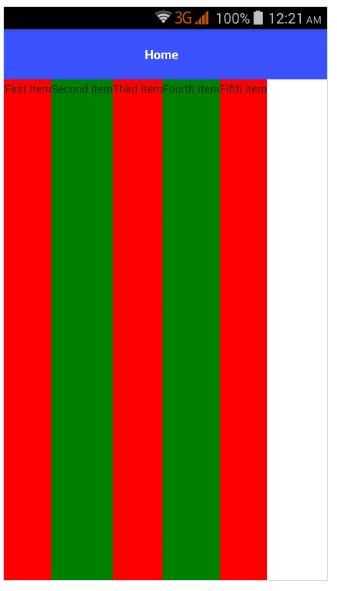
<ActionBar>
   <Label text="Home"></Label>
</ActionBar>
<FlexboxLayout flexDirection="row">
   <Label text="First Item" backgroundColor="red"></Label>
   <Label text="Second Item" backgroundColor="green"></Label>
   <Label text="Third Item" backgroundColor="red"></Label>
   <Label text="Fourth Item" backgroundColor="green"></Label>
   <Label text="Fifth Item" backgroundColor="red"></Label>
</FlexboxLayout>
输出
以下是 FlexLayout – Row − 的输出
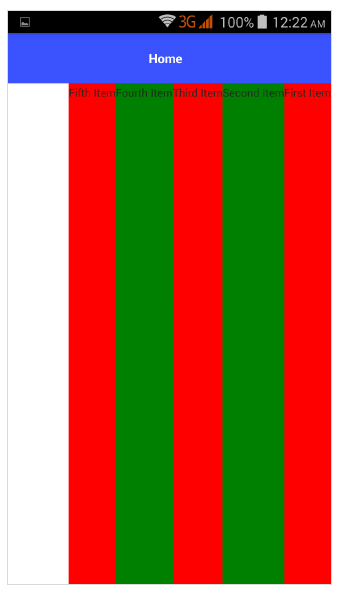
现在,让我们将 flexDirection 值从 row 更改为 row-reverse,并检查它如何影响布局。
<ActionBar>
   <Label text="Home"></Label>
</ActionBar> <FlexboxLayout flexDirection="row-reverse">
   <Label text="First Item" backgroundColor="red"></Label>
   <Label text="Second Item" backgroundColor="green"></Label>
   <Label text="Third Item" backgroundColor="red"></Label>
   <Label text="Fourth Item" backgroundColor="green"></Label>
   <Label text="Fifth Item" backgroundColor="red"></Label>
</FlexboxLayout>
输出
以下是 Flex Layout - Row Reverse − 的输出
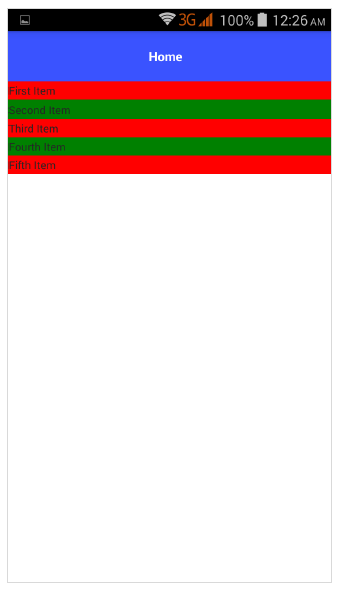
让我们将 flexDirection 值从 row-reverse 更改为 column,并检查它如何影响布局。
<ActionBar>
   <Label text="Home"></Label>
</ActionBar>
<FlexboxLayout flexDirection="column">
   <Label text="First Item" backgroundColor="red"></Label>
   <Label text="Second Item" backgroundColor="green"></Label>
   <Label text="Third Item" backgroundColor="red"></Label>
   <Label text="Fourth Item" backgroundColor="green"></Label>
   <Label text="Fifth Item" backgroundColor="red"></Label>
</FlexboxLayout>
输出
FlexLayout – Column 的输出如下所示 −
让我们将 flexDirection 值从 column 更改为 column-reverse,并检查它如何影响布局。
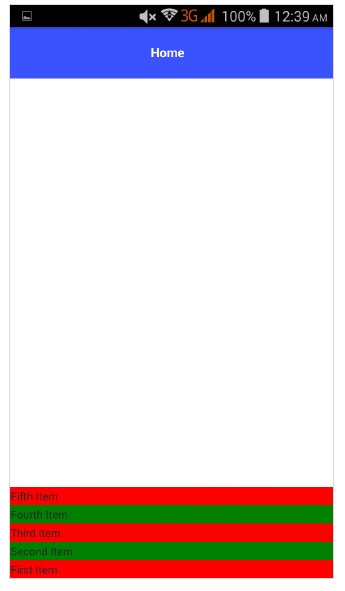
<ActionBar>
   <Label text="Home"></Label>
</ActionBar>
<FlexboxLayout flexDirection="column-reverse">
   <Label text="First Item" backgroundColor="red"></Label>
   <Label text="Second Item" backgroundColor="green"></Label>
   <Label text="Third Item" backgroundColor="red"></Label>
   <Label text="Fourth Item" backgroundColor="green"></Label>
   <Label text="Fifth Item" backgroundColor="red"></Label>
</FlexboxLayout>
输出
以下是 FlexLayout – Column Reverse − 的输出
flexWrap
它表示子组件是呈现在单行/单列中还是按照 flexDirection 设置的方向换行流入多行。
可能的值如下 −
wrap − 如果在给定方向(flexDirection)没有可用空间,则包装子组件。
wrap-reverse − 与 wrap 相同,只是组件流动方向相反。
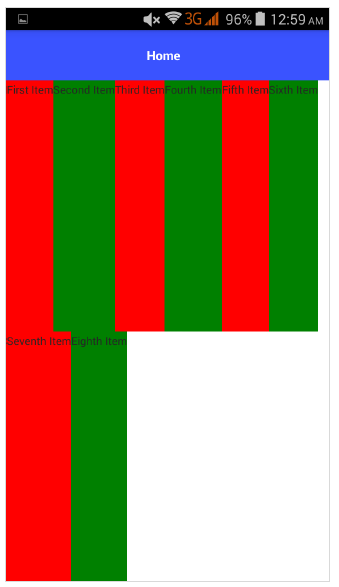
让我们添加 flexWrap 属性,然后将其值设置为 wrap。还请添加下面指定的另外三个子项 −
<ActionBar>
   <Label text="Home"></Label>
&tl;/ActionBar>
<FlexboxLayout flexDirection="row" flexWrap="wrap">
   <Label text="First Item" backgroundColor="red"></Label>
   <Label text="Second Item" backgroundColor="green"></Label>
   <Label text="Third Item" backgroundColor="red"></Label>
   <Label text="Fourth Item" backgroundColor="green"></Label>
   <Label text="Fifth Item" backgroundColor="red"></Label>
   <Label text="Sixth Item" backgroundColor="green"></Label>
   <Label text="Seventh Item" backgroundColor="red"></Label>
   <Label text="Eighth Item" backgroundColor="green"></Label>
</FlexboxLayout>
输出
以下是 flexWrap 的输出 −
JustifyContent
它表示子组件相对于彼此和整体结构的排列方式。它具有三个属性,如下所示 −
flex-end − 它将子组件打包到结束行。
space-between − 它通过均匀分布在行中来打包子组件。
space-around − 与 space-between 类似,不同之处在于它通过均匀分布在行中以及在它们周围留出相等的空间来打包子组件。
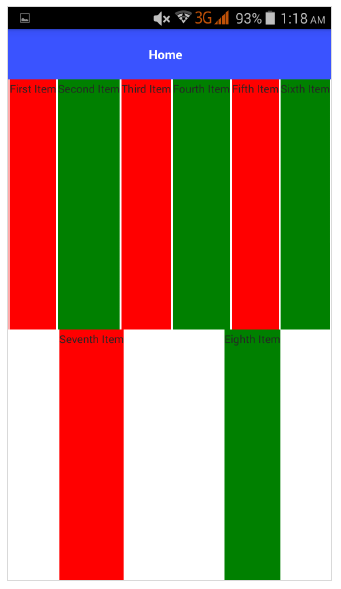
让我们也添加 justifyContent 并检查它的行为 −
<ActionBar>
   <Label text="Home"></Label>
</ActionBar>
<FlexboxLayout flexDirection="row" flexWrap="wrap" justifyContent="space-around">
   <Label text="First Item" backgroundColor="red"></Label>
   <Label text="Second Item" backgroundColor="green"></Label>
   <Label text="Third Item" backgroundColor="red"></Label>
   <Label text="Fourth Item" backgroundColor="green"></Label>
   <Label text="Fifth Item" backgroundColor="red"></Label>
   <Label text="Sixth Item" backgroundColor="green"></Label>
   <Label text="Seventh Item" backgroundColor="red"></Label>
   <Label text="Eighth Item" backgroundColor="green"></Label>
</FlexboxLayout>
输出
以下是 Flex Layout – JustifyContent 的输出 −
FlexLayout 容器为其子项提供了另外两个属性,以指定顺序和收缩能力。它们如下 −
order − 它确定 FlexLayout 容器的子项的呈现顺序。
flexShrink − 它确定子项收缩到级别 0 的能力。


