GraphQL - 快速指南
GraphQL - 简介
GraphQL 是一种开源服务器端技术,由 Facebook 开发,用于优化 RESTful API 调用。它是一个执行引擎和数据查询语言。在本章中,我们讨论使用 GraphQL 的优势。
为什么选择 GraphQL
RESTful API 遵循清晰且结构良好的面向资源的方法。但是,当数据变得更复杂时,路由会变得更长。有时无法通过单个请求获取数据。这就是 GraphQL 派上用场的地方。GraphQL 以图形的形式构造数据,其强大的查询语法可用于遍历、检索和修改数据。
以下是使用 GraphQL 查询语言的优势 −
提出您的需求 −并获取它
向您的 API 发送 GraphQL 查询并获取您所需的内容。GraphQL 查询始终返回可预测的结果。使用 GraphQL 的应用程序快速且稳定。与 Restful 服务不同,这些应用程序可以限制应从服务器获取的数据。
以下示例将帮助您更好地理解这一点 −
让我们考虑一个业务对象 Student,其属性为 id、firstName、lastName 和 collegeName。假设移动应用程序只需要获取 firstName 和 id。如果我们设计一个 REST 端点,如 /api/v1/students,它最终将获取 student 对象的所有字段的数据。这意味着,RESTful 服务过度获取了数据。这个问题可以通过使用 GraphQL 来解决。
考虑下面给出的 GraphQL 查询 −
{
   students {
      id
      firstName
   }
}
这将仅返回 id 和 firstname 字段的值。查询不会获取 student 对象其他属性的值。上面所示的查询的响应如下所示 −
{
   "data": {
      "students": [
         {
            "id": "S1001",
            "firstName": "Mohtashim"
         },
         {
            "id": "S1002",
            "firstName": "Kannan"
         }
      ]
   }
}
通过单个请求获取许多资源
GraphQL 查询有助于顺利检索关联的业务对象,而典型的 REST API 需要从多个 URL 加载。GraphQL API 通过单个请求获取应用程序所需的所有数据。使用 GraphQL 的应用程序即使在较慢的移动网络连接上也可以快速运行。
让我们再考虑一个业务对象 College,它具有以下属性:名称和位置。Student 业务对象与 College 对象具有关联关系。如果我们要使用 REST API 来获取学生及其大学的详细信息,我们最终将向服务器发出两个请求,如 /api/v1/students 和 /api/v1/colleges。这将导致每次请求的数据获取不足。因此,移动应用程序被迫多次调用服务器以获取所需数据。
但是,移动应用程序可以使用 GraphQL 在单个请求中获取 Student 和 College 对象的详细信息。
以下是用于获取数据的 GraphQL 查询 −
{
   students{
      id
      firstName
      lastName
      college{
         name
         location
      }
   }
}
上述查询的输出恰好包含我们请求的那些字段,如下所示 −
{
   "data": {
      "students": [
         {
            "id": "S1001",
            "firstName": "Mohtashim",
            "lastName": "Mohammad",
            "college": {
               "name": "CUSAT",
               "location": "Kerala"
            }
         },

         {
            "id": "S1002",
            "firstName": "Kannan",
            "lastName": "Sudhakaran",
            "college": {
               "name": "AMU",
               "location": "Uttar Pradesh"
            }
         },

         {
            "id": "S1003",
            "firstName": "Kiran",
            "lastName": "Panigrahi",
            "college": {
               "name": "AMU",
               "location": "Uttar Pradesh"
            }
         }
      ]
   }
}
描述类型系统的可能性
GraphQL 是强类型的,查询基于字段及其相关数据类型。如果 GraphQL 查询中存在类型不匹配,服务器应用程序将返回清晰有用的错误消息。这有助于顺利调试并让客户端应用程序轻松检测错误。GraphQL 还提供了客户端库,可帮助减少显式数据转换和解析。
下面给出了 Student 和 College 数据类型的示例 −
type Query {
   students:[Student]
}

type Student {
   id:ID!
   firstName:String
   lastName:String
   fullName:String
   college:College
}

type College {
   id:ID!
   name:String
   location:String
   rating:Float
   students:[Student]
}
使用强大的开发人员工具加快速度
GraphQL 提供了丰富的开发人员工具来记录和测试查询。GraphiQL 是一款出色的工具,可生成查询及其架构的文档。它还提供了一个查询编辑器来测试 GraphQL API 和智能代码完成功能,同时构建查询。
GraphQL - 环境设置
在本章中,我们将了解 GraphQL 的环境设置。要执行本教程中的示例,您将需要以下 −
运行 Linux、macOS 或 Windows 的计算机。
网络浏览器,最好是最新版本的 Google Chrome。
安装了最新版本的 Node.js。建议使用最新的 LTS 版本。
安装了带有扩展 GraphQL for VSCode 的 Visual Studio Code 或您选择的任何代码编辑器。
如何使用 Nodejs 构建 GraphQL 服务器
我们将通过详细的分步方法使用 Nodejs 构建 GraphQL 服务器,如下所示 −
步骤 1 − 验证 Node 和 Npm 版本
安装 NodeJs 后,使用终端上的以下命令验证 node 和 npm 的版本 −
C:\Users\Admin>node -v
v8.11.3

C:\Users\Admin>npm -v
5.6.0
步骤 2 −创建项目文件夹并在 VSCode 中打开
项目的根文件夹可以命名为 test-app。
按照以下说明使用 Visual Studio Code 编辑器打开文件夹 −
C:\Users\Admin>mkdir test-app
C:\Users\Admin>cd test-app
C:\Users\Admin	est-app>code.
步骤 3 − 创建 package.json 并安装依赖项
创建一个 package.json 文件,其中将包含 GraphQL 服务器应用程序的所有依赖项。
{
   "name": "hello-world-server",
   "private": true,
   "scripts": {
      "start": "nodemon --ignore data/ server.js"
   },

   "dependencies": {
      "apollo-server-express": "^1.4.0",
      "body-parser": "^1.18.3",
      "cors": "^2.8.4",
      "express": "^4.16.3",
      "graphql": "^0.13.2",
      "graphql-tools": "^3.1.1"
   },

   "devDependencies": {
      "nodemon": "1.17.1"
   }
}
使用下面给出的命令安装依赖项 −
C:\Users\Admin est-app>npm install
步骤 4 − 在数据文件夹中创建平面文件数据库
在此步骤中,我们使用平面文件来存储和检索数据。创建文件夹数据并添加两个文件 students.json 和 colleges.json。
以下是 colleges.json 文件 −
[
   {
      "id": "col-101",
      "name": "AMU",
      "location": "Uttar Pradesh",
      "rating":5.0
   },

   {
      "id": "col-102",
      "name": "CUSAT",
      "location": "Kerala",
      "rating":4.5
   }
]
以下是 students.json 文件 −
[
   {
      "id": "S1001",
      "firstName":"Mohtashim",
      "lastName":"Mohammad",
      "email": "mohtashim.mohammad@tutorialpoint.org",
      "password": "pass123",
      "collegeId": "col-102"
   },

   {
      "id": "S1002",
      "email": "kannan.sudhakaran@tutorialpoint.org",
      "firstName":"Kannan",
      "lastName":"Sudhakaran",
      "password": "pass123",
      "collegeId": "col-101"
   },

   {
      "id": "S1003",
      "email": "kiran.panigrahi@tutorialpoint.org",
      "firstName":"Kiran",
      "lastName":"Panigrahi",
      "password": "pass123",
      "collegeId": "col-101"
   }
]
步骤 5 − 创建数据访问层
我们需要创建一个数据存储来加载数据文件夹的内容。在本例中,我们需要集合变量 students 和 colleges。每当应用程序需要数据时,它都会使用这些集合变量。
在项目文件夹中创建文件 db.js,如下所示 −
const { DataStore } = require('notarealdb');

const store = new DataStore('./data');

module.exports = {
    students:store.collection('students'),
    colleges:store.collection('colleges')
};
步骤 6 −创建Schema文件,schema.graphql
在当前项目文件夹中创建一个Schema文件,并添加以下内容 −
type Query  {
   test: String
}
第 7 步 − 创建解析器文件 resolvers.js
在当前项目文件夹中创建一个解析器文件并添加以下内容 −
const Query = {
   test: () => 'Test Success, GraphQL server is up & running !!'
}
module.exports = {Query}
第 8 步 − 创建 Server.js 并配置 GraphQL
创建服务器文件并按如下方式配置 GraphQL −
const bodyParser = require('body-parser');
const cors = require('cors');
const express = require('express');
const db = require('./db');

const port = process.env.PORT || 9000;
const app = express();

const fs = require('fs')
const typeDefs = fs.readFileSync('./schema.graphql',{encoding:'utf-8'})
const resolvers = require('./resolvers')

const {makeExecutableSchema} = require('graphql-tools')
const schema = makeExecutableSchema({typeDefs, resolvers})

app.use(cors(), bodyParser.json());

const  {graphiqlExpress,graphqlExpress} = require('apollo-server-express')
app.use('/graphql',graphqlExpress({schema}))
app.use('/graphiql',graphiqlExpress({endpointURL:'/graphql'}))

app.listen(
   port, () => console.info(
      `Server started on port ${port}`
   )
);
第 9 步 − 运行应用程序并使用 GraphiQL 进行测试
验证项目 test-app 的文件夹结构如下 −
test-app /
   -->package.json
   -->db.js
   -->data
      students.json
      colleges.json
   -->resolvers.js
   -->schema.graphql
   -->server.js
运行下面给出的命令 npm start −
C:\Users\Admin est-app>npm start
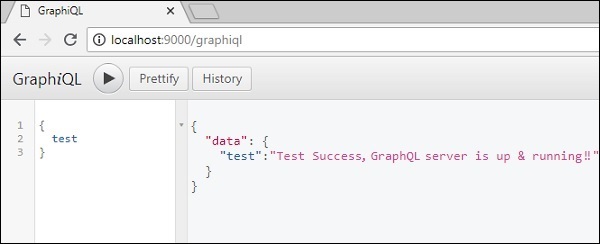
服务器在 9000 端口运行,因此我们可以使用 GraphiQL 工具测试应用程序。打开浏览器并输入 URL http://localhost:9000/graphiql。在编辑器中输入以下查询 −
{
   Test
}
服务器的响应如下所示 −
{
   "data": {
      "test": "Test Success, GraphQL server is running !!"
   }
}
GraphQL - 架构
GraphQL 是一种描述 GraphQL 服务器行为的规范。它是一组关于如何处理请求和响应的指南,例如支持的协议、服务器可以接受的数据格式、服务器返回的响应格式等。客户端向 GraphQL 服务器发出的请求称为查询。GraphQL 的另一个重要概念是其传输层不可知性。它可以与任何可用的网络协议一起使用,例如 TCP、websocket 或任何其他传输层协议。它对数据库也是中性的,因此您可以将它与关系数据库或 NoSQL 数据库一起使用。
可以使用下面列出的三种方法中的任何一种来部署 GraphQL Server −
- 带有连接数据库的 GraphQL 服务器
- 集成现有系统的 GraphQL 服务器
- 混合方法
带有连接数据库的 GraphQL 服务器
此架构具有带有集成数据库的 GraphQL 服务器,通常可用于新项目。在收到查询后,服务器将读取请求负载并从数据库中提取数据。这称为解析查询。返回给客户端的响应遵循官方 GraphQL 规范中指定的格式。
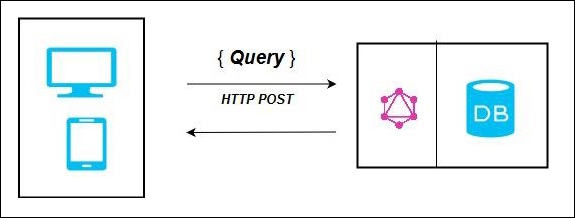
在上图中,GraphQL 服务器和数据库集成在单个节点上。客户端(桌面/移动)通过 HTTP 与 GraphQL 服务器通信。服务器处理请求,从数据库获取数据并将其返回给客户端。
GraphQL 服务器集成现有系统
这种方法对于拥有遗留基础设施和不同 API 的公司很有帮助。 GraphQL 可用于统一现有系统中的微服务、旧式基础设施和第三方 API。
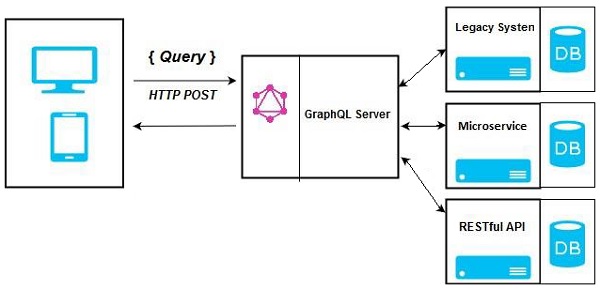
在上图中,GraphQL API 充当客户端和现有系统之间的接口。客户端应用程序与 GraphQL 服务器通信,然后服务器解析查询。
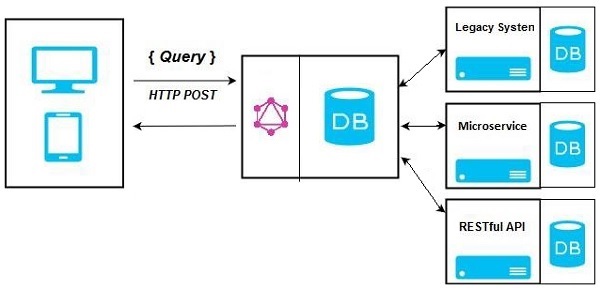
混合方法
最后,我们可以结合上述两种方法并构建 GraphQL 服务器。在此架构中,GraphQL 服务器将解析收到的任何请求。它将从连接的数据库或集成的 API 中检索数据。这在下图中表示 −
GraphQL - 应用程序组件
本章讨论不同的 GraphQL 组件及其相互通信的方式。整个应用程序组件可以区分如下 −
- 服务器端组件
- 客户端组件
服务器端组件
GraphQL 服务器构成服务器端的核心组件,并允许解析来自 GraphQL 客户端应用程序的查询。Apollo Server 是 GraphQL 规范最常用的实现。其他服务器编程组件包括以下内容 −
| Sr.No. | 服务器基本信息和说明 |
|---|---|
| 1 | 架构 GraphQL 架构是任何 GraphQL 服务器实现的核心,并描述了连接到它的客户端可用的功能。 |
| 2 | 查询 GraphQL 查询是客户端应用程序请求从数据库或旧式 API 检索数据。 |
| 3 | 解析器 解析器提供将 GraphQL 操作转换为数据的指令。它们通过定义解析器函数来解析对数据的查询。 |
客户端组件
下面给出的是客户端组件 −
| Sr.No. | 工具 &描述 |
|---|---|
| 1 | GraphiQL 基于浏览器的界面,用于编辑和测试 GraphQL 查询和变异。 |
| 2 | ApolloClient 构建 GraphQL 客户端应用程序的最佳工具。与所有 javascript 前端完美集成。 |
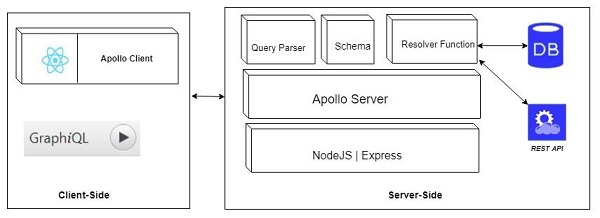
下图显示了客户端-服务器架构。Web 服务器基于 NodeJs 和 Express 框架构建。ReactJS 应用程序(使用 Apollo 客户端库构建)或 GraphiQL 浏览器应用程序向 Apollo GraphQL 服务器发出请求。查询将根据服务器中定义的模式进行解析和验证。如果请求模式通过验证,则将执行相关的解析器函数。解析器将包含从 API 或数据库获取数据的代码。
GraphQL - 示例
在本章中,我们将创建一个返回问候消息 HelloWorld 的简单 API,并使用 GraphiQL 访问它。
示例
此示例基于 NodeJS、Express 和 Apollo 服务器。我们将学习将所有概念与以下步骤结合起来 −
步骤 1 − 设置 Express
ExpressJS 是一个 Web 应用程序框架,可帮助构建网站和 Web 应用程序。在此示例中,我们将在 Express 框架之上构建一个 GraphQL API。
下一步是创建一个文件夹 hello-world-server 并从终端导航到同一文件夹。添加 package.json,并为包命名。由于此包仅在内部使用,我们可以将其声明为私有包。
{
   "name":"hello-world-server",
   "private":true
}
按照以下所示安装 Express 服务器的依赖项 −
C:\Users\Admin\hello-world-server>npm install express body-parser cors
body-parser 是一个中间件包,可帮助 Express 高效处理 HTTP Post 请求。cors 是另一个处理跨源资源共享的中间件包。
在项目文件夹中创建一个 server.js 文件,并在其中输入以下内容 −
const bodyParser = require('body-parser')
   const cors = require('cors')
   const express = require('express')
   const port = process.env.PORT|| 9000
   const app = express()

   //注册中间件
   app.use(bodyParser.json() , cors())
   app.listen(port, () =>  console.log(`server is up and running at ${port}`)
要验证 Express 服务器是否已启动并正在运行,请在终端窗口中执行以下代码 −
C:\Users\Admin\hello-world-server>node server.js
服务器控制台中显示以下输出。这表明 Express 服务器正在端口 9000 上运行。
server is up and running at 9000
如果打开浏览器并输入 http://localhost:9000,您将看到以下屏幕 −
要停止服务器,请按 Ctrl + C。
第 2 步 −安装 GraphQL 和 Apollo Server
现在 Express 已配置完毕,下一步是下载以下 GraphQL 依赖项 −
- graphql
- graphql-tools
- apollo-server-express@1
我们将使用 Apollo server v1.0,因为它是一个稳定版本。输入以下命令来安装这些依赖项 −
C:\Users\Admin\hello-world-server>npm install graphql graphql-tools apollo-server-express@1
我们可以通过检查我们之前创建的 package.json 文件来验证这些依赖项是否安装成功。
{
   "name": "hello-world-server",
   "private": true,

   "dependencies": {
      "apollo-server-express": "^1.4.0",
      "body-parser": "^1.18.3",
      "cors": "^2.8.4",
      "express": "^4.16.3",
      "graphql": "^0.13.2",
      "graphql-tools": "^3.1.1"
   }
}
步骤 3 − 定义架构
GraphQL 架构定义可以从服务中获取哪种类型的对象,以及它具有哪些字段。可以使用 GraphQL 架构定义语言 定义架构。现在,在 server.js 文件中添加以下代码片段 −
// 添加类型定义
const typeDefinition = `
type Query {
    Greeting: String
}
此处,查询包含一个返回 string 值的 greeting 属性。
步骤 4 − 创建解析器
创建解析器的第一步是添加一些代码来处理对 Greeting 字段的请求。这在 解析器 中指定。解析器函数的结构必须与架构匹配。在 server.js 文件中添加以下代码片段。
// 添加解析器
const  resolverObject = {
   Query : {
      greeting: () => 'Hello GraphQL  From TutorialsPoint !!'
   }
}
第二步是使用 makeExecutableSchema 绑定架构和解析器。此函数在 graphql-tools 模块中预定义。在 server.js 文件中添加以下代码片段。
const {makeExecutableSchema} = require('graphql-tools')
const schema = makeExecutableSchema({typeDefs:typeDefinition, resolvers:resolverObject})
第 5 步 − 定义从 ReactJS/GraphiQL 应用程序获取数据的路由
在 server.js 文件中添加以下代码片段−
const {graphqlExpress, graphiqlExpress} = require('apollo-server-express')

   //为 graphql 和 graphiql 创建路由
   app.use('/graphql',graphqlExpress({schema}))

   app.use('/graphiql',graphiqlExpress({endpointURL:'/graphql'}))
graphqlExpress 函数有助于注册路由 http://localhost:9000/graphql。ReactJS 应用程序可以使用此端点查询数据。同样,graphqliExpress 函数有助于注册路由 http://localhost:9000/graphiql。GraphiQL 浏览器客户端将使用它来测试 API。
完整的 server.js 代码如下所示 −
const bodyParser = require('body-parser')
const cors = require('cors')
const express = require('express')
const port = process.env.PORT||9000
const app = express()

app.use(bodyParser.json() , cors())
const typeDefinition = `
type Query  {
   greeting: String
}`
const  resolverObject = {
   Query : {
      greeting: () => 'Hello GraphQL  From TutorialsPoint !!'
   }
}
const {makeExecutableSchema} = require('graphql-tools')

const schema = makeExecutableSchema({typeDefs:typeDefinition, resolvers:resolverObject})

const {graphqlExpress,graphiqlExpress} = require('apollo-server-express')

app.use('/graphql',graphqlExpress({schema}))
app.use('/graphiql',graphiqlExpress({endpointURL:'/graphql'}))
app.listen(port, () =>  console.log(`server is up and running ${port}`))
第 6 步 − 启动应用程序
使用 Node.js 执行 server.js,如下所示 −
C:\Users\Admin\hello-world-server>node server.js
第 7 步 − 测试 GraphQL API
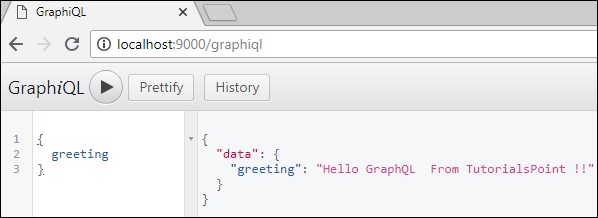
打开浏览器并输入 http://localhost:9000/graphiql。在 GraphiQL 的查询选项卡中,输入以下内容 −
{
   greeting
}
服务器的响应如下所示 −
{
   "data": {
      "greeting": "Hello GraphQL From TutorialsPoint !!"
   }
}
下图说明了响应 −
注意 − 请确保使用 Apollo Server 版本 1.0。
GraphQL - 类型系统
GraphQL 是一种强类型语言。类型系统定义了 GraphQL 应用程序中使用的各种数据类型。类型系统有助于定义模式,即客户端和服务器之间的契约。常用的 GraphQL 数据类型如下 −
| Sr.No. | 类型 &描述 |
|---|---|
| 1 | 标量 存储单个值 |
| 2 | 对象 显示可以获取哪种对象 |
| 3 | 查询 其他特定类型的入口点类型 |
| 4 | 突变 数据操作的入口点 |
| 5 | 枚举 在需要用户从规定的选项列表中进行选择的情况下很有用 |
标量类型
标量类型是只能存储单个值的原始数据类型。GraphQL 提供的默认标量类型是 −
Int − 有符号 32 位整数
Float − 有符号双精度浮点值
String − UTF - 8 个字符序列
Boolean −真或假
ID − 唯一标识符,通常用作获取对象的唯一标识符或缓存的键。
定义标量类型的语法如下 −
field: data_type
下面给出的代码片段定义了一个名为greeting的字段,该字段返回字符串值。
greeting: String
对象类型
对象类型是模式中最常用的类型,表示一组字段。对象类型中的每个字段都映射到另一个类型,从而允许嵌套类型。换句话说,对象类型由多个标量类型或对象类型组成。
定义对象类型的语法如下 −
type object_type_name
{
   field1: data_type
   field2:data_type
   ....
   fieldn:data_type
}
您可以考虑以下代码片段 −
--Define an object type--

type Student {
   stud_id:ID
   firstname: String
   age: Int
   score:Float
}
--Defining a GraphQL schema--

type Query
{
   stud_details:[Student]
}
上面给出的示例定义了一个对象数据类型 Student。根查询模式中的 stud_details 字段将返回 Student 对象列表。
查询类型
GraphQL 查询用于获取数据。这就像在基于 REST 的 API 中请求资源一样。为简单起见,查询类型是从客户端应用程序发送到 GraphQL 服务器的请求。GraphQL 使用 模式定义语言 (SDL) 来定义查询。查询类型是 GraphQL 中的众多根级类型之一。
定义查询的语法如下所示 −
type Query {
   field1: data_type
   field2:data_type
   field2(param1:data_type,param2:data_type,...paramN:data_type):data_type
}
定义查询的示例 −
type Query {
    greeting: String
}
Mutation 类型
Mutation 是发送到服务器以创建、更新或删除数据的操作。这些类似于调用基于 REST 的 API 的 PUT、POST、PATCH 和 DELETE 动词。
Mutation 是 GraphQL 中的根级数据类型之一。查询类型定义数据获取操作的入口点,而 Mutation 类型指定数据操作操作的入口点。
定义 Mutation 类型的语法如下 −
type Mutation {
   field1: data_type
   field2(param1:data_type,param2:data_type,...paramN:data_type):data_type
}
例如,我们可以定义一个突变类型来添加一个新的学生,如下所示 −
type Mutation {
    addStudent(firstName: String, lastName: String): Student
}
枚举类型
枚举类似于标量类型。枚举在字段的值必须来自规定的选项列表的情况下很有用。
定义枚举类型的语法是 −
type enum_name{
   value1
   value2
}
以下代码片段说明了如何定义枚举类型−
type Days_of_Week{
   SUNDAY
   MONDAY
   TUESDAY
   WEDNESDAY
   THURSDAY
   FRIDAY
   SATURDAY
}
列表类型
列表可用于表示特定类型的值数组。列表使用类型修饰符 [] 定义,该修饰符包装对象类型、标量和枚举。
以下语法可用于定义列表类型 −
field:[data_type]
以下示例定义了列表类型 todos −
type Query {
    todos: [String]
}
不可为空类型
默认情况下,每个核心标量类型都可以设置为 null。换句话说,这些类型可以返回指定类型的值,也可以没有值。要覆盖此默认值并指定必须定义字段,可以将感叹号 (!) 附加到类型。这可确保查询返回的结果中存在值。
以下语法可用于定义不可为空的字段 −
field:data_type!
在下面的示例中,stud_id 被声明为必填字段。
type Student {
   stud_id:ID!
   firstName:String
   lastName:String
   fullName:String
   college:College
}
GraphQL - Schema
GraphQL 模式是任何 GraphQL 服务器实现的核心。它描述了连接到它的客户端应用程序可用的功能。我们可以使用任何编程语言来创建 GraphQL 模式并围绕它构建接口。
GraphQL 运行时定义了一个基于图的通用模式来发布它所代表的数据服务的功能。客户端应用程序可以在其功能范围内查询模式。这种方法将客户端与服务器分离,并允许两者独立发展和扩展。
在本章中,我们使用 Apollo 服务器执行 GraphQL 查询。graphql-tools 中的 makeExecutableSchema 函数可帮助您绑定模式和解析器。
makeExecutableSchema 函数语法
makeExecutableSchema 函数接受一个 Object 类型的参数 {}。使用此函数的语法如下 −
import { makeExecutableSchema } from 'graphql-tools';

const jsSchema = makeExecutableSchema({
   typeDefs,
   resolvers, // optional
   logger, // optional
   allowUndefinedInResolve = false, // optional
   resolverValidationOptions = {}, // optional
   directiveResolvers = null, // optional
   schemaDirectives = null,  // optional
   parseOptions = {},  // optional
   inheritResolversFromInterfaces = false  // optional
});
| Sr.No. | 参数和说明 |
|---|---|
| 1 | typeDefs 这是一个必需参数。它将 GraphQL 查询表示为 UTF-8 字符串。 |
| 2 | Resolvers 这是一个可选参数(默认为空对象)。它具有处理查询的函数。 |
| 3 | logger 这是一个可选参数,可用于将错误打印到服务器控制台。 |
| 4 | parseOptions 这是一个可选参数,允许在将 typeDefs 指定为字符串时自定义解析。 |
| 5 | allowUndefinedInResolve 默认情况下为 true。设置为 false 时,如果解析函数返回 undefined,则会导致解析函数抛出错误。 |
| 6 | resolverValidationOptions 这是一个可选参数,接受具有布尔属性的对象。 |
| 7 | inheritResolversFromInterfaces 这是一个可选参数,接受布尔参数来检查解析器对象继承。 |
插图
让我们创建一个简单的应用程序来理解这个模式。这将创建一个从服务器查询学生列表的模式。学生数据将存储在平面文件中,我们将使用名为 notarealdb 的节点模块来伪造数据库并从平面文件中读取数据。
步骤 1 − 下载并安装项目所需的依赖项
创建一个名为 schema-app 的文件夹。从终端将目录更改为 schema-app。然后,按照环境设置章节中说明的步骤 3 到 5 完成下载和安装过程。
步骤 2 − 创建架构
在项目文件夹 schema-app 中添加 schema.graphql 文件并添加以下代码 −
type Query {
   greeting:String
   students:[Student]
}

type Student {
   id:ID!
   firstName:String
   lastName:String
   password:String
   collegeId:String
}
架构的根将是查询类型。查询有两个字段 −greeting 和 Students,分别返回字符串和学生列表。Student 被声明为 Object 类型,因为它包含多个字段。ID 字段被声明为不可为空。
步骤 3 − 创建解析器
在项目文件夹中创建一个文件 resolvers.js 并添加以下代码 −
const db = require('./db')
const Query = {
   greeting:() => {
      return "hello from  TutorialsPoint !!!"
   },
   students:() => db.students.list()
}

module.exports = {Query}
此处的 Greeting 和 Students 是处理查询的解析器。Students 解析器函数 从数据访问层返回学生列表。要访问模块外部的解析器函数,必须使用 module.exports 导出查询对象。
步骤 4 − 运行应用程序
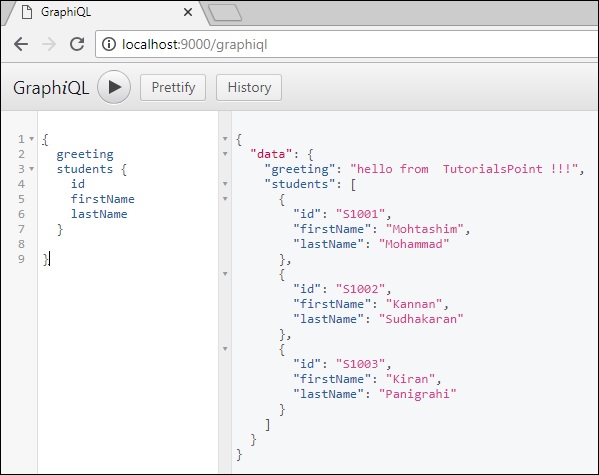
创建 server.js 文件并参考环境设置章节中的步骤 8。下一步是在终端中执行命令 npm start。服务器将在 9000 端口上启动并运行。在这里,我们使用 GraphiQL 作为客户端来测试应用程序。打开浏览器并输入 URL,http://localhost:9000/graphiql。
在编辑器中输入以下查询 −
{
   greeting
   students {
      id
      firstName
      lastName
   }
}
查询将显示如下所示的输出 −
注意 − 我们可以用 RESTful API 调用替换 students.json 来检索学生数据,甚至可以使用 MySQL 或 MongoDB 等真实数据库。GraphQL 成为原始应用程序层的薄包装器,以提高性能。
GraphQL - 解析器
解析器是一组为 GraphQL 查询生成响应的函数。简单来说,解析器充当 GraphQL 查询处理程序。GraphQL 模式中的每个解析器函数都接受四个位置参数,如下所示 −
fieldName:(root, args, context, info) => { result }
下面显示了解析器函数的示例 −
//没有参数并返回字符串的解析器函数
greeting:() => {
    return "hello from TutorialsPoint !!!"
}

//没有参数并返回列表的解析器函数
students:() => db.students.list()

//有参数并返回对象的解析器函数
studentById:(root,args,context,info) => {
   return db.students.get(args.id);
}
下面给出了位置参数及其描述 −
| Sr.No. | 参数 &描述 |
|---|---|
| 1 | root 包含解析器在父字段上返回的结果的对象。 |
| 2 | args 带有传递到查询字段的参数的对象。 |
| 3 | context 这是特定查询中所有解析器共享的对象。 |
| 4 | info 它包含有关查询执行状态的信息,包括字段name,从根到字段的路径。 |
解析器结果格式
GraphQL 中的解析器可以返回不同类型的值,如下所示 −
| Sr.No. | 参数和说明 |
|---|---|
| 1 | null 或 undefined this 表示找不到对象 |
| 2 | array this仅当架构指示字段的结果应为列表时才有效 |
| 3 | promise 解析器通常执行异步操作,例如从数据库或后端 API 中获取,因此它们可以返回承诺 |
| 4 | 标量或对象 解析器还可以返回其他值 |
插图
让我们创建一个简单的应用程序来了解解析器。这将创建用于从服务器按 ID 查询学生的架构。学生数据将存储在平面文件中,我们将使用名为 notarealdb 的节点模块来伪造数据库并从平面文件中读取数据。
以下是创建简单应用程序的分步过程 −
步骤 1 − 下载并安装项目所需的依赖项
创建一个名为 resolver-app 的文件夹。从终端将目录更改为 resolver-app。稍后,按照环境设置章节中的步骤 3 到 5 进行操作。
步骤 2 − 创建架构
在项目文件夹 resolver-app 中添加 schema.graphql 文件并添加以下代码 −
type Query {
   greeting:String
   students:[Student]
   studentById(id:ID!):Student
}

type Student {
   id:ID!
   firstName:String
   lastName:String
   password:String
   collegeId:String
}
架构文件显示用户可以查询 greeting、students 和 studentById。要检索具有特定 ID 的学生,我们使用 数据类型 ID!,它显示一个不可为空的唯一标识符字段。students 字段返回学生数组,greeting 返回一个简单的字符串值。
步骤 3 − 创建解析器
在项目文件夹中创建一个文件 resolvers.js 并添加以下代码 −
const db = require('./db')
const Query = {
    //resolver function for Greeting
    Greeting:() => {
    return "hello from TutorialsPoint !!!"
    },

    //resolver function for students returns list
    students:() => db.students.list(),

    //studentbyId 解析器函数
    studentById:(root,args,context,info) => {
      //args 将包含查询中传递的参数
      return db.students.get(args.id);
   }
}
module.exports = {Query}
此处,studentById 包含三个参数。如本章所述,studentId 可以从 args 中检索;root 将包含查询对象本身。要返回特定学生,我们需要使用 students 集合中的 id 参数调用 get 方法。
此处 greeting、students、studentById 是处理查询的解析器。students 解析器函数 从数据访问层返回学生列表。要访问模块外部的解析器函数,必须使用 module.exports 导出查询对象。
步骤 4 − 运行应用程序
创建 server.js 文件。请参阅环境设置章节中的步骤 8。在终端中执行命令 npm start。服务器将在 9000 端口上启动并运行。这里我们使用 GraphiQL 作为客户端来测试应用程序。
打开浏览器并输入网址 http://localhost:9000/graphiql。在编辑器中输入以下查询 −
{
   studentById(id:"S1001") {
      id
      firstName
      lastName
   }
}
上述查询的输出如下所示 −
{
   "data": {
      "studentById": {
         "id": "S1001",
         "firstName": "Mohtashim",
         "lastName": "Mohammad"
      }
   }
}
GraphQL - 查询
GraphQL 操作可以是读取操作,也可以是写入操作。GraphQL 查询用于读取或获取值,而变异用于写入或发布值。无论哪种情况,操作都是一个简单的字符串,GraphQL 服务器可以解析并以特定格式的数据进行响应。通常用于移动和 Web 应用程序的流行响应格式是 JSON。
定义查询的语法如下 −
//语法 1
query query_name{ someField }

//语法 2
{ someField }
以下是查询的示例 −
//query with name myQuery
query myQuery{
    Greeting
}

// query without any name
{
    Greeting
}
从上面的示例中可以清楚地看出,查询关键字是可选的。
GraphQL 查询有助于减少过度获取数据。与 Restful API 不同,GraphQL 允许用户限制应从服务器获取的字段。这意味着更小的查询和更少的网络流量;从而减少响应时间。
示例 1 - 使用自定义字段查询学生模型
在此示例中,我们将一组学生存储在 json 文件中。每个学生模型都有 firstName、lastName 和 id 等字段,但没有 fullName。在这里,我们将讨论如何进行查询以检索所有学生的 fullName。为此,我们需要在两个架构解析器中创建 fullName 字段。
让我们看看如何使用以下步骤完成此示例 −
步骤 1 − 下载并安装项目所需的依赖项
创建一个名为 query-app 的文件夹。从终端将目录更改为 query-app。稍后,按照环境设置章节中说明的步骤 3 到 5 进行操作。
步骤 2 −创建 Schema
在项目文件夹 query-app 中添加 schema.graphql 文件,并添加以下代码 −
type Query {
   greeting:String
   students:[Student]
   studentById(id:ID!):Student
}

type Student {
   id:ID!
   firstName:String
   lastName:String
   fullName:String
}
请注意,students.json 文件中没有 fullName 字段。但是,我们需要通过查询获取学生的 fullname。在这种情况下,fullName 将是一个数据源不可用的自定义字段。
步骤 3 − 创建解析器
在项目文件夹中创建文件 resolvers.js 并添加以下代码 −
const db = require('./db')
const Query = {
    //resolver function for Greeting
    Greeting:() => {
        return "hello from TutorialsPoint !!!"
    },

    //resolver function for students returns list
    students:() => db.students.list(),

    //studentbyId 的解析器函数
    studentById:(root,args,context,info) => {
        //args 将包含查询中传递的参数
        return db.students.get(args.id);
    }
}

//对于返回的每个学生对象,都会调用解析器

const Student = {
   fullName:(root,args,context,info) => {
      return root.firstName+":"+root.lastName
   }
}

module.exports = {Query,Student}
第 4 步 − 运行应用程序
创建一个 server.js 文件。请参阅环境设置章节中的第 8 步。在终端中执行命令 npm start 。服务器将在 9000 端口上启动并运行。在这里,我们使用 GraphiQL 作为客户端来测试应用程序。
打开浏览器并输入 URL http://localhost:9000/graphiql。在编辑器中输入以下查询 −
{
   students{
      id
      fullName
   }
}
查询的响应如下所示 −
{
   "data": {
      "students": [
         {
            "id": "S1001",
            "fullName": "Mohtashim:Mohammad"
         },

         {
            "id": "S1002",
            "fullName": "Kannan:Sudhakaran"
         },

         {
            "id": "S1003",
            "fullName": "Kiran:Panigrahi"
         }
      ]
   }
}
创建一个 server.js 并添加以下代码 −
const bodyParser = require('body-parser');
const cors = require('cors');
const express = require('express');

const db = require('./db');
const port = 9000;
const app = express();

//从架构文件加载类型定义
const fs = require('fs')
const typeDefs = fs.readFileSync('./schema.graphql',{encoding:'utf-8'})

//加载解析器
const resolvers = require('./resolvers')

//绑定架构和解析器
const {makeExecutableSchema} = require('graphql-tools')
const schema = makeExecutableSchema({typeDefs, resolvers})

//启用跨域调用和表单发布
app.use(cors(), bodyParser.json());

//启用路由
const {graphiqlExpress,graphqlExpress} = require('apollo-server-express')
app.use('/graphql',graphqlExpress({schema}))
app.use('/graphiql',graphiqlExpress({endpointURL:'/graphql'}))

//注册端口
app.listen(port, () => console.info(`服务器在端口 ${port} 上启动`));
在终端中执行命令 npm start。服务器将在 9000 端口上启动并运行。在这里,我们使用 GraphiQL 作为客户端来测试应用程序。
打开浏览器并输入 URL http://localhost:9000/graphiql。在编辑器中输入以下查询 −
{
   students{
      id
      fullName
   }
}
查询的响应如下所示 −
{
   "data": {
      "students": [
         {
            "id": "S1001",
            "fullName": "Mohtashim:Mohammad"
         },
         {
            "id": "S1002",
            "fullName": "Kannan:Sudhakaran"
         },
         {
            "id": "S1003",
            "fullName": "Kiran:Panigrahi"
         }
      ]
   }
}
图 2 - 嵌套查询
让我们创建一个嵌套查询来获取学生详细信息及其大学详细信息。我们将使用相同的项目文件夹。
步骤 1 − 编辑架构
架构文件已经具有 student 字段。让我们添加一个字段 college 并定义其类型。
type College {
   id:ID!
   name:String
   location:String
   rating:Float
}

type Student {
   id:ID!
   firstName:String
   lastName:String
   fullName:String
   college:College
}
第 2 步 − 修改 resolver.js
我们需要添加一个 college 解析器函数,如下所示。 college 解析器函数将针对返回的每个 student 对象执行。 在这种情况下,解析器的根参数将包含 student。
const Student = {
   fullName:(root,args,context,info) => {
      return root.firstName+":"+root.lastName
   },
   college:(root) => {
      return db.colleges.get(root.collegeId);
   }
}
module.exports = {Query,Student}
解析器通过调用 college 集合的 get 方法并传递 collegeId 返回每个学生的 college。我们通过 collegeId 建立了 Student 和 College 之间的关联关系。
步骤 3 − 测试应用程序
打开终端窗口并导航到项目文件夹。输入命令 -npm start。启动浏览器并输入 URL http://localhost:9000/graphiql。
在 GraphiQL 窗口中输入以下查询 −
{
   students{
      id
      firstName
      college {
         id
         name
         location
         rating
      }
   }
}
查询的响应如下所示 −
{
   "data": {
      "students": [
         {
            "id": "S1001",
            "firstName": "Mohtashim",
            "college": {
               "id": "col-102",
               "name": "CUSAT",
               "location": "Kerala",
               "rating": 4.5
            }
         },

         {
            "id": "S1002",
            "firstName": "Kannan",
            "college": {
               "id": "col-101",
               "name": "AMU",
               "location": "Uttar Pradesh",
               "rating": 5
            }
         },

         {
            "id": "S1003",
            "firstName": "Kiran",
            "college": {
               "id": "col-101",
               "name": "AMU",
               "location": "Uttar Pradesh",
               "rating": 5
            }
         }
      ]
   }
}
什么是查询变量?
如果查询需要传递一些动态值,则使用变量表示这些动态值。因此,客户端应用程序可以重用该查询。
插图
让我们创建一个简单的应用程序来了解查询变量。
步骤 1 − 编辑架构文件
添加一个 sayHello 字段,该字段接受字符串参数并返回字符串。名称值在客户端应用程序中将是动态的。
type Query {
    sayHello(name:String!):String
}
步骤 2 −编辑 resolver.js 文件
添加一个 sayHello 解析器,它接受以下参数 −
sayHello:(root,args,context,info) => `Hi ${args.name} GraphQL 服务器对您说 Hello!!`
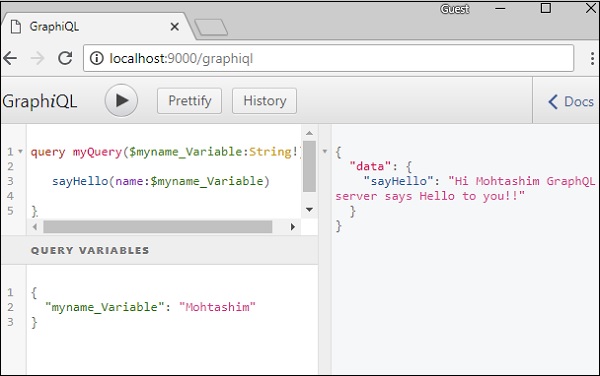
步骤 3 − 在 GraphiQL 中声明查询变量
变量用 $ 声明,后跟变量名称。例如:$myname_Variable。
声明 $myname_Variable 后,必须将其与命名查询语法一起使用。查询 myQuery 接受字符串值并将其传递给 sayHello,如下所示 −
query myQuery($myname_Variable:String!) {
    sayHello(name:$myname_Variable)
}
在 GraphiQL 客户端的查询变量部分中将 $myname_Variable 的值设置为 JSON 对象。
{
   "myname_Variable": "Mohtashim"
}
上述代码的输出如下 −
{
   "data": {
      "sayHello": "Hi Mohtashim GraphQL server says Hello to you!!"
   }
}
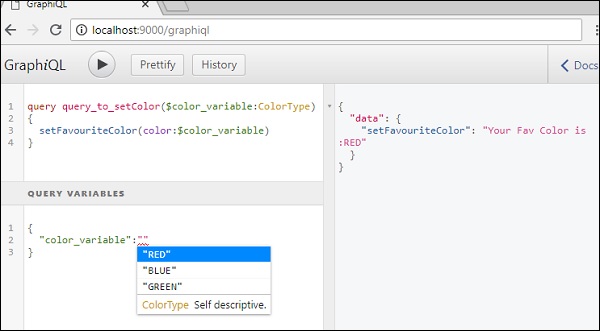
如何将查询变量与枚举结合使用
让我们看看当字段参数为枚举类型时如何使用查询变量。
步骤 1 − 编辑 schema.graphql 文件
enum ColorType {
   RED
   BLUE
   GREEN
}

type Query {
   setFavouriteColor(color:ColorType):String
}
setFavouriteColor 函数以枚举作为输入并返回字符串值。
步骤 2 − 编辑 resolvers.js 文件
解析器函数 setFavouriteColor 接受 root 和 args。运行时传递给函数的枚举值可通过 args 参数访问。
setFavouriteColor:(root,args) => {
    return "Your Fav Color is :"+args.color;
}
步骤 3 − 在 GraphiQL 中声明查询变量
查询名为 query_to_setColor,它接受名为 color_variable 且 ColorType 的变量。此变量将传递给方法 setFavouriteColor。
query query_to_setColor($color_variable:ColorType) {
    setFavouriteColor(color:$color_variable)
}
在 GraphiQL 的查询变量部分中,输入以下代码 −
{
   "color_variable":"RED"
}
响应如下所示 −
{
   "data": {
      "setFavouriteColor": "Your Fav Color is: RED"
   }
}
GraphQL - 突变
在本章中,我们将学习 GraphQL 中的突变查询。
突变查询修改数据存储中的数据并返回一个值。它可用于插入、更新或删除数据。突变被定义为架构的一部分。
突变查询的语法如下 −
mutation{
    someEditOperation(dataField:"valueOfField"):returnType
}
插图
让我们了解如何使用突变查询将新学生记录添加到数据存储中。
步骤 1 −下载并安装项目所需的依赖项
创建一个名为mutation-app的项目文件夹。从终端将目录更改为mutation-app。按照环境设置章节中说明的步骤3至5进行操作。
步骤2 − 创建schema.graphql文件
在项目文件夹mutation-app中添加schema.graphql文件并添加以下代码 −
type Query {
    greeting:String
}

type Mutation {
    createStudent(collegeId:ID,firstName:String,lastName:String):String
}
请注意,函数createStudent返回String类型。这是创建学生后生成的唯一标识符(ID)。
步骤3 −创建 resolver.js 文件
在项目文件夹中创建 resolvers.js 文件,并添加以下代码 −
const db = require('./db')
const Mutation = {
   createStudent:(root,args,context,info) => {
      return db.students.create({collegeId:args.collegeId,
      firstName:args.firstName,
      lastName:args.lastName})
   }
}
const Query = {
   greeting:() => "hello"
}

module.exports = {Query,Mutation}
突变函数指向数据存储区中的学生集合。要添加新的学生,请调用学生集合中的创建方法。args对象将包含查询中传递的参数。学生集合的创建方法将返回新创建的学生对象的ID。
步骤4 − 运行应用程序
创建一个server.js文件。请参阅环境设置章节中的步骤8。在终端中执行命令npm start。服务器将在9000端口上启动并运行。在这里,我们使用GraphiQL作为客户端来测试应用程序。
下一步是打开浏览器并输入URL http://localhost:9000/graphiql。在编辑器中输入以下查询 −
//college Id 应与 colleges.json 中的数据匹配,以便于检索

mutation {
    createStudent(collegeId:"col-2",firstName:"Tim",lastName:"George")
}
上述查询将在 student.json 文件中创建一个学生对象。查询将返回一个唯一标识符。查询的响应如下所示 −
{
    "data": {
        "createStudent": "SkQtxYBUm"
    }
}
要验证学生对象是否已创建,我们可以使用 studentById 查询。您还可以从数据文件夹打开 students.json 文件来验证 ID。
要使用 studentById 查询,请编辑 schema.graphql,如下所示−
type Query {
   studentById(id:ID!):Student
}

type Student {
   id:ID!
   firstName:String
   lastName:String
   collegeId:String
}
编辑 resolver.js 文件,如下所示 −
const db = require('./db')
const Query = {
   studentById:(root,args,context,info) => {
      return db.students.get(args.id);
   }
}

const Mutation = {
   createStudent:(root,args,context,info) => {
      return db.students.create({collegeId:args.collegeId,
      firstName:args.firstName,
      lastName:args.lastName})
   }
}

module.exports = {Query,Mutation}
下面给出的是通过突变查询返回的唯一 ID 获取学生的查询 −
{
    studentById(id:"SkQtxYBUm") {
    id
    firstName
    lastName
  }
}
服务器的响应如下 −
{
   "data": {
      "studentById": {
         "id": "SkQtxYBUm",
         "firstName": "Tim",
         "lastName":"George"
      }
   }
}
在变异中返回对象
在变异中返回对象是最佳实践。例如,客户端应用程序想要获取学生和大学的详细信息。在这种情况下,我们可以创建一个查询,返回一个包含学生及其大学详细信息的对象,而不是发出两个不同的请求。
步骤 1 − 编辑架构文件
添加一个名为 addStudent 的新方法,该方法返回变异类型为 schema.graphql 的对象。
让我们学习如何通过学生详细信息访问大学详细信息。在架构文件中添加大学类型。
type Mutation {
   addStudent_returns_object(collegeId:ID,firstName:String,lastName:String):Student

   createStudent(collegeId:ID,firstName:String,lastName:String):String
}

type College {
   id:ID!
   name:String
   location:String
   rating:Float
}

type Student {
   id:ID!
   firstName:String
   lastName:String
   college:College
}
第 2 步 − 更新 resolvers.js 文件
更新项目文件夹中的文件 resolvers.js 并添加以下代码 −
const Mutation = {
   createStudent:(root,args,context,info) => {

      return db.students.create({
         collegeId:args.collegeId,
         firstName:args.firstName,
         lastName:args.lastName
      })
   },

   // new resolver function
   addStudent_returns_object:(root,args,context,info) => {
      const id = db.students.create({
         collegeId:args.collegeId,
         firstName:args.firstName,
         lastName:args.lastName
      })

      return db.students.get(id)
   }
}

//对于返回的每个学生对象,都会调用解析器
const Student = {
   college:(root) => {
      return db.colleges.get(root.collegeId);
   }
}

module.exports = {Query,Student,Mutation}
步骤 3 − 启动服务器并在 GraphiQL 中输入请求查询
接下来,我们将使用以下代码启动服务器并在 GraphiQL 中请求查询 −
mutation {
   addStudent_returns_object(collegeId:"col-101",firstName:"Susan",lastName:"George") {
      id
      firstName
      college{
         id
         name
      }
   }
}
上述查询添加了一名新学生,并检索了学生对象和大学对象。这节省了往返服务器的次数。
响应如下所示。 −
{
   "data": {
      "addStudent_returns_object": {
         "id": "rklUl08IX",
         "firstName": "Susan",
         "college": {
            "id": "col-101",
            "name": "AMU"
         }
      }
   }
}
GraphQL - 验证
在添加或修改数据时,验证用户输入非常重要。例如,我们可能需要确保字段的值始终不为空。我们可以在 GraphQL 中使用 !(不可为空) 类型标记来执行此类验证。
使用 ! 类型标记的语法如下 −
type TypeName {
    field1:String!,
    field2:String!,
    field3:Int!
}
上述语法可确保所有字段不为空。
如果我们想要实现其他规则,例如检查字符串的长度或检查数字是否在给定范围内,我们可以定义自定义验证器。自定义验证逻辑将成为解析器函数的一部分。让我们借助一个例子来理解这一点。
插图 - 实现自定义验证器
让我们创建一个具有基本验证功能的注册表单。该表单将包含电子邮件、名字和密码字段。
步骤 1 − 下载并安装项目所需的依赖项
创建一个名为 validation-app 的文件夹。从终端将目录更改为 validation-app 。按照环境设置章节中说明的步骤 3 到 5 进行操作。
步骤 2 − 创建架构
在项目文件夹 validation-app 中添加 schema.graphql 文件并添加以下代码 −
type Query {
   greeting:String
}

type Mutation {
   signUp(input:SignUpInput):String
}

input SignUpInput {
   email:String!,
   password:String!,
   firstName:String!
}
注意 − 我们可以使用输入类型 SignUpInput 来减少 signUp 函数中的参数数量。因此,signUp 函数只接受一个 SignUpInput 类型的参数。
步骤 3 − 创建解析器
在项目文件夹中创建文件 resolvers.js 并添加以下代码 −
const Query = {
   greeting:() => "Hello"
}

const Mutation ={
   signUp:(root,args,context,info) => {

      const {email,firstName,password} = args.input;

      const emailExpression = /^(([^<>()\[\]\.,;:\s@"]+(\.[^<>()\[\]\.,;:\s@"]+)*)|(".+"))@((\[[0-9]{1,3}\.[0-9]{1,3}\.[0-9]{1,3}\.[0-9]{1,3}\])|(([a-zA-Z\-0-9]+\.)+[a-zA-Z]{2,}))$/;

      const isValidEmail =  emailExpression.test(String(email).toLowerCase())
      if(!isValidEmail)
      throw new Error("email not in proper format")

      if(firstName.length > 15)
      throw new Error("firstName should be less than 15 characters")

      if(password.length < 8 )
      throw new Error("password should be minimum 8 characters")

      return "success";
   }
}
module.exports = {Query,Mutation}
解析器函数 signUp 接受参数 email、password 和 firstName。这些将通过 input 变量传递,以便可以通过 args.input 访问。
第 4 步 − 运行应用程序
创建一个 server.js 文件。请参阅环境设置章节中的第 8 步。在终端中执行命令 npm start。服务器将在 9000 端口上启动并运行。在这里,我们将使用 GraphiQL 作为客户端来测试应用程序。
打开浏览器并输入 URL http://localhost:9000/graphiql。在编辑器中输入以下查询 −
mutation doSignUp($input:SignUpInput) {
    signUp(input:$input)
}
由于 signup 函数的输入是复杂类型,我们需要在 graphiql 中使用查询变量。为此,我们需要首先为查询命名并将其命名为 doSignUp,$input 是一个查询变量。
必须在 graphiql 的查询变量选项卡中输入以下查询变量 −
{
   "input":{
      "email": "abc@abc",
      "firstName": "kannan",
      "password": "pass@1234"
   }
}
错误数组包含验证错误的详细信息,如下所示 −
{
   "data": {
      "signUp": null
   },

   "errors": [
      {
         "message": "email not in proper format",
         "locations": [
            {
               "line": 2,
               "column": 4
            }
         ],
         "path": [
            "signUp"
         ]
      }
   ]
}
我们必须为每个字段输入正确的内容,如下所示 −
{
   "input":{
      "email": "abc@abc.com",
      "firstName": "kannan",
      "password": "pass@1234"
   }
}
响应如下 −
{
   "data": {
      "signUp": "success"
   }
}
在下面的查询中,我们没有分配任何密码。
{
   "input":{
      "email": "abc@abc.com",
      "firstName": "kannan"
   }
}
如果没有提供必填字段,则 qraphql 服务器将显示以下错误 −
{
   "errors": [
      {
         "message": "Variable \"$input\" got invalid value {\"email\":\"abc@abc.com\",\"firstName\":\"kannan\"}; Field value.password of required type String! was not provided.",
         "locations": [
            {
               "line": 1,
               "column": 19
            }
         ]
      }
   ]
}
GraphQL - JQuery 集成
Web 应用程序异步发送和检索数据(在后台)。AJAX 允许网站在不刷新页面的情况下将内容加载到屏幕上。jQuery 提供了几种 AJAX 功能方法,从而使使用 AJAX 变得更加容易。在本章中,我们将学习如何将 GraphQL 与 jQuery 集成。
考虑使用客户端服务器架构的应用程序。我们可以构建一个从 GraphQL 服务器请求数据的前端网页。该网页将使用 jQuery 向 GraphQL 服务器发出 AJAX 调用。
要将 GraphQL 与 JQuery 集成,让我们检查 GraphiQL 请求标头并了解请求参数。
启动 hello-world 应用程序(有关插图,请参阅第 6 章)。在 GraphiQL 窗口中输入 graphql 查询 {greeting} 。右键单击并检查或在 chrome 上按 (ctrl + shift + I) 转到网络选项卡,如下所示 −
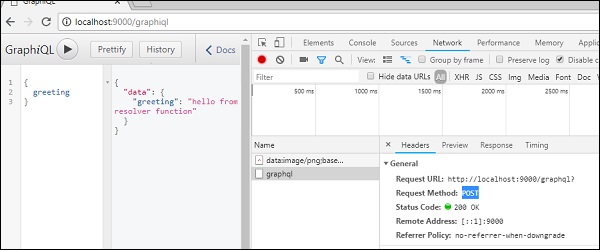
从简单的 hello-world 示例中,我们可以了解到使用的 http 方法 是 POST。现在在浏览器中,向下滚动到标题部分以查看 请求负载。
单击 查看代码后,您将在 chrome 的请求负载部分看到以下内容。
{"query":"{
Greeting
}","variables":null,"operationName":null}
另请注意请求 URL, http://localhost:9000/graphql 应从客户端应用程序调用。
插图
让我们了解如何使用分步过程将 GraphQL 与 JQuery 集成。
设置服务器
我们将学习使用以下步骤设置服务器 −
步骤 1 −下载并安装项目所需的依赖项
创建一个名为 jquery-server-app 的文件夹。从终端将目录更改为 jquery-server-app。按照环境设置章节中说明的步骤 3 到 5 进行操作。
第 2 步 − 创建架构
在项目文件夹 jquery-server-app 中添加 schema.graphql 文件并添加以下代码 −
type Query
{
   greeting: String
   sayHello(name:String!):String
}
该文件定义了两个查询greeting和sayHello。 sayHello 查询接受一个字符串参数并返回另一个字符串。 sayHello() 函数的参数不为空。
步骤 3 − 创建解析器
在项目文件夹中创建文件 resolvers.js 并添加以下代码 −
const Query =
{
   greeting: () => 'Hello GraphQL  From TutorialsPoint !!' ,
   sayHello:(root,args,context,info) =>  `Hi ${args.name} GraphQL server says Hello to you!!`
}
module.exports = {Query}
这里,greeting 和 sayHello 是两个解析器。在 sayHello 解析器中,传递给 name 参数的值可以通过 args 访问。要访问模块外的解析器函数,必须使用 module.exports 导出 Query 对象。
第 4 步 − 运行应用程序
创建一个 server.js 文件。请参阅环境设置章节中的步骤 8。在终端中执行命令 npm start。服务器将在 9000 端口上启动并运行。在这里,我们使用 GraphiQL 作为客户端来测试应用程序。
打开浏览器并输入 URL http://localhost:9000/graphiql。在编辑器中输入以下查询 −
{
   greeting,
   sayHello(name:"Mohtashim")
}
服务器的响应如下所示 −
{
   "data": {
      "greeting": "Hello GraphQL From TutorialsPoint !!",
      "sayHello": "Hi Mohtashim GraphQL server says Hello to you!!"
   }
}
设置客户端
由于我们已经设置了服务器,现在我们将学习如何设置客户端。
步骤 1 − 在当前项目文件夹外创建一个新文件夹 jquery-client-app
首先,我们将在项目文件夹外创建一个名为 jquery-client-app 的文件夹。
步骤 2 − 创建用于 jQuery 集成的 HTML 页面 index.html
我们将在 jquery 中创建一个客户端应用程序并调用这两种方法。以下是 index.html 文件的代码。当单击按钮 - Greet 和 SayHello 时,index.html 页面会向服务器发送请求。我们将使用 $.ajax() 函数发出异步请求。
<!DOCTYPE html>
<html>
   <head>
      <script src = "https://ajax.googleapis.com/ajax/libs/jquery/3.3.1/jquery.min.js"></script>
      <script>
         $(document).ready(function() {

            $("#btnSayhello").click(function() {

               const name = $("#txtName").val();
               console.log(name);
               $("#SayhelloDiv").html('loading....');

               $.ajax({url: "http://localhost:9000/graphql",
                  contentType: "application/json",type:'POST',
                  data: JSON.stringify({ query:`{
                     sayHello(name:"${name}")}`
                  }),
                  success: function(result) {
                     console.log(JSON.stringify(result))
                     $("#SayhelloDiv").html("<h1>"+result.data.sayHello +"</h1>");
                  }
               });
            });

            $("#btnGreet").click(function() {
               $("#greetingDiv").html('loading....');
               //https://kannan-first-graphql-app.herokuapp.com/graphql
               $.ajax({url: "http://localhost:9000/graphql",
                  contentType: "application/json",
                  type:'POST',
                  data: JSON.stringify({
                     query:`{greeting}`
                  }),
                  success: function(result) {
                     $("#greetingDiv").html("<h1>"+result.data.greeting+"</h1>");
                  }
               });
            });
         });
      </script>
   </head>

   <body>
      <h1>Jquery Client </h1>

      <hr/>
      <section>
         <button id = "btnGreet">Greet</button>
         <br/> <br/>
         <div id = "greetingDiv"> </div>
      </section>

      <br/> <br/> <br/>
      <hr/>

      <section>
         Enter a name:<input id = "txtName" type = "text" value = "kannan"/>
         <button id = "btnSayhello">SayHello</button>
         <div id = "SayhelloDiv"> </div>
      </section>
   </body>
</html>
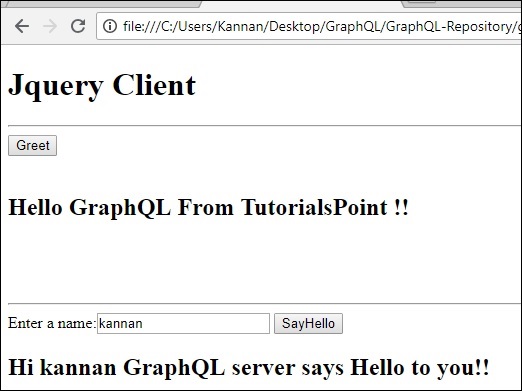
在浏览器中打开此文件并单击按钮以查看响应。输出将如下所示 −
GraphQL - React Integration
React 是一个用于构建用户界面的 Javascript 库。本章介绍如何将 GraphQL 与 React 应用程序集成。
插图
设置 React 项目的最快方法是使用 Create React App 工具。在后续部分中,我们将学习如何设置服务器和客户端。
设置服务器
要设置服务器,请按照以下步骤 −
步骤 1 −下载并安装项目所需的依赖项
创建文件夹 react-server-app。从终端将目录更改为 react-server-app。按照环境设置章节中说明的步骤 3 到 5 进行操作。
第 2 步 − 创建架构
在项目文件夹 react-server-app 中添加 schema.graphql 文件并添加以下代码 −
type Query
{
    Greeting: String
    sayHello(name:String!):String
}
该文件定义了两个查询 - greeting 和 sayHello。sayHello 查询接受一个字符串参数并返回另一个字符串。 sayHello() 函数的参数不为空。
第 3 步 − 创建 Resolvers
在项目文件夹中创建文件 resolvers.js,并添加以下代码 −
const Query =
{
   greeting: () => 'Hello GraphQL  From TutorialsPoint !!' ,
   sayHello:(root,args,context,info) =>  `Hi ${args.name} GraphQL server says Hello to you!!`
}
module.exports = {Query}
此处greeting和sayHello是两个解析器。在sayHello解析器中,传递给name参数的值可以通过args访问。要访问模块外的解析器函数,必须使用module.exports导出Query对象。
第4步 − 运行应用程序
创建一个server.js文件。请参阅环境设置章节中的第8步。在终端中执行命令npm start。服务器将在9000端口上启动并运行。在这里,我们使用GraphiQL作为客户端来测试应用程序。
打开浏览器并输入URL http://localhost:9000/graphiql。在编辑器中输入以下查询 −
{
   greeting,
   sayHello(name:"Mohtashim")
}
服务器的响应如下所示 −
{
   "data": {
      "greeting": "Hello GraphQL  From TutorialsPoint !!",
      "sayHello": "Hi Mohtashim GraphQL server says Hello to you!!"
   }
}
设置客户端
为客户端打开一个新终端。在执行客户端应用程序之前,应保持服务器终端运行。React 应用程序将在端口号 3000 上运行,服务器应用程序将在端口号 9000 上运行。
步骤 1 − 创建一个 React 项目 hello-world-client
在客户端终端中,输入以下命令 −
npx create-react-app hello-world-client
这将安装典型 React 应用程序所需的一切。npx 实用程序和 create-react-app 工具创建一个名为 hello-world-client 的项目。安装完成后,在 VSCode 中打开该项目。
步骤 2 −启动 hello-world-client
将终端中的当前文件夹路径更改为 hello-world-client。输入 npm start 以启动项目。这将在端口 3000 上运行开发服务器,并自动打开浏览器并加载索引页。
这在下面给出的屏幕截图中显示 −
步骤 3 − 修改应用组件
在 src 文件夹中的 App.js 中,添加两个函数,一个用于加载问候语,另一个用于加载 sayHello 消息。
以下是 loadGreeting 函数,它发送 GraphQL 查询以进行问候。
async function loadGreeting() {
   const response = await fetch('http://localhost:9000/graphql', {
      method:'POST',

      headers:{'content-type':'application/json'},
      body:JSON.stringify({query:'{greeting}'})
   })

   const rsponseBody = await response.json();
   return rsponseBody.data.greeting;

   console.log("end of function")
}
以下是 loadSayhello 函数,它发送 sayHello 的 GraphQL 查询 −
async function  loadSayhello(name) {
   const response = await fetch('http://localhost:9000/graphql', {
      method:'POST',
      headers:{'content-type':'application/json'},
      body:JSON.stringify({query:`{sayHello(name:"${name}")}`})
   })
}
完整的 App.js 文件如下所示−
import React, { Component } from 'react';
import logo from './logo.svg';
import './App.css';

async function loadGreeting() {
   const response =  await fetch('http://localhost:9000/graphql', {
      method:'POST',
      headers:{'content-type':'application/json'},
      body:JSON.stringify({query:'{greeting}'})
   })
   const rsponseBody =  await response.json();
   return rsponseBody.data.greeting;
   console.log("end of function")
}

async function  loadSayhello(name) {
   const response =  await fetch('http://localhost:9000/graphql', {
      method:'POST',
      headers:{'content-type':'application/json'},
      body:JSON.stringify({query:`{sayHello(name:"${name}")}`})
   })
   const rsponseBody =  await response.json();
   return rsponseBody.data.sayHello;
}

class App extends Component {
   constructor(props) {
      super(props);
      this.state =  {greetingMessage:'',sayHelloMessage:'',userName:''}
      this.updateName =  this.updateName.bind(this);
      this.showSayHelloMessage =  this.showSayHelloMessage.bind(this);
      this.showGreeting =  this.showGreeting.bind(this);
   }

   showGreeting() {
      loadGreeting().then(g => this.setState({greetingMessage:g+" :-)"}))
   }

   showSayHelloMessage() {
      const name = this.state.userName;
      console.log(name)
      loadSayhello(name).then(m => this.setState({sayHelloMessage:m}))
   }

   updateName(event) {
      this.setState({userName:event.target.value})
   }
   render() {
      return (
         <div className = "App">
            <header className = "App-header">
               <img src = {logo} className = "App-logo" alt = "logo" />
               <h1 className = "App-title">Welcome to React</h1>
            </header>
            <br/><br/>
            <section>
               <button id = "btnGreet" onClick = {this.showGreeting}>Greet</button>
               <br/> <br/>
               <div id = "greetingDiv">
                  <h1>{this.state.greetingMessage}</h1>
               </div>
            </section>

            <hr/>

            <section>
               Enter a name:<input id = "txtName" type = "text" onChange = {this.updateName}
               value = {this.state.userName}/>
               <button id = "btnSayhello" onClick = {this.showSayHelloMessage}>SayHello</button>
               <br/>
               user name is:{this.state.userName}    <br/>
               <div id = "SayhelloDiv">
                  <h1>{this.state.sayHelloMessage}</h1>
               </div>
            </section>
         </div>
      );
   }
}

export default App;
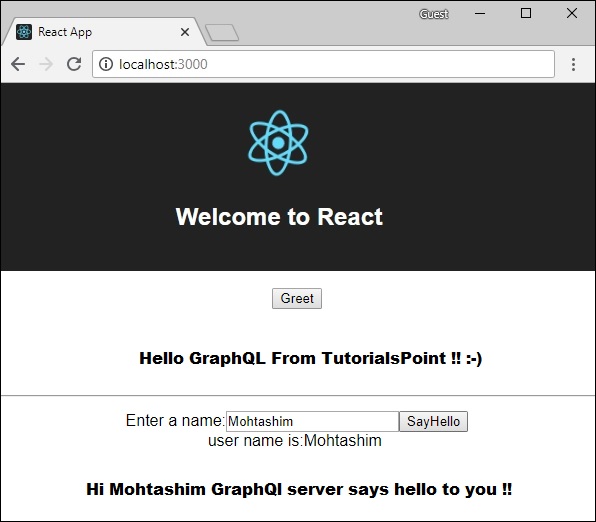
两个应用程序运行后,单击greet按钮。接下来,在文本框中输入名称,然后单击sayHello按钮。输出将如下所示−
GraphQL - Apollo Client
我们已经使用Apollo Server在服务器端构建graphql规范。构建可用于生产的GraphQL服务器既快速又简单。现在让我们了解客户端。
Apollo Client是使用GraphQL构建客户端应用程序的最佳方式。该客户端旨在帮助开发人员快速构建一个使用 GraphQL 获取数据并可与任何 JavaScript 前端一起使用的 UI。
Apollo Client 支持以下平台 −
| Sr.No. | 平台 &框架 |
|---|---|
| 1 | Javascript React、Angular、Vue、Meteor、Ember |
| 2 | WebComponents Polymer,lit-apollo |
| 3 | 原生移动 使用 Java 的原生 Android,使用 Swift 的原生 iOS |
缓存是 Apollo Client 的主要功能之一。 apollo-boost 是一个便利包,它带来了一堆其他依赖项。
插图
让我们看看如何使用 Apollo Client 按照以下步骤构建客户端应用程序 −
设置服务器
我们必须按照以下步骤设置服务器 −
步骤 1 − 下载并安装项目所需的依赖项
创建文件夹 apollo-server-app。从终端将目录更改为 apollo-server-app。然后,按照环境设置章节中说明的步骤 3 到 5 进行操作。
步骤 2 − 创建架构
在项目文件夹 apollo-server-app 中添加 schema.graphql 文件并添加以下代码 −
type Query
{
   students:[Student]
}

type Student {
   id:ID!
   firstName:String
   lastName:String
   college:College
}

type College {
   id:ID!
   name:String
   location:String
   rating:Float
}
步骤 3 − 添加解析器
在项目文件夹中创建文件 resolvers.js 并添加以下代码 −
const db = require('./db')

const Query = {
   //resolver function for students returns list
   students:() => db.students.list(),
}

const Student = {
   college:(root) => {
      return db.colleges.get(root.collegeId);
   }
}
module.exports = {Query,Student}
第 4 步 − 运行应用程序
创建一个 server.js 文件。请参阅环境设置章节中的第 8 步。在终端中执行命令 npm start。服务器将在 9000 端口上启动并运行。在这里,我们将使用 GraphiQL 作为客户端来测试应用程序。
打开浏览器并输入 URL http://localhost:9000/graphiql。在编辑器中输入以下查询。
{
   students{
      id
      firstName
      college{
         name
      }
   }
}
查询的响应如下所示 −
{
   "data": {
      "students": [
         {
            "id": "S1001",
            "firstName": "Mohtashim",
            "college": {
               "name": "CUSAT"
            }
         },

         {
            "id": "S1002",
            "firstName": "Kannan",
            "college": {
               "name": "AMU"
            }
         },

         {
            "id": "S1003",
            "firstName": "Kiran",
            "college": {
               "name": "AMU"
            }
         }
      ]
   }
}
设置客户端
为客户端打开一个新终端。在执行客户端应用程序之前,应保持服务器终端运行。React 应用程序将在端口号 3000 上运行,服务器应用程序将在端口号 9000 上运行。
步骤 1 − 创建 React 应用程序
在客户端终端中,输入以下命令 −
npx create-react-app hello-world-client
这将安装典型 React 应用程序所需的一切。npx 实用程序和 create-react-app 工具创建一个名为 hello-world-client 的项目。安装完成后,在 VSCode 中打开该项目。
步骤 2 − 启动 hello-world-client
将终端中的当前文件夹路径更改为 hello-world-client。输入 npm start 启动项目。这将在端口 3000 上运行开发服务器,并自动打开浏览器并加载索引页。
如下面的屏幕截图所示 −
步骤 3 − 安装 Apollo 客户端库
要安装 Apollo 客户端,请打开一个新终端并进入当前项目文件夹路径。输入以下命令 −
npm install apollo-boost graphql
这将下载客户端的 graphql 库以及 Apollo Boost 包。我们可以通过在 apollo-boost 依赖项中输入 npm view 来交叉检查。这将有许多依赖项,如下所示 −
{
   'apollo-cache': '^1.1.15',
   'apollo-cache-inmemory': '^1.2.8',
   'apollo-client': '^2.4.0',
   'apollo-link': '^1.0.6',
   'apollo-link-error': '^1.0.3',
   'apollo-link-http': '^1.3.1',
   'apollo-link-state': '^0.4.0',
   'graphql-tag': '^2.4.2'
}
我们可以清楚地看到 Apollo-Client 库已安装。
第 4 步 − 修改 index.js 文件中的应用组件
使用 Apollo Client,我们可以直接调用服务器,而无需使用 fetch API。此外,查询和变异不应嵌入用反勾符号表示的字符串中。这是因为,gql 函数直接解析查询。这意味着,程序员可以在 GraphiQL 工具中编写查询时以相同的方式直接编写查询。gql 是一个标记函数,它将把用反勾符号编写的模板字符串解析为 graphql 查询对象。 Apollo Client 查询方法返回一个承诺。
以下代码片段显示如何导入 Apollo Client −
import {ApolloClient, HttpLink, InMemoryCache} from 'apollo-boost'

const endPointUrl = 'http://localhost:9000/graphql'
const client = new ApolloClient({
    link: new HttpLink({uri:endPointUrl}),
    cache:new InMemoryCache()
});
在上一章中,我们讨论了如何使用 fetch API 进行 HTTP 请求。以下代码显示如何使用 gql 函数。loadStudentsAsync 函数使用 graphql 客户端查询服务器。
async function loadStudentsAsync() {
   const query = gql`
   {
      students{
         id
         firstName
         lastName
         college{
            name
         }
      }
   }`
   const {data} = await client.query({query}) ;
   return data.students;
}
您只需将 index.js 保留在 src 文件夹中,将 index.html 保留在 public 文件夹中;所有其他自动生成的文件都可以删除。
目录结构如下。 −
hello-world-client /
   -->node_modules
   -->public
         index.html
   -->src
         index.js
   -->package.json
以下是 React 应用程序中的 index.js −
import React, {Component} from 'react';
import ReactDOM from 'react-dom';

// apollo client

import {ApolloClient, HttpLink, InMemoryCache} from 'apollo-boost'
import gql from 'graphql-tag'

const endPointUrl = 'http://localhost:9000/graphql'
const client = new ApolloClient({
   link: new HttpLink({uri:endPointUrl}),
   cache:new InMemoryCache()
});

async function loadStudentsAsync() {
   const query = gql`
   {
      students{
         id
         firstName
         lastName
         college{
            name
         }
      }
   }
   `
   const {data} = await client.query({query}) ;
   return data.students;
}
class  App  extends Component {
   constructor(props) {
      super(props);
      this.state = {
         students:[]
      }
      this.studentTemplate =  [];
   }
   async loadStudents() {
      const studentData =  await loadStudentsAsync();
      this.setState({
         students: studentData
      })
      console.log("loadStudents")
   }
   render() {
      return(
         <div>
            <input type = "button"  value = "loadStudents" onClick = {this.loadStudents.bind(this)}/>
            <div>
               <br/>
               <hr/>
               <table border = "3">
                  <thead>
                     <tr>
                        <td>First Name</td>
                        <td>Last Name</td>
                        <td>college Name</td>
                     </tr>
                  </thead>

                  <tbody>
                     {
                        this.state.students.map(s => {
                           return (
                              <tr key = {s.id}>
                                 <td>
                                    {s.firstName}
                                 </td>
                                 <td>
                                    {s.lastName}
                                 </td>
                                 <td>
                                    {s.college.name}
                                 </td>
                              </tr>
                           )
                        })
                     }
                  </tbody>
               </table>
            </div>
         </div>
      )
   }
}
ReactDOM.render(<App/>, document.getElementById('root'));
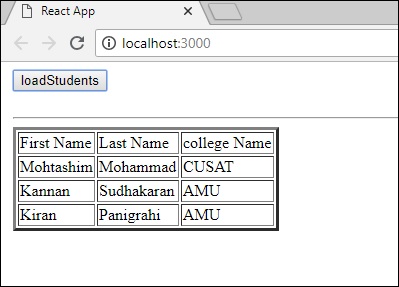
一旦我们点击 loadStudents 按钮,React 应用程序将从 GraphQL 服务器加载学生,如下所示 −
GraphQL - 身份验证客户端
身份验证是验证用户或进程身份的过程或操作。应用程序对用户进行身份验证以确保匿名用户无法获取数据非常重要。在本节中,我们将学习如何对 GraphQL 客户端进行身份验证。
Express JWT
在此示例中,我们将使用 jQuery 创建客户端应用程序。要对请求进行身份验证,我们将在服务器端使用 express-jwt 模块。
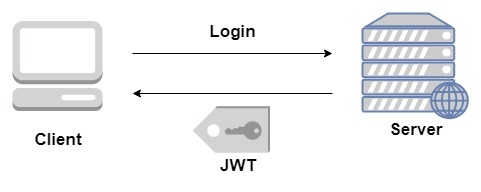
express-jwt 模块是一个中间件,可让您使用 JWT 令牌对 HTTP 请求进行身份验证。JSON Web Token (JWT) 是一个标识已登录用户的长字符串。
用户成功登录后,服务器将生成 JWT 令牌。此令牌明确标识日志。换句话说,令牌是用户身份的表示。因此,下次当客户端访问服务器时,它必须出示此令牌以获取所需的资源。客户端可以是移动应用程序,也可以是 Web 应用程序。
插图
我们将按照分步过程来理解此插图。
设置服务器
以下是设置服务器的步骤 −
步骤 1 − 下载并安装项目所需的依赖项
创建文件夹 auth-server-app。从终端将目录更改为 auth-server-app。按照环境设置章节中说明的步骤 3 到 5 进行操作。
步骤 2 −创建 Schema
在项目文件夹 auth-server-app 中添加 schema.graphql 文件并添加以下代码 −
type Query
{
   greetingWithAuth:String
}
步骤 3 − 添加解析器
在项目文件夹中创建文件 resolvers.js 并添加以下代码 −
解析器将验证 GraphQL 上下文对象中是否存在经过身份验证的用户对象。如果经过身份验证的用户不可用,它将引发异常。
const db = require('./db')
const Query = {
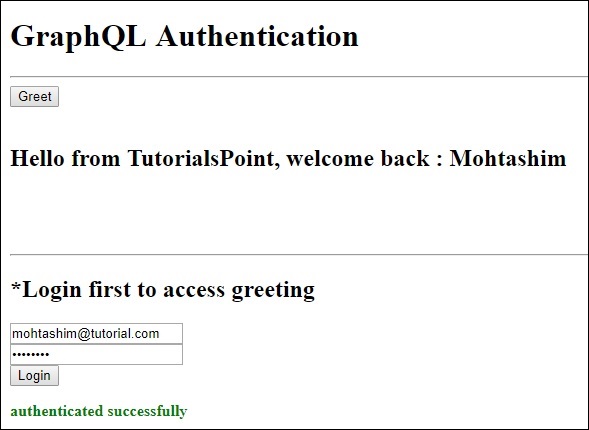
greetingWithAuth:(root,args,context,info) => {
//检查 context.user 是否为空
if (!context.user) {
throw new Error('Unauthorized');
}
return "Hello from TutorialsPoint, welcome back : "+context.user.firstName;
}
}
module.exports = {Query}
步骤 4 − 创建 Server.js 文件
身份验证中间件使用 JSON Web Token 对调用者进行身份验证。身份验证的 URL 为 http://localhost:9000/login。
这是一个后期操作。用户必须提交其电子邮件和密码,后端将对其进行验证。如果使用 jwt.sign 方法生成了有效令牌,则客户端必须在标头中发送该令牌以供后续请求使用。
如果令牌有效,则 req.user 将设置为 JSON 对象解码,以供后续中间件用于授权和访问控制。
以下代码使用两个模块 − jsonwebtoken 和 express-jwt 来验证请求 −
当用户点击 greet 按钮时,将发出 /graphql 路由请求。如果用户未通过身份验证,系统将提示他进行身份验证。
向用户显示一个接受电子邮件 ID 和密码的表单。在我们的示例中,/login 路由负责对用户进行身份验证。
/login 路由验证数据库中是否找到与用户提供的凭据匹配的凭据。
如果凭据无效,则向用户返回 HTTP 401 异常。
如果凭据有效,则服务器生成一个令牌。此令牌作为响应的一部分发送给用户。这是由 jwt.sign 函数完成的。
const expressJwt = require('express-jwt');
const jwt = require('jsonwebtoken');

//private key
const jwtSecret = Buffer.from('Zn8Q5tyZ/G1MHltc4F/gTkVJMlrbKiZt', 'base64');

app.post('/login', (req, res) => {
   const {email, password} = req.body;

   //check database
   const user = db.students.list().find((user) =>  user.email === email);
   if (!(user && user.password === password)) {
      res.sendStatus(401);
      return;
   }

   //根据私钥生成token,token没有有效期
   const token = jwt.sign({sub: user.id}, jwtSecret);
   res.send({token});
});
对于每个请求,都会调用 app.use() 函数。这反过来会调用 expressJWT 中间件。该中间件将解码 JSON Web Token。存储在令牌中的用户 ID 将被检索并作为属性 user 存储在请求对象中。
//解码 JWT 并存储在请求对象中
app.use(expressJwt({
    secret: jwtSecret,
    credentialsRequired: false
}));
为了在 GraphQL 上下文中提供用户属性,此属性被分配给 context 对象,如下所示 −
//使 req.user 可用于 GraphQL 上下文
app.use('/graphql', graphqlExpress((req) => ({
   schema,
   context: {user: req.user &&apm; db.students.get(req.user.sub)}
})));
在当前文件夹路径下创建server.js,完整的server.js文件如下 −
const bodyParser = require('body-parser');
const cors = require('cors');
const express = require('express');
const expressJwt = require('express-jwt'); //auth
const jwt = require('jsonwebtoken'); //auth
const db = require('./db');

var port = process.env.PORT || 9000
const jwtSecret = Buffer.from('Zn8Q5tyZ/G1MHltc4F/gTkVJMlrbKiZt', 'base64');
const app = express();

const fs = require('fs')
const typeDefs = fs.readFileSync('./schema.graphql',{encoding:'utf-8'})
const resolvers = require('./resolvers')
const {makeExecutableSchema} = require('graphql-tools')

const schema = makeExecutableSchema({typeDefs, resolvers})

app.use(cors(), bodyParser.json(), expressJwt({
   secret: jwtSecret,
   credentialsRequired: false
}));

const  {graphiqlExpress,graphqlExpress} = require('apollo-server-express')

app.use('/graphql', graphqlExpress((req) => ({
   schema,
   context: {user: req.user && db.students.get(req.user.sub)}
})));
app.use('/graphiql',graphiqlExpress({endpointURL:'/graphql'}))

//authenticate students
app.post('/login', (req, res) => {
   const email = req.body.email;
   const password = req.body.password;

   const user = db.students.list().find((user) =>  user.email === email);
   if (!(user && user.password === password)) {
      res.sendStatus(401);
      return;
   }
   const token = jwt.sign({sub: user.id}, jwtSecret);
   res.send({token});
});

app.listen(port, () => console.info(`Server started on port ${port}`));
第 5 步 − 运行应用程序
在终端中执行命令 npm start 。服务器将在 9000 端口上启动并运行。在这里,我们使用 GraphiQL 作为客户端来测试应用程序。
打开浏览器并输入 URL http://localhost:9000/graphiql。在编辑器中输入以下查询 −
{
    greetingWithAuth
}
在下面的响应中,我们收到错误,因为我们不是经过身份验证的用户。
{
   "data": {
      "greetingWithAuth": null
   },
   "errors": [
      {
         "message": "Unauthorized",
         "locations": [
            {
               "line": 2,
               "column": 3
            }
         ],
         "path": [
            "greetingWithAuth"
         ]
      }
   ]
}
在下一节中,让我们创建一个客户端应用程序来进行身份验证。
设置 JQuery 客户端
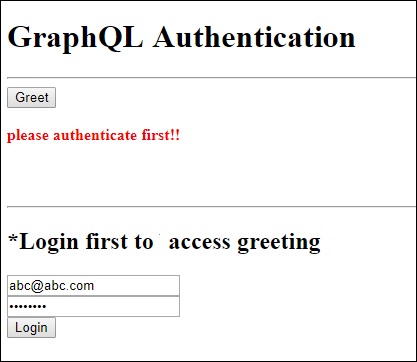
在客户端应用程序中,提供了一个问候按钮,它将调用架构 greetingWithAuth。如果您在未登录的情况下单击该按钮,它将向您显示以下错误消息 −
使用数据库中可用的用户登录后,将出现以下屏幕 −
要访问 greeting,我们需要首先访问 URL http://localhost:9000/login 路由,如下所示。
响应将包含从服务器生成的令牌。
$.ajax({
   url:"http://localhost:9000/login",
   contentType:"application/json",
   type:"POST",
   data:JSON.stringify({email,password}),
   success:function(response) {
      loginToken = response.token;
      $('#authStatus')
      .html("authenticated successfully")
      .css({"color":"green",'font-weight':'bold'});
      $("#greetingDiv").html('').css({'color':''});
   },
   error:(xhr,err) =>  alert('error')
})
登录成功后,我们可以访问如下所示的 greetingWithAuth 架构。所有带有 bearer token 的后续请求都应该有一个 Authorizationheader。
{
   url: "http://localhost:9000/graphql",
   contentType: "application/json",
   headers: {"Authorization": 'bearer '+loginToken},  type:'POST',
   data: JSON.stringify({
   query:`{greetingWithAuth}`
}
以下是index.html的代码 −
<!DOCTYPE html>
<html>
   <head>
      <script src = "https://ajax.googleapis.com/ajax/libs/jquery/3.3.1/jquery.min.js"></script>
      <script>
         $(document).ready(function() {
            let loginToken = "";
            $("#btnGreet").click(function() {
                  $.ajax({url: "http://localhost:9000/graphql",
                  contentType: "application/json",
                  headers: {"Authorization": 'bearer '+loginToken},
                  type:'POST',
                  data: JSON.stringify({
                  query:`{greetingWithAuth}` }),
                  success: function(result) {
                  $("#greetingDiv").html("<h1>"+result.data.greetingWithAuth+"</h1>")
                  },
                  error:function(jQxhr,error) {
                     if(jQxhr.status == 401) {
                        $("#greetingDiv").html('please authenticate first!!')
                        .css({"color":"red",'font-weight':'bold'})
                        return;
                     }
                     $("#greetingDiv").html('error').css("color","red");
                  }
               });
            });
            $('#btnAuthenticate').click(function() {
               var email =  $("#txtEmail").val();
               var password =  $("#txtPwd").val();
               if(email && password) {
                  $.ajax({
                     url:"http://localhost:9000/login",
                     contentType:"application/json",
                     type:"POST",
                     data:JSON.stringify({email,password}),
                     success:function(response) {
                        loginToken =  response.token;
                        $('#authStatus')
                        .html("authenticated successfully")
                        .css({"color":"green",'font-weight':'bold'});
                        $("#greetingDiv").html('').css({'color':''});
                     },
                     error:(xhr,err) =>  alert('error')
                  })
               }else alert("email and pwd empty")
            })
         });
      </script>
   </head>

   <body>
      <h1> GraphQL Authentication </h1>
      <hr/>
      <section>
         <button id = "btnGreet">Greet</button>
         <br/> <br/>
         <div id = "greetingDiv"></div>
      </section>
      <br/> <br/> <br/>
      <hr/>

      <section id = "LoginSection">
         <header>
            <h2>*Login first to  access greeting </h2>
         </header>
         <input type = "text" value = "mohtashim.mohammad@tutorialpoint.org" placeholder = "enter email" id = "txtEmail"/>
         <br/>

         <input type = "password" value = "pass123" placeholder = "enter password" id = "txtPwd"/>
         <br/>

         <input type = "button" id = "btnAuthenticate"  value = "Login"/>
         <p id = "authStatus"></p>
      </section>
   </body>
</html>
GraphQL - 缓存
缓存是将数据存储在名为缓存的临时存储区域的过程。当您返回最近访问的页面时,浏览器可以从缓存而不是原始服务器获取这些文件。这样可以节省您的时间,并减轻网络额外流量的负担。
与 GraphQL 交互的客户端应用程序负责在其端缓存数据。一种可能的模式是保留一个字段(如 id)作为全局唯一标识符。
InMemory 缓存
InMemoryCache 是一种规范化的数据存储,常用于 GraphQL 客户端应用程序,无需使用其他库(如 Redux)。
下面给出了将 InMemoryCache 与 ApolloClient 结合使用的示例代码−
import {ApolloClient, HttpLink, InMemoryCache} from 'apollo-boost'
const cache = new InMemoryCache();

const client = new ApolloClient({
   link: new HttpLink(),
   cache
});
InMemoryCache 构造函数采用具有属性的可选配置对象来自定义缓存。
| Sr.No. | 参数 &描述 |
|---|---|
| 1 | addTypename 一个布尔值,用于确定是否将 __typename 添加到文档(默认值:true) |
| 2 | dataIdFromObject 一个函数,它接受一个数据对象并返回一个唯一标识符,该标识符将在规范化存储中的数据时使用 |
| 3 | fragmentMatcher 默认情况下,InMemoryCache 使用启发式片段匹配器 |
| 4 | cacheRedirects 在请求发生之前将查询重定向到缓存中的另一个条目的函数映射。 |
插图
我们将在 ReactJS 中创建一个包含两个选项卡的单页应用程序 - 一个用于主页选项卡,另一个用于学生选项卡。学生选项卡将从 GraphQL 服务器 API 加载数据。当用户从主页选项卡导航到学生选项卡时,应用程序将查询学生数据。结果数据将由应用程序缓存。
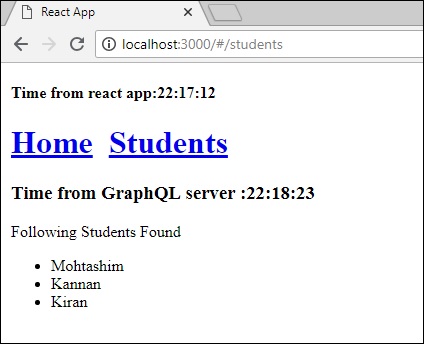
我们还将使用 getTime 字段查询服务器时间以验证页面是否已缓存。如果从缓存返回数据,页面将显示发送到服务器的第一个请求的时间。如果数据是向服务器发出的新请求的结果,它将始终显示来自服务器的最新时间。
设置服务器
以下是设置服务器的步骤 −
步骤 1 − 下载并安装项目所需的依赖项
创建文件夹 cache-server-app。从终端将目录更改为 cache-server-app。按照环境设置章节中说明的步骤 3 到 5 进行操作。
步骤 2 − 创建架构
在项目文件夹 cache-server-app 中添加 schema.graphql 文件并添加以下代码 −
type Query {
   students:[Student]
   getTime:String
}

type Student {
   id:ID!
   firstName:String
   lastName:String
   fullName:String
}
第 3 步 − 添加解析器
在项目文件夹中创建文件 resolvers.js,并添加以下代码−
const db = require('./db')

const Query = {
      students:() => db.students.list(),
      getTime:() => {
      const today = new Date();
      var h = today.getHours();
      var m = today.getMinutes();
      var s = today.getSeconds();
      return `${h}:${m}:${s}`;
   }
}
module.exports = {Query}
第 4 步 − 运行应用程序
创建一个 server.js 文件。请参阅环境设置章节中的第 8 步。在终端中执行命令 npm start。服务器将在 9000 端口上启动并运行。在这里,我们将使用 GraphiQL 作为客户端来测试应用程序。
打开浏览器并输入 URL http://localhost:9000/graphiql。在编辑器中输入以下查询 −
{
   getTime
   students {
      id
      firstName
   }
}
示例响应显示学生姓名和服务器时间。
{
   "data": {
      "getTime": "22:18:42",
      "students": [
         {
            "id": "S1001",
            "firstName": "Mohtashim"
         },
         {
            "id": "S1002",
            "firstName": "Kannan"
         },
         {
            "id": "S1003",
            "firstName": "Kiran"
         }
      ]
   }
}
设置 ReactJS 客户端
为客户端打开一个新终端。在执行客户端应用程序之前,应保持服务器终端运行。React 应用程序将在端口号 3000 上运行,服务器应用程序将在端口号 9000 上运行。
步骤 1 − 创建 React 应用程序
在客户端终端中,输入以下命令 −
npx create-react-app hello-world-client
这将安装典型 React 应用程序所需的一切。npx 实用程序 和 create-react-app 工具创建一个名为 hello-world-client 的项目。安装完成后,在 VSCode 中打开项目。
使用以下命令安装 React 的路由器模块 - npm install react-router-dom。
第 2 步 − 启动 hello-world-client
将终端中的当前文件夹路径更改为 hello-world-client。输入 npm start 以启动项目。这将在端口 3000 运行开发服务器,并自动打开浏览器并加载索引页。
这在下面给出的屏幕截图中显示 −

第 3 步 − 安装 Apollo 客户端库
要安装 Apollo 客户端,请打开一个新终端并位于当前项目文件夹路径中。输入以下命令 −
npm install apollo-boost graphql
这将下载客户端的 graphql 库以及 Apollo Boost 包。我们可以通过输入 npm view apollo-boost dependency 来交叉验证这一点。这将有许多依赖项,如下所示。−
{
   'apollo-cache': '^1.1.15',
   'apollo-cache-inmemory': '^1.2.8',
   'apollo-client': '^2.4.0',
   'apollo-link': '^1.0.6',
   'apollo-link-error': '^1.0.3',
   'apollo-link-http': '^1.3.1',
   'apollo-link-state': '^0.4.0',
   'graphql-tag': '^2.4.2'
}
我们可以清楚地看到 apollo-client 库已安装。
第 4 步 − 修改 index.js 文件中的 App 组件
对于简单的 React 应用程序,您只需将 index.js 保留在 src 文件夹中,将 index.html 保留在 public 文件夹中;所有其他自动生成的文件都可以删除。
目录结构如下 −
hello-world-client /
   -->node_modules
   -->public
      index.html
   -->src
      index.js
      students.js
   -->package.json
添加一个包含学生组件的附加文件 students.js。学生详细信息通过学生组件获取。在 App 组件中,我们使用 HashRouter。
以下是 React 应用程序中的 index.js −
import React, {Component} from 'react';
import ReactDOM from 'react-dom';
import {HashRouter, Route, Link} from 'react-router-dom'

//components
import Students from './students'
class App extends Component {
   render() {
      return(
         <div><h1>Home !!</h1>
         <h2>Welcome to React Application !! </h2>
         </div>
      )
   }
}

function getTime() {
   var d = new Date();
   return d.getHours()+":"+d.getMinutes()+":"+d.getSeconds()
}

const routes = <HashRouter>
   <div>
      <h4>Time from react app:{getTime()}</h4>
      <header>
         <h1>  <Link to="/">Home</Link>
         <Link to = "/students">Students</Link>  </h1>
      </header>
      <Route exact path = "/students" component = {Students}></Route>
      <Route exact path = "/" component = {App}></Route>
   </div>
</HashRouter>

ReactDOM.render(routes, document.querySelector("#root"))
第 5 步 − 在 Students.js 中编辑学生组件
在学生组件中,我们将使用以下两种方法来加载数据 −
获取 API (loadStudents_noCache) − 每次单击学生选项卡时,这将触发新请求。
Apollo 客户端 (loadWithApolloclient) − 这将从缓存中获取数据。
添加一个函数 loadWithApolloclient,该函数从服务器查询学生和时间。此函数将启用缓存。这里我们使用 gql 函数来解析查询。
async loadWithApolloclient() {
   const query = gql`{
      getTime
      students {
         id
         firstName
      }
   }`;

   const {data} = await  client.query({query})
   return data;
}
Fetch API 是一个用于获取资源的简单接口。与旧版 XMLHttpRequest 相比,Fetch 可以更轻松地发出 Web 请求并处理响应。以下方法显示了如何使用 fetch api 直接加载数据 −
async  loadStudents_noCache() {
      const response = await fetch('http://localhost:9000/graphql', {
      method:'POST',
      headers:{'content-type':'application/json'},
      body:JSON.stringify({query:`{
         getTime
         students {
            id
            firstName
         }
      }`})
   })

   const rsponseBody = await response.json();
   return rsponseBody.data;
}
在 StudentsComponent 的构造函数中,调用 loadWithApolloClient 方法。完整的 Student.js 文件如下 −
import React, {Component} from 'react';
import { Link} from 'react-router-dom'

//Apollo Client
import {ApolloClient, HttpLink, InMemoryCache} from 'apollo-boost'
import gql from 'graphql-tag'
const client = new ApolloClient({
   link: new HttpLink({uri:`http://localhost:9000/graphql`}),
   cache:new InMemoryCache()
})

class Students extends Component {
   constructor(props) {
      super(props);
      this.state = {
         students:[{id:1,firstName:'test'}],
         serverTime:''
      }
      this.loadWithApolloclient().then(data => {
         this.setState({
            students:data.students,
            serverTime:data.getTime
         })
      })
   }

   async  loadStudents_noCache() {
      const response = await fetch('http://localhost:9000/graphql', {
         method:'POST',
         headers:{'content-type':'application/json'},
         body:JSON.stringify({query:`{
            getTime
            students {
               id
               firstName
            }
         }`})
      })
      const rsponseBody =  await response.json();
      return rsponseBody.data;
   }

   async loadWithApolloclient() {
      console.log("inside apollo client function")
      const query = gql`{
         getTime
         students {
            id
            firstName
         }
      }`;
      const {data} = await  client.query({query})
      return data;
   }

   render() {
      return(
         <div>
            <h3>Time from GraphQL server :{this.state.serverTime}</h3>
            <p>Following Students Found </p>
            <div>
               <ul>
                  {
                     this.state.students.map(s => {
                        return(
                           <li key = {s.id}>
                              {s.firstName}
                           </li>
                        )
                     })
                  }
               </ul>
            </div>
         </div>
      )
   }
}
export default Students
第 6 步 − 使用 npm start
运行 React 应用程序您可以通过从主页选项卡切换到学生选项卡来测试 React 应用程序。一旦学生选项卡从服务器加载了数据。它将缓存数据。您可以通过多次从主页切换到学生选项卡来测试它。输出将如下所示 −
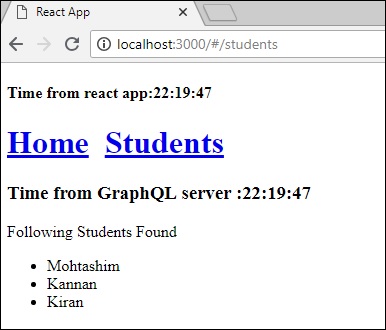
如果您首先通过输入 URL http://localhost:3000/#/students 加载了学生页面,您会发现 React 应用程序和 GraphQL 的加载时间大致相同。之后,如果您切换到主页视图并返回到 GraphQL 服务器,时间不会改变。这表明数据已缓存。
第 7 步 − 将 loadWithApolloclient 调用更改为 loadStudents_noCache
如果在 StudentComponent 的构造函数中将 load 方法更改为 loadStudents_noCache,则输出将不会缓存数据。这显示了缓存和非缓存之间的区别。
this.loadStudents_noCache().then(data => {
   this.setState({
      students:data.students,
      serverTime:data.getTime
   })
})
从上面的输出可以清楚地看出,如果您在选项卡之间来回切换,来自 graphql 服务器的时间将始终是最新的,这意味着数据不会被缓存。


