Angular 8 - 服务和依赖注入
如前所述,服务在 Angular 应用程序中提供特定功能。 在给定的 Angular 应用程序中,可能可以使用一项或多项服务。 同样,Angular 组件可能依赖于一项或多项服务。
此外,Angular 服务可能依赖于其他服务才能正常工作。 依赖关系解析是开发任何应用程序时复杂且耗时的活动之一。 为了降低复杂性,Angular 提供了依赖注入模式作为核心概念之一。
本章让我们学习如何在 Angular 应用程序中使用依赖注入。
创建 Angular 服务
Angular 服务是普通的 Typescript 类,具有一个或多个方法(功能)以及 @Injectable 装饰器。 它使普通的 Typescript 类能够在 Angular 应用程序中用作服务。
import { Injectable } from '@angular/core'; @Injectable()
export class DebugService {
   constructor() { }
}
这里,@Injectable 装饰器将普通的 Typescript 类转换为 Angular 服务。
注册 Angular 服务
要使用依赖注入,每个服务都需要注册到系统中。 Angular 提供了多种注册服务的选项。 它们如下 −
- ModuleInjector @ root level
- ModuleInjector @ platform level
- ElementInjector using providers meta data
- ElementInjector using viewProviders meta data
- NullInjector
ModuleInjector @ root
ModuleInjector 强制该服务仅在特定模块内使用。 必须使用 @Injectable 中可用的 ProvidedIn 元数据来指定可以使用该服务的模块。
该值应引用已注册的 Angular 模块(用 @NgModule 装饰)。 root 是一个特殊选项,它指的是应用程序的根模块。 示例代码如下 −
import { Injectable } from '@angular/core'; @Injectable({
   providedIn: 'root',
})
export class DebugService {
   constructor() { }
}
ModuleInjector @ platform
Platform Injector比ModuleInject高一级,仅在高级且罕见的情况下使用。 每个 Angular 应用程序都通过执行 PreformBrowserDynamic().bootstrap 方法(参见 main.js)开始,该方法负责引导 Angular 应用程序的根模块。
PreformBrowserDynamic() 方法创建由 PlatformModule 配置的注入器。 我们可以使用PlatformModule提供的platformBrowser()方法来配置平台级服务。
NullInjector
NullInjector 比平台级别 ModuleInjector 高一级,并且位于层次结构的顶层。 我们无法在 NullInjector 中注册任何服务。 当在层次结构中的任何位置都找不到所需的服务时,它会解决并简单地抛出错误。
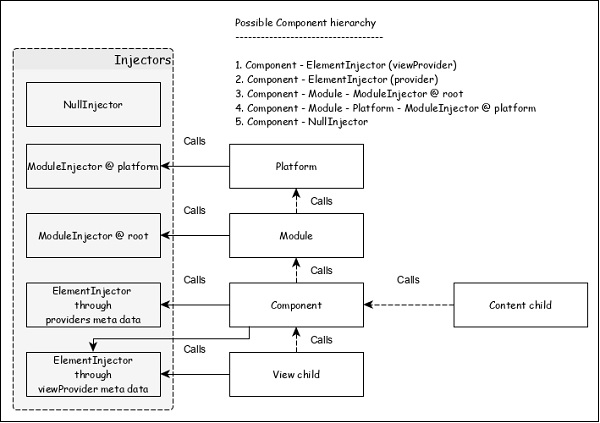
ElementInjector using providers
ElementInjector 强制该服务仅在某些特定组件内使用。 @Component 装饰器中提供的提供者和 ViewProviders 元数据用于指定特定组件可见的服务列表。 使用provider的示例代码如下 −
ExpenseEntryListComponent
// import statement
import { DebugService } from '../debug.service';
// component decorator
@Component({
   selector: 'app-expense-entry-list',
   templateUrl: './expense-entry-list.component.html',
   styleUrls: ['./expense-entry-list.component.css'],
   providers: [DebugService] })
此处,DebugService 仅在 ExpenseEntryListComponent 及其视图内可用。 要在其他组件中创建 DebugService,只需在必要的组件中使用 providers 装饰器即可。
使用 viewProvider 的 ElementInjector
viewProviders 与 provider 类似,但它不允许在使用 ng-content 指令创建的组件内容内使用该服务。
ExpenseEntryListComponent
// import statement
import { DebugService } from '../debug.service';
// component decorator
@Component({
   selector: 'app-expense-entry-list',
   templateUrl: './expense-entry-list.component.html',
   styleUrls: ['./expense-entry-list.component.css'], viewProviders: [DebugService]
})
父组件可以通过其视图或内容使用子组件。 下面提到了具有子视图和内容视图的父组件的示例 −
Parent 父组件视图/模板
<div>
   child template in view
   <child></child>
</div>
<ng-content></ng-content>
child 子组件视图/模板
<div>
   child template in view
</div>
模板中父组件的使用(另一个组件)
<parent>
   <!-- child template in content -->
   <child></child>
</parent>
这里,
- child 子组件在两个地方使用。 一个在父组件的视图内。 另一个在父组件的内容中。
- 服务在 child 子组件中可用,该子组件放置在父组件的视图内。
- 服务在 child 子组件中不可用,该子组件放置在父组件的内容中。
解决 Angular 服务
让我们看看组件如何使用下面的流程图解析服务。
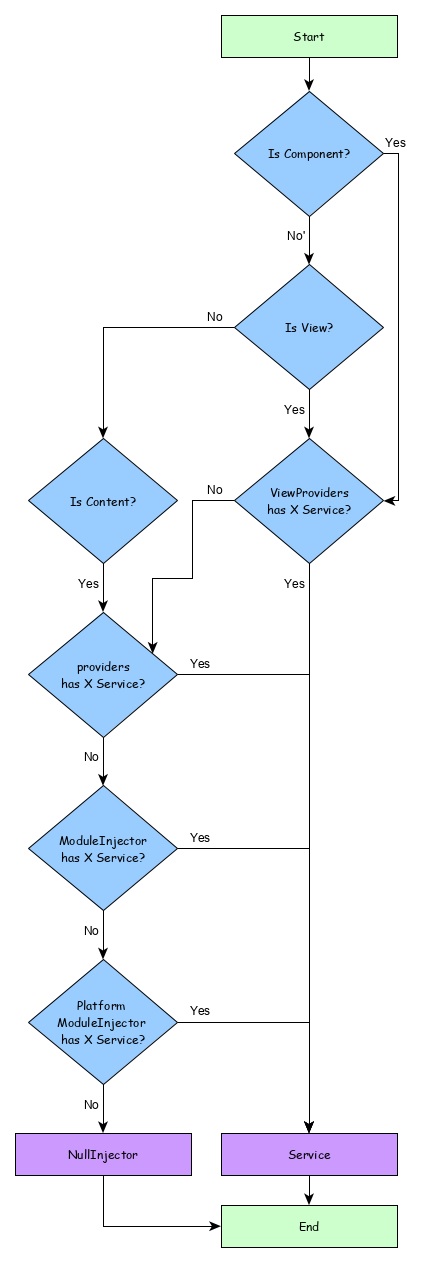
这里,
- 首先,组件尝试查找使用 viewProviders 元数据注册的服务。
- 如果未找到,组件会尝试查找使用providers元数据注册的服务。
- 如果没有找到,组件会尝试查找使用 ModuleInjector 注册的服务
- 如果没有找到,组件会尝试查找使用 PlatformInjector 注册的服务
- 如果没有找到,组件会尝试查找使用NullInjector注册的服务,这总是会抛出错误。
注入器的层次结构以及解析服务的工作流程如下−
Resolution Modifier
正如我们在上一章中了解到的,服务的解析从组件开始,并在找到服务或到达 NUllInjector 时停止。 这是默认分辨率,可以使用Resolution Modifier进行更改。 它们如下所示 −
Self()
Self() 启动和停止在当前 ElementInjector 本身中搜索服务。
import { Self } from '@angular/core';
constructor(@Self() public debugService: DebugService) {}
SkipSelf()
SkipSelf() 与 Self() 正好相反。 它会跳过当前的 ElementInjector 并开始从其父 ElementInjector 搜索服务。
import { SkipSelf } from '@angular/core';
constructor(@SkipSelf() public debugService: DebugService) {}
Host()
Host() 停止在其主机 ElementInjector 中搜索服务。 即使服务在更高级别可用,它也会在主机处停止。
import { Host } from '@angular/core';
constructor(@Host() public debugService: DebugService) {}
Optional()
当搜索服务失败时,Optional() 不会抛出错误。
import { Optional } from '@angular/core';
constructor(@Optional() private debugService?: DebugService) {
   if (this.debugService) {
      this.debugService.info("Debugger initialized");
   }
}
依赖注入器提供程序
依赖注入器提供程序有两个目的。 首先,它有助于为要注册的服务设置令牌。 该令牌将用于引用和调用服务。 其次,它有助于根据给定的配置创建服务。
如前所述,最简单的提供程序如下 −
providers: [ DebugService ]
这里,DebugService 既是令牌也是类,必须使用它来创建服务对象。 Provider的实际形式如下 −
providers: [ { provides: DebugService, useClass: DebugService }]
这里,provides是令牌,useClass是创建服务对象的类引用。
Angular 提供了更多的提供者,它们如下 −
Aliased class providers
提供者的目的是重用现有的服务。
providers: [ DebugService,
   { provides: AnotherDebugService, userClass: DebugService }]
此处,只会创建一个 DebugService 服务实例。
Value 值提供者
Value 值提供者的目的是提供值本身,而不是要求 DI 创建服务对象的实例。 它也可以使用现有的对象。 唯一的限制是对象应该采用引用服务的形式。
export class MyCustomService {
   name = "My Custom Service"
}
[{ provide: MyService, useValue: { name: 'instance of MyCustomService' }]
这里,DI 提供者只是返回 useValue 选项中设置的实例,而不是创建新的服务对象。
非类依赖提供者
它允许在 Angular DI 中使用字符串、函数或对象。
让我们看一个简单的例子。
// Create the injectable token
import { InjectionToken } from '@angular/core';
export const APP_CONFIG = new InjectionToken<AppConfig>('app.config');
// Create value
export const MY_CONFIG: AppConfig = {
   title: 'Dependency Injection'
};
// congfigure providers
providers: [{ provide: APP_CONFIG, useValue: HERO_DI_CONFIG }]
// inject the service
constructor(@Inject(APP_CONFIG) config: AppConfig) {
Factory 工厂提供商
工厂提供者支持复杂的服务创建。 它将对象的创建委托给外部函数。 工厂提供者也可以选择设置工厂对象的依赖关系。
{ provide: MyService, useFactory: myServiceFactory, deps: [DebugService] };
这里,myServiceFactory返回MyService的实例。
Angular 服务使用
现在,我们知道如何创建和注册 Angular 服务了。 让我们看看如何在组件内使用 Angular 服务。 使用 Angular 服务就像将构造函数的参数类型设置为服务提供者的令牌一样简单。
export class ExpenseEntryListComponent implements OnInit {
   title = 'Expense List';
   constructor(private debugService : DebugService) {}
   ngOnInit() {
      this.debugService.info("Angular Application starts");
   }
}
这里,
ExpenseEntryListComponent 构造函数设置 DebugService 类型的参数。
Angular 依赖注入器 (DI) 将尝试查找在应用程序中注册的 DebugService 类型的任何服务。 如果找到,它将把 DebugService 的实例设置为 ExpenseEntryListComponent 组件。 如果没有找到,就会抛出错误。
添加 debug 调试服务
让我们添加一个简单的debug调试服务,它将帮助我们在应用程序开发过程中打印调试信息。
打开命令提示符并转到项目根文件夹。
cd /go/to/expense-manager
启动应用程序。
ng serve
运行以下命令生成 Angular 服务 DebugService。
ng g service debug
这将创建两个 Typescript 文件(调试服务及其测试),如下所示−
CREATE src/app/debug.service.spec.ts (328 bytes)
CREATE src/app/debug.service.ts (134 bytes)
让我们分析一下DebugService服务的内容。
import { Injectable } from '@angular/core'; @Injectable({
   providedIn: 'root'
})
export class DebugService {
   constructor() { }
}
这里,
@Injectable 装饰器附加到 DebugService 类,这使得 DebugService 能够在应用程序的 Angular 组件中使用。
providerIn 选项及其值,root 使 DebugService 能够在应用程序的所有组件中使用。
让我们添加一个方法 Info,它将把消息打印到浏览器控制台中。
info(message : String) : void {
   console.log(message);
}
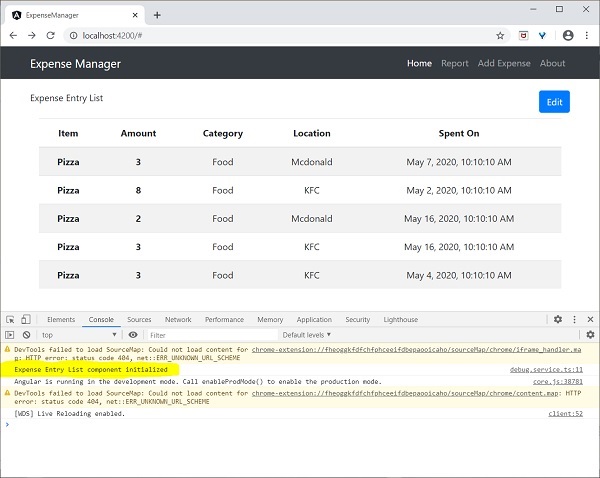
让我们初始化 ExpenseEntryListComponent 中的服务并使用它来打印消息。
import { Component, OnInit } from '@angular/core'; import { ExpenseEntry } from '../expense-entry'; import { DebugService } from '../debug.service'; @Component({
   selector: 'app-expense-entry-list',
   templateUrl: './expense-entry-list.component.html', styleUrls: ['./expense-entry-list.component.css']
})
export class ExpenseEntryListComponent implements OnInit {
   title: string;
   expenseEntries: ExpenseEntry[];
   constructor(private debugService: DebugService) { }
   ngOnInit() {
      this.debugService.info("Expense Entry List
      component initialized");
      this.title = "Expense Entry List";
      this.expenseEntries = this.getExpenseEntries();
   }
   // other coding
}
这里,
DebugService 使用构造函数参数进行初始化。 设置 DebugService 类型的参数 (debugService) 将触发依赖注入来创建新的 DebugService 对象并将其设置到 ExpenseEntryListComponent 组件中。
在ngOnInit方法中调用DebugService的info方法,将消息打印到浏览器控制台中。
结果可以使用开发者工具查看,看起来类似如下所示 −
让我们扩展应用程序以了解服务的范围。
让我们使用下面提到的命令创建一个DebugComponent。
ng generate component debug
CREATE src/app/debug/debug.component.html (20 bytes) CREATE src/app/debug/debug.component.spec.ts (621 bytes)
CREATE src/app/debug/debug.component.ts (265 bytes) CREATE src/app/debug/debug.component.css (0 bytes) UPDATE src/app/app.module.ts (392 bytes)
让我们删除根模块中的 DebugService。
// src/app/debug.service.ts
import { Injectable } from '@angular/core'; @Injectable()
export class DebugService {
   constructor() {
   }
   info(message : String) : void {
      console.log(message);
   }
}
在ExpenseEntryListComponent组件下注册DebugService。
// src/app/expense-entry-list/expense-entry-list.component.ts @Component({
   selector: 'app-expense-entry-list',
   templateUrl: './expense-entry-list.component.html',
   styleUrls: ['./expense-entry-list.component.css']
   providers: [DebugService]
})
在这里,我们使用提供者元数据(ElementInjector)来注册服务。
打开 DebugComponent (src/app/debug/debug.component.ts) 并导入 DebugService 并在组件的构造函数中设置一个实例。
import { Component, OnInit } from '@angular/core'; import { DebugService } from '../debug.service';
@Component({
   selector: 'app-debug',
   templateUrl: './debug.component.html',
   styleUrls: ['./debug.component.css']
})
export class DebugComponent implements OnInit {
   constructor(private debugService: DebugService) { }
   ngOnInit() {
      this.debugService.info("Debug component gets service from Parent");
   }
}
这里,我们还没有注册DebugService。 因此,如果用作父组件,则 DebugService 将不可用。 当在父组件内部使用时,如果父组件有权访问该服务,则可以从父组件获取该服务。
打开 ExpenseEntryListComponent 模板 (src/app/expense-entry-list/expense-entry-list.component.html) 并包含内容部分,如下所示:
// existing content
<app-debug></app-debug>
<ng-content></ng-content>
在这里,我们包含了内容部分和 DebugComponent 部分。
让我们将调试组件作为内容包含在 AppComponent 模板的 ExpenseEntryListComponent 组件中。 打开 AppComponent 模板并更改 app-expense-entry-list 如下 −
// navigation code
<app-expense-entry-list>
<app-debug></app-debug>
</app-expense-entry-list>
在这里,我们将 DebugComponent 作为内容包含在内。
让我们检查应用程序,它将在页面末尾显示 DebugService 模板,如下所示 −
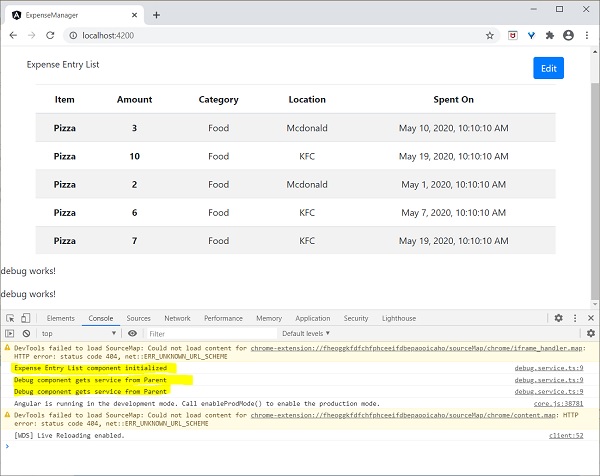
此外,我们还可以在控制台中的调试组件中看到两条调试信息。 这表明调试组件从其父组件获取服务。
让我们更改服务在 ExpenseEntryListComponent 中的注入方式以及它如何影响服务的范围。 将提供程序注入器更改为 viewProviders 注入。 viewProviders 不会将服务注入到内容子项中,因此它应该失败。
viewProviders: [DebugService]
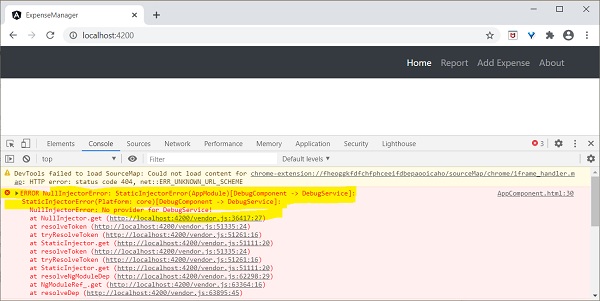
检查应用程序,您将看到调试组件之一(用作内容子组件)抛出错误,如下所示−
让我们删除模板中的调试组件并恢复应用程序。
打开ExpenseEntryListComponent模板(src/app/expense-entry-list/expense-entry-list.component.html)并删除以下内容
<app-debug></app-debug>
<ng-content></ng-content>
打开AppComponent模板并更改app-expense-entry-list如下 −
// navigation code
<app-expense-entry-list>
</app-expense-entry-list>
将 ExpenseEntryListComponent 中的 viewProviders 设置更改为 providers。
providers: [DebugService]
重新运行应用程序并检查结果。


