使用 ELK 和 Sleuth 进行分布式日志记录
简介
在分布式环境或单体环境中,每当出现问题时,应用程序日志对于调试非常重要。 在本节中,我们将了解如何有效地记录和提高可追溯性,以便我们可以轻松查看日志。
日志记录模式对日志记录至关重要的两个主要原因 −
服务间调用 − 在微服务架构中,我们在服务之间进行异步和同步调用。 链接这些请求非常关键,因为单个请求可以有多个嵌套级别。
服务内调用 − 单个服务会收到多个请求,并且它们的日志很容易混合在一起。 这就是为什么拥有与请求相关联的一些 ID 对于过滤请求的所有日志变得很重要的原因。
Sleuth 是用于登录应用程序的著名工具,而 ELK 用于更简单地观察整个系统。
依赖设置
让我们使用我们在每一章中都使用过的餐厅案例。 因此,假设我们的客户服务和餐厅服务通过 API 进行通信,即同步通信。 我们希望使用 Sleuth 来跟踪请求,并使用 ELK 堆栈进行集中可视化。
为此,首先设置 ELK 堆栈。 为此,首先,我们将设置 ELK 堆栈。 我们将使用 Docker 容器启动 ELK 堆栈。 以下是我们可以考虑的图像 −
完成 ELK 设置后,通过点击以下 API 确保它按预期工作 −
Elasticsearch − localhost:9200
Kibana − localhost:5601
我们将在本节末尾查看 logstash 配置文件。
然后,让我们将以下依赖项添加到我们的 Customer Service 和 Restaurant Service −
<dependency>
      <groupId>org.springframework.cloud</groupId>
      <artifactId>spring-cloud-starter-sleuth</artifactId>
</dependency>
现在我们已经设置了依赖项并运行了 ELK,让我们转到核心示例。
服务内的请求跟踪
在一个非常基本的层面上,以下是 Sleuth 添加的元数据 −
Service name − 当前处理请求的服务。
Trace Id − 元数据 ID 被添加到日志中,该 ID 跨服务发送以处理输入请求。 这对于将处理一个输入请求的所有内部请求进行分组的服务间通信很有用。
Span Id − 将元数据 ID 添加到日志中,该 ID 在服务记录的用于处理请求的所有日志语句中都是相同的。 它对于服务内日志很有用。 请注意,父服务的 Span ID = Trace Id。
让我们看看这一点。 为此,让我们更新我们的客户服务代码以包含日志行。 这是我们将使用的控制器代码。
package com.tutorialspoint;
import java.util.HashMap;
import org.slf4j.Logger;
import org.slf4j.LoggerFactory;
import org.springframework.beans.factory.annotation.Autowired;
import org.springframework.messaging.Message;
import org.springframework.web.bind.annotation.PathVariable;
import org.springframework.web.bind.annotation.RequestMapping;
import org.springframework.web.bind.annotation.RequestMethod;
import org.springframework.web.bind.annotation.RestController;
@RestController
class RestaurantCustomerInstancesController {
   Logger logger =
LoggerFactory.getLogger(RestaurantCustomerInstancesController.class);
   static HashMap<Long, Customer> mockCustomerData = new HashMap();
   static{
      mockCustomerData.put(1L, new Customer(1, "Jane", "DC"));
      mockCustomerData.put(2L, new Customer(2, "John", "SFO"));
      mockCustomerData.put(3L, new Customer(3, "Kate", "NY"));
   }
   @RequestMapping("/customer/{id}")
   public Customer getCustomerInfo(@PathVariable("id") Long id) {
      logger.info("Querying customer with id: " + id);
      Customer customer = mockCustomerData.get(id);
      if(customer != null) {
         logger.info("Found Customer: " + customer);
      }
      return customer;
   }
}
现在让我们执行代码,像往常一样启动 Eureka Server。 请注意,这不是硬性要求,为了完整起见,此处提供。
然后,让我们使用以下命令编译并开始更新客户服务 −
mvn clean install ; java -Dapp_port=8083 -jar .\target\spring-cloud-eurekaclient-
1.0.jar
我们已经准备好了,现在让我们通过点击 API 来测试我们的代码片段 −
curl -X GET http://localhost:8083/customer/1
这是我们将为此 API 获得的输出 −
{
   "id": 1,
   "name": "Jane",
   "city": "DC"
}
现在让我们检查一下客户服务的日志 −
2021-03-23 13:46:59.604 INFO [customerservice,
b63d4d0c733cc675,b63d4d0c733cc675] 11860 --- [nio-8083-exec-7]
.t.RestaurantCustomerInstancesController : Querying customer with id: 1
2021-03-23 13:46:59.605 INFO [customerservice,
b63d4d0c733cc675,b63d4d0c733cc675] 11860 --- [nio-8083-exec-7]
.t.RestaurantCustomerInstancesController : Found Customer: Customer [id=1,
name=Jane, city=DC]
…..
因此,正如我们所见,我们将服务名称、跟踪 ID 和跨度 ID 添加到日志语句中。
跨服务请求跟踪
让我们看看如何跨服务进行日志记录和跟踪。 因此,例如,我们要做的是使用内部调用客户服务的餐厅服务。
为此,让我们更新我们的餐厅服务代码以包含日志行。 这是我们将使用的控制器代码。
package com.tutorialspoint;
import java.util.HashMap;
import java.util.List;
import java.util.function.Consumer;
import java.util.function.Supplier;
import java.util.stream.Collectors;
import org.slf4j.Logger;
import org.slf4j.LoggerFactory;
import org.springframework.beans.factory.annotation.Autowired;
import org.springframework.context.annotation.Bean;
import org.springframework.web.bind.annotation.PathVariable;
import org.springframework.web.bind.annotation.RequestMapping;
import org.springframework.web.bind.annotation.RestController;
@RestController
class RestaurantController {
   @Autowired
   CustomerService customerService;
   Logger logger = LoggerFactory.getLogger(RestaurantController.class);
   static HashMap<Long, Restaurant> mockRestaurantData = new HashMap();
   static{
      mockRestaurantData.put(1L, new Restaurant(1, "Pandas", "DC"));
      mockRestaurantData.put(2L, new Restaurant(2, "Indies", "SFO"));
      mockRestaurantData.put(3L, new Restaurant(3, "Little Italy", "DC"));
      mockRestaurantData.put(4L, new Restaurant(4, "Pizeeria", "NY"));
   }
   @RequestMapping("/restaurant/customer/{id}")
   public List<Restaurant> getRestaurantForCustomer(@PathVariable("id") Long id) {
      logger.info("Get Customer from Customer Service with customer id: " + id);
      Customer customer = customerService.getCustomerById(id);
      logger.info("Found following customer: " + customer);
      String customerCity = customer.getCity();
      return mockRestaurantData.entrySet().stream().filter(
      entry -> entry.getValue().getCity().equals(customerCity))
      .map(entry -> entry.getValue())
      .collect(Collectors.toList());
   }
}
让我们使用以下命令编译并开始更新餐厅服务 −
mvn clean install; java -Dapp_port=8082 -jar .\target\spring-cloud-feign-client-1.0.jar
确保我们有 Eureka 服务器和客户服务正在运行。 我们已经准备好了,现在让我们通过点击 API 来测试我们的代码片段 −
curl -X GET http://localhost:8082/restaurant/customer/2
这是我们将为此 API 获得的输出 −
[
   {
      "id": 2,
      "name": "Indies",
      "city": "SFO"
   }
]
现在,让我们检查一下餐厅服务的日志 −
2021-03-23 14:44:29.381 INFO [restaurantservice,
6e0c5b2a4fc533f8,6e0c5b2a4fc533f8] 19600 --- [nio-8082-exec-6]
com.tutorialspoint.RestaurantController : Get Customer from Customer Service
with customer id: 2
2021-03-23 14:44:29.400 INFO [restaurantservice,
6e0c5b2a4fc533f8,6e0c5b2a4fc533f8] 19600 --- [nio-8082-exec-6]
com.tutorialspoint.RestaurantController : Found following customer: Customer
[id=2, name=John, city=SFO]
然后,让我们检查一下客户服务的日志 −
2021-03-23 14:44:29.392 INFO [customerservice,
6e0c5b2a4fc533f8,f2806826ac76d816] 11860 --- [io-8083-exec-10]
.t.RestaurantCustomerInstancesController : Querying customer with id: 2
2021-03-23 14:44:29.392 INFO [customerservice,
6e0c5b2a4fc533f8,f2806826ac76d816] 11860 --- [io-8083-exec-10]
.t.RestaurantCustomerInstancesController : Found Customer: Customer [id=2,
name=John, city=SFO]…..
因此,正如我们所见,我们将服务名称、跟踪 ID 和跨度 ID 添加到日志语句中。 另外,我们看到跟踪 ID,即 6e0c5b2a4fc533f8 在客户服务和餐厅服务中重复出现。
使用 ELK 进行集中式日志记录
到目前为止,我们看到的是一种通过 Sleuth 提高我们的日志记录和跟踪能力的方法。 但是,在微服务架构中,我们有多个服务在运行,并且每个服务的多个实例都在运行。 查看每个实例的日志来识别请求流是不切实际的。 这就是 ELK 帮助我们的地方。
让我们使用与 Sleuth 相同的服务间通信案例。 让我们更新我们的 Restaurant 和客户 Customer,为 ELK 堆栈添加 logback appenders。
在继续之前,请确保已设置 ELK 堆栈并且 Kibana 可通过 localhost:5601 访问。 此外,使用以下设置配置 Lostash 配置 −
input {
   tcp {
      port => 8089
      codec => json
   }
}
output {
   elasticsearch {
      index => "restaurant"
      hosts => ["http://localhost:9200"]
   }
}
完成此操作后,我们需要执行两个步骤才能在 Spring 应用程序中使用 logstash。 我们将为我们的两种服务执行以下步骤。 首先,为 logback 添加一个依赖项,以便为 Logstash 使用 appender。
<dependency>
<groupId>net.logstash.logback</groupId>
   <artifactId>logstash-logback-encoder</artifactId>
   <version>6.6</version>
</dependency>
其次,为 logback 添加一个 appender,以便 logback 可以使用这个 appender 将数据发送到 Logstash
<?xml version="1.0" encoding="UTF-8"?>
<configuration>
   <appender name="logStash"
class="net.logstash.logback.appender.LogstashTcpSocketAppender">
      <destination>10.24.220.239:8089</destination>
      <encoder class="net.logstash.logback.encoder.LogstashEncoder" />
   </appender>
   <appender name="console" class="ch.qos.logback.core.ConsoleAppender">
      <encoder>
         <pattern>%d{HH:mm:ss.SSS} [%thread] %-5level %logger{36} -
%msg%n</pattern>
      </encoder>
   </appender>
   <root level="INFO">
      <appender-ref ref="logStash" />
      <appender-ref ref="console" />
   </root>
</configuration>
上面的 appender 将记录到控制台以及将日志发送到logstash。 现在已经完成了,我们都准备好测试了。
现在,让我们像往常一样执行上面的代码,启动 Eureka Server。
然后,让我们使用以下命令编译并开始更新客户服务 −
mvn clean install ; java -Dapp_port=8083 -jar .\target\spring-cloud-eurekaclient- 1.0.jar
然后,让我们使用以下命令编译并开始更新餐厅服务 −
mvn clean install; java -Dapp_port=8082 -jar .\target\spring-cloud-feign-client- 1.0.jar
我们已经准备好了,现在让我们通过点击 API 来测试我们的代码片段 −
curl -X GET http://localhost:8082/restaurant/customer/2
这是我们将为此 API 获得的输出 −
[
   {
      "id": 2,
      "name": "Indies",
      "city": "SFO"
   }
]
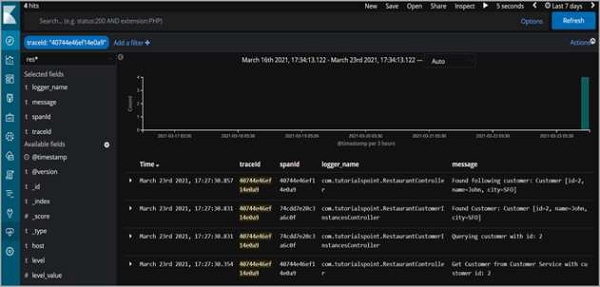
但更重要的是,日志语句也可以在 Kibana 上使用。

因此,正如我们所看到的,我们可以过滤 traceId 并查看为满足请求而记录的跨服务的所有日志语句。


