AWT GridBagLayout 类
简介
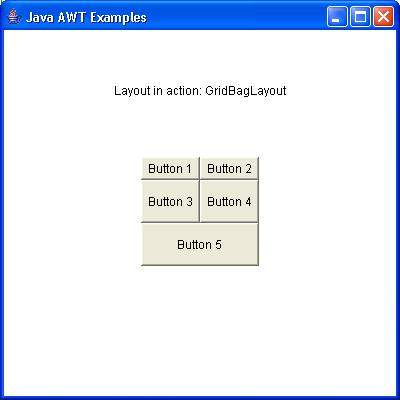
类 GridBagLayout 以水平和垂直方式排列组件。
类声明
以下是 java.awt.GridBagLayout 类的声明:
public class GridBagLayout
    extends Object
        implements LayoutManager2, Serializable
字段
以下是 java.awt.BorderLayout 类的字段:
double[] columnWeights -- 此字段保存对列权重的覆盖。
int[] columnWidths -- 此字段保存对列最小宽度的覆盖。
protected Hashtable comptable -- 此哈希表维护组件与其网格包约束之间的关联。
protected GridBagConstraints defaultConstraints -- 此字段保存包含默认值的网格包约束实例,因此如果组件没有与之关联的网格包约束,则将为该组件分配 defaultConstraints 的副本。
protected java.awt.GridBagLayoutInfo layoutInfo -- 此字段保存网格包的布局信息。
protected static int MAXGRIDSIZE -- 网格包可以布置的最大网格位置数(水平和垂直)布局。
protected static int MINSIZE -- 网格包布局可以布局的最小网格。
protected static int PREFERREDSIZE -- 网格包布局可以布局的首选网格大小。
int[] rowHeights -- 此字段保存对行最小高度的覆盖。
double[] rowWeights -- 此字段保存对行权重的覆盖。
类构造函数
| S.N. | 构造函数 &描述 |
|---|---|
| 1 | GridBagLayout()
创建一个网格包布局管理器。 |
类方法
| S.N. | 方法 &描述 |
|---|---|
| 1 | void addLayoutComponent(Component comp, Object Constraints) 使用指定的约束对象将指定的组件添加到布局中。 |
| 2 | void addLayoutComponent(String name, Component comp) 将具有指定名称的指定组件添加到布局中。 |
| 3 | protected void adjustForGravity(GridBagConstraints Constraints, Rectangle r) 根据约束几何和焊盘将 x、y、宽度和高度字段调整为正确的值。 |
| 4 | protected void AdjustForGravity(GridBagConstraints 约束,Rectangle r) 此方法已过时,仅用于向后兼容;新代码应改为调用 adjustForGravity。 |
| 5 | protected void arrangeGrid(Container parent) 布置网格。 |
| 6 | protected void ArrangeGrid(Container parent) 此方法已过时,仅用于向后兼容;新代码应改为调用arrangeGrid。 |
| 7 | GridBagConstraints getConstraints(Component comp) 获取指定组件的约束。 |
| 8 | float getLayoutAlignmentX(Container parent) 返回沿x轴的对齐方式。 |
| 9 | float getLayoutAlignmentY(Container parent) 返回沿y轴的对齐方式。 |
| 10 | int[][] getLayoutDimensions() 确定布局的列宽和行高网格。 |
| 11 | protected java.awt.GridBagLayoutInfo getLayoutInfo(Container parent, int sizeflag) 为当前管理的子项集填充 GridBagLayoutInfo 实例。 |
| 12 | protected java.awt.GridBagLayoutInfo GetLayoutInfo(Container parent, int sizeflag) 此方法已过时,仅为向后兼容而提供;新代码应改为调用 getLayoutInfo。 |
| 13 | Point getLayoutOrigin() 确定布局区域的原点,在目标容器的图形坐标空间中。 |
| 14 | double[][] getLayoutWeights() 确定布局网格的列和行的权重。 |
| 15 | protected Dimension getMinSize(Container parent, java.awt.GridBagLayoutInfo info) 根据以下信息确定主控件的最小尺寸getLayoutInfo()。 |
| 16 | protected Dimension GetMinSize(Container parent, java.awt.GridBagLayoutInfo info) 此方法已过时,仅用于向后兼容;新代码应改为调用 getMinSize。 |
| 17 | void invalidateLayout(Container target) 使布局无效,表示如果布局管理器已缓存信息,则应将其丢弃。 |
| 18 | void layoutContainer(Container parent) 使用此网格包布局对指定容器进行布局。 |
| 19 | Point location(int x, int y) 确定布局网格中的哪个单元格包含 (x, y) 指定的点。 |
| 20 | protected GridBagConstraints lookupConstraints(Component comp) 检索指定组件的约束。 |
| 21 | Dimension maximumLayoutSize(Container target) 根据指定目标容器中的组件,返回此布局的最大尺寸。 |
| 22 | Dimension minimumLayoutSize(Container parent) 使用此网格包布局确定父容器的最小尺寸。 |
| 23 | Dimension preferredLayoutSize(Container parent) 使用此网格包确定父容器的首选尺寸布局。 |
| 24 | void removeLayoutComponent(Component comp) 从此布局中移除指定组件。 |
| 25 | void setConstraints(Component comp, GridBagConstraints Constraints) 设置此布局中指定组件的约束。 |
| 26 | String toString() 返回此网格包布局值的字符串表示形式。 |
继承的方法
此类从以下类继承方法:
java.lang.Object
GridBagLayout 示例
使用您选择的任何编辑器在 D:/ > AWT > com > tutorialspoint > gui > 中创建以下 Java 程序
AwtLayoutDemo.java
package com.tutorialspoint.gui;

import java.awt.*;
import java.awt.event.*;

public class AwtLayoutDemo {
   private Frame mainFrame;
   private Label headerLabel;
   private Label statusLabel;
   private Panel controlPanel;
   private Label msglabel;

   public AwtLayoutDemo(){
      prepareGUI();
   }

   public static void main(String[] args){
      AwtLayoutDemo  awtLayoutDemo = new AwtLayoutDemo();
      awtLayoutDemo.showGridBagLayoutDemo();
   }

   private void prepareGUI(){
      mainFrame = new Frame("Java AWT Examples");
      mainFrame.setSize(400,400);
      mainFrame.setLayout(new GridLayout(3, 1));
      mainFrame.addWindowListener(new WindowAdapter() {
         public void windowClosing(WindowEvent windowEvent){
            System.exit(0);
         }
      });
      headerLabel = new Label();
      headerLabel.setAlignment(Label.CENTER);
      statusLabel = new Label();
      statusLabel.setAlignment(Label.CENTER);
      statusLabel.setSize(350,100);

      msglabel = new Label();
      msglabel.setAlignment(Label.CENTER);
      msglabel.setText("Welcome to TutorialsPoint AWT Tutorial.");

      controlPanel = new Panel();
      controlPanel.setLayout(new FlowLayout());

      mainFrame.add(headerLabel);
      mainFrame.add(controlPanel);
      mainFrame.add(statusLabel);
      mainFrame.setVisible(true);
   }

   private void showGridBagLayoutDemo(){
      headerLabel.setText("Layout in action: GridBagLayout");

      Panel panel = new Panel();
      panel.setBackground(Color.darkGray);
      panel.setSize(300,300);
      GridBagLayout layout = new GridBagLayout();

      panel.setLayout(layout);
      GridBagConstraints gbc = new GridBagConstraints();

      gbc.fill = GridBagConstraints.HORIZONTAL;
      gbc.gridx = 0;
      gbc.gridy = 0;
      panel.add(new Button("Button 1"),gbc);

      gbc.gridx = 1;
      gbc.gridy = 0;
      panel.add(new Button("Button 2"),gbc);

      gbc.fill = GridBagConstraints.HORIZONTAL;
      gbc.ipady = 20;
      gbc.gridx = 0;
      gbc.gridy = 1;
      panel.add(new Button("Button 3"),gbc);

      gbc.gridx = 1;
      gbc.gridy = 1;
      panel.add(new Button("Button 4"),gbc);

      gbc.gridx = 0;
      gbc.gridy = 2;
      gbc.fill = GridBagConstraints.HORIZONTAL;
      gbc.gridwidth = 2;
      panel.add(new Button("Button 5"),gbc);

      controlPanel.add(panel);

      mainFrame.setVisible(true);
   }
}
使用命令提示符编译程序。转到 D:/ > AWT 并键入以下命令。
D:\AWT>javac com utorialspoint\gui\AwtlayoutDemo.java
如果没有错误,则表示编译成功。使用以下命令运行程序。
D:\AWT>java com.tutorialspoint.gui.AwtlayoutDemo
验证以下输出
 awt_layouts.html

