Requests - 快速指南
Requests - 概述
Requests 是一个 HTTP 库,它提供了简单的功能来处理 Web 应用程序中的 http 请求/响应。该库是用 Python 开发的。
Python Requests 的官方网站位于 https://2.python-requests.org/en/master/,其对 Requests 的定义如下 −
Requests 是一个优雅而简单的 Python HTTP 库,专为人类而构建。
Requests 的功能
下面讨论了 Requests 的功能 −
Request
python 请求库具有易于使用的方法来处理 Http 请求。传递参数和处理请求类型(如 GET、POST、PUT、DELETE 等)非常容易。
响应
您可以以所需的格式获取响应,支持的格式包括文本格式、二进制响应、json 响应和原始响应。
标头
该库允许您根据需要读取、更新或发送新标头。
超时
使用 python 请求库可以轻松将超时添加到您正在请求的 URL。碰巧您正在使用第三方 URL 并等待响应。
在 URL 上设置超时始终是一个好习惯,因为我们可能希望 URL 在超时内响应,或者由于超时而出现错误。不这样做可能会导致无限期地等待该请求。
错误处理
请求模块支持错误处理,其中包括连接错误、超时错误、TooManyRedirects、Response.raise_for_status 错误等。
Cookies
该库允许您读取、写入和更新请求的 URL。
会话
要维护数据,您需要在请求之间进行会话。因此,如果一次又一次地调用同一主机,您可以重新使用 TCP 连接,从而提高性能。
SSL 证书
SSL 证书是安全 URL 附带的安全功能。当您使用请求时,它还会验证给定的 https URL 的 SSL 证书。 SSL 验证在请求库中默认启用,如果证书不存在,则会抛出错误。
身份验证
HTTP 身份验证是在服务器端进行的,当客户端请求 URL 时,要求提供一些身份验证信息,如用户名、密码。这是客户端和服务器之间交换的请求和响应的额外安全性。
使用 Python 请求库的优势
以下是使用 Python 请求库的优势 −
- 易于使用并从给定的 URL 获取数据。
- 请求库可用于从网站抓取数据。
- 使用请求,您可以获取、发布、删除、更新给定 URL 的数据。
- 处理 cookie 和会话非常容易。
- 在身份验证模块支持的帮助下,安全性也得到了保障。
Requests - 环境设置
在本章中,我们将介绍 Requests 的安装。要开始使用 Requests 模块,我们需要先安装 Python。因此,我们将进行以下操作 −
- 安装 Python
- 安装 Requests
安装 Python
转到 Python 官方网站:https://www.python.org/downloads/,如下所示,然后单击适用于 Windows、Linux/Unix 和 Mac OS 的最新版本。根据您可用的 64 位或 32 位操作系统下载 Python。
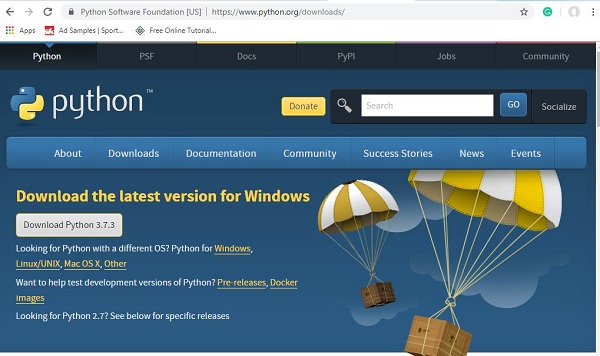
下载后,单击 .exe 文件并按照步骤在您的系统上安装 python。
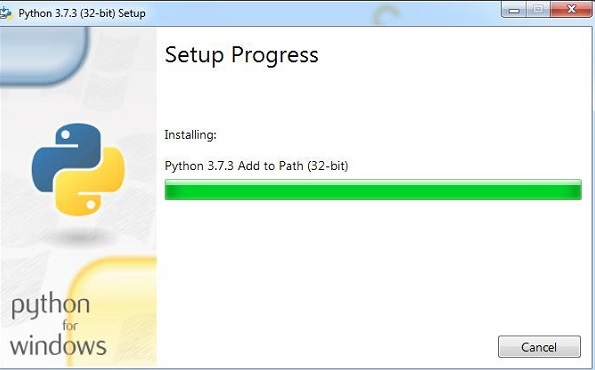
python 包管理器(即 pip)也将默认安装在上述安装中。要使其在您的系统上全局运行,请直接将 python 的位置添加到 PATH 变量。安装开始时会显示相同的内容,请记住选中"添加到 PATH"复选框。如果您忘记检查,请按照以下步骤将其添加到 PATH。
要添加到 PATH,请按照以下步骤 −
右键单击您的计算机图标,然后单击属性 > 高级系统设置。
它将显示如下所示的屏幕 −

单击如上所示的环境变量。它将显示如下所示的屏幕 −
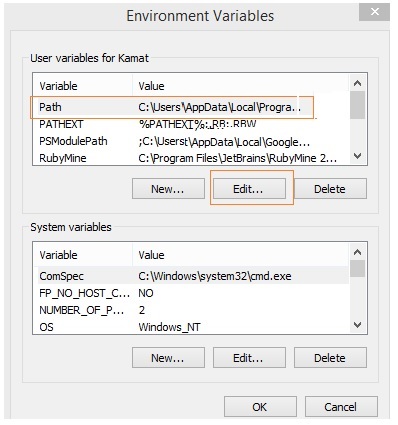
选择路径并单击编辑按钮,在末尾添加您的 python 的位置路径。现在,让我们检查一下 python 版本。
检查 python 版本
E:\prequests>python --version
Python 3.7.3
安装 Requests
现在我们已经安装了 python,我们将安装 Requests。
一旦安装了 python,python 包管理器即 pip 也将安装。以下是检查 pip 版本的命令。
E:\prequests>pip --version
pip 19.1.1 from c:\users\xxxxx\appdata\local\programs\python\python37\lib\site-
packages\pip (python 3.7)
我们已经安装了 pip,版本是 19.1.1。现在,将使用 pip 安装 Requests 模块。
命令如下 −
pip install requests
E:\prequests>pip install requests
Requirement already satisfied: requests in c:\users\xxxx\appdata\local\programs
\python\python37\lib\site-packages (2.22.0)
Requirement already satisfied: certifi>=2017.4.17 in c:\users\kamat\appdata\local\
programs\python\python37\lib\site-packages (from requests) (2019.3.9)
Requirement already satisfied: urllib3!=1.25.0,!=1.25.1,<1.26,>=1.21.1 in c:\use
rs\xxxxx\appdata\local\programs\python\python37\lib\site-packages (from requests
) (1.25.3)
Requirement already satisfied: idna<2.9,>=2.5 in c:\users\xxxxxxx\appdata\local\
programs\python\python37\lib\site-packages (from requests) (2.8)
Requirement already satisfied: chardet<3.1.0,>=3.0.2 in c:\users\xxxxx\appdata\
local\programs\python\python37\lib\site-packages (from requests) (3.0.4)
我们已经安装了该模块,因此在命令提示符中它显示要求已满足;如果没有安装,它会下载安装所需的软件包。
要检查已安装的请求模块的详细信息,您可以使用以下命令 −
pip show requests
E:\prequests>pip show requests
Name: requests
Version: 2.22.0
Summary: Python HTTP for Humans.
Home-page: http://python-requests.org
Author: Kenneth Reitz
Author-email: me@kennethreitz.org
License: Apache 2.0
Location: c:\users\xxxxx\appdata\local\programs\python\python37\lib\site-package
S
Requires: certifi, idna, urllib3, chardet
Required-by:
Requests模块版本为2.22.0。
Requests - Http Requests 如何工作?
Python 的 Requests 是一个 HTTP 库,可帮助我们在客户端和服务器之间交换数据。假设您有一个带有表单的 UI,您需要在其中输入用户详细信息,因此一旦输入,您就必须提交数据,而这只不过是从客户端到服务器的 Http POST 或 PUT 请求以保存数据。
当您想要数据时,您需要从服务器获取数据,这又是一个 Http GET 请求。客户端请求数据时与服务器响应所需数据之间的数据交换,客户端和服务器之间的这种关系非常重要。
请求是针对给定的 URL 发出的,它可以是安全或非安全的 URL。
可以使用 GET、POST、PUT、DELETE 向 URL 发出请求。最常用的是GET方法,主要用于从服务器获取数据时。
您还可以将数据作为查询字符串发送到URL,例如−
https://jsonplaceholder.typicode.com/users?id=9&username=Delphine
因此,在这里,我们将id = 9和username = Delphine传递给URL。所有值均以问号(?)后的键/值对形式发送,多个参数以&分隔传递给URL。
使用请求库,使用字符串字典按如下方式调用URL。
其中,发送到URL的数据作为字符串字典。如果要传递 id = 9 和 username = Delphine,可以执行以下操作 −
payload = {'id': '9', 'username': 'Delphine'}
请求库的调用方式如下 −
res = request.get('https://jsonplaceholder.typicode.com/users',
params = payload')
使用 POST,我们可以执行以下操作 −
res = request.post('https://jsonplaceholder.typicode.com/users', data =
{'id':'9', 'username':'Delphine'})
使用 PUT
res = request.put('https://jsonplaceholder.typicode.com/users', data =
{'id':'9', 'username':'Delphine'})
使用 DELETE
res = request.delete('https://jsonplaceholder.typicode.com/users')
Http 请求的响应可以是文本编码形式、二进制编码、json 格式或原始响应。请求和响应的细节将在下一章中详细解释。
Requests - 使用 Requests
在本章中,我们将了解如何使用 Requests 请求模块。我们将研究以下内容 −
- 发出 HTTP 请求。
- 将参数传递给 HTTP 请求。
发出 HTTP 请求
要发出 Http 请求,我们需要首先导入请求模块,如下所示 −
import request
现在让我们看看如何使用请求模块调用 URL。
让我们使用 URL − https://jsonplaceholder.typicode.com/users 在代码中,测试请求模块。
示例
import request
getdata = request.get('https://jsonplaceholder.typicode.com/users')
print(getdata.status_code)
使用 request.get() 方法调用 url − https://jsonplaceholder.typicode.com/users。 URL 的响应对象存储在 getdata 变量中。当我们打印变量时,它会给出 200 响应代码,这意味着我们已成功获得响应。
输出
E:\prequests>python makeRequest.py
<Response [200]>
要从响应中获取内容,我们可以使用 getdata.content 进行操作,如下所示 −
示例
import request
getdata = request.get('https://jsonplaceholder.typicode.com/users')
print(getdata.content)
getdata.content 将打印响应中可用的所有数据。
输出
E:\prequests>python makeRequest.py
b'[
 {
  "id": 1,
  "name": "Leanne Graham",
  "username": "Bret",

"email": "Sincere@april.biz",
  "address": {
  "street": "Kulas Light
",
  "suite": "Apt. 556",
  "city": "Gwenborough",
  "zipcode": "
92998-3874",
  "geo": {
 "lat": "-37.3159",
  "lng": "81.149
6"
 }
 },
  "phone": "1-770-736-8031 x56442",
  "website": "hild
egard.org",
  "company": {
 "name": "Romaguera-Crona",
  "catchPhr
ase": "Multi-layered client-server neural-net",
  "bs": "harness real-time
e-markets"
 }
 }
向 HTTP 请求传递参数
仅请求 URL 是不够的,我们还需要向 URL 传递参数。
参数大多以键/值对的形式传递,例如 −
https://jsonplaceholder.typicode.com/users?id=9&username=Delphine
因此,我们有 id = 9 和 username = Delphine。现在,我们将看到如何将这些数据传递给请求 Http 模块。
示例
import requests
payload = {'id': 9, 'username': 'Delphine'}
getdata = requests.get('https://jsonplaceholder.typicode.com/users',
params = payload)
print(getdata.content)
详细信息存储在对象有效负载中的键/值对中,并传递给 get() 方法中的 params。
输出
E:\prequests>python makeRequest.py
b'[
 {
 "id": 9,
 "name": "Glenna Reichert",
 "username": "Delphin
e",
 "email": "Chaim_McDermott@dana.io",
 "address": {
 "street":
"Dayna Park",
 "suite": "Suite 449",
 "city": "Bartholomebury",

"zipcode": "76495-3109",
 "geo": {
 "lat": "24.6463",

"lng": "-168.8889"
 }
 },
 "phone": "(775)976-6794 x41206",
 "
website": "conrad.com",
 "company": {
 "name": "Yost and Sons",

"catchPhrase": "Switchable contextually-based project",
 "bs": "aggregate
real-time technologies"
 }
 }
]'
我们现在在响应中获取 id = 9 和 username = Delphine 的详细信息。
如果您想查看,在传递参数后 URL 的外观,请利用响应对象到 URL。
示例
import requests
payload = {'id': 9, 'username': 'Delphine'}
getdata = requests.get('https://jsonplaceholder.typicode.com/users',
params = payload)
print(getdata.url)
输出
E:\prequests>python makeRequest.py
https://jsonplaceholder.typicode.com/users?id=9&username=Delphine
处理 HTTP 请求的响应
在本章中,我们将详细介绍从请求模块收到的响应。我们将讨论以下细节 −
- 获取响应
- JSON 响应
- RAW 响应
- 二进制响应
获取响应
我们将使用 request.get() 方法向 URL 发出请求。
import 请求
getdata = request.get('https://jsonplaceholder.typicode.com/users');
getdata 有响应对象。它包含响应的所有详细信息。我们可以通过两种方式获得响应,即 (text) 和 (.content)。使用 response.text 将以文本格式返回数据,如下所示 −
示例
E:\prequests>python makeRequest.py
[
   {
      "id": 1,
      "name": "Leanne Graham",
      "username": "Bret",
      "email": "Sincere@april.biz",
      "address": {
         "street": "Kulas Light",
         "suite": "Apt. 556",
         "city": "Gwenborough",
         "zipcode": "92998-3874",
        "geo": {
            "lat": "-37.3159",
            "lng": "81.1496"
         }
      },
      "phone": "1-770-736-8031 x56442",
      "website": "hildegard.org",
      "company": {
         "name": "Romaguera-Crona",
         "catchPhrase": "Multi-layered client-server neural-net",
         "bs": "harness real-time e-markets"
      }
   },
]
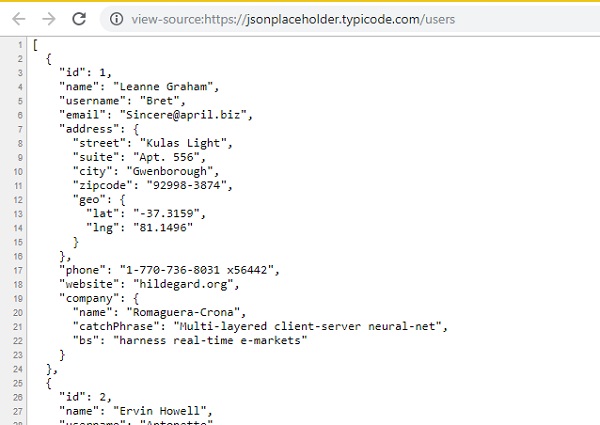
您将看到响应与浏览器中查看 URL 源代码时显示的内容相同,如下所示 −
您还可以尝试 .html URL 并使用 response.text 查看内容,它将与浏览器中 .html URL 的查看源代码内容相同。
现在,让我们对同一 URL 尝试 response.content 并查看输出。
示例
import requests
getdata = requests.get('https://jsonplaceholder.typicode.com/users')
print(getdata.content)
输出
E:\prequests>python makeRequest.py
b'[
 {
 "id": 1,
 "name": "Leanne Graham",
 "username": "Bret",

"email": "Sincere@april.biz",
 "address": {
 "street": "Kulas Light
",
 "suite": "Apt. 556",
 "city": "Gwenborough",
 "zipcode": "
92998-3874",
 "geo": {
 "lat": "-37.3159",
 "lng": "81.149
6"
 }
 },
 "phone": "1-770-736-8031 x56442",
 "website": "hild
egard.org",
 "company": {
 "name": "Romaguera-Crona",
 "catchPhr
ase": "Multi-layered client-server neural-net",
 "bs": "harness real-time
e-markets"
 }
 },
 {
 "id": 2,
 "name": "Ervin Howell",

"username": "Antonette",
 "email": "Shanna@melissa.tv",
 "address": {

"street": "Victor Plains",
 "suite": "Suite 879",
 "city": "Wisoky
burgh",
 "zipcode": "90566-7771",
 "geo": {
 "lat": "-43.950
9",
 "lng": "-34.4618"
 }
 },
 "phone": "010-692-6593 x091
25",
 "website": "anastasia.net",
 "company": {
 "name": "Deckow-Crist",

 "catchPhrase": "Proactive didactic contingency",
 "bs":
"synergize scalable supply-chains"
 }
 },
 {
 "id": 3,
 "name":
"Clementine Bauch",
 "username": "Samantha",
 "email":
"Nathan@yesenia.net",

 "address": {
 "street": "Douglas Extension",
 "suite": "Suite
847",
 "city": "McKenziehaven",
 "zipcode": "59590-4157",
 "ge
o": {
 "lat": "-68.6102",
 "lng": "-47.0653"
 }
 },
响应以字节为单位。您将在响应开头看到一个字母 b。使用请求模块,您可以获取所使用的编码,并根据需要更改编码。例如,要获取编码,您可以使用 response.encoding。
print(getdata.encoding)
输出
utf-8
您可以按如下方式更改编码 − 您可以使用您选择的编码。
getdata.encoding = 'ISO-8859-1'
JSON 响应
您还可以使用 response.json() 方法以 json 格式获取 Http 请求的响应,如下所示 −
示例
import requests
getdata = requests.get('https://jsonplaceholder.typicode.com/users')
print(getdata.json())
输出
E:\prequests>python makeRequest.py
[{'id': 1, 'name': 'Leanne Graham', 'username': 'Bret', 'email': 'Sincere@april.
biz', 'address': {'street': 'Kulas Light', 'suite': 'Apt. 556', 'city': 'Gwenborough',
'zipcode': '92998-3874', 'geo': {'lat': '-37.3159', 'lng': '81.1496'}},
'
phone': '1-770-736-8031 x56442', 'website': 'hildegard.org', 'company': {'name':
'Romaguera-Crona', 'catchPhrase': 'Multi-layered client-server neural-net', 'bs':
'harness real-time e-markets'}}]
原始响应
如果您需要 Http URL 的原始响应,则可以使用 response.raw,还可以在 get 方法中添加 stream = True,如下所示 −
示例
import requests
getdata = requests.get('https://jsonplaceholder.typicode.com/users', stream=True)
print(getdata.raw)
输出
E:\prequests>python makeRequest.py
<urllib3.response.HTTPResponse object at 0x000000A8833D7B70>
要从原始数据中读取更多内容,您可以按如下方式操作 −
print(getdata.raw.read(50))
输出
E:\prequests>python makeRequest.py
b'\x1f\x8b\x08\x00\x00\x00\x00\x00\x00\x03\x95\x98[o\xe38\x12\x85\xdf\xe7W\x10y\
xda\x01F\x82.\xd4m\x9f\xdc\x9dd\xba\xb7\x93\xf4\x06q\xef4\x06\x83A@K\x15\x89m'
二进制响应
要获取二进制响应,我们可以使用 response.content。
示例
import requests
getdata = requests.get('https://jsonplaceholder.typicode.com/users')
print(getdata.content)
输出
E:\prequests>python makeRequest.py
b'[
 {
 "id": 1,
 "name": "Leanne Graham",
 "username": "Bret",

"email": "Sincere@april.biz",
 "address": {
 "street": "Kulas Light
",
 "suite": "Apt. 556",
 "city": "Gwenborough",
 "zipcode": "
92998-3874",
 "geo": {
 "lat": "-37.3159",
 "lng": "81.149
6"
 }
 },
 "phone": "1-770-736-8031 x56442",
 "website":
"hildegard.org",
 "company": {
 "name": "Romaguera-Crona",
 "catchPhr
ase": "Multi-layered client-server neural-net",
 "bs": "harness real-time
e-markets"
 }
 },
 {
 "id": 2,
 "name": "Ervin Howell",
 "us
ername": "Antonette",
 "email": "Shanna@melissa.tv",
 "address": {

"street": "Victor Plains",
 "suite": "Suite 879",
 "city": "Wisoky
burgh",
 "zipcode": "90566-7771",
 "geo": {
 "lat": "-43.950
9",
 "lng": "-34.4618"
 }
 },
 "phone": "010-692-6593 x091
25",
 "website": "anastasia.net",
 "company": {
 "name": "Deckow-Crist",

 "catchPhrase": "Proactive didactic contingency",
 "bs": "syn
ergize scalable supply-chains"
 }
 },
 {
 "id": 3,
 "name":
"Clementine Bauch",
 "username": "Samantha",
 "email": "Nathan@yesenia.net",

 "address": {
 "street": "Douglas Extension",
 "suite": "Suite
847",
 "city": "McKenziehaven",
 "zipcode": "59590-4157",
 "
geo": {
 "lat": "-68.6102",
 "lng": "-47.0653"
 }
 },
响应以字节为单位给出。您将在响应开头看到一个字母 b。二进制响应主要用于非文本请求。
Requests - HTTP 请求标头
在上一章中,我们了解了如何发出请求并获取响应。本章将进一步探讨 URL 的标头部分。因此,我们将研究以下内容 −
- 了解请求标头
- 自定义标头
- 响应标头
了解请求标头
在浏览器中点击任意 URL,检查它并在开发者工具网络选项卡中签入。
您将获得响应标头、请求标头、有效负载等。
例如,考虑以下 URL −
https://jsonplaceholder.typicode.com/users
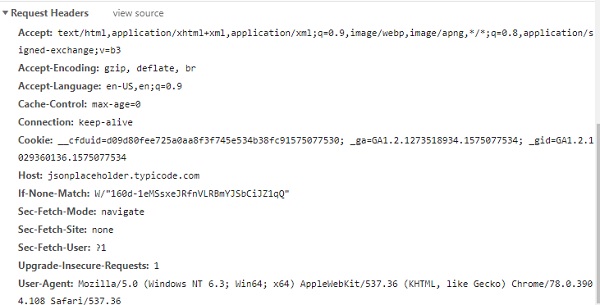
您可以按如下方式获取标头详细信息−
示例
import requests
getdata = requests.get('https://jsonplaceholder.typicode.com/users',
stream = True)
print(getdata.headers)
输出
E:\prequests>python makeRequest.py
{'Date': 'Sat, 30 Nov 2019 05:15:00 GMT', 'Content-Type': 'application/json;
charset=utf-8', 'Transfer-Encoding': 'chunked', 'Connection': 'keep-alive',
'Set-Cookie': '__cfduid=d2b84ccf43c40e18b95122b0b49f5cf091575090900; expires=Mon, 30-De
c-19 05:15:00 GMT; path=/; domain=.typicode.com; HttpOnly', 'X-Powered-By':
'Express', 'Vary': 'Origin, Accept-Encoding', 'Access-Control-Allow-Credentials': 't
rue', 'Cache-Control': 'max-age=14400', 'Pragma': 'no-cache', 'Expires': '-1', '
X-Content-Type-Options': 'nosniff', 'Etag': 'W/"160d-1eMSsxeJRfnVLRBmYJSbCiJZ1qQ
"', 'Content-Encoding': 'gzip', 'Via': '1.1 vegur', 'CF-Cache-Status': 'HIT',
'Age': '2271', 'Expect-CT': 'max-age=604800,
report-uri="https://report-uri.cloudflare.com/cdn-cgi/beacon/expect-ct"', 'Server': 'cloudflare', 'CF-RAY': '53da574f
f99fc331-SIN'}
要读取任何 http 标头,您可以按如下方式执行 −
getdata.headers["Content-Encoding"] // gzip
自定义标头
您还可以将标头发送到被调用的 URL,如下所示。
示例
import request
headers = {'x-user': 'test123'}
getdata = request.get('https://jsonplaceholder.typicode.com/users',
headers=headers)
传递的标头必须是字符串、字节串或 Unicode 格式。请求的行为不会根据传递的自定义标头而改变。
响应标头
当您在浏览器开发人员工具、网络选项卡中检查 URL 时,响应标头如下所示 −
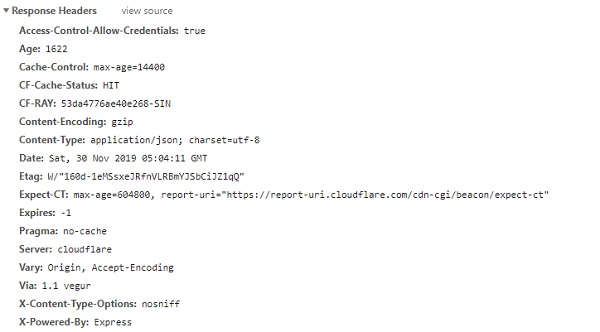
要从请求模块获取标头的详细信息,请使用。Response.headers 如下所示 −
示例
import requests
getdata = requests.get('https://jsonplaceholder.typicode.com/users')
print(getdata.headers)
输出
E:\prequests>python makeRequest.py
{'Date': 'Sat, 30 Nov 2019 06:08:10 GMT', 'Content-Type': 'application/json;
charset=utf-8', 'Transfer-Encoding': 'chunked', 'Connection': 'keep-alive',
'Set-Cookie': '__cfduid=de1158f1a5116f3754c2c353055694e0d1575094090; expires=Mon,
30-Dec-19 06:08:10 GMT; path=/; domain=.typicode.com; HttpOnly', 'X-Powered-By':
'Express', 'Vary': 'Origin, Accept-Encoding', 'Access-Control-Allow-Credentials': 't
rue', 'Cache-Control': 'max-age=14400', 'Pragma': 'no-cache', 'Expires': '-1', '
X-Content-Type-Options': 'nosniff', 'Etag': 'W/"160d-1eMSsxeJRfnVLRBmYJSbCiJZ1qQ
"', 'Content-Encoding': 'gzip', 'Via': '1.1 vegur', 'CF-Cache-Status': 'HIT',
'Age': '5461', 'Expect-CT': 'max-age=604800, report-uri="https://report-uri.cloudf
lare.com/cdn-cgi/beacon/expect-ct"', 'Server': 'cloudflare', 'CF-RAY': '53daa52f
3b7ec395-SIN'}
您可以按如下方式获取所需的任何特定标头 −
print(getdata.headers["Expect-CT"])
输出
max-age=604800, report-uri="https://report-uri.cloudflare.com/cdn-cgi/beacon/exp
ect-ct
您还可以使用 get() 方法获取标头详细信息。
print(getdata.headers.get("Expect-CT"))
输出
max-age=604800, report-uri="https://report-uri.cloudflare.com/cdn-cgi/beacon/exp
ect-ct
Requests - 处理 GET 请求
本章将重点介绍 GET 请求,这是最常见且最常用的请求。请求模块中 GET 的操作非常简单。这是一个使用 GET 方法处理 URL 的简单示例。
示例
import requests
getdata = requests.get('https://jsonplaceholder.typicode.com/users')
print(getdata.content)
getdata.content, will print all the data available in the response.
输出
E:\prequests>python makeRequest.py
b'[
 {
 "id": 1,
 "name": "Leanne Graham",
 "username": "Bret",

"email": "Sincere@april.biz",
 "address": {
 "street": "Kulas Light
",
 "suite": "Apt. 556",
 "city": "Gwenborough",
 "zipcode": "
92998-3874",
 "geo": {
 "lat": "-37.3159",
 "lng": "81.149
6"
 }
 },
 "phone": "1-770-736-8031 x56442",
 "website":
"hildegard.org",
 "company": {
 "name": "Romaguera-Crona",
 "catchPhrase":
"Multi-layered client-server neural-net",
 "bs":
"harness real-time e-markets"
 }
 }
您还可以使用 param 属性将参数传递给 get 方法,如下所示 −
import requests
payload = {'id': 9, 'username': 'Delphine'}
getdata = requests.get('https://jsonplaceholder.typicode.com/users',
params=payload)
print(getdata.content)
详细信息存储在对象有效负载中的键/值对中,并传递给 get() 方法内的 params。
输出
E:\prequests>python makeRequest.py
b'[
 {
 "id": 9,
 "name": "Glenna Reichert",
 "username": "Delphine",

 "email": "Chaim_McDermott@dana.io",
 "address": {
 "street":
"Dayna Park",
 "suite": "Suite 449",
 "city": "Bartholomebury",

"zipcode": "76495-3109",
 "geo": {
 "lat": "24.6463",

"lng": "-168.8889"
 }
 },
 "phone": "(775)976-6794 x41206",
 "
website": "conrad.com",
 "company": {
 "name": "Yost and Sons",

"catchPhrase": "Switchable contextually-based project",
 "bs": "aggregate
real-time technologies"
 }
 }
]'
处理 POST、PUT、PATCH 和 DELETE 请求
在本章中,我们将了解如何使用请求库中的 POST 方法以及如何将参数传递给 URL。
使用 POST
对于 PUT 请求,Requests 库有 request.post() 方法,其示例如下所示 −
导入 requests 请求
myurl = 'https://postman-echo.com/post'
myparams = {'name': 'ABC', 'email':'xyz@gmail.com'}
res = requests.post(myurl, data=myparams)
print(res.text)
输出
E:\prequests>python makeRequest.py
{"args":{},"data":"","files":{},"form":{"name":"ABC","email":"xyz@gmail.com"},
"headers":{"x-forwarded-proto":"https","host":"postman-echo.com","content-
length":"30","accept":"*/*","accept-encoding":"gzip,deflate","content-
type":"application/x-www-form-urlencoded","user-agent":"python-
requests/2.22.0","x-forwarded-
port":"443"},"json":{"name":"ABC","email":"xyz@gmail.com"},
"url":"https://postman-echo.com/post"}
在上面的示例中,您可以将表单数据作为键值对传递给requests.post()中的数据参数。我们还将了解如何在请求模块中使用PUT、PATCH和DELETE。
使用PUT
对于PUT请求,Requests库具有requests.put()方法,其示例如下所示。
import requests
myurl = 'https://postman-echo.com/put'
myparams = {'name': 'ABC', 'email':'xyz@gmail.com'}
res = requests.put(myurl, data=myparams)
print(res.text)
输出
E:\prequests>python makeRequest.py
{"args":{},"data":"","files":{},"form":{"name":"ABC","email":"xyz@gmail.com"},
"headers":{"x-forwarded-proto":"https","host":"postman-echo.com","content-
length":
"30","accept":"*/*","accept-encoding":"gzip, deflate","content-
type":"applicatio
n/x-www-form-urlencoded","user-agent":"python-requests/2.22.0","x-forwarded-
port
":"443"},"json":{"name":"ABC","email":"xyz@gmail.com"},
"url":"https://postman-echo.com/put"}
使用 PATCH
对于 PATCH 请求,Requests 库有 request.patch() 方法,其示例如下所示。
import requests
myurl = https://postman-echo.com/patch'
res = requests.patch(myurl, data="testing patch")
print(res.text)
输出
E:\prequests>python makeRequest.py
{"args":{},"data":{},"files":{},"form":{},"headers":{"x-forwarded-
proto":"https"
,"host":"postman-echo.com","content-length":"13","accept":"*/*","accept-
encoding
":"gzip, deflate","user-agent":"python-requests/2.22.0","x-forwarded-
port":"443"
},"json":null,"url":"https://postman-echo.com/patch"}
使用 DELETE
对于 DELETE 请求,Requests 库有 request.delete() 方法,其示例如下所示。
import requests
myurl = 'https://postman-echo.com/delete'
res = requests.delete(myurl, data="testing delete")
print(res.text)
输出
E:\prequests>python makeRequest.py
{"args":{},"data":{},"files":{},"form":{},"headers":{"x-forwarded-
proto":"https"
,"host":"postman-echo.com","content-length":"14","accept":"*/*","accept-
encoding
":"gzip, deflate","user-agent":"python-requests/2.22.0","x-forwarded-
port":"443"
},"json":null,"url":"https://postman-echo.com/delete"}
Requests - 文件上传
在本章中,我们将使用请求上传文件并读取已上传文件的内容。我们可以使用 files 参数执行此操作,如以下示例所示。
我们将使用 http://httpbin.org/post 上传文件。
示例
import requests
myurl = 'https://httpbin.org/post'
files = {'file': open('test.txt', 'rb')}
getdata = requests.post(myurl, files=files)
print(getdata.text)
Test.txt
File upload test using Requests
输出
E:\prequests>python makeRequest.py
{
   "args": {},
   "data": "",
   "files": {
      "file": "File upload test using Requests"
   },
   "form": {},
   "headers": {
      "Accept": "*/*",
      "Accept-Encoding": "gzip, deflate",
      "Content-Length": "175",
      "Content-Type": "multipart/form-data;
      boundary=28aee3a9d15a3571fb80d4d2a94bfd33",
      "Host": "httpbin.org",
      "User-Agent": "python-requests/2.22.0"
   },
   "json": null,
   "origin": "117.223.63.135, 117.223.63.135",
   "url": "https://httpbin.org/post"
}
也可以发送如下所示的文件内容−
示例
import requests
myurl = 'https://httpbin.org/post'
files = {'file': ('test1.txt', 'Welcome to TutorialsPoint')}
getdata = requests.post(myurl, files=files)
print(getdata.text)
输出
E:\prequests>python makeRequest.py
{
   "args": {},
   "data": "",
   "files": {
      "file": "Welcome to TutorialsPoint"
   },
   "form": {},
   "headers": {
      "Accept": "*/*",
      "Accept-Encoding": "gzip, deflate",
      "Content-Length": "170",
      "Content-Type": "multipart/form-data;
      boundary=f2837238286fe40e32080aa7e172be4f",
      "Host": "httpbin.org",
      "User-Agent": "python-requests/2.22.0"
   },
   "json": null,
   "origin": "117.223.63.135, 117.223.63.135",
   "url": "https://httpbin.org/post"
}
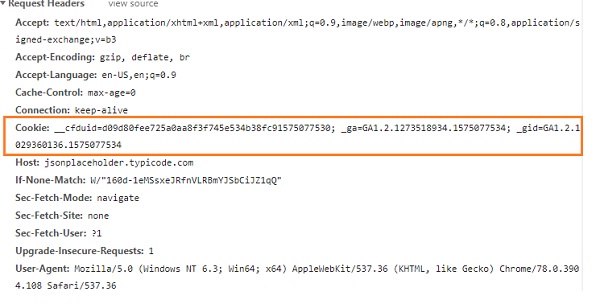
Requests - 使用 Cookies
本章将讨论如何处理 cookies。您可以使用请求库在调用 URL 时获取 cookie 以及发送 cookie。
url,https://jsonplaceholder.typicode.com/users,当在浏览器中点击时,我们可以获得 cookie 的详细信息,如下所示 −
您可以读取 cookie,如下所示 −
示例
import request
getdata = 请求。获取('https://jsonplaceholder.typicode.com/users')
print(getdata.cookies["__cfduid"])
输出
E:\prequests>python makeRequest.py
d1733467caa1e3431fb7f768fa79ed3741575094848
您也可以在我们发出请求时发送 cookie。
示例
import request
cookies = dict(test='test123')
getdata = request.get('https://httpbin.org/cookies',cookies=cookies)
print(getdata.text)
输出
E:\prequests>python makeRequest.py
{
   "cookies": {
      "test": "test123"
   }
}
Requests - 处理错误
本章将讨论如何处理使用 Http 请求库时出现的错误。始终管理所有可能情况的错误是一种很好的做法。
错误异常
请求模块提供以下类型的错误异常 −
ConnectionError − 如果出现任何连接错误,则会引发此异常。例如,网络失败、DNS 错误,因此请求库将引发 ConnectionError 异常。
Response.raise_for_status() − 根据状态代码(即 401、404),它将为请求的 URL 引发 HTTPError。
HTTPError − 如果对所发出的请求的响应无效,则会引发此错误。
超时 −请求的 URL 超时引发错误。
TooManyRedirects − 如果超出最大重定向限制,则会引发 TooManyRedirects 错误。
示例
以下是超时错误的示例 −
import requests
getdata =
requests.get('https://jsonplaceholder.typicode.com/users',timeout=0.001)
print(getdata.text)
输出
raise ConnectTimeout(e, request=request)
requests.exceptions.ConnectTimeout:
HTTPSConnectionPool(host='jsonplaceholder.ty
picode.com', port=443): Max retries exceeded with url: /users (Caused
by Connect
TimeoutError(<urllib3.connection.VerifiedHTTPSConnection object at
0x000000B02AD
E76A0>, 'Connection to jsonplaceholder.typicode.com timed out. (connect
timeout = 0.001)'))
Requests - 处理超时
您可以轻松将超时添加到您请求的 URL。碰巧的是,您正在使用第三方 URL 并等待响应。为 URL 提供超时始终是一种很好的做法,因为我们可能希望 URL 在一定时间范围内响应或错误。不这样做可能会导致无限期地等待该请求。
我们可以使用超时参数为 URL 提供超时,并以秒为单位传递值,如下例所示 −
示例
import requests
getdata =
requests.get('https://jsonplaceholder.typicode.com/users',timeout=0.001)
print(getdata.text)
输出
raise ConnectTimeout(e, request=request)
requests.exceptions.ConnectTimeout:
HTTPSConnectionPool(host='jsonplaceholder.typicode.com',
port=443): Max retries exceeded with url: /users (Caused
by Connect
TimeoutError(<urllib3.connection.VerifiedHTTPSConnection object at
0x000000B02AD
E76A0>, 'Connection to jsonplaceholder.typicode.com timed out. (connect
timeout = 0.001)'))
给出的超时如下 −
getdata =
requests.get('https://jsonplaceholder.typicode.com/users',timeout=0.001)
执行抛出连接超时错误,如输出所示。给出的超时为 0.001,请求无法返回响应并抛出错误。现在,我们将增加超时并检查。
示例
import requests
getdata =
requests.get('https://jsonplaceholder.typicode.com/users',timeout=1.000)
print(getdata.text)
输出
E:\prequests>python makeRequest.py
[
   {
      "id": 1,
      "name": "Leanne Graham",
      "username": "Bret",
      "email": "Sincere@april.biz",
      "address": {
         "street": "Kulas Light",
         "suite": "Apt. 556",
         "city": "Gwenborough",
         "zipcode": "92998-3874",
         "geo": {
            "lat": "-37.3159",
            "lng": "81.1496"
         }
      },
      "phone": "1-770-736-8031 x56442",
      "website": "hildegard.org",
      "company": {
         "name": "Romaguera-Crona",
         "catchPhrase": "Multi-layered client-server neural-net",
         "bs": "harness real-time e-markets"
      }
   }
]
超时 1 秒后,我们可以获得所请求 URL 的响应。
Requests - 处理重定向
本章将介绍 Request 库如何处理 URL 重定向情况。
示例
import 请求
getdata = request.get('http://google.com/')
print(getdata.status_code)
print(getdata.history)
URL:http://google.com 将使用状态代码 301(永久移动)重定向到 https://www.google.com/。重定向将被保存在历史记录中。
输出
执行上述代码后,我们得到以下结果 −
E:\prequests>python makeRequest.py
200
[<Response [301]>]
您可以使用 allow_redirects = False 停止 URL 重定向。可以在使用的 GET、POST、OPTIONS、PUT、DELETE、PATCH 方法上执行此操作。
示例
以下是相同的示例。
import requests
getdata = request.get('http://google.com/', allow_redirects=False)
print(getdata.status_code)
print(getdata.history)
print(getdata.text)
现在,如果您检查输出,重定向将不被允许,并将获得状态代码 301。
输出
E:\prequests>python makeRequest.py
301
[]
<HTML><HEAD><meta http-equiv="content-type" content="text/html;charset=utf-8">
<TITLE>301 Moved</TITLE></HEAD><BODY>
<H1>301 Moved</H1>
The document has moved
<A HREF="http://www.google.com/">here</A>.
</BODY></HTML>
Requests - 处理历史记录
您可以使用 response.history 获取给定 URL 的历史记录。如果给定的 URL 有任何重定向,则该重定向将存储在历史记录中。
对于历史记录
import requests
getdata = requests.get('http://google.com/')
print(getdata.status_code)
print(getdata.history)
输出
E:\prequests>python makeRequest.py
200
[<Response [301]>]
response.history 属性将包含根据请求完成的响应对象的详细信息。存在的值将按从最旧到最新的顺序排序。response.history 属性跟踪对请求的 URL 执行的所有重定向。
Requests - 处理会话
要维护请求之间的数据,您需要会话。因此,如果一次又一次地调用同一主机,您可以重用 TCP 连接,从而提高性能。现在让我们看看如何在使用会话发出的请求之间维护 cookie。
使用会话添加 cookie
import requests
req = requests.Session()
cookies = dict(test='test123')
getdata = req.get('https://httpbin.org/cookies',cookies=cookies)
print(getdata.text)
输出
E:\prequests>python makeRequest.py
{
   "cookies": {
      "test": "test123"
   }
}
使用会话,您可以跨请求保存 cookie 数据。也可以使用会话传递标头数据,如下所示 −
示例
import requests
req = requests.Session()
req.headers.update({'x-user1': 'ABC'})
headers = {'x-user2': 'XYZ'}
getdata = req.get('https://httpbin.org/headers', headers=headers)
print(getdata.headers)
Requests - SSL 证书
SSL 证书是安全 URL 附带的安全功能。当您使用 Requests 库时,它还会验证给定的 https URL 的 SSL 证书。默认情况下,请求模块中启用了 SSL 验证,如果证书不存在,则会抛出错误。
使用安全 URL
以下是使用安全 URL 的示例 −
import requests
getdata = requests.get(https://jsonplaceholder.typicode.com/users)
print(getdata.text)
输出
E:\prequests>python makeRequest.py
[
   {
      "id": 1,
      "name": "Leanne Graham",
      "username": "Bret",
      "email": "Sincere@april.biz",
      "address": {
         "street": "Kulas Light",
         "suite": "Apt. 556",
         "city": "Gwenborough",
         "zipcode": "92998-3874",
         "geo": {
            "lat": "-37.3159",
            "lng": "81.1496"
         }
      },
      "phone": "1-770-736-8031 x56442",
      "website": "hildegard.org",
      "company": {
         "name": "Romaguera-Crona",
         "catchPhrase": "Multi-layered client-server neural-net",
         "bs": "harness real-time e-markets"
      }
   }
]
我们很容易从上面的 https URL 获得响应,这是因为请求模块可以验证 SSL 证书。
您可以通过简单地添加 verify=False 来禁用 SSL 验证,如下例所示。
示例
import request
getdata =
requests.get('https://jsonplaceholder.typicode.com/users', verify=False)
print(getdata.text)
您将获得输出,但它也会给出一条警告消息,指出 SSL 证书未经验证,建议添加证书验证。
输出
E:\prequests>python makeRequest.py
connectionpool.py:851: InsecureRequestWarning: Unverified HTTPS request is
being made. Adding certificate verification is strongly advised. See:
https://urllib3
.readthedocs.io/en/latest/advanced-usage.htm  l#ssl-warnings
 InsecureRequestWarning)
[
   {
      "id": 1,
      "name": "Leanne Graham",
      "username": "Bret",
      "email": "Sincere@april.biz",
      "address": {
         "street": "Kulas Light",
         "suite": "Apt. 556",
         "city": "Gwenborough",
         "zipcode": "92998-3874",
         "geo": {
            "lat": "-37.3159",
            "lng": "81.1496"
         }
      },
      "phone": "1-770-736-8031 x56442",
      "website": "hildegard.org",
      "company": {
         "name": "Romaguera-Crona",
         "catchPhrase": "Multi-layered   client-server neural-net",
         "bs": "harness real-time e-markets"
      }
   }
]
您还可以通过在您的终端托管 SSL 证书并使用 verify 参数提供路径来验证证书,如下所示。
示例
import requests
getdata =
requests.get('https://jsonplaceholder.typicode.com/users', verify='C:\Users\AppData\Local\certificate.txt')
print(getdata.text)
输出
E:\prequests>python makeRequest.py
[
   {
      "id": 1,
      "name": "Leanne Graham",
      "username": "Bret",
      "email": "Sincere@april.biz",
      "address": {
         "street": "Kulas Light",
         "suite": "Apt. 556",
         "city": "Gwenborough",
         "zipcode": "92998-3874",
         "geo": {
            "lat": "-37.3159",
            "lng": "81.1496"
         }
      },
      "phone": "1-770-736-8031 x56442",
      "website": "hildegard.org",
      "company": {
         "name": "Romaguera-Crona",
         "catchPhrase": "Multi-layered   client-server neural-net",
         "bs": "harness real-time e-markets"
      }
   }
]
Requests - 身份验证
本章将讨论请求模块中可用的身份验证类型。
我们将讨论以下内容 −
- HTTP 请求中的身份验证工作
- 基本身份验证
- 摘要身份验证
- OAuth2 身份验证
HTTP 请求中的身份验证工作
HTTP 身份验证是在服务器端进行的,当客户端请求 URL 时,会要求提供一些身份验证信息,如用户名、密码。这是客户端和服务器之间交换的请求和响应的额外安全性。
从客户端,这些额外的身份验证信息(即用户名和密码)可以在标头中发送,稍后将在服务器端进行验证。仅当身份验证有效时,才会从服务器端传递响应。
Requests 库在 request.auth 中有最常用的身份验证,即基本身份验证 (HTTPBasicAuth) 和摘要身份验证 (HTTPDigestAuth)。
基本身份验证
这是向服务器提供身份验证的最简单形式。要使用基本身份验证,我们将使用请求库中提供的 HTTPBasicAuth 类。
示例
这是一个如何使用它的工作示例。
import requests
from requests.auth import HTTPBasicAuth
response_data =
requests.get('httpbin.org/basic-auth/admin/admin123',
auth = HTTPDigestAuth('admin', 'admin123'))
print(response_data.text)
我们正在调用 URL,https://httpbin.org/basic-auth/admin/admin123,用户为 admin,密码为 admin123。
因此,如果没有身份验证(即用户和密码),此 URL 将无法工作。一旦您使用 auth 参数进行身份验证,则只有服务器会返回响应。
输出
E:\prequests>python makeRequest.py
{
   "authenticated": true,
   "user": "admin"
}
摘要式身份验证
这是请求中可用的另一种身份验证形式。我们将利用请求中的 HTTPDigestAuth 类。
示例
import requests
from requests.auth import HTTPDigestAuth
response_data =
requests.get('https://httpbin.org/digest-auth/auth/admin/admin123',
auth = HTTPDigestAuth('admin', 'admin123'))
print(response_data.text)
输出
E:\prequests>python makeRequest.py
{
   "authenticated": true,
   "user": "admin"
}
OAuth2 身份验证
要使用 OAuth2 身份验证,我们需要"requests_oauth2"库。要安装"requests_oauth2",请执行以下操作 −
pip install request_oauth2
安装时终端中的显示内容将如下所示 −
E:\prequests>pip install requests_oauth2
Collecting requests_oauth2
Downloading https://files.pythonhosted.org/packages/52/dc/01c3c75e6e7341a2c7a9
71d111d7105df230ddb74b5d4e10a3dabb61750c/requests-oauth2-0.3.0.tar.gz
Requirement already satisfied: requests in c:\users\xyz\appdata\local\programs
\python\python37\lib\site-packages (from requests_oauth2) (2.22.0)
Requirement already satisfied: six in c:\users\xyz\appdata\local\programs\pyth
on\python37\lib\site-packages (from requests_oauth2) (1.12.0)
Requirement already satisfied: urllib3!=1.25.0,!=1.25.1,<1.26,>=1.21.1 in c:\use
rs\xyz\appdata\local\programs\python\python37\lib\site-packages (from requests
->requests_oauth2) (1.25.3)
Requirement already satisfied: certifi>=2017.4.17 in c:\users\xyz\appdata\loca
l\programs\python\python37\lib\site-packages (from requests->requests_oauth2) (2
019.3.9)
Requirement already satisfied: chardet<3.1.0,>=3.0.2 in c:\users\xyz\appdata\l
ocal\programs\python\python37\lib\site-packages (from requests->requests_oauth2)
(3.0.4)
Requirement already satisfied: idna<2.9,>=2.5 in c:\users\xyz\appdata\local\pr
ograms\python\python37\lib\site-packages (from requests->requests_oauth2) (2.8)
Building wheels for collected packages: requests-oauth2
Building wheel for requests-oauth2 (setup.py) ... done
Stored in directory: C:\Users\xyz\AppData\Local\pip\Cache\wheels\90\ef\b4\43
3743cbbc488463491da7df510d41c4e5aa28213caeedd586
Successfully built requests-oauth2
我们已安装"requests-oauth2"。要使用 Google、Twitter 的 API,我们需要获得其同意,使用 OAuth2 身份验证也是如此。
对于 OAuth2 身份验证,我们需要客户端 ID 和密钥。如何获取它的详细信息,请参阅https://developers.google.com/identity/protocols/OAuth2。
稍后,登录 Google API 控制台(位于 https://console.developers.google.com/)并获取客户端 ID 和密钥。
示例
以下是如何使用"requests-oauth2"的示例。
import requests
from requests_oauth2.services import GoogleClient
google_auth = GoogleClient(
   client_id="xxxxxxxxxxxxxxxxxxxxxxxxxx.apps.googleusercontent.com",
   redirect_uri="http://localhost/auth/success.html",
)
a = google_auth.authorize_url(
   scope=["profile", "email"],
   response_type="code",
)
res = requests.get(a)
print(res.url)
我们将无法重定向到给定的 URL,因为它需要登录 Gmail 帐户,但在这里,您将从示例中看到,google_auth 有效并且给出了授权的 URL。
输出
E:\prequests>python oauthRequest.py
https://accounts.google.com/o/oauth2/auth?redirect_uri=
http%3A%2F%2Flocalhost%2Fauth%2Fsuccess.html&
client_id=xxxxxxxxxxxxxxxxxxxxx.apps.googleusercontent.com&
scope=profile+email&response_type=code
Requests - 事件钩子
我们可以使用事件钩子将事件添加到请求的 URL。在下面的示例中,我们将添加一个回调函数,该函数将在响应可用时被调用。
示例
要添加回调,我们需要使用钩子参数,如下例所示 −
import requests
def printData(r, *args, **kwargs):
   print(r.url)
   print(r.text)
getdata = requests.get('https://jsonplaceholder.typicode.com/users',
hooks={'response': printData})
输出
E:\prequests>python makeRequest.py
https://jsonplaceholder.typicode.com/users
[
   {
      "id": 1,
      "name": "Leanne Graham",
      "username": "Bret",
      "email": "Sincere@april.biz",
      "address": {
         "street": "Kulas Light",
         "suite": "Apt. 556",
         "city": "Gwenborough",
         "zipcode": "92998-3874",
         "geo": {
            "lat": "-37.3159",
            "lng": "81.1496"
         }
      },
      "phone": "1-770-736-8031 x56442",
      "website": "hildegard.org",
      "company": {
         "name": "Romaguera-Crona",
         "catchPhrase": "Multi-layered client-server neural-net",
         "bs": "harness real-time e-markets"
      }
   }
]
您还可以调用多个回调函数,如下所示 −
示例
import requests
def printRequestedUrl(r, *args, **kwargs):
   print(r.url)
def printData(r, *args, **kwargs):
   print(r.text)
getdata = requests.get('https://jsonplaceholder.typicode.com/users',
hooks = {'response': [printRequestedUrl, printData]})
输出
E:\prequests>python makeRequest.py
https://jsonplaceholder.typicode.com/users
[
   {
      "id": 1,
      "name": "Leanne Graham",
      "username": "Bret",
      "email": "Sincere@april.biz",
      "address": {
         "street": "Kulas Light",
         "suite": "Apt. 556",
         "city": "Gwenborough",
         "zipcode": "92998-3874",
         "geo": {
            "lat": "-37.3159",
            "lng": "81.1496"
         }
      },
      "phone": "1-770-736-8031 x56442",
      "website": "hildegard.org",
      "company": {
         "name": "Romaguera-Crona",
         "catchPhrase": "Multi-layered client-server neural-net",
         "bs": "harness real-time e-markets"
      }
   }
]
您还可以将钩子添加到创建的会话中,如下所示 −
示例
import requests
def printData(r, *args, **kwargs):
print(r.text)
s = requests.Session()
s.hooks['response'].append(printData)
s.get('https://jsonplaceholder.typicode.com/users')
输出
E:\prequests>python makeRequest.py
[
   {
      "id": 1,
      "name": "Leanne Graham",
      "username": "Bret",
      "email": "Sincere@april.biz",
      "address": {
         "street": "Kulas Light",
         "suite": "Apt. 556",
         "city": "Gwenborough",
         "zipcode": "92998-3874",
         "geo": {
            "lat": "-37.3159",
            "lng": "81.1496"
         }
      },
      "phone": "1-770-736-8031 x56442",
      "website": "hildegard.org",
      "company": {
         "name": "Romaguera-Crona",
         "catchPhrase": "Multi-layered client-server neural-net",
         "bs": "harness real-time e-markets"
      }
   }
]
Requests - 代理
到目前为止,我们已经看到客户端直接连接并与服务器通信。使用代理,交互如下 −
- 客户端向代理发送请求。
- 代理将请求发送到服务器。
- 服务器将响应发送回代理。
- 代理将响应发送回客户端。
使用 Http 代理是分配的额外安全性,用于管理客户端和服务器之间的数据交换。请求库还可以通过使用代理参数来处理代理,如下所示 −
示例
import requests
proxies = {
'http': 'http://localhost:8080'
}
res = requests.get('http://httpbin.org/', proxies=proxies)
print(res.status_code)
请求将路由到 http://localhost:8080 URL。
输出
200
Requests - 使用请求进行 Web 抓取
我们已经了解了如何使用 Python 请求库从给定 URL 获取数据。我们将尝试从 Tutorialspoint 网站抓取数据,该网站位于 https://www.tutorialspoint.com/tutorialslibrary.htm,使用以下 −
- 请求库
- 来自 Python 的 Beautiful soup 库
我们已经安装了请求库,现在让我们安装 Beautiful soup 包。如果您想了解 beautiful soup 的更多功能,请访问以下网址:https://www.crummy.com/software/BeautifulSoup/bs4/doc/。
安装 Beautifulsoup
我们将在下面看到如何安装 Beautiful Soup−
E:\prequests>pip install beautifulsoup4
Collecting beautifulsoup4
Downloading https://files.pythonhosted.org/packages/3b/c8/a55eb6ea11cd7e5ac4ba
cdf92bac4693b90d3ba79268be16527555e186f0/beautifulsoup4-4.8.1-py3-none-any.whl
(
101kB)
|████████████████████████████████| 102kB 22kB/s
Collecting soupsieve>=1.2 (from beautifulsoup4)
Downloading https://files.pythonhosted.org/packages/81/94/03c0f04471fc245d08d0
a99f7946ac228ca98da4fa75796c507f61e688c2/soupsieve-1.9.5-py2.py3-none-any.whl
Installing collected packages: soupsieve, beautifulsoup4
Successfully installed beautifulsoup4-4.8.1 soupsieve-1.9.5
现在我们已安装好 Python 请求库和 Beautiful Soup。
现在让我们编写代码,从给定的 URL 中抓取数据。
网页抓取
import requests
from bs4 import BeautifulSoup
res = requests.get('https://www.tutorialspoint.com/tutorialslibrary.htm')
print("The status code is ", res.status_code)
print("
")
soup_data = BeautifulSoup(res.text, 'html.parser')
print(soup_data.title)
print("
")
print(soup_data.find_all('h4'))
使用请求库,我们可以从给定的 URL 获取内容,而 beautiful soup 库可以帮助解析它并按照我们想要的方式获取详细信息。
您可以使用 beautiful soup 库通过 Html 标签、类、id、css 选择器等多种方式获取数据。以下是我们得到的输出,其中我们打印了页面的标题以及页面上的所有 h4 标签。
输出
E:\prequests>python makeRequest.py
The status code is 200
<title>Free Online Tutorials and Courses</title>
[<h4>Academic</h4>, <h4>Computer Science</h4>, <h4>Digital Marketing</h4>,
<h4>Monuments</h4>,<h4>Machine Learning</h4>, <h4>Mathematics</h4>,
<h4>Mobile Development</h4>,<h4>SAP</h4>,
<h4>Software Quality</h4>, <h4>Big Data & Analytics</h4>,
<h4>Databases</h4>, <h4>Engineering Tutorials</h4>,
<h4>Mainframe Development</h4>,
<h4>Microsoft Technologies</h4>, <h4>Java Technologies</h4>,
<h4>XML Technologies</h4>, <h4>Python Technologies</h4>, <h4>Sports</h4>,
<h4>Computer Programming</h4>,<h4>DevOps</h4>, <h4>Latest Technologies</h4>,
<h4>Telecom</h4>, <h4>Exams Syllabus</h4>,
<h4>UPSC IAS Exams</h4>,
<h4>Web Development</h4>,
<h4>Scripts</h4>, <h4>Management</h4>,<h4>Soft Skills</h4>,
<h4>Selected Reading</h4>, <h4>Misc</h4>]


