使用 Java 的 DSA - 快速指南
使用 Java 的 DSA - 概述
什么是数据结构?
数据结构是一种以高效使用数据的方式组织数据的方法。以下术语是数据结构的基础术语。
接口 − 每个数据结构都有一个接口。接口表示数据结构支持的一组操作。接口仅提供支持的操作列表、它们可以接受的参数类型以及这些操作的返回类型。
实现 − 实现提供数据结构的内部表示。实现还提供了数据结构操作中使用的算法的定义。
数据结构的特征
正确性 − 数据结构实现应正确实现其接口。
时间复杂度 − 数据结构操作的运行时间或执行时间必须尽可能小。
空间复杂度 − 数据结构操作的内存使用量应尽可能少。
数据结构的需求
随着应用程序变得越来越复杂和数据丰富,应用程序现在面临三个常见问题。
数据搜索 −假设一家商店有 100 万 (106) 件商品的库存。如果应用程序要搜索某件商品,每次都必须在 100 万 (106) 件商品中搜索,这会减慢搜索速度。随着数据的增长,搜索速度会变慢。
处理器速度 − 处理器速度虽然非常高,但如果数据增长到十亿条记录,速度就会受到限制。
多个请求 − 由于数千名用户可以同时在 Web 服务器上搜索数据,即使是非常快的服务器也会在搜索数据时失败。
为了解决上述问题,数据结构应运而生。数据可以以这样的方式组织在数据结构中,即可能不需要搜索所有项目,并且可以几乎立即搜索所需的数据。
执行时间情况
通常有三种情况用于以相对方式比较各种数据结构的执行时间。
最坏情况 − 这是特定数据结构操作花费最大时间的情况。如果操作的最坏情况时间为 ƒ(n),则此操作所花费的时间不会超过 ƒ(n) 时间,其中 ƒ(n) 表示 n 的函数。
平均情况 − 这是描述数据结构操作平均执行时间的场景。如果一个操作需要 ƒ(n) 时间执行,则 m 个操作将需要 mƒ(n) 时间。
最佳情况 − 这是描述数据结构操作最短可能执行时间的场景。如果一个操作需要 ƒ(n) 时间执行,则实际操作可能花费随机数的时间,最大值为 ƒ(n)。
使用 Java 的 DSA - 环境设置
本地环境设置
如果您仍愿意为 Java 编程语言设置环境,那么本部分将指导您如何在您的机器上下载和设置 Java。请按照以下步骤设置环境。
Java SE 可从链接下载 Java免费获得。因此,您可以根据您的操作系统下载一个版本。
按照说明下载 Java 并运行 .exe 以在您的机器上安装 Java。在计算机上安装 Java 后,您需要设置环境变量以指向正确的安装目录:
设置 Windows 2000/XP 的路径
假设您已在 c:\Program Files\java\jdk 目录中安装了 Java:
右键单击"我的电脑",然后选择"属性"。
单击"高级"选项卡下的"环境变量"按钮。
现在更改"Path"变量,使其也包含 Java 可执行文件的路径。例如,如果路径当前设置为"C:\WINDOWS\SYSTEM32",则将路径更改为"C:\WINDOWS\SYSTEM32;c:\Program Files\java\jdk\bin"。
设置适用于 Windows 95/98/ME 的路径
假设您已在 c:\Program Files\java\jdk 目录 −
中安装了 Java编辑"C:\autoexec.bat"文件并在末尾添加以下行:
'SET PATH=%PATH%;C:\Program Files\java\jdk\bin'
设置适用于 Linux、UNIX、Solaris、FreeBSD 的路径:
应将环境变量 PATH 设置为指向 Java 二进制文件所在的位置安装。如果执行此操作时遇到问题,请参阅 shell 文档。
例如,如果您使用 bash 作为 shell,则应将以下行添加到".bashrc:export PATH=/path/to/java:$PATH"的末尾
常用 Java 编辑器
要编写 Java 程序,您需要一个文本编辑器。市场上有更复杂的 IDE。但目前,您可以考虑以下之一:
Notepad − 在 Windows 机器上,您可以使用任何简单的文本编辑器,如 Notepad(本教程推荐使用)、TextPad。
Netbeans − 是一个开源且免费的 Java IDE,可以从 https://www.netbeans.org/index.html 下载。
Eclipse − 也是一个由 eclipse 开源社区开发的 Java IDE,可以从 https://www.eclipse.org/。
下一步是什么?
下一章将教您如何编写和运行您的第一个 Java 程序以及开发应用程序所需的一些重要的 Java 基本语法。
使用 Java 的 DSA - 算法
算法概念
算法是一个逐步的过程,它定义了一组要按特定顺序执行以获得所需输出的指令。就数据结构而言,以下是算法的类别。
搜索 − 在数据结构中搜索项目的算法。
排序 − 按特定顺序对项目进行排序的算法
插入 − 在数据结构中插入项目的算法
更新 − 在数据结构中更新现有项目的算法
删除 −从数据结构中删除现有项目的算法
算法分析
算法分析处理数据结构中各种操作的执行时间或运行时间。操作的运行时间可以定义为每个操作执行的计算机指令数。由于任何操作的确切运行时间在不同的计算机上有所不同,我们通常将任何操作的运行时间分析为 n 的某个函数,其中 n 是数据结构中该操作处理的项目数。
渐近分析
渐近分析是指以数学计算单位计算任何操作的运行时间。例如,一个操作的运行时间计算为 f(n),另一个操作的运行时间计算为 g(n2)。这意味着第一个操作的运行时间将随着 n 的增加而线性增加,而第二个操作的运行时间将随着 n 的增加而呈指数增加。同样,如果 n 非常小,则两个操作的运行时间将几乎相同。
渐近符号
以下是用于计算算法运行时间复杂度的常用渐近符号。
Ο 符号
Ω 符号
θ 符号
大 O 符号,Ο
Ο(n) 是表达算法运行时间上限的正式方式。它衡量最坏情况下的时间复杂度或算法可能需要完成的最长时间。 例如,对于函数 f(n)Big Oh 符号用于简化函数。例如,我们可以用 Ο(f(nlogn)) 替换特定函数方程 7nlogn + n - 1。考虑以下场景:
它证明 f(n) = 7nlogn + n - 1 在 O(nlogn) 之外的范围内,使用常数 c = 8 和 n0 = 2。
Omega 符号,Ω
Ω(n) 是表达算法运行时间下限的正式方式。它衡量最佳情况下的时间复杂度或算法可能需要完成的最佳时间。
例如,对于函数 f(n)
Theta 符号,θ
θ(n) 是表达算法运行时间下限和上限的正式方式。它表示如下。
使用 Java 的 DSA - 数据结构
数据结构是一种以高效使用数据的方式组织数据的方法。以下术语是数据结构的基本术语。
数据定义
数据定义定义具有以下特征的特定数据。
原子 − 定义应定义单一概念
可跟踪 − 定义应能够映射到某些数据元素。
准确的 − 定义应明确无误。
清晰简洁的 − 定义应易于理解。
数据对象
数据对象表示具有数据的对象。
数据类型
数据类型是对各种数据类型(如整数、字符串等)进行分类的方法,它决定了可以与相应数据类型一起使用的值,以及可以对相应数据类型执行的操作类型。两种类型的数据类型 −
内置数据类型
派生数据类型
内置数据类型
语言具有内置支持的数据类型称为内置数据类型。例如,大多数语言都提供以下内置数据类型。
整数
布尔值(真、假)
浮点数(十进制数)
字符和字符串
派生数据类型
那些可以以某种方式实现的独立于实现的数据类型称为派生数据类型。这些数据类型通常由主要或内置数据类型及其相关操作的组合构建。例如 −
列表
数组
堆栈
队列
使用 Java 的 DSA - 数组
数组基础知识
数组是一个可以容纳固定数量项目的容器,这些项目应该是相同类型的。大多数数据结构都使用数组来实现其算法。以下是理解数组概念的重要术语
元素 − 存储在数组中的每个项目称为元素。
索引 −数组中元素的每个位置都有一个数字索引,用于标识元素。
数组表示
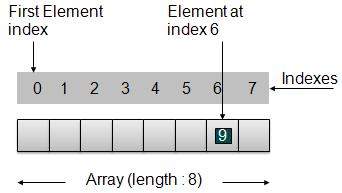
根据上图所示,以下是需要考虑的重要点。
索引从 0 开始。
数组长度为 8,这意味着它可以存储 8 个元素。
每个元素都可以通过其索引访问。例如,我们可以将索引 6 处的元素作为 9 获取。
基本操作
以下是数组支持的基本操作。
插入 −在给定索引处添加一个元素。
删除 − 删除给定索引处的一个元素。
搜索 − 使用给定索引或按值搜索元素。
更新 − 更新给定索引处的一个元素。
在 java 中,当数组用大小初始化时,它会按以下顺序为其元素分配默认值。
| 数据类型 | 默认值 |
|---|---|
| byte | 0 |
| short | 0 |
| int | 0 |
| long | 0L |
| float | 0.0f |
| double | 0.0d |
| char | '\u0000' |
| boolean | false |
| Object | null |
演示
package com.tutorialspoint.array;

public class ArrayDemo {
   public static void main(String[] args){

        // 声明一个数组
        int intArray[];

        // 初始化一个 8 int 数组
        // 预留 8 int 的内存
        intArray = new int[8];

        System.out.println("添加数据前的数组。");

        // 显示数组的元素。
        display(intArray);

        // 操作:插入
        // 在数组中添加元素
        for(int i = 0; i< intArray.length; i++)
        {
        // 将 i 的值放置在索引 i 处。
        System.out.println("在索引 "+i 处添加 "+i+");
        intArray[i] = i;
        }
        System.out.println();

        System.out.println("添加数据后的数组。");
        display(intArray);

        // 操作:插入
        // 任何位置的元素都可以直接更新
        int index = 5;
        intArray[index] = 10;

        System.out.println("更新索引处元素后的数组 " + index);
        display(intArray);

        // 操作:使用索引进行搜索
        // 使用索引搜索元素。
        System.out.println("索引处的数据 " + index + ": "+ intArray[index]);

        // 操作:使用值进行搜索
        // 使用值搜索元素。
        int value = 4;
        for(int i = 0; i< intArray.length; i++)
        {
         if(intArray[i] == value ){
            System.out.println(value + " Found at index "+i);
            break;
         }
        }
        System.out.println("Data at index " + index + ": "+ intArray[index]);
   }

   private static void display(int[] intArray){
      System.out.print("Array : [");
      for(int i = 0; i< intArray.length; i++)
      {
         // 显示索引 i 处元素的值。
         System.out.print(" "+intArray[i]);
      }
      System.out.println(" ]");
      System.out.println();
   }
}
如果我们编译并运行上述程序,则会产生以下结果 −
添加数据前的数组。
数组:[ 0 0 0 0 0 0 0 0 ]

在索引 0 处添加 0
在索引 1 处添加 1
在索引 2 处添加 2
在索引 3 处添加 3
在索引 4 处添加 4
在索引 5 处添加 5
在索引 6 处添加 6
在索引 7 处添加 7

添加数据后的数组。
数组:[ 0 1 2 3 4 5 6 7 ]

更新索引 5 处的元素后的数组
数组:[ 0 1 2 3 4 10 6 7 ]

索引 5 处的数据:10
在索引 4 处找到 4
使用 Java 的 DSA - 链接列表
链接列表基础知识
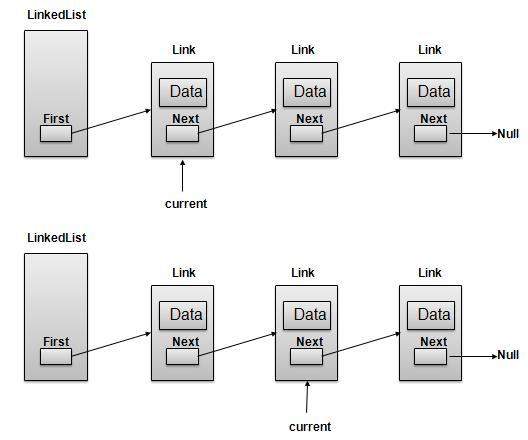
链接列表是包含项目的链接序列。每个链接都包含与另一个链接的连接。链接列表是继数组之后第二常用的数据结构。以下是理解链接列表概念的重要术语。
链接 − 链接列表的每个链接都可以存储称为元素的数据。
下一个 − 链接列表的每个链接都包含指向下一个链接的链接,称为下一个。
LinkedList − LinkedList 包含指向第一个 Link 的连接链接,称为 First。
Linked List 表示
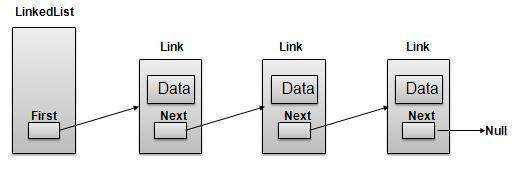
如上图所示,以下是需要考虑的重要点。
LinkedList 包含一个名为 first 的链接元素。
每个 Link 都带有一个数据字段和一个称为 next 的链接字段。
每个 Link 都使用其下一个链接与其下一个链接链接。
Last Link 带有一个 Link 作为 null 来标记列表的结尾。
Linked List 的类型
以下是各种类型的 Link列表。
简单链接列表 − 项目导航仅向前。
双向链接列表 − 项目可以向前和向后导航。
循环链接列表 − 最后一项包含第一个元素的链接作为下一个,并且第一个元素具有到最后一个元素的链接作为上一个。
基本操作
以下是列表支持的基本操作。
插入 − 在列表开头添加一个元素。
删除 −删除列表开头的一个元素。
显示 − 显示完整列表。
搜索 − 使用给定的键搜索元素。
删除 − 使用给定的键删除元素。
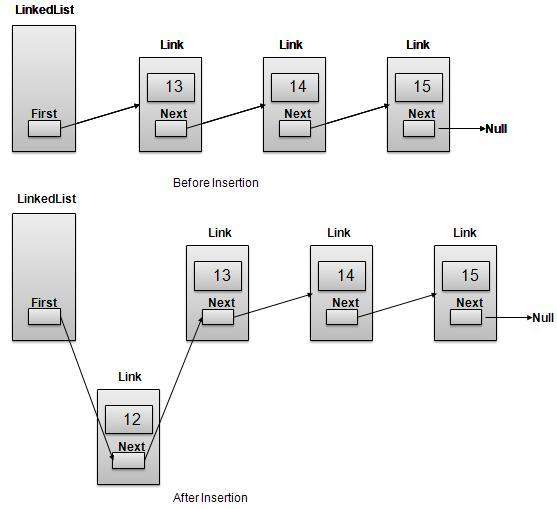
插入操作
插入分为三个步骤:
使用提供的数据创建新链接。
将新链接指向旧的第一个链接。
将第一个链接指向此新链接。
//在第一个位置插入链接
public void insertFirst(int key, int data){
   //创建链接
   Link link = new Link(key,data);
   //将其指向旧的第一个节点
   link.next = first;
   //将 first 指向新的第一个节点
   first = link;
}
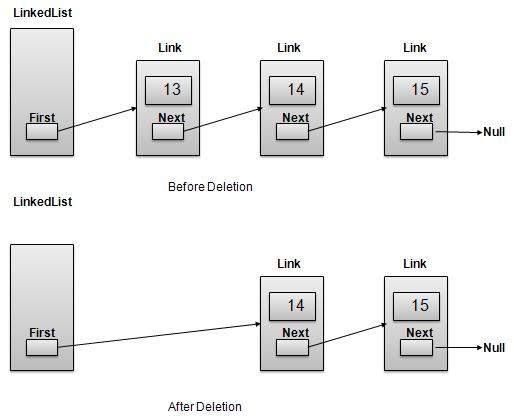
删除操作
删除分为两个步骤:
获取 First Link 指向的链接作为临时链接。
将 First Link 指向临时链接的下一个链接。
//删除第一项
public Link deleteFirst(){
   //保存对第一个链接的引用
   Link tempLink = first;
   //将第一个链接旁边的标记为第一个
   first = first.next;
   //返回删除的链接
   return tempLink;
}
导航操作
导航是一个递归步骤过程,是搜索、删除等许多操作的基础:
获取第一个链接指向的链接作为当前链接。
检查当前链接是否不为空并显示它。
将当前链接指向当前链接的下一个链接并移动到上一步。
注意
//显示列表
public void display(){
   //从头开始
   Link current = first;
   //导航到列表末尾
   System.out.print("[ ");
   while(current != null){
      //打印数据
      current.display();
      //移动到下一个项目
      current = current.next;
      System.out.print(" ");
   }
   System.out.print(" ]");
}
高级操作
以下是针对列表指定的高级操作。
排序 − 根据特定顺序对列表进行排序。
反转 − 反转链接列表。
连接 − 连接两个列表。
排序操作
我们使用冒泡排序对列表进行排序。
public void sort(){

   int i, j, k, tempKey, tempData ;
   Link current,next;
   int size = length();
   k = size ;
   for ( i = 0 ; i < size - 1 ; i++, k-- ) {
      current = first ;
      next = first.next ;
      for ( j = 1 ; j < k ; j++ ) {
         if ( current.data > next.data ) {
            tempData = current.data ;
            current.data = next.data;
            next.data = tempData ;

            tempKey = current.key;
            current.key = next.key;
            next.key = tempKey;
         }
         current = current.next;
         next = next.next;
      }
   }
}
反向操作
以下代码演示了如何反转单个链接列表。
public LinkedList reverse() {
    LinkedList reversedlist = new LinkedList();
    Link nextLink = null;
    reverselist.insertFirst(first.key, first.data);

    Link currentLink = first;
    // 直到列表中没有更多数据,
    // 在第一个之前插入当前链接并向前移动。
    while(currentLink.next != null){
        nextLink = currentLink.next;
        // 在新列表的开头插入。
        reverselist.insertFirst(nextLink.key, nextLink.data);
        //前进到下一个节点
        currentLink = currentLink.next;
    }
    return reversedlist;
}
连接操作
以下代码演示了反转单个链接列表。
public void concatenate(LinkedList list){
   if(first == null){
      first = list.first;
   }
   if(list.first == null){
      return;
   }
   Link temp = first;
   while(temp.next !=null) {
      temp = temp.next;
   }
   temp.next = list.first;
}
演示
Link.java
package com.tutorialspoint.list;

public class Link {
   public int key;
   public int data;
   public Link next;

   public Link(int key, int data){
      this.key = key;
      this.data = data;
   }

   public void display(){
      System.out.print("{"+key+","+data+"}");
   }
}
LinkedList.java
package com.tutorialspoint.list;

public class LinkedList {
    //此链接始终指向链接列表中的第一个链接
    //private Link first;

    //创建一个空链接列表
    public LinkedList(){
        first = null;
    }

   //在第一个位置插入链接
   public void insertFirst(int key, int data){
      //创建链接
      Link link = new Link(key,data);
      //将其指向旧的第一个节点
      link.next = first;
      //将 first 指向新的第一个节点
      first = link;
   }

   //delete first item
   public Link deleteFirst(){
      //保存对第一个链接的引用
      Link tempLink = first;
      //将第一个链接旁边的标记为第一个
      first = first.next;
      //返回删除的链接
      return tempLink;
   }

   //display the list
   public void display(){
      //从头开始
      Link current = first;
      //导航到列表末尾
      System.out.print("[ ");
      while(current != null){
         //打印数据
         current.display();
         //移动到下一个项目
         current = current.next;
         System.out.print(" ");
      }
      System.out.print(" ]");
   }

   //找到具有给定键的链接
   public Link find(int key){
      //从第一个链接开始
      Link current = first;

      //如果列表为空
      if(first == null){
         return null;
      }
      //浏览列表
      while(current.key != key){
         //如果它是最后一个节点
         if(current.next == null){
            return null;
         }else{
            //转到下一个链接
            current = current.next;
         }
      }
      //如果找到数据,返回当前链接
      return current;
   }

   //删除指定键的链接
   public Link delete(int key){
      //从第一个链接开始
      Link current = first;
      Link previous = null;
      //如果列表为空
      if(first == null){
         return null;
      }

      //浏览列表
      while(current.key != key){
         //如果它是最后一个节点
         if(current.next == null){
            return null;
         }else{
            //存储对当前链接的引用
            previous = current;
            //移动到下一个链接
            current = current.next;
         }
      }

      //找到匹配项,更新链接
      if(current == first) {
         //将 first 改为指向 next 链接
         first = first.next;
      }else {
         //绕过当前链接
         previous.next = current.next;
      }
      return current;
   }

   //列表是否为空
   public boolean isEmpty(){
      return first == null;
   }

   public int length(){
      int length = 0;
      for(Link current = first; current!=null;
         current = current.next){
         length++;
      }
      return length;
   }

   public void sort(){
      int i, j, k, tempKey, tempData ;
      Link current,next;
      int size = length();
      k = size ;
      for ( i = 0 ; i < size - 1 ; i++, k-- ) {
         current = first ;
         next = first.next ;
         for ( j = 1 ; j < k ; j++ ) {
            if ( current.data > next.data ) {
               tempData = current.data ;
               current.data = next.data;
               next.data = tempData ;

	           tempKey = current.key;
	           current.key = next.key;
	           next.key = tempKey;
            }
            current = current.next;
           next = next.next;
         }
      }
   }

   public LinkedList reverse() {
      LinkedList reversedlist = new LinkedList();
      Link nextLink = null;
      reversedlist.insertFirst(first.key, first.data);

      Link currentLink = first;
      // 直到列表中没有更多数据,
      // 在第一个链接之前插入当前链接并继续前进。
      while(currentLink.next != null){
         nextLink = currentLink.next;
         // 插入到新列表的开头。
         reversedlist.insertFirst(nextLink.key, nextLink.data);
         //前进到下一个节点
         currentLink = currentLink.next;
      }
      return reversedlist;
   }

   public void concatenate(LinkedList list){
      if(first == null){
         first = list.first;
      }
      if(list.first == null){
         return;
      }
      Link temp = first;

      while(temp.next !=null) {
         temp = temp.next;
      }
      temp.next = list.first;
   }
}
LinkedListDemo.java
package com.tutorialspoint.list;

public class LinkedListDemo {
   public static void main(String args[]){
      LinkedList list = new LinkedList();

      list.insertFirst(1, 10);
      list.insertFirst(2, 20);
      list.insertFirst(3, 30);
      list.insertFirst(4, 1);
      list.insertFirst(5, 40);
      list.insertFirst(6, 56);

      System.out.print("原始列表: ");
      list.display();
      System.out.println("");
      while(!list.isEmpty()){
         Link temp = list.deleteFirst();
         System.out.print("删除的值:");
         temp.display();
         System.out.println("");
      }
      System.out.print("删除所有项目后的列表: ");
      list.display();
      System.out.println("");
      list.insertFirst(1, 10);
      list.insertFirst(2, 20);
      list.insertFirst(3, 30);
      list.insertFirst(4, 1);
      list.insertFirst(5, 40);
      list.insertFirst(6, 56);

      System.out.print("Restored List: ");
      list.display();
      System.out.println("");

      Link foundLink = list.find(4);
      if(foundLink != null){
        System.out.print("Element found: ");
         foundLink.display();
         System.out.println("");
      }else{
         System.out.println("Element not found.");
      }

      list.delete(4);
      System.out.print("List after deleting an item: ");
      list.display();
      System.out.println("");
      foundLink = list.find(4);
      if(foundLink != null){
         System.out.print("Element found: ");
         foundLink.display();
         System.out.println("");
      }else{
         System.out.print("Element not found. {4,1}");
      }
      System.out.println("");
      list.sort();
      System.out.print("List after sorting the data: ");
      list.display();
      System.out.println("");
      System.out.print("Reverse of the list: ");
      LinkedList list1 = list.reverse();
      list1.display();
      System.out.println("");

      LinkedList list2 = new LinkedList();

      list2.insertFirst(9, 50);
      list2.insertFirst(8, 40);
      list2.insertFirst(7, 20);

      list.concatenate(list2);
      System.out.print("List after concatenation: ");
      list.display();
      System.out.println("");
   }
}
如果我们编译并运行上述程序,则会产生以下结果:
原始列表: [ {6,56} {5,40} {4,1} {3,30} {2,20} {1,10}  ]
删除的值:{6,56}
删除的值:{5,40}
删除的值:{4,1}
删除的值:{3,30}
删除的值:{2,20}
删除的值:{1,10}
删除所有项目后的列表: [  ]
恢复的列表:[ {6,56} {5,40} {4,1} {3,30} {2,20} {1,10} ]
找到元素:{4,1}
删除项目后的列表:[ {6,56} {5,40} {3,30} {2,20} {1,10} ]
未找到元素。{4,1}
对数据进行排序后的列表:[ {1,10} {2,20} {3,30} {5,40} {6,56} ]
列表的反转:[ {6,56} {5,40} {3,30} {2,20} {1,10} ]
连接后的列表:[ {1,10} {2,20} {3,30} {5,40} {6,56} {7,20} {8,40} {9,50} ]
使用 Java 的 DSA - 双向链表
双向链表基础知识
双向链表是链表的一种变体,与单链表相比,双向链表可以轻松地向前和向后导航。以下是理解双向链表概念的重要术语
链接 − 链表的每个链接都可以存储称为元素的数据。
下一个 − 链表的每个链接都包含一个指向下一个链接的链接,称为下一个。
上一个 − 链表的每个链接都包含一个指向上一个链接的链接,称为上一个。
链接列表 − LinkedList 包含指向第一个 Link(称为 First)和最后一个 Link(称为 Last)的连接链接。
双向链接列表表示
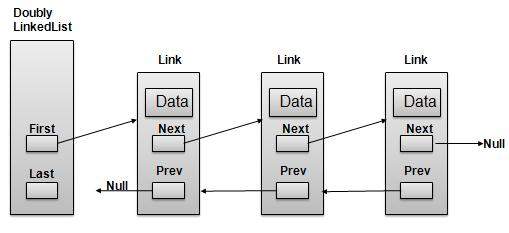
如上图所示,以下是需要考虑的重要点。
双向链接列表包含一个称为 first 和 last 的链接元素。
每个 Link 都带有一个数据字段和一个称为 next 的链接字段。
每个 Link 都使用其下一个链接与其下一个链接链接。
每个 Link 都使用其上一个链接与其上一个链接链接。
最后一个 Link 带有一个为 null 的 Link 来标记结束列表。
基本操作
以下是列表支持的基本操作。
插入 − 在列表开头添加一个元素。
删除 − 删除列表开头的一个元素。
插入最后一个 − 在列表末尾添加一个元素。
删除最后一个 − 从列表末尾删除一个元素。
在后面插入 − 在列表的某项后面添加一个元素。
删除 −使用键从列表中删除一个元素。
向前显示 − 以向前方式显示完整列表。
向后显示 − 以向后方式显示完整列表。
插入操作
以下代码演示了在双向链表开头的插入操作。
//在第一个位置插入链接
public void insertFirst(int key, int data){
   //创建链接
   Link link = new Link(key,data);

    if(isEmpty()){
        //使其成为最后一个链接
        last = link;
    }else {
        //更新第一个上一个链接
        first.prev = link;
    }

    //将其指向旧的第一个链接
    link.next = first;
    //将 first 指向新的第一个链接
    first = link;
}
删除操作
以下代码演示了双向链表开头的删除操作。
//删除第一个位置的链接
public Link deleteFirst(){
   //保存对第一个链接的引用
   Link tempLink = first;
   //如果只有一个链接
   if(first.next == null){
      last = null;
   }else {
      first.next.prev = null;
   }
   first = first.next;
   //返回删除的链接
   return tempLink;
}
在末尾插入操作
以下代码演示了在双向链表的最后一个位置插入操作。
//在最后一个位置插入链接
public void insertLast(int key, int data){
   //创建链接
   Link link = new Link(key,data);

    if(isEmpty()){
        //使其成为最后一个链接
        last = link;
    }else {
        //使链接成为新的最后一个链接
        last.next = link;
        //将旧的最后一个节点标记为新链接的前一个
        link.prev = last;
    }

    //将最后一个指向新的最后一个节点
    last = link;
}
演示
Link.java
package com.tutorialspoint.list;

public class Link {
   public int key;
   public int data;
   public Link next;
   public Link prev;

   public Link(int key, int data){
      this.key = key;
      this.data = data;
   }

   public void display(){
      System.out.print("{"+key+","+data+"}");
   }
}
DoublyLinkedList.java
package com.tutorialspoint.list;

public class DoublyLinkedList {

    //此链接始终指向第一个链接
    private Link first;
    //此链接始终指向最后一个链接
    private Link last;

    // 创建一个空的链接列表
   public DoublyLinkedList(){
      first = null;
      last = null;
   }

   //列表是否为空
   public boolean isEmpty(){
      return first == null;
   }

   //在第一个位置插入链接
   public void insertFirst(int key, int data){
      	//创建链接
        Link link = new Link(key,data);

        if(isEmpty()){
            //使其成为最后一个链接
            last = link;
        }else {
            //更新第一个上一个链接
            first.prev = link;
        }

        //将其指向旧的第一个链接
        link.next = first;
        //将 first 指向新的第一个链接
        first = link;
   }

   //在最后位置插入链接
   public void insertLast(int key, int data){
        //创建链接
        Link link = new Link(key,data);

        if(isEmpty()){
            //使其成为最后一个链接
            last = link;
        }else {
            //使链接成为新的最后一个链接
            last.next = link;
            //将旧的最后一个节点标记为新链接的前一个
            link.prev = last;
        }

        //将最后一个指向新的最后一个节点
        last = link;
   }

   //删除第一个位置的链接
   public Link deleteFirst(){
      //保存对第一个链接的引用
      Link tempLink = first;
      //如果只有一个链接
      if(first.next == null){
         last = null;
      }else {
         first.next.prev = null;
      }
      first = first.next;
      //返回删除的链接
      return tempLink;
   }

   //删除最后一个位置的链接
   public Link deleteLast(){
      //保存对最后一个链接的引用
      Link tempLink = last;
      //如果只有一个链接
      if(first.next == null){
         first = null;
      }else {
         last.prev.next = null;
      }
      last = last.prev;
      //返回删除的链接
      return tempLink;
   }

   //从第一个到最后一个显示列表
   public void displayForward(){
      //从头开始
      Link current = first;
      //导航到列表末尾
      System.out.print("[ ");
      while(current != null){
         //打印数据
         current.display();
         //移动到下一个项目
         current = current.next;
         System.out.print(" ");
      }
      System.out.print(" ]");
   }

    //从最后一个到第一个显示列表
    public void displayBackward(){
        //从最后一个开始
        Link current = last;
        //导航到列表开头
        System.out.print("[ ");
        while(current != null){
         //打印数据
         current.display();
         //移动到下一个项目
         current = current.prev;
         System.out.print(" ");
      }
      System.out.print(" ]");
   }

   //删除指定键的链接
   public Link delete(int key){
      //从第一个链接开始
      Link current = first;
      //如果列表为空
      if(first == null){
         return null;
      }

      //浏览列表
      while(current.key != key){
      //如果它是最后一个节点
      if(current.next == null){
            return null;
         }else{
            //移动到下一个链接
            current = current.next;
         }
      }

      //找到匹配项,更新链接
      if(current == first) {
         //将 first 改为指向 next 链接
            first = current.next;
         }else {
            //绕过当前链接
            current.prev.next = current.next;
         }

         if(current == last){
            //将最后一个链接改为指向上一个链接
            last = current.prev;
         }else {
            current.next.prev = current.prev;
         }
         return current;
      }

   public boolean insertAfter(int key, int newKey, int data){
      //从第一个链接开始
      Link current = first;
      //如果列表为空
      if(first == null){
         return false;
      }

      //浏览列表
      while(current.key != key){
         //如果它是最后一个节点
         if(current.next == null){
            return false;
         }else{
            //移动到下一个链接
            current = current.next;
         }
      }

      Link newLink = new Link(newKey,data);
      if(current==last) {
         newLink.next = null;
         last = newLink;
      }
      else {
         newLink.next = current.next;
         current.next.prev = newLink;
      }
      newLink.prev = current;
      current.next = newLink;
      return true;
   }
}
DoublyLinkedListDemo.java
package com.tutorialspoint.list;

public class DoublyLinkedListDemo {
    public static void main(String args[]){
        DoublyLinkedList list = new DoublyLinkedList();

        list.insertFirst(1, 10);
        list.insertFirst(2, 20);
        list.insertFirst(3, 30);

        list.insertLast(4, 1);
        list.insertLast(5, 40);
        list.insertLast(6, 56);

        System.out.print("
List (First to Last): ");
        list.displayForward();
        System.out.println("");
        System.out.print("
List (Last to first): ");
        list.displayBackward();

        System.out.print("
List , after deleting first record: ");
        list.deleteFirst();
        list.displayForward();

        System.out.print("
List , after deleting last record: ");
        list.deleteLast();
        list.displayForward();

        System.out.print("
List , insert after key(4) : ");
        list.insertAfter(4,7, 13);
        list.displayForward();

        System.out.print("
List  , after delete key(4) : ");
        list.delete(4);
        list.displayForward();

    }
}
如果我们编译并运行上述程序,则会产生以下结果 −
List (First to Last): [ {3,30} {2,20} {1,10} {4,1} {5,40} {6,56}  ]

List (Last to first): [ {6,56} {5,40} {4,1} {1,10} {2,20} {3,30}  ]
List (First to Last) after deleting first record: [ {2,20} {1,10} {4,1} {5,40} {6,56}  ]
List  (First to Last) after deleting last record: [ {2,20} {1,10} {4,1} {5,40}  ]
List  (First to Last) insert after key(4) : [ {2,20} {1,10} {4,1} {7,13} {5,40}  ]
List  (First to Last) after delete key(4) : [ {2,20} {1,10} {7,13} {5,40}  ]
使用 Java 的 DSA - 循环链接列表
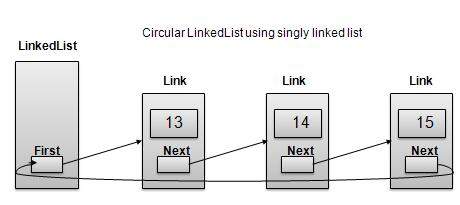
循环链接列表基础知识
循环链接列表是链接列表的一种变体,其中第一个元素指向最后一个元素,最后一个元素指向第一个元素。单链表和双链表都可以制成循环链表
单链表作为循环
双链表作为循环
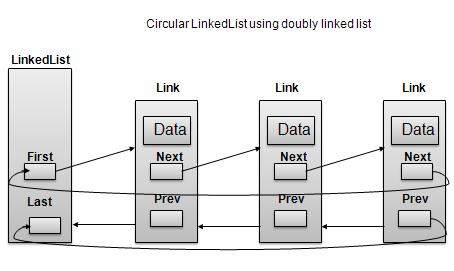
根据上图,以下是需要考虑的重要点。
无论是单链表还是双链表,Last Link'next 都指向列表的第一个链接列表。
如果是双向链表,第一个链接的 prev 指向列表的最后一个。
基本操作
以下是循环列表支持的重要操作。
插入 − 在列表开头插入一个元素。
删除 − 从列表开头插入一个元素。
显示 −显示列表。
长度操作
以下代码演示了基于单链表的循环链表中的插入操作。
//在第一个位置插入链接
public void insertFirst(int key, int data){
    //创建链接
   Link link = new Link(key,data);
   if (isEmpty()) {
      first  = link;
      first.next = first;
   }
   else{
      //将其指向旧的第一个节点
      link.next = first;
      //将 first 指向新的第一个节点
      first = link;
   }
}
删除操作
以下代码演示了基于单链表的循环链表中的删除操作。
//删除第一个位置的链接
public Link deleteFirst(){
    //保存对第一个链接的引用
    Link tempLink = first;
    //如果只有一个链接
    if(first.next == null){
        last = null;
    }else {
        first.next.prev = null;
    }
    first = first.next;
    //返回已删除的链接
    return tempLink;
}
显示列表操作
以下代码演示了循环链表中的显示列表操作。
public void display(){
    //从头开始
    Link current = first;
    //导航到列表末尾
    System.out.print("[ ");
    if(first != null){
        while(current.next != current){
            //打印数据
            current.display();
            //移动到下一个项目
            current = current.next;
            System.out.print(" ");
        }
    }
    System.out.print(" ]");
}
演示
Link.java
package com.tutorialspoint.list;

public class CircularLinkedList {
    //此链接始终指向第一个链接
    private Link first;

    // 创建一个空的链接列表
   public CircularLinkedList(){
      first = null;
   }

   public boolean isEmpty(){
      return first == null;
   }

   public int length(){
      int length = 0;

      //如果列表为空
      if(first == null){
         return 0;
      }

      Link current = first.next;

      while(current != first){
         length++;
         current = current.next;
      }
      return length;
   }

   //在第一个位置插入链接
   public void insertFirst(int key, int data){
   //创建链接
   Link link = new Link(key,data);
      if (isEmpty()) {
         first  = link;
         first.next = first;
      }
      else{
         //将其指向旧的第一个节点
         link.next = first;
         //将 first 指向新的第一个节点
         first = link;
      }
   }

   //delete first item
   public Link deleteFirst(){
      //保存对第一个链接的引用
      Link tempLink = first;
      if(first.next == first){
         first = null;
         return tempLink;
      }

      //将第一个链接旁边的标记为第一个
      first = first.next;
      //返回删除的链接
      return tempLink;
   }

   public void display(){

      //从头开始
      Link current = first;
      //导航到列表末尾
      System.out.print("[ ");
      if(first != null){
         while(current.next != current){
            //打印数据
            current.display();
            //移动到下一个项目
            current = current.next;
            System.out.print(" ");
         }
      }
      System.out.print(" ]");
   }
}
DoublyLinkedListDemo.java
package com.tutorialspoint.list;

public class CircularLinkedListDemo {
   public static void main(String args[]){
      CircularLinkedList list = new CircularLinkedList();

      list.insertFirst(1, 10);
      list.insertFirst(2, 20);
      list.insertFirst(3, 30);
      list.insertFirst(4, 1);
      list.insertFirst(5, 40);
      list.insertFirst(6, 56);

      System.out.print("原始列表: ");
      list.display();
      System.out.println("");
      while(!list.isEmpty()){
         Link temp = list.deleteFirst();
         System.out.print("删除的值:");
         temp.display();
         System.out.println("");
      }
      System.out.print("删除所有项目后的列表: ");
      list.display();
      System.out.println("");
   }
}
如果我们编译并运行上述程序,则会产生以下结果 −
原始列表: [ {6,56} {5,40} {4,1} {3,30} {2,20}  ]
删除的值:{6,56}
删除的值:{5,40}
删除的值:{4,1}
删除的值:{3,30}
删除的值:{2,20}
删除的值:{1,10}
删除所有项目后的列表: [  ]
使用 Java 的 DSA -堆栈
概述
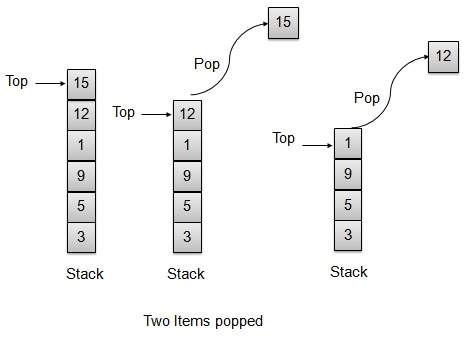
Stack 堆栈是一种数据结构,它只允许在一端对数据进行操作。它只允许访问最后插入的数据。Stack 也称为 LIFO(后进先出)数据结构,Push 和 Pop 操作以这样的方式相关:只有最后推送(添加到堆栈)的项目才能弹出(从堆栈中删除)。
Stack 表示
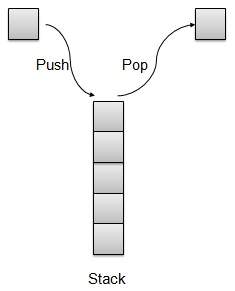
我们将在本文中使用数组实现 Stack。
基本操作
以下是堆栈的两个主要操作。
Push −将元素推送到堆栈顶部。
Pop − 从堆栈顶部弹出一个元素。
堆栈支持以下几个操作。
Peek − 获取堆栈顶部元素。
isFull − 检查堆栈是否已满。
isEmpty − 检查堆栈是否为空。
推送操作
每当将元素推送到堆栈时,堆栈都会将该元素存储在存储的顶部并增加顶部索引以供以后使用。如果存储已满,通常会显示错误消息。

// 将项目推送到堆栈顶部
public void push(int data) {

   if(!isFull()){
      // 将 top 加 1 并插入数据
      intArray[++top] = data;
   }else{
      System.out.println("Cannot add data. Stack is full.");
   }
}
弹出操作
每当要从堆栈中弹出一个元素时,堆栈都会从存储顶部检索该元素并减少顶部索引以供以后使用。
// 从堆栈顶部弹出项目
public int pop() {
    // 检索数据并将顶部减少 1
    return intArray[top--];
}
堆栈实现
Stack.java
package com.tutorialspoint.datastructure;

public class Stack {
    private int size; // 堆栈的大小
    private int[] intArray; // 堆栈存储
    private int top; // 堆栈顶部

    // 构造函数
    public Stack(int size){
        this.size = size;
        intArray = new int[size]; //初始化数组
        top = -1; //堆栈最初为空
    }

    // 操作:推送
    // 将项目推送到堆栈顶部
    public void push(int data) {

        if(!isFull()){
            // 将顶部增加 1 并插入数据
            intArray[++top] = data;
        }else{
            System.out.println("无法添加数据。堆栈已满。");
        }
    }

    // 操作:弹出
    // 从堆栈顶部弹出项目
    public int pop() {
        //检索数据并将顶部减少 1
        return intArray[top--];
    }

    // 操作:Peek
    // 查看堆栈顶部的数据
    public int peek() {
        // 从顶部检索数据
        return intArray[top];
    }

    // 操作:isFull
    // 如果堆栈已满,则返回 true
    public boolean isFull(){
        return (top == size-1);
    }

    // 操作:isEmpty
    // 如果堆栈为空,则返回 true
    public boolean isEmpty(){
        return (top == -1);
    }
}
演示程序
StackDemo.java
package com.tutorialspoint.datastructure;

public class StackDemo {
   public static void main (String[] args){

        // 创建新堆栈
        Stack stack = new Stack(10);

        // 将项目推送到堆栈上
        stack.push(3);
        stack.push(5);
        stack.push(9);
        stack.push(1);
        stack.push(12);
        stack.push(15);

        System.out.println("堆栈顶部的元素:" + stack.peek());
        System.out.println("元素:");

        // 打印堆栈数据
        while(!stack.isEmpty()){
         int data = stack.pop();
         System.out.println(data);
        }

        System.out.println("堆栈已满: " + stack.isFull());
        System.out.println("堆栈为空: " + stack.isEmpty());
   }
}
如果我们编译并运行上述程序,则会产生以下结果 −
堆栈顶部的元素:15
元素:
15
12
1
9
5
3
堆栈已满:false
堆栈为空:true
使用 Java 的 DSA - 解析表达式
像 2*(3*4) 这样的普通数学表达式更容易被人脑解析,但对于算法来说,解析这样的表达式会非常困难。为了缓解这种困难,可以使用两步方法通过算法解析数学表达式。
将提供的算术表达式转换为后缀表示法。
评估后缀表示法。
中缀表示法
普通数学表达式遵循中缀表示法,其中运算符位于操作数之间。例如 A+B,其中 A 是第一个操作数,B 是第二个操作数,+ 是作用于两个操作数的运算符。
后缀表示法
后缀表示法与普通算术表达式或中缀表示法不同,因为运算符位于操作数之后。例如,请考虑以下示例
| Sr.No | 中缀表示法 | 后缀表示法 |
|---|---|---|
| 1 | A+B | AB+ |
| 2 | (A+B)*C | AB+C* |
| 3 | A*(B+C) | ABC+* |
| 4 | A/B+C/D | AB/CD/+ |
| 5 | (A+B)*(C+D) | AB+CD+* |
| 6 | ((A+B)*C)-D | AB+C*D- |
中缀到后缀的转换
在研究如何将中缀转换为后缀表示法之前,我们需要考虑以下中缀表达式求值的基础知识。
中缀表达式的求值从左到右开始。
记住优先级,例如例如 * 的优先级高于 +。例如
2+3*4 = 2+12。
2+3*4 = 14。
使用括号覆盖优先级,例如
(2+3)*4 = 5*4.
(2+3)*4= 20.
现在让我们手动将一个简单的中缀表达式 A+B*C 转换为后缀表达式。
| 步骤 | 读取的字符 | 到目前为止解析的中缀表达式 | 到目前为止开发的后缀表达式 | 备注 |
|---|---|---|---|---|
| 1 | A | A | A | |
| 2 | + | A+ | A | |
| 3 | B | A+B | AB | |
| 4 | * | A+B* | AB | + 无法复制,因为 * 具有更高的优先级。 |
| 5 | C | A+B*C | ABC | |
| 6 | A+B*C | ABC* | 复制 *,因为有两个操作数 B 和 C | |
| 7 | A+B*C | ABC*+ | 复制 +,因为有两个操作数 BC 和 A |
现在让我们使用堆栈将上面的中缀表达式 A+B*C 转换为后缀表达式。
| 步骤 | 读取字符 | 到目前为止解析的中缀表达式 | 到目前为止开发的后缀表达式 | 堆栈内容 | 备注 |
|---|---|---|---|---|---|
| 1 | A | A | A | ||
| 2 | + | A+ | A | + | 将 + 运算符推入堆栈。 |
| 3 | B | A+B | AB | + | |
| 4 | * | A+B* | AB | +* | 运算符 * 的优先级高于 +。将 * 运算符推送到堆栈中。否则,+ 会弹出。 |
| 5 | C | A+B*C | ABC | +* | |
| 6 | A+B*C | ABC* | + | 没有更多操作数,弹出 * 运算符。 | |
| 7 | A+B*C | ABC*+ | 弹出 + 运算符。 |
现在让我们看另一个例子,通过使用堆栈将中缀表达式 A*(B+C) 转换为后缀表达式。
| 步骤 | 读取的字符 | 到目前为止解析的中缀表达式 | 到目前为止开发的后缀表达式 | 堆栈内容 | 备注 |
|---|---|---|---|---|---|
| 1 | A | A | A | ||
| 2 | * | A* | A | * | 将 * 运算符推送到堆栈中。 |
| 3 | ( | A*( | A | *( | 将 ( 推送到堆栈中。 |
| 4 | B | A*(B | AB | *( | |
| 5 | + | A*(B+ | AB | *(+ | 将 + 压入堆栈。 |
| 6 | C | A*(B+C | ABC | *(+ | |
| 7 | ) | A*(B+C) | ABC+ | *( | 弹出 + 运算符。 |
| 8 | A*(B+C) | ABC+ | * | 弹出 ( 运算符。 | |
| 9 | A*(B+C) | ABC+* | 弹出其余运算符。 |
演示程序
现在我们来演示如何使用堆栈将中缀表达式转换为后缀表达式,然后对后缀表达式求值。
Stack.java
package com.tutorialspoint.expression;

public class Stack {

   private int size;
   private int[] intArray;
   private int top;

   //Constructor
   public Stack(int size){
      this.size = size;
      intArray = new int[size];
      top = -1;
   }

   //将项目推送到堆栈顶部
   public void push(int data) {
      if(!isFull()){
         //将顶部增加 1 并插入数据
         intArray[++top] = data;
      }else{
         System.out.println("Cannot add data. Stack is full.");
      }
   }

    //从堆栈顶部弹出项目
    public int pop() {
        //检索数据并将顶部减 1
        return intArray[top--];
    }

    //查看堆栈顶部的数据
    public int peek() {
        //从顶部检索数据
        return intArray[top];
    }

    //如果堆栈已满,则返回 true
    public boolean isFull(){
        return (top == size-1);
    }

    //如果堆栈为空,则返回 true
    public boolean isEmpty(){
        return (top == -1);
    }
}
InfixToPostFix.java
package com.tutorialspoint.expression;

public class InfixToPostfix {
   private Stack stack;
   private String input = "";
   private String output = "";

   public InfixToPostfix(String input){
      this.input = input;
      stack = new Stack(input.length());
   }

   public String translate(){
      for(int i=0;i<input.length();i++){
         char ch = input.charAt(i);
            switch(ch){
               case '+':
               case '-':
                  gotOperator(ch, 1);
                  break;
               case '*':
               case '/':
                  gotOperator(ch, 2);
                  break;
               case '(':
                  stack.push(ch);
                  break;
               case ')':
                  gotParenthesis(ch);
                  break;
               default:
                  output = output+ch;
                  break;
          }
      }

      while(!stack.isEmpty()){
         output = output + (char)stack.pop();
      }

      return output;
   }

      //从输入中获取运算符
      public void gotOperator(char operator, int precedence){
      while(!stack.isEmpty()){
         char prevOperator = (char)stack.pop();
         if(prevOperator == '('){
            stack.push(prevOperator);
            break;
         }else{
            int precedence1;
            if(prevOperator == '+' || prevOperator == '-'){
               precedence1 = 1;
            }else{
               precedence1 = 2;
            }

            if(precedence1 < precedence){
               stack.push(Character.getNumericValue(prevOperator));
               break;
            }else{
               output = output + prevOperator;
            }
         }
      }
      stack.push(operator);
   }

   //从输入中获取运算符
   public void gotParenthesis(char parenthesis){
      while(!stack.isEmpty()){
         char ch = (char)stack.pop();
         if(ch == '('){
            break;
         }else{
            output = output + ch;
         }
      }
   }
}
PostFixParser.java
package com.tutorialspoint.expression;

public class PostFixParser {
private Stack stack;
private String input;

public PostFixParser(String postfixExpression){
   input = postfixExpression;
   stack = new Stack(input.length());
}

   public int evaluate(){
      char ch;
      int firstOperand;
      int secondOperand;
      int tempResult;

      for(int i=0;i<input.length();i++){
         ch = input.charAt(i);

         if(ch >= '0' && ch <= '9'){
            stack.push(Character.getNumericValue(ch));
         }else{
            firstOperand = stack.pop();
            secondOperand = stack.pop();
            switch(ch){
               case '+':
                  tempResult = firstOperand + secondOperand;
                  break;
               case '-':
                  tempResult = firstOperand - secondOperand;
                  break;
               case '*':
                  tempResult = firstOperand * secondOperand;
                  break;
               case '/':
                  tempResult = firstOperand / secondOperand;
                  break;
               default:
                  tempResult = 0;
            }
            stack.push(tempResult);
         }
      }
      return stack.pop();
   }
}
PostFixDemo.java
package com.tutorialspoint.expression;

public class PostFixDemo {
   public static void main(String args[]){
      String input = "1*(2+3)";
      InfixToPostfix translator = new InfixToPostfix(input);
      String output = translator.translate();
      System.out.println("Infix expression is: " + input);
      System.out.println("Postfix expression is: " + output);

      PostFixParser parser = new PostFixParser(output);
      System.out.println("Result is: " + parser.evaluate());
   }
}
如果我们编译并运行上述程序,则会产生以下结果 −
Infix expression is: 1*(2+3)
Postfix expression is: 123+*
Result is: 5
使用 Java 的 DSA - 队列
概述
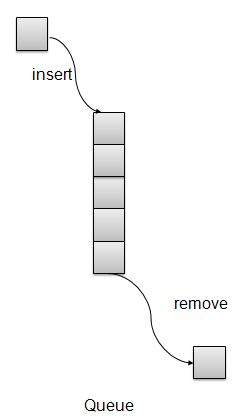
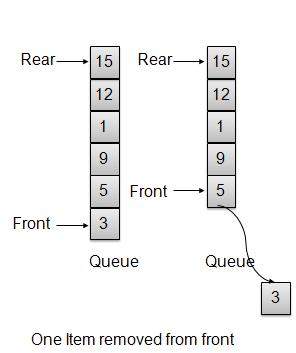
队列是一种类似于堆栈的数据结构,主要区别在于插入的第一个项目是第一个被移除的项目(FIFO - 先进先出),而堆栈基于 LIFO,后进先出原则。
队列表示
基本操作
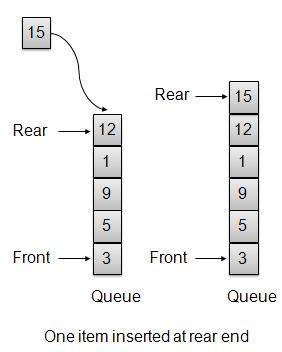
插入/入队 − 将一个项目添加到队列的后面。
移除/出队 − 从队列的前面移除一个项目。
在本文中,我们将使用数组实现队列。队列支持以下几个操作。
Peek − 获取队列前面的元素。
isFull − 检查队列是否已满。
isEmpty − 检查队列是否为空。
插入/入队操作
每当将元素插入队列时,队列都会增加后索引以供以后使用,并将该元素存储在存储的后端。如果后端到达最后一个索引,它将被包装到底部位置。这种安排称为环绕,这种队列是循环队列。此方法也称为入队操作。
public void insert(int data){
   if(!isFull()){
      if(rear == MAX-1){
         rear = -1;
      }

      intArray[++rear] = data;
      itemCount++;
   }
}
移除/出队操作
每当要从队列中移除元素时,队列都会使用前索引获取元素并增加前索引。作为环绕式安排,如果前索引大于数组的最大索引,则将其设置为 0。
public int remove(){
   int data = intArray[front++];
   if(front == MAX){
      front = 0;
   }
   itemCount--;
   return data;
}
队列实现
Queue.java
package com.tutorialspoint.datastructure;

public class Queue {

   private final int MAX;
   private int[] intArray;
   private int front;
   private int rear;
   private int itemCount;

   public Queue(int size){
      MAX = size;
      intArray = new int[MAX];
      front = 0;
      rear = -1;
      itemCount = 0;
   }

   public void insert(int data){
      if(!isFull()){
         if(rear == MAX-1){
            rear = -1;
         }

         intArray[++rear] = data;
         itemCount++;
      }
   }

   public int remove(){
      int data = intArray[front++];
      if(front == MAX){
         front = 0;
      }
      itemCount--;
      return data;
   }

   public int peek(){
      return intArray[front];
   }

   public boolean isEmpty(){
      return itemCount == 0;
   }

   public boolean isFull(){
      return itemCount == MAX;
   }

   public int size(){
      return itemCount;
   }
}
演示程序
QueueDemo.java
package com.tutorialspoint.datastructure;

public class QueueDemo {
   public static void main(String[] args){
        Queue queue = new Queue(6);

        //插入5个项目
        queue.insert(3);
        queue.insert(5);
        queue.insert(9);
        queue.insert(1);
        queue.insert(12);

        // 前面 : 0
        // 后面 : 4
        // ------------------
        // 索引 : 0 1 2 3 4
        // ------------------
        // 队列 : 3 5 9 1 12

        queue.insert(15);

        // 前面 : 0
        // 后面 : 5
        // ---------------------
        // 索引 : 0 1 2 3 4 5
        // ---------------------
        // 队列 : 3 5 9 1 12 15

        if(queue.isFull()){
        System.out.println("队列已满!");
        }

        //删除一个项目
        int num =queue.remove();
        System.out.println("元素已移除:"+num);
        // front : 1
        // rear : 5
        // -------------------
        // index : 1 2 3 4 5
        // -------------------
        // 队列 : 5 9 1 12 15

        //插入更多项目
        queue.insert(16);

        // front : 1
        // rear : -1
        // ----------------------
        // index : 0 1 2 3 4 5
        // ----------------------
        // 队列 : 16 5 9 1 12 15

        //由于队列已满,元素将无法插入。
        queue.insert(17);
        queue.insert(18);

        // ----------------------
        // index : 0 1 2 3 4 5
        // ----------------------
        // 队列 : 16 5 9 1 12 15
        System.out.println("Element at front: "+queue.peek());

        System.out.println("----------------------");
        System.out.println("index : 5 4 3 2  1  0");
        System.out.println("----------------------");
        System.out.print("Queue:  ");
        while(!queue.isEmpty()){
         int n = queue.remove();
         System.out.print(n +" ");
        }
   }
}
如果我们编译并运行上述程序,则会产生以下结果 −
Queue is full!
Element removed: 3
Element at front: 5
----------------------
index : 5 4 3 2  1  0
----------------------
Queue:  5 9 1 12 15 16
使用 Java 的 DSA - 优先级队列
概述
优先级队列是一种比队列更专业的数据结构。与普通队列一样,优先级队列具有相同的方法,但有一个主要区别。在优先级队列中,项目按键值排序,因此键值最低的项目位于前面,键值最高的项目位于后面,反之亦然。因此,我们根据项目的键值为其分配优先级。值越低,优先级越高。以下是优先级队列的主要方法。
基本操作
插入/入队 − 将项目添加到队列后面。
删除/出队 −从队列前面删除一个项目。
优先级队列表示
在本文中,我们将使用数组实现队列。队列支持以下几个操作。
Peek − 获取队列前面的元素。
isFull − 检查队列是否已满。
isEmpty − 检查队列是否为空。
插入/入队操作
每当将元素插入队列时,优先级队列都会按照其顺序插入项目。这里我们假设价值高的数据优先级较低。
public void insert(int data){
   int i =0;

   if(!isFull()){
      // 如果队列为空,则插入数据
      if(itemCount == 0){
         intArray[itemCount++] = data;
      }else{
         // 从队列的右端开始
         for(i = itemCount - 1; i >= 0; i-- ){
            // 如果数据较大,则将现有项目移至右端
            if(data > intArray[i]){
               intArray[i+1] = intArray[i];
            }else{
               break;
            }
         }
         // 插入数据
         intArray[i+1] = data;
         itemCount++;
      }
   }
}
移除/出队操作
每当要从队列中移除元素时,队列都会使用项目计数获取元素。一旦元素被移除。项目计数减少一。
public int remove(){
    return intArray[--itemCount];
}
优先级队列实现
PriorityQueue.java
package com.tutorialspoint.datastructure;

public class PriorityQueue {
   private final int MAX;
   private int[] intArray;
   private int itemCount;

   public PriorityQueue(int size){
      MAX = size;
      intArray = new int[MAX];
      itemCount = 0;
   }

   public void insert(int data){
      int i =0;

      if(!isFull()){
         // 如果队列为空,则插入数据
         if(itemCount == 0){
            intArray[itemCount++] = data;
         }else{
            // 从队列的右端开始
            for(i = itemCount - 1; i >= 0; i-- ){
               // 如果数据较大,则将现有项目移至右端
               if(data > intArray[i]){
                  intArray[i+1] = intArray[i];
               }else{
                  break;
               }
            }
            // 插入数据
            intArray[i+1] = data;
            itemCount++;
         }
      }
   }

   public int remove(){
      return intArray[--itemCount];
   }

   public int peek(){
      return intArray[itemCount - 1];
   }

   public boolean isEmpty(){
      return itemCount == 0;
   }

   public boolean isFull(){
      return itemCount == MAX;
   }

   public int size(){
      return itemCount;
   }
}
演示程序
PriorityQueueDemo.java
package com.tutorialspoint.datastructure;

public class PriorityQueueDemo {
   public static void main(String[] args){
      PriorityQueue queue = new PriorityQueue(6);

      //insert 5 items
      queue.insert(3);
      queue.insert(5);
      queue.insert(9);
      queue.insert(1);
      queue.insert(12);

      // ------------------
      // index : 0  1 2 3 4
      // ------------------
      // queue : 12 9 5 3 1

      queue.insert(15);

      // ---------------------
      // index : 0  1 2 3 4  5
      // ---------------------
      // queue : 15 12 9 5 3 1

      if(queue.isFull()){
         System.out.println("Queue is full!");
      }

      //remove one item
      int num = queue.remove();
      System.out.println("Element removed: "+num);
      // ---------------------
      // index : 0  1  2 3 4
      // ---------------------
      // queue : 15 12 9 5 3

      //insert more items
      queue.insert(16);

      // ----------------------
      // index :  0  1 2 3 4  5
      // ----------------------
      // queue : 16 15 12 9 5 3

      //As queue is full, elements will not be inserted.
      queue.insert(17);
      queue.insert(18);

      // ----------------------
      // index : 0   1  2 3 4 5
      // ----------------------
      // queue : 16 15 12 9 5 3
      System.out.println("Element at front: "+queue.peek());
      System.out.println("----------------------");
      System.out.println("index : 5 4 3 2  1  0");
      System.out.println("----------------------");
      System.out.print("Queue:  ");
      while(!queue.isEmpty()){
         int n = queue.remove();
         System.out.print(n +" ");
      }
   }
}
如果我们编译并运行上述程序,则会产生以下结果 −
Queue is full!
Element removed: 1
Element at front: 3
----------------------
index : 5 4 3 2  1  0
----------------------
Queue:  3 5 9 12 15 16
使用 Java 的 DSA - 树
概述
树表示通过边连接的节点。我们将专门讨论二叉树或二叉搜索树。
二叉树是一种用于数据存储目的的特殊数据结构。二叉树有一个特殊条件,即每个节点最多可以有两个子节点。二叉树兼具有序数组和链表的优点,因为搜索速度与排序数组一样快,插入或删除操作与链表一样快。
术语
以下是与树有关的重要术语。
路径 −路径是指沿着树的边缘的节点序列。
根 − 树顶部的节点称为根。每棵树只有一个根,从根节点到任何节点只有一条路径。
父节点 − 除根节点外的任何节点都有一条向上的边指向称为父节点的节点。
子节点 − 通过向下的边连接的给定节点下方的节点称为其子节点。
叶节点 − 没有任何子节点的节点称为叶节点。
子树 − 子树表示节点的后代。
访问 −访问是指在控制节点上时检查节点的值。
遍历 − 遍历意味着按特定顺序穿过节点。
级别 − 节点的级别表示节点的代数。如果根节点在级别 0,则其下一个子节点在级别 1,其孙节点在级别 2,依此类推。
键 − 键表示节点的值,基于该值对节点执行搜索操作。
二叉搜索树表现出一种特殊的行为。节点的左子节点的值必须小于其父节点的值,而节点的右子节点的值必须大于其父节点的值。
二叉搜索树表示
我们将使用节点对象实现树并通过引用连接它们。
基本操作
以下是树的基本主要操作。
搜索 − 在树中搜索元素。
插入 − 在树中插入元素。
前序遍历 − 以前序方式遍历树。
中序遍历 −以中序方式遍历树。
后序遍历 − 以后序方式遍历树。
节点
定义一个节点,其中包含一些数据、对其左子节点和右子节点的引用。
public class Node {
   public int data;
   public Node leftChild;
   public Node rightChild;

   public Node(){}

   public void display(){
      System.out.print("("+data+ ")");
   }
}
搜索操作
每当要搜索元素时。从根节点开始搜索,然后如果数据小于键值,则在左子树中搜索元素,否则在右子树中搜索元素。对每个节点遵循相同的算法。
public Node search(int data){
   Node current = root;
   System.out.print("Visiting elements: ");
   while(current.data != data){
      if(current != null)
         System.out.print(current.data + " ");
         //转到左边的树
         if(current.data > data){
            current = current.leftChild;
         }//否则转到右树
         else{
            current = current.rightChild;
         }
         //未找到
         if(current == null){
            return null;
         }
      }
   return current;
}
插入操作
每当要插入一个元素时。首先找到其正确的位置。从根节点开始搜索,然后如果数据小于键值,则在左子树中搜索空位置并插入数据。否则在右子树中搜索空位置并插入数据。
public void insert(int data){
   Node tempNode = new Node();
   tempNode.data = data;

   //如果树为空
   if(root == null){
      root = tempNode;
   }else{
      Node current = root;
      Node parent = null;

      while(true){
         parent = current;
         //转到树的左边
         if(data < parent.data){
            current = current.leftChild;
            //插入到左侧
            if(current == null){
               parent.leftChild = tempNode;
               return;
            }
         }// 转到树的右边
         else{
            current = current.rightChild;
            //插入到右侧
            if(current == null){
               parent.rightChild = tempNode;
               return;
            }
         }
      }
   }
}
前序遍历
这是一个简单的三步过程。
访问根节点
遍历左子树
遍历右子树
private void preOrder(Node root){
   if(root!=null){
      System.out.print(root.data + " ");
      preOrder(root.leftChild);
      preOrder(root.rightChild);
   }
}
中序遍历
这是一个简单的三步过程。
遍历左子树
访问根节点
遍历右子树
private void inOrder(Node root){
    if(root!=null){
    inOrder(root.leftChild);
    System.out.print(root.data + " ");
    inOrder(root.rightChild);
    }
}
后序遍历
这是一个简单的三步过程。
遍历左子树
遍历右子树
访问根节点
private void postOrder(Node root){
   if(root!=null){
      postOrder(root.leftChild);
      postOrder(root.rightChild);
      System.out.print(root.data + " ");
   }
}
树的实现
Node.java
package com.tutorialspoint.datastructure;

public class Node {
   public int data;
   public Node leftChild;
   public Node rightChild;

   public Node(){}

   public void display(){
      System.out.print("("+data+ ")");
   }
}
Tree.java
package com.tutorialspoint.datastructure;

public class Tree {
   private Node root;

   public Tree(){
      root = null;
   }

   public Node search(int data){
      Node current = root;
      System.out.print("Visiting elements: ");
      while(current.data != data){
         if(current != null)
            System.out.print(current.data + " ");
            //转到左边的树
            if(current.data > data){
               current = current.leftChild;
            }//否则转到右树
            else{
               current = current.rightChild;
            }
            //未找到
            if(current == null){
               return null;
            }
         }
      return current;
   }

   public void insert(int data){
      Node tempNode = new Node();
      tempNode.data = data;

      //如果树为空
      if(root == null){
         root = tempNode;
     }else{
         Node current = root;
         Node parent = null;

         while(true){
            parent = current;
            //转到树的左边
            if(data < parent.data){
               current = current.leftChild;
               //插入到左侧
               if(current == null){
                  parent.leftChild = tempNode;
                  return;
               }
            }// 转到树的右边
            else{
               current = current.rightChild;
               //插入到右侧
               if(current == null){
                  parent.rightChild = tempNode;
                  return;
               }
            }
         }
      }
   }

   public void traverse(int traversalType){
      switch(traversalType){
         case 1:
            System.out.print("
Preorder traversal: ");
            preOrder(root);
            break;
         case 2:
            System.out.print("
Inorder traversal: ");
            inOrder(root);
            break;
         case 3:
            System.out.print("
Postorder traversal: ");
            postOrder(root);
            break;
         }
   }

   private void preOrder(Node root){
      if(root!=null){
         System.out.print(root.data + " ");
         preOrder(root.leftChild);
         preOrder(root.rightChild);
      }
   }

   private void inOrder(Node root){
      if(root!=null){
         inOrder(root.leftChild);
         System.out.print(root.data + " ");
         inOrder(root.rightChild);
      }
   }

   private void postOrder(Node root){
      if(root!=null){
         postOrder(root.leftChild);
         postOrder(root.rightChild);
         System.out.print(root.data + " ");
      }
   }
}
演示程序
TreeDemo.java
package com.tutorialspoint.datastructure;

public class TreeDemo {
   public static void main(String[] args){
      Tree tree = new Tree();

      /*                     11               //Level 0
      */
      tree.insert(11);
      /*                     11               //Level 0
      *                      |
      *                      |---20           //Level 1
      */
      tree.insert(20);
      /*                     11               //Level 0
      *                      |
      *                  3---|---20           //Level 1
      */
      tree.insert(3);
      /*                     11               //Level 0
      *                      |
      *                  3---|---20           //Level 1
      *                           |
      *                           |--42       //Level 2
      */
      tree.insert(42);
      /*                     11               //Level 0
      *                      |
      *                  3---|---20           //Level 1
      *                           |
      *                           |--42       //Level 2
      *                               |
      *                               |--54   //Level 3
      */
      tree.insert(54);
      /*                     11               //Level 0
      *                      |
      *                  3---|---20           //Level 1
      *                           |
      *                       16--|--42       //Level 2
      *                               |
      *                               |--54   //Level 3
      */
      tree.insert(16);
      /*                     11               //Level 0
      *                      |
      *                  3---|---20           //Level 1
      *                           |
      *                       16--|--42       //Level 2
      *                               |
      *                           32--|--54   //Level 3
      */
      tree.insert(32);
      /*                     11               //Level 0
      *                      |
      *                  3---|---20           //Level 1
      *                  |        |
      *                  |--9 16--|--42       //Level 2
      *                               |
      *                           32--|--54   //Level 3
      */
      tree.insert(9);
      /*                     11               //Level 0
      *                      |
      *                  3---|---20           //Level 1
      *                  |        |
      *                  |--9 16--|--42       //Level 2
      *                     |         |
      *                  4--|     32--|--54   //Level 3
      */
      tree.insert(4);
      /*                     11               //Level 0
      *                      |
      *                  3---|---20           //Level 1
      *                  |        |
      *                  |--9 16--|--42       //Level 2
      *                     |         |
      *                  4--|--10 32--|--54   //Level 3
      */
      tree.insert(10);
      Node node = tree.search(32);
      if(node!=null){
         System.out.print("Element found.");
         node.display();
         System.out.println();
      }else{
         System.out.println("Element not found.");
      }

      Node node1 = tree.search(2);
      if(node1!=null){
         System.out.println("Element found.");
         node1.display();
         System.out.println();
      }else{
         System.out.println("Element not found.");
      }

      //pre-order traversal
      //root, left ,right
      tree.traverse(1);
      //in-order traversal
      //left, root ,right
      tree.traverse(2);
      //post order traversal
      //left, right, root
      tree.traverse(3);
   }
}
如果我们编译并运行上述程序,则会产生以下结果 −
Visiting elements: 11 20 42 Element found.(32)
Visiting elements: 11 3 Element not found.

Preorder traversal: 11 3 9 4 10 20 16 42 32 54
Inorder traversal: 3 4 9 10 11 16 20 32 42 54
Postorder traversal: 4 10 9 3 16 32 54 42 20 11
使用 Java 的 DSA - 哈希表
概述
HashTable 是一种数据结构,无论哈希表的大小如何,插入和搜索操作都非常快。它几乎是一个常数或 O(1)。哈希表使用数组作为存储介质,并使用哈希技术生成要插入元素或从中定位元素的索引。
哈希
哈希是一种将一系列键值转换为数组索引范围的技术。我们将使用模运算符来获取一系列键值。考虑一个大小为 20 的哈希表示例,需要存储以下项目。项目采用 (key,value) 格式。
(1,20)
(2,70)
(42,80)
(4,25)
(12,44)
(14,32)
(17,11)
(13,78)
(37,98)
| Sr.No. | Key | Hash | Array Index |
|---|---|---|---|
| 1 | 1 | 1 % 20 = 1 | 1 |
| 2 | 2 | 2 % 20 = 2 | 2 |
| 3 | 42 | 42 % 20 = 2 | 2 |
| 4 | 4 | 4 % 20 = 4 | 4 |
| 5 | 12 | 12 % 20 = 12 | 12 |
| 6 | 14 | 14 % 20 = 14 | 14 |
| 7 | 17 | 17 % 20 = 17 | 17 |
| 8 | 13 | 13 % 20 = 13 | 13 |
| 9 | 37 | 37 % 20 = 17 | 17 |
线性探测
如我们所见,所使用的哈希技术可能会创建已使用的数组索引。在这种情况下,我们可以通过查看下一个单元格直到找到一个空单元格来搜索数组中的下一个空位置。这种技术称为线性探测。
| Sr.No. | Key | Hash | 数组索引 | 线性探测后,数组索引 |
|---|---|---|---|---|
| 1 | 1 | 1 % 20 = 1 | 1 | 1 |
| 2 | 2 | 2 % 20 = 2 | 2 | 2 |
| 3 | 42 | 42 % 20 = 2 | 2 | 3 |
| 4 | 4 | 4 % 20 = 4 | 4 | 4 |
| 5 | 12 | 12 % 20 = 12 | 12 | 12 |
| 6 | 14 | 14 % 20 = 14 | 14 | 14 |
| 7 | 17 | 17 % 20 = 17 | 17 | 17 |
| 8 | 13 | 13 % 20 = 13 | 13 | 13 |
| 9 | 37 | 37 % 20 = 17 | 17 | 18 |
基本操作
以下是哈希表的基本主要操作。
搜索 − 在哈希表中搜索元素。
插入 − 在哈希表中插入元素。
删除 − 从哈希表中删除元素。
DataItem
定义一个具有一些数据的数据项,以及在哈希表中进行搜索所基于的键。
public class DataItem {
   private int key;
   private int data;

   public DataItem(int key, int data){
      this.key = key;
      this.data = data;
   }

   public int getKey(){
      return key;
   }

   public int getData(){
      return data;
   }
}
哈希方法
定义一个哈希方法来计算数据项键的哈希码。
public int hashCode(int key){
    return key % size;
}
搜索操作
每当要搜索元素时。计算传递的键的哈希码,并使用该哈希码作为数组中的索引来定位元素。如果在计算的哈希码中未找到元素,则使用线性探测来获取元素。
public DataItem search(int key){
    //获取哈希值
    int hashIndex = hashCode(key);
    //在数组中移动直到为空
    while(hashArray[hashIndex] !=null){
        if(hashArray[hashIndex].getKey() == key)
        return hashArray[hashIndex];
        //转到下一个单元格
        ++hashIndex;
        //环绕表格
        hashIndex %= size;
    }
    return null;
}
插入操作
每当要插入元素时。计算传递的键的哈希码,并使用该哈希码作为数组中的索引来定位索引。如果在计算的哈希码中找到元素,则使用线性探测来查找空位置。
public void insert(DataItem item){
    int key = item.getKey();

    //获取哈希值
    int hashIndex = hashCode(key);

    //在数组中移动直到单元格为空或已删除
    while(hashArray[hashIndex] !=null
    && hashArray[hashIndex].getKey() != -1){
        //转到下一个单元格
        ++hashIndex;
        //环绕表格
        hashIndex %= size;
    }

    hashArray[hashIndex] = item;
}
删除操作
每当要删除元素时。计算传递的键的哈希码,并使用该哈希码作为数组中的索引来定位索引。如果在计算的哈希码中未找到元素,则使用线性探测来获取元素。找到后,在此处存储一个虚拟项目以保持哈希表的性能完好无损。
public DataItem delete(DataItem item){
    int key = item.getKey();

    //获取哈希值
    int hashIndex = hashCode(key);

    //在数组中移动直到为空
    while(hashArray[hashIndex] !=null){
        if(hashArray[hashIndex].getKey() == key){
            DataItem temp = hashArray[hashIndex];
            //在已删除的位置分配一个虚拟项
            hashArray[hashIndex] = dummyItem;
            return temp;
        }
        //转到下一个单元格
        ++hashIndex;
        //环绕表格
        hashIndex %= size;
    }
    return null;
}
HashTable 实现
DataItem.java
package com.tutorialspoint.datastructure;

public class DataItem {
   private int key;
   private int data;

   public DataItem(int key, int data){
      this.key = key;
      this.data = data;
   }

   public int getKey(){
      return key;
   }

   public int getData(){
      return data;
   }
}
HashTable.java
package com.tutorialspoint.datastructure;

public class HashTable {

   private DataItem[] hashArray;
   private int size;
   private DataItem dummyItem;

   public HashTable(int size){
      this.size = size;
      hashArray = new DataItem[size];
      dummyItem = new DataItem(-1,-1);
   }

   public void display(){
      for(int i=0; i<size; i++) {
         if(hashArray[i] != null)
            System.out.print(" ("
               +hashArray[i].getKey()+","
               +hashArray[i].getData() + ") ");
         else
            System.out.print(" ~~ ");
      }
      System.out.println("");
   }

   public int hashCode(int key){
      return key % size;
   }

    public DataItem search(int key){
        //获取哈希值
        int hashIndex = hashCode(key);
        //在数组中移动直到为空
        while(hashArray[hashIndex] !=null){
            if(hashArray[hashIndex].getKey() == key)
            return hashArray[hashIndex];
            //转到下一个单元格
            ++hashIndex;
            //环绕表格
            hashIndex %= size;
        }
        return null;
    }

    public void insert(DataItem item){
        int key = item.getKey();

        //获取哈希值
        int hashIndex = hashCode(key);

        //在数组中移动直到单元格为空或已删除
        while(hashArray[hashIndex] !=null
        && hashArray[hashIndex].getKey() != -1){
            //转到下一个单元格
            ++hashIndex;
            //环绕表格
            hashIndex %= size;
        }

        hashArray[hashIndex] = item;
    }

    public DataItem delete(DataItem item){
        int key = item.getKey();

        //获取哈希值
        int hashIndex = hashCode(key);

        //在数组中移动直到为空
        while(hashArray[hashIndex] !=null){
            if(hashArray[hashIndex].getKey() == key){
                DataItem temp = hashArray[hashIndex];
                //在已删除的位置分配一个虚拟项
                hashArray[hashIndex] = dummyItem;
                return temp;
            }
            //转到下一个单元格
            ++hashIndex;
            //环绕表格
            hashIndex %= size;
        }
        return null;
    }
}
演示程序
HashTableDemo.java
package com.tutorialspoint.datastructure;

public class HashTableDemo {
   public static void main(String[] args){
      HashTable hashTable = new HashTable(20);

      hashTable.insert(new DataItem(1, 20));
      hashTable.insert(new DataItem(2, 70));
      hashTable.insert(new DataItem(42, 80));
      hashTable.insert(new DataItem(4, 25));
      hashTable.insert(new DataItem(12, 44));
      hashTable.insert(new DataItem(14, 32));
      hashTable.insert(new DataItem(17, 11));
      hashTable.insert(new DataItem(13, 78));
      hashTable.insert(new DataItem(37, 97));

      hashTable.display();

      DataItem item = hashTable.search(37);

      if(item != null){
         System.out.println("Element found: "+ item.getData());
      }else{
         System.out.println("Element not found");
      }

      hashTable.delete(item);

      item = hashTable.search(37);

      if(item != null){
         System.out.println("Element found: "+ item.getData());
      }else{
         System.out.println("Element not found");
      }
   }
}
如果我们编译并运行上述程序,则会产生以下结果 −
 ~~  (1,20)  (2,70)  (42,80)  (4,25)  ~~  ~~  ~~  ~~  ~~  ~~  ~~ (12,44)  (13,78)  (14,32)  ~~  ~~  (17,11)  (37,97)  ~~
Element found: 97
Element not found
使用 Java 的 DSA - 堆
概述
堆表示一种特殊的基于树的数据结构,用于表示优先级队列或堆排序。我们将专门讨论二叉堆树。
二叉堆树可以归类为具有两个约束的二叉树 −
完整性 − 二叉堆树是一棵完整的二叉树,除了最后一级可能不包含所有元素,但从左到右的元素应该被填充。
堆性 − 所有父节点都应该大于或小于其子节点。如果父节点大于其子节点,则称为最大堆,否则称为最小堆。最大堆用于堆排序,最小堆用于优先级队列。我们正在考虑最小堆,并将使用数组实现。
基本操作
以下是最小堆的基本主要操作。
插入 − 在堆中插入一个元素。
获取最小值 − 从堆中获取最小元素。
删除最小值 − 从堆中删除最小元素
插入操作
每当要插入一个元素时。在数组末尾插入元素。将堆的大小增加 1。
- 在堆属性被破坏时堆积元素。将元素与父级的值进行比较,并根据需要交换它们。
public void insert(int value) {
   size++;
   intArray[size - 1] = value;
   heapUp(size - 1);
}

private void heapUp(int nodeIndex){
   int parentIndex, tmp;
   if (nodeIndex != 0) {
      parentIndex = getParentIndex(nodeIndex);
      if (intArray[parentIndex] > intArray[nodeIndex]) {
         tmp = intArray[parentIndex];
         intArray[parentIndex] = intArray[nodeIndex];
         intArray[nodeIndex] = tmp;
         heapUp(parentIndex);
      }
   }
}
获取最小值
获取实现堆的数组的第一个元素作为根。
public int getMinimum(){
    return intArray[0];
}
删除最小值
每当要删除一个元素时。获取数组的最后一个元素并将堆的大小减少 1。
- 当堆属性被破坏时,将元素堆下移。将元素与子元素的值进行比较,并在需要时交换它们。
public void removeMin() {
   intArray[0] = intArray[size - 1];
   size--;
   if (size > 0)
      heapDown(0);
}

private void heapDown(int nodeIndex){
   int leftChildIndex, rightChildIndex, minIndex, tmp;
   leftChildIndex = getLeftChildIndex(nodeIndex);
   rightChildIndex = getRightChildIndex(nodeIndex);
   if (rightChildIndex >= size) {
      if (leftChildIndex >= size)
         return;
      else
         minIndex = leftChildIndex;
   } else {
      if (intArray[leftChildIndex] <= intArray[rightChildIndex])
         minIndex = leftChildIndex;
      else
         minIndex = rightChildIndex;
   }
   if (intArray[nodeIndex] > intArray[minIndex]) {
      tmp = intArray[minIndex];
      intArray[minIndex] = intArray[nodeIndex];
      intArray[nodeIndex] = tmp;
      heapDown(minIndex);
   }
}
堆实现
Heap.java
package com.tutorialspoint.datastructure;

public class Heap {
   private int[] intArray;
   private int size;

   public Heap(int size){
      intArray = new int[size];
   }

   public boolean isEmpty(){
      return size == 0;
   }

   public int getMinimum(){
      return intArray[0];
   }

   public int getLeftChildIndex(int nodeIndex){
      return 2*nodeIndex +1;
   }

   public int getRightChildIndex(int nodeIndex){
      return 2*nodeIndex +2;
   }

   public int getParentIndex(int nodeIndex){
      return (nodeIndex -1)/2;
   }

   public boolean isFull(){
      return size == intArray.length;
   }

   public void insert(int value) {
      size++;
      intArray[size - 1] = value;
      heapUp(size - 1);
   }

   public void removeMin() {
      intArray[0] = intArray[size - 1];
      size--;
      if (size > 0)
         heapDown(0);
   }

   /**
   * Heap up the new element,until heap property is broken.
   * Steps:
   * 1. Compare node's value with parent's value.
   * 2. Swap them, If they are in wrong order.
   * */
   private void heapUp(int nodeIndex){
      int parentIndex, tmp;
      if (nodeIndex != 0) {
         parentIndex = getParentIndex(nodeIndex);
         if (intArray[parentIndex] > intArray[nodeIndex]) {
            tmp = intArray[parentIndex];
            intArray[parentIndex] = intArray[nodeIndex];
            intArray[nodeIndex] = tmp;
            heapUp(parentIndex);
         }
      }
   }

   /**
   * Heap down the root element being least in value,until heap property is broken.
   * Steps:
   * 1.If current node has no children, done.
   * 2.If current node has one children and heap property is broken,
   * 3.Swap the current node and child node and heap down.
   * 4.If current node has one children and heap property is broken, find smaller one
   * 5.Swap the current node and child node and heap down.
   * */
   private void heapDown(int nodeIndex){
      int leftChildIndex, rightChildIndex, minIndex, tmp;
      leftChildIndex = getLeftChildIndex(nodeIndex);
      rightChildIndex = getRightChildIndex(nodeIndex);
      if (rightChildIndex >= size) {
         if (leftChildIndex >= size)
            return;
         else
            minIndex = leftChildIndex;
      } else {
         if (intArray[leftChildIndex] <= intArray[rightChildIndex])
            minIndex = leftChildIndex;
         else
            minIndex = rightChildIndex;
      }
      if (intArray[nodeIndex] > intArray[minIndex]) {
         tmp = intArray[minIndex];
         intArray[minIndex] = intArray[nodeIndex];
         intArray[nodeIndex] = tmp;
         heapDown(minIndex);
      }
   }
}
演示程序
HeapDemo.java
package com.tutorialspoint.datastructure;

public class HeapDemo {
   public static void main(String[] args){
      Heap heap = new Heap(10);
       /*                     5                //Level 0
        *
        */
      heap.insert(5);
       /*                     1                //Level 0
        *                     |
        *                 5---|                //Level 1
        */
      heap.insert(1);
       /*                     1                //Level 0
        *                     |
        *                 5---|---3            //Level 1
        */
      heap.insert(3);
       /*                     1                //Level 0
        *                     |
        *                 5---|---3            //Level 1
        *                 |
        *              8--|                    //Level 2
        */
      heap.insert(8);
      /*                     1                //Level 0
       *                     |
       *                 5---|---3            //Level 1
       *                 |
       *              8--|--9                 //Level 2
       */
      heap.insert(9);
      /*                     1                 //Level 0
       *                     |
       *                 5---|---3             //Level 1
       *                 |       |
       *              8--|--9 6--|             //Level 2
       */
      heap.insert(6);
      /*                     1                 //Level 0
       *                     |
       *                 5---|---2             //Level 1
       *                 |       |
       *              8--|--9 6--|--3          //Level 2
       */
      heap.insert(2);

      System.out.println(heap.getMinimum());

      heap.removeMin();
      /*                     2                 //Level 0
       *                     |
       *                 5---|---3             //Level 1
       *                 |       |
       *              8--|--9 6--|             //Level 2
       */
      System.out.println(heap.getMinimum());
   }
}
如果我们编译并运行上述程序,则会产生以下结果 −
1
2
使用 Java 的 DSA - Graph
概述
Graph 是一种用于对数学图形进行建模的数据结构。它由一组称为顶点边的连接对组成。我们可以使用顶点数组和边的二维数组来表示图形。
重要术语
顶点 − 图的每个节点都表示为一个顶点。在下面给出的示例中,带标签的圆圈表示顶点。因此 A 到 G 是顶点。我们可以使用数组来表示它们,如下图所示。这里 A 可以通过索引 0 来标识。B 可以使用索引 1 来标识,依此类推。
边 − 边表示两个顶点之间的路径或两个顶点之间的线。在下面给出的例子中,从 A 到 B、从 B 到 C 等的线表示边。我们可以使用二维数组来表示数组,如下图所示。这里 AB 可以表示为第 0 行第 1 列的 1,BC 可以表示为第 1 行第 2 列的 1,依此类推,其他组合保持为 0。
相邻 − 如果两个节点或顶点通过边相互连接,则它们是相邻的。在下面给出的例子中,B 与 A 相邻,C 与 B 相邻,依此类推。
路径 − 路径表示两个顶点之间的一系列边。在下面给出的例子中,ABCD 表示从 A 到 D 的路径。
基本操作
以下是图形的基本主要操作。
添加顶点 − 向图形添加顶点。
添加边 − 在图的两个顶点之间添加边。
显示顶点 −显示图形的顶点。
添加顶点操作
//将顶点添加到顶点数组
public void addVertex(char label){
    lstVertices[vertexCount++] = new Vertex(label);
}
添加边操作
//将边添加到边数组
public void addEdge(int start,int end){
    adjMatrix[start][end] = 1;
    adjMatrix[end][start] = 1;
}
显示边操作
//显示顶点
public void displayVertex(int vertexIndex){
   System.out.print(lstVertices[vertexIndex].label+" ");
}
遍历算法
以下是图上的重要遍历算法。
深度优先搜索 − 以深度方向遍历图。
广度优先搜索 −以宽度方向遍历图形。
深度优先搜索算法
深度优先搜索算法 (DFS) 以深度方向遍历图形,并使用堆栈记住在任何迭代中出现死胡同时获取下一个顶点以开始搜索。
如上例所示,DFS 算法首先从 A 到 B 到 C 到 D,然后到 E,然后到 F,最后到 G。它采用以下规则。
规则 1 − 访问相邻的未访问顶点。将其标记为已访问。显示它。将其推送到堆栈中。
规则 2 − 如果未找到相邻顶点,则从堆栈中弹出一个顶点。 (它将弹出堆栈中没有相邻顶点的所有顶点。)
规则 3 − 重复规则 1 和规则 2,直到堆栈为空。
public void depthFirstSearch(){
    //将第一个节点标记为已访问
    lstVertices[0].visited = true;
    //显示顶点
    displayVertex(0);
    //将顶点索引推送到堆栈中
    stack.push(0);

    while(!stack.isEmpty()){
    //获取位于堆栈顶部的顶点的未访问顶点
    int unvisitedVertex = getAdjUnvisitedVertex(stack.peek());
    //未找到相邻顶点
    if(unvisitedVertex == -1){
        stack.pop();
        }else{
            lstVertices[unvisitedVertex].visited = true;
            displayVertex(unvisitedVertex);
            stack.push(unvisitedVertex);
        }
    }

    //堆栈为空,搜索完成,重置访问标志
    for(int i=0;i<vertexCount;i++){
        lstVertices[i].visited = false;
    }
}
广度优先搜索算法
广度优先搜索算法 (BFS) 以广度运动遍历图形,并使用队列记住在任何迭代中出现死胡同时获取下一个顶点以开始搜索。
如上例所示,BFS 算法首先从 A 到 B 到 E 到 F,然后到 C 和 G,最后到 D。它采用以下规则。
规则 1 − 访问相邻的未访问顶点。将其标记为已访问。显示它。将其插入队列中。
规则 2 − 如果未找到相邻顶点,则从队列中删除第一个顶点。
规则 3 −重复规则 1 和规则 2,直到队列为空。
public void breadthFirstSearch(){
    //将第一个节点标记为已访问
    lstVertices[0].visited = true;
    //显示顶点
    displayVertex(0);
    //将顶点索引插入队列
    queue.insert(0);

    int unvisitedVertex;
    while(!queue.isEmpty()){
        //获取位于队列最前面的顶点的未访问顶点
        int tempVertex =queue.remove();
        //未找到相邻顶点
        while((unvisitedVertex=getAdjUnvisitedVertex(tempVertex)) != -1){
            lstVertices[unvisitedVertex].visited = true;
            displayVertex(unvisitedVertex);
            queue.insert(unvisitedVertex);
        }
    }

    //队列为空,搜索完成,重置访问标志
    for(int i=0;i<vertexCount;i++){
        lstVertices[i].visited = false;
    }
}
图形实现
Stack.java
package com.tutorialspoint.datastructure;

public class Stack {
    private int size; // 堆栈的大小
    private int[] intArray; // 堆栈存储
    private int top; // 堆栈顶部

    // 构造函数
    public Stack(int size){
        this.size = size;
        intArray = new int[size]; //初始化数组
        top = -1; //堆栈最初为空
    }

    // 操作:推送
    // 将项目推送到堆栈顶部
    public void push(int data) {

        if(!isFull()){
            // 将顶部增加 1 并插入数据
            intArray[++top] = data;
        }else{
            System.out.println("无法添加数据。堆栈已满。");
        }
    }

    // 操作:弹出
    // 从堆栈顶部弹出项目
    public int pop() {
        //检索数据并将顶部减少 1
        return intArray[top--];
    }

    // 操作:Peek
    // 查看堆栈顶部的数据
    public int peek() {
        // 从顶部检索数据
        return intArray[top];
    }

    // 操作:isFull
    // 如果堆栈已满,则返回 true
    public boolean isFull(){
        return (top == size-1);
    }

    // 操作:isEmpty
    // 如果堆栈为空,则返回 true
    public boolean isEmpty(){
        return (top == -1);
    }
}
Queue.java
package com.tutorialspoint.datastructure;

public class Queue {

   private final int MAX;
   private int[] intArray;
   private int front;
   private int rear;
   private int itemCount;

   public Queue(int size){
      MAX = size;
      intArray = new int[MAX];
      front = 0;
      rear = -1;
      itemCount = 0;
   }

   public void insert(int data){
      if(!isFull()){
         if(rear == MAX-1){
            rear = -1;
         }

         intArray[++rear] = data;
         itemCount++;
      }
   }

   public int remove(){
      int data = intArray[front++];
      if(front == MAX){
         front = 0;
      }
      itemCount--;
      return data;
   }

   public int peek(){
      return intArray[front];
   }

   public boolean isEmpty(){
      return itemCount == 0;
   }

   public boolean isFull(){
      return itemCount == MAX;
   }

   public int size(){
      return itemCount;
   }
}
Vertex.java
package com.tutorialspoint.datastructure;

public class Vertex {
   public char label;
   public boolean visited;

   public Vertex(char label){
      this.label = label;
      visited = false;
   }
}
Graph.java
package com.tutorialspoint.datastructure;

public class Graph {
    private final int MAX = 20;
    //顶点数组
    private Vertex lstVertices[];
    //邻接矩阵
    private int adjMatrix[][];
    //顶点数
    private int vertexCount;

    private Stack stack;
    private Queue query;

    public Graph(){
        lstVertices = new Vertex[MAX];
        adjMatrix = new int[MAX][MAX];
        vertexCount = 0;
        stack = new Stack(MAX);
        query = new Queue(MAX);
        for(int j=0; j<MAX; j++) // 设置邻接
        for(int k=0; k<MAX; k++) // 将矩阵设置为 0
        adjMatrix[j][k] = 0;
    }

    //将顶点添加到顶点列表
    public void addVertex(char label){
        lstVertices[vertexCount++] = new Vertex(label);
    }

    //将边添加到边数组
    public void addEdge(int start,int end){
        adjMatrix[start][end] = 1;
        adjMatrix[end][start] = 1;
    }

    //显示顶点
    public void displayVertex(int vertexIndex){
        System.out.print(lstVertices[vertexIndex].label+" ");
    }

    //获取相邻的未访问顶点
    public int getAdjUnvisitedVertex(int vertexIndex){
        for(int i=0; i<vertexCount; i++)
        if(adjMatrix[vertexIndex][i]==1 && lstVertices[i].visited==false)
        return i;
        return -1;
    }

    public voiddepthFirstSearch(){
        //将第一个节点标记为已访问
        lstVertices[0].visited = true;
        //显示顶点
        displayVertex(0);
        //将顶点索引推送到堆栈中
        stack.push(0);

        while(!stack.isEmpty()){
            //获取位于堆栈顶部的顶点的未访问顶点
            int unvisitedVertex = getAdjUnvisitedVertex(stack.peek());
            //未找到相邻顶点
            if(unvisitedVertex == -1){
                stack.pop();
            }else{
                lstVertices[unvisitedVertex].visited = true;
                displayVertex(unvisitedVertex);
                stack.push(unvisitedVertex);
            }
        }

        //堆栈为空,搜索完成,重置访问标志
        for(int i=0;i<vertexCount;i++){
            lstVertices[i].visited = false;
        }
    }

    public void breadthFirstSearch(){
        //将第一个节点标记为已访问
        lstVertices[0].visited = true;
        //显示顶点
        displayVertex(0);
        //将顶点索引插入队列
        queue.insert(0);
        int unvisitedVertex;
        while(!queue.isEmpty()){
            //获取位于队列最前面的顶点的未访问顶点
            int tempVertex =queue.remove();
            //未找到相邻顶点
            while((unvisitedVertex=getAdjUnvisitedVertex(tempVertex)) != -1){
                lstVertices[unvisitedVertex].visited = true;
                displayVertex(unvisitedVertex);
                queue.insert(unvisitedVertex);
            }
        }

        //队列为空,搜索完成,重置已访问标志
        for(int i=0;i<vertexCount;i++){
            lstVertices[i].visited = false;
        }
    }
}
演示程序
GraphDemo.java
package com.tutorialspoint.datastructure;

public class GraphDemo {
   public static void main(String args[]){
      Graph graph = new Graph();

      graph.addVertex('A');   //0
      graph.addVertex('B');   //1
      graph.addVertex('C');   //2
      graph.addVertex('D');   //3
      graph.addVertex('E');   //4
      graph.addVertex('F');   //5
      graph.addVertex('G');   //6

      /*       1  2  3
       * 0  |--B--C--D
       * A--|
       * |
       * |     4
       * |-----E
       * |     5  6
       * |  |--F--G
       * |--|
       */
      graph.addEdge(0, 1);   //AB
      graph.addEdge(1, 2);   //BC
      graph.addEdge(2, 3);   //CD
      graph.addEdge(0, 4);   //AC
      graph.addEdge(0, 5);   //AF
      graph.addEdge(5, 6);   //FG
      System.out.print("Depth First Search: ");
      //A B C D E F G
      graph.depthFirstSearch();
      System.out.println("");
      System.out.print("Breadth First Search: ");
      //A B E F C G D
      graph.breadthFirstSearch();
   }
}
如果我们编译并运行上述程序,则会产生以下结果 −
Depth First Search: A B C D E F G
Breadth First Search: A B E F C G D
使用 Java 的 DSA - 搜索技术
搜索是指在项目集合中定位具有指定属性的所需元素。我们将使用以下常用和简单的搜索算法开始讨论。
| Sr.No | 技术与描述 |
|---|---|
| 1 | 线性搜索 线性搜索搜索所有项目,其最差执行时间为 n,其中 n 是项目数。 |
| 2 | 二分搜索 二分搜索要求项目按排序顺序排列,但其最差执行时间是常数,并且比线性搜索快得多。 |
| 3 | 插值搜索 插值搜索要求项目按排序顺序排列,但其最差执行时间为时间为 O(n),其中 n 是项目数,它比线性搜索快得多。 |
使用 Java 的 DSA - 排序技术
排序是指以特定格式排列数据。排序算法指定以特定顺序排列数据的方式。最常见的顺序是数字或字典顺序。
排序的重要性在于,如果数据以排序的方式存储,则可以将数据搜索优化到非常高的水平。排序还用于以更易读的格式表示数据。以下是现实生活中排序的一些示例。
电话簿 − 电话簿按姓名排序保存人们的电话号码。这样就可以搜索姓名了。
字典 −词典按字母顺序保存单词,以便轻松搜索任何作品。
排序类型
以下是流行排序算法的列表及其比较。
| Sr.No | 技术和描述 |
|---|---|
| 1 | 冒泡排序 冒泡排序是一种易于理解和实现的算法,但性能很差。 |
| 2 | 选择排序 选择排序顾名思义,使用该技术选择所需项目并相应地准备排序数组。 |
| 3 | 插入排序 插入排序是选择排序的一种变体。 |
| 4 | 希尔排序 希尔排序是插入排序的高效版本。 |
| 5 | 快速排序 快速排序是一种高效的排序算法,它基于将数据数组划分为较小的数组。 |
| 6 | 排序对象
可以使用 java.util.Arrays.sort() 轻松对 Java 对象进行排序 |
使用 Java 的 DSA - 递归
概述
递归是指编程语言中的一种技术,其中函数调用自身。调用自身的函数称为递归方法。
特征
递归函数必须具备以下两个特征
基本情况
在减少情况后导致基本情况的规则集。
递归阶乘
阶乘是递归的经典示例之一。阶乘是满足以下条件的非负数。
0!= 1
1!= 1
n! = n * n-1!
阶乘用"!"表示。这里规则 1 和规则 2 是基本情况,规则 3 是阶乘规则。
例如,3! = 3 x 2 x 1 = 6
private int factorial(int n){
   //base case
   if(n == 0){
      return 1;
   }else{
      return n * factorial(n-1);
   }
}
递归斐波那契数列
斐波那契数列是递归的另一个经典示例。斐波那契数列是满足以下条件的一系列整数。
F0 = 0
F1 = 1
Fn = Fn-1 + Fn-2
斐波那契用"F"表示。这里规则 1 和规则 2 是基本情况,规则 3 是斐波那契规则。
例如,F5 = 0 1 1 2 3
演示程序
RecursionDemo.java
package com.tutorialspoint.algorithm;

public class RecursionDemo {
   public static void main(String[] args){
      RecursionDemo recursionDemo = new RecursionDemo();
      int n = 5;
      System.out.println("Factorial of " + n + ": "
         + recursionDemo.factorial(n));
      System.out.print("Fibbonacci of " + n + ": ");
      for(int i=0;i<n;i++){
         System.out.print(recursionDemo.fibbonacci(i) +" ");
      }
   }

   private int factorial(int n){
      //base case
      if(n == 0){
         return 1;
      }else{
         return n * factorial(n-1);
      }
   }

   private int fibbonacci(int n){
      if(n ==0){
         return 0;
      }
      else if(n==1){
         return 1;
      }
      else {
         return (fibbonacci(n-1) + fibbonacci(n-2));
      }
   }
}
如果我们编译并运行上述程序,则会产生以下结果 −
Factorial of 5: 120
Fibbonacci of 5: 0 1 1 2 3


