Ruby on Rails 2.1 - 脚手架
在开发 Rails 应用程序时,尤其是那些主要为您提供数据库中数据的简单界面的应用程序,使用脚手架方法通常很有用。
脚手架提供的不仅仅是廉价的演示刺激。这里有一些好处 −
您可以快速将代码呈现在用户面前以获得反馈。
您被更快的成功所激励。
您可以通过查看生成的代码来了解 Rails 的工作原理。
您可以使用脚手架作为基础来快速启动您的开发。
脚手架示例
Ruby on Rails 2.0 改变了 Rails 使用脚手架的方式。为了理解脚手架,让我们创建一个名为cookbook的数据库和一个名为recipes的表。−
创建一个空的Rails Web应用程序
打开命令窗口并导航到您想要创建此cookbook Web应用程序的位置。我们使用c: uby。运行以下命令创建完整的目录结构和所需的.yml文件MySQL数据库。
C:
uby> rails -d mysql cookbook
在这里我们使用-d mysql选项来指定我们感兴趣的MySQL数据库。我们可以使用-d选项指定任何其他数据库名称,如oracle或postgress。默认情况下,Rails 使用 SQLite 数据库。
设置数据库
以下是创建数据库的方法 −
mysql> create database cookbook;
Query OK, 1 row affected (0.01 sec)

mysql> grant all privileges on cookbook.*
 to 'root'@'localhost' identified by 'password';
Query OK, 0 rows affected (0.00 sec)

mysql> FLUSH PRIVILEGES;
Query OK, 0 rows affected (0.00 sec)
要指示 Rails 定位数据库,请编辑配置文件 ~\cookbook\config\database.yml 并将数据库名称更改为 cookbook。完成后,它应如下所示 −
development:
   adapter: mysql
   encoding: utf8
   database: cookbook
   username: root
   password: password
   host: localhost
test:
   adapter: mysql
   encoding: utf8
   database: cookbook
   username: root
   password: password
   host: localhost
production:
   adapter: mysql
   encoding: utf8
   database: cookbook
   username: root
   password: password
   host: localhost
注意 − 如果您想使用除 MySQL 之外的任何其他数据库,您可以对其他数据库适配器使用类似的设置。
Rails 允许您在开发模式、测试模式或生产模式下运行,使用不同的数据库。此应用程序对每个模式使用相同的数据库。
数据库表定义
假设我们的 recipes 表具有以下结构 −
id INT(11)
title VARCHAR(40)
chef VARCHAR(40)
instructions VARCHAR(255)
生成的脚手架代码
使用 scaffold 操作,Rails 会动态生成所需的所有代码。通过以脚本形式运行 scaffold,生成模型、脚手架和所需的数据库迁移脚本以及控制器、帮助程序和测试支持文件,如下所示 −
cookbook> ruby script/generate scaffold Recipe title:string \ chef:string instructions:text
请注意,单数名称 Recipe 会创建复数表名 recipes。但是,上述命令将生成以下消息 −
   exists  app/models/
   exists  app/controllers/
   exists  app/helpers/
   create  app/views/recipes
   exists  app/views/layouts/
   exists  test/functional/
   exists  test/unit/
   exists  public/stylesheets/
   create  app/views/recipes/index.html.erb
   create  app/views/recipes/show.html.erb
   create  app/views/recipes/new.html.erb
   create  app/views/recipes/edit.html.erb
   create  app/views/layouts/recipes.html.erb
   create  public/stylesheets/scaffold.css
   create  app/controllers/recipes_controller.rb
   create  test/functional/recipes_controller_test.rb
   create  app/helpers/recipes_helper.rb
   route  map.resources :recipes
dependency  model
   exists    app/models/
   exists    test/unit/
   exists    test/fixtures/
   create    app/models/recipe.rb
   create    test/unit/recipe_test.rb
   create    test/fixtures/recipes.yml
   create    db/migrate
   create    db/migrate/20080614192220_create_recipes.rb
cookbook>
现在,让我们来看看幕后发生了什么。
控制器
让我们看看控制器背后的代码。此代码由 scaffold 生成器生成。如果您打开 app/controllers/recipes_controller.rb,您将发现以下内容 −
class RecipesController < ApplicationController
   # GET /recipes
   # GET /recipes.xml
   def index
      @recipes = Recipe.find(:all)

      respond_to do |format|
         format.html # index.html.erb
         format.xml  { render :xml => @recipes }
      end
   end

   # GET /recipes/1
   # GET /recipes/1.xml
   def show
      @recipe = Recipe.find(params[:id])

      respond_to do |format|
         format.html # show.html.erb
         format.xml  { render :xml => @recipe }
      end
   end

   # GET /recipes/new
   # GET /recipes/new.xml
   def new
      @recipe = Recipe.new

      respond_to do |format|
         format.html # new.html.erb
         format.xml  { render :xml => @recipe }
      end
   end

   # GET /recipes/1/edit
   def edit
      @recipe = Recipe.find(params[:id])
   end

   # POST /recipes
   # POST /recipes.xml
   def create
      @recipe = Recipe.new(params[:recipe])

      respond_to do |format|
      if @recipe.save
         flash[:notice] = 'Recipe was successfully created.'
         format.html { redirect_to(@recipe) }
         format.xml  { render :xml =>
            @recipe, :status => :created, :location => @recipe }
      else
         format.html { render :action => "new" }
         format.xml  { render :xml =>
            @recipe.errors, :status => :unprocessable_entity }
         end
      end
   end

   # PUT /recipes/1
   # PUT /recipes/1.xml
   def update
   @recipe = Recipe.find(params[:id])

   respond_to do |format|
      if @recipe.update_attributes(params[:recipe])
         flash[:notice] = 'Recipe was successfully updated.'
         format.html { redirect_to(@recipe) }
         format.xml  { head :ok }
      else
         format.html { render :action => "edit" }
         format.xml  { render :xml => @recipe.errors,
                      :status => :unprocessable_entity }
      end

   end

   # DELETE /recipes/1
   # DELETE /recipes/1.xml
   def destroy
      @recipe = Recipe.find(params[:id])
      @recipe.destroy

      respond_to do |format|
         format.html { redirect_to(recipes_url) }
         format.xml  { head :ok }
      end
   end
end
此文件自动实现了所有方法。您可以使用这些可用方法执行任何创建、读取、删除或编辑操作。
当 Rails 应用程序的用户选择操作(例如"显示")时,控制器将执行相应部分中的任何代码 - "def show" - 然后默认呈现同名模板 - "show.html.erb"。可以通过覆盖任何模板中的代码来覆盖此默认行为。−
控制器使用 ActiveRecord 方法(例如 find、find_all、new、save、update_attributes 和 destroy)将数据移入和移出数据库表。请注意,您不必编写任何 SQL 语句,Rails 会自动处理。
视图
所有视图和相应的控制器方法均由 scaffold 命令创建,它们位于 app/views/recipes 目录中。您将在此目录中拥有以下文件 −
index.html.erb − 这是显示默认页面的模板文件,当您输入 http://127.0.0.1:3000/recipes 时将执行该模板文件。
new.html.erb − 这是创建新配方的模板,当您尝试创建新配方时将执行该模板文件。
show.html.erb − 这是显示数据库中所有配方的模板,当您尝试查看所有配方时将执行该模板文件。
edit.html.erb −这是编辑数据库中任何配方的模板,每当您尝试编辑任何配方时都会执行该模板。
我们建议您逐个打开这些文件并尝试了解其源代码。
迁移
您将在 ~/cookbook/db/migrate 子目录中找到一个迁移文件。该文件将包含以下内容 −
class CreateRecipes < ActiveRecord::Migration
   def self.up
      create_table :recipes do |t|
         t.string :title
         t.string :chef
         t.text :instructions
         t.timestamps
      end
   end

   def self.down
      drop_table :recipes
   end
end
要在您的数据库中创建所需的文件,请使用以下帮助脚本。
cookbook> rake db:migrate
此命令将在您的 cookbook 数据库中创建 recipes 和 schema_migrations 表。在继续之前,请确保您已在数据库中成功创建所需的表。
准备测试
所有上述步骤都将使您的数据库表变得生动。它为您的数据提供了一个简单的接口,以及方式 −
- 创建新条目
- 编辑当前条目
- 查看当前条目
- 销毁当前条目
在创建或编辑条目时,scaffold 将完成表单生成和处理的所有艰苦工作。它甚至会提供巧妙的表单生成,支持以下类型的输入 −
- 简单文本字符串
- 文本区域(或大块文本)
- 日期选择器
- 日期时间选择器
现在,转到 cookbook 目录并使用以下命令运行 Web 服务器 −
cookbook> ruby script/server
现在,打开浏览器并导航到 http://127.0.0.1:3000/recipes/new。它将为您提供一个屏幕,用于在食谱表中创建新条目。屏幕截图如下所示 −
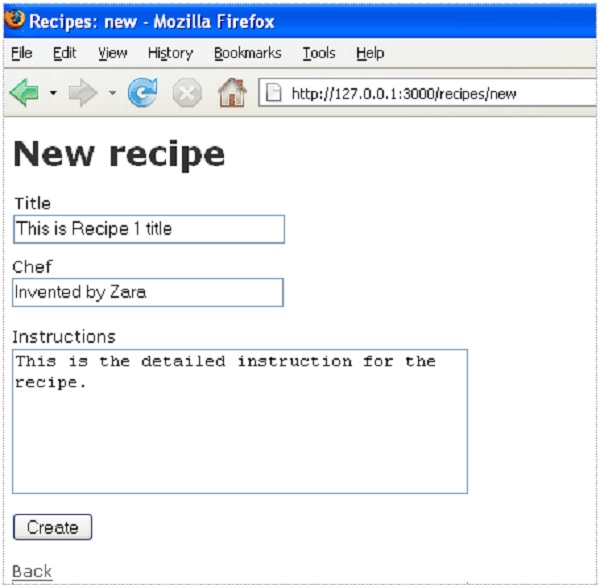
现在,在给定的文本框中输入一些值,然后按"创建"按钮创建一个新食谱。您的记录已添加到食谱表中,并显示以下结果 −
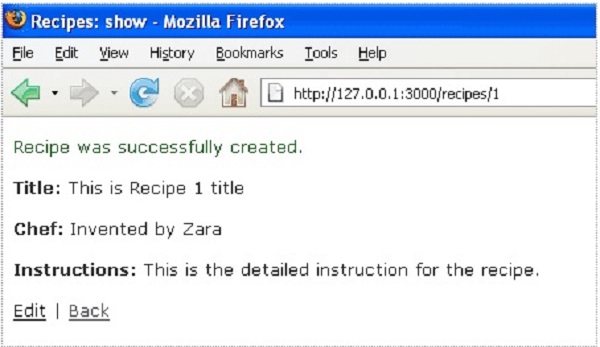
您可以使用 编辑 选项编辑食谱,也可以使用 返回 按钮返回上一页。假设您按下了返回按钮,它将显示数据库中可用的所有食谱。由于我们的数据库中只有一条记录,它将向您显示以下屏幕 −
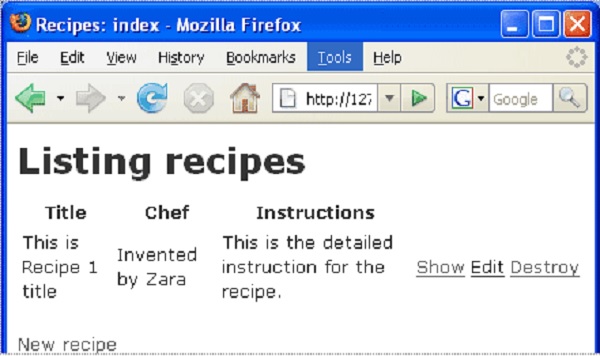
此屏幕为您提供了查看食谱表完整详细信息的选项。此外,它还提供了编辑甚至删除表格的选项。
增强模型
Rails 为您提供了大量的免费错误处理。要理解这一点,请向空食谱模型添加一些验证规则 −
按如下方式修改 ~/cookbook/app/models/recipe.rb,然后测试您的应用程序 −
class Recipe < ActiveRecord::Base
   validates_length_of :title, :within => 1..20
   validates_uniqueness_of :title, :message => "already exists"
end
这些条目将提供自动检查,例如 −
validates_length_of − 字段不为空且不太长。
validates_uniqueness_of − 重复值被捕获。我们给出了自定义消息,而不是默认的 Rails 错误消息。
在这里,我们试图在编辑现有记录时提供更大的标题。它会产生以下错误消息,只是因为我们添加了上述验证 −

脚手架有何不同?
如果您已经阅读过前面的章节,那么您一定已经看到我们已经创建了列出、显示、删除和创建数据的方法,但脚手架会自动完成这项工作。


