线程间通信
在现实生活中,如果一个团队正在执行一项共同的任务,那么他们之间应该进行通信以正确完成任务。同样的类比也适用于线程。在编程中,为了减少处理器的理想时间,我们创建多个线程并为每个线程分配不同的子任务。因此,必须有一个通信设施,它们应该相互交互以同步方式完成工作。
考虑以下与线程间通信相关的要点 −
没有性能提升 − 如果我们无法在线程和进程之间实现正确的通信,那么并发和并行带来的性能提升就毫无用处。
正确完成任务 −如果线程之间没有适当的通信机制,则无法正确完成分配的任务。
比进程间通信更高效 − 线程间通信比进程间通信更高效且易于使用,因为进程内的所有线程共享相同的地址空间,并且它们不需要使用共享内存。
用于线程安全通信的 Python 数据结构
多线程代码存在将信息从一个线程传递到另一个线程的问题。标准通信原语无法解决这个问题。因此,我们需要实现自己的复合对象,以便在线程之间共享对象,从而使通信线程安全。以下是一些数据结构,在对其进行一些更改后,它们可提供线程安全的通信 −
集合
为了以线程安全的方式使用集合数据结构,我们需要扩展集合类来实现我们自己的锁定机制。
示例
以下是扩展该类的 Python 示例 −
class extend_class(set):
   def __init__(self, *args, **kwargs):
      self._lock = Lock()
      super(extend_class, self).__init__(*args, **kwargs)

   def add(self, elem):
      self._lock.acquire()
	  try:
      super(extend_class, self).add(elem)
      finally:
      self._lock.release()

   def delete(self, elem):
      self._lock.acquire()
      try:
      super(extend_class, self).delete(elem)
      finally:
      self._lock.release()
在上面的例子中,定义了一个名为 extend_class 的类对象,该对象进一步继承自 Python set 类。在该类的构造函数中创建了一个锁对象。现在,有两个函数 - add() 和 delete()。这些函数已定义并且是线程安全的。它们都依赖于 super 类功能,但有一个关键例外。
装饰器
这是线程安全通信的另一种关键方法,即使用装饰器。
示例
考虑一个 Python 示例,该示例展示了如何使用装饰器 &mminus;
def lock_decorator(method):

   def new_deco_method(self, *args, **kwargs):
      with self._lock:
         return method(self, *args, **kwargs)
return new_deco_method

class Decorator_class(set):
   def __init__(self, *args, **kwargs):
      self._lock = Lock()
      super(Decorator_class, self).__init__(*args, **kwargs)

   @lock_decorator
   def add(self, *args, **kwargs):
      return super(Decorator_class, self).add(elem)
   @lock_decorator
   def delete(self, *args, **kwargs):
      return super(Decorator_class, self).delete(elem)
在上面的例子中,定义了一个名为 lock_decorator 的装饰器方法,该方法进一步继承自 Python 方法类。然后在该类的构造函数中创建一个锁对象。现在,有两个函数 - add() 和 delete()。这些函数已定义并且是线程安全的。它们都依赖于超类功能,但有一个关键例外。
列表
列表数据结构是线程安全的、快速且简单的临时内存存储结构。在 Cpython 中,GIL 可防止对它们的并发访问。我们知道列表是线程安全的,但其中的数据呢?实际上,列表的数据不受保护。例如,如果另一个线程试图做同样的事情,则 L.append(x) 不能保证返回预期结果。这是因为,尽管 append() 是原子操作并且是线程安全的,但另一个线程正试图以并发方式修改列表的数据,因此我们可以看到竞争条件对输出的副作用。
为了解决此类问题并安全地修改数据,我们必须实现适当的锁定机制,以进一步确保多个线程不会遇到竞争条件。为了实现适当的锁定机制,我们可以像前面的例子中那样扩展该类。
列表上的其他一些原子操作如下 −
L.append(x)
L1.extend(L2)
x = L[i]
x = L.pop()
L1[i:j] = L2
L.sort()
x = y
x.field = y
D[x] = y
D1.update(D2)
D.keys()
这里 −
- L、L1、L2 都是列表
- D、D1、D2 是字典
- x、y 是对象
- i、j 是整数
队列
如果列表的数据没有得到保护,我们可能不得不面对后果。我们可能会获取或删除错误的数据项,出现竞争条件。这就是为什么建议使用队列数据结构的原因。队列的一个现实世界示例可以是单车道单行道,车辆先进入,先离开。您还可以在售票窗口和公交车站看到更多现实世界的例子。

默认情况下,队列是线程安全的数据结构,我们不必担心实现复杂的锁定机制。Python 为我们提供了
队列类型
在本节中,我们将了解不同类型的队列。Python 提供了 <queue> 模块中的三种队列选项供使用−
- 普通队列(FIFO,先进先出)
- LIFO,后进先出
- 优先级
我们将在后续章节中了解不同的队列。
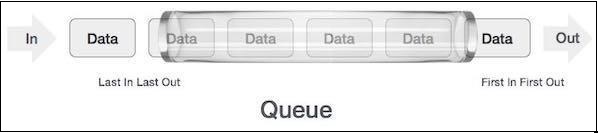
普通队列(FIFO,先进先出)
这是 Python 提供的最常用的队列实现。在这种排队机制中,谁先到,谁就先得到服务。FIFO 也称为普通队列。 FIFO 队列可以表示如下 −
FIFO 队列的 Python 实现
在 Python 中,FIFO 队列可以用单线程和多线程实现。
单线程 FIFO 队列
为了实现单线程 FIFO 队列,Queue 类将实现一个基本的先进先出容器。元素将使用 put() 添加到序列的一端,并使用 get() 从另一端删除。
示例
以下是用于实现单线程 FIFO 队列的 Python 程序 −
import queue

q = queue.Queue()

for i in range(8):
   q.put("item-" + str(i))

while not q.empty():
   print (q.get(), end = " ")
输出
item-0 item-1 item-2 item-3 item-4 item-5 item-6 item-7
输出显示,上述程序使用单个线程来说明元素从队列中删除的顺序与插入的顺序相同。
具有多个线程的 FIFO 队列
为了实现具有多个线程的 FIFO,我们需要定义 myqueue() 函数,该函数是从队列模块扩展而来的。在使用单个线程实现 FIFO 队列时,get() 和 put() 方法的工作方式与上面讨论的相同。然后,为了使其多线程化,我们需要声明和实例化线程。这些线程将以 FIFO 方式使用队列。
示例
以下是用于实现具有多个线程的 FIFO 队列的 Python 程序
import threading
import queue
import random
import time
def myqueue(queue):
   while not queue.empty():
   item = queue.get()
   if item is None:
   break
   print("{} removed {} from the queue".format(threading.current_thread(), item))
   queue.task_done()
   time.sleep(2)
q = queue.Queue()
for i in range(5):
   q.put(i)
threads = []
for i in range(4):
   thread = threading.Thread(target=myqueue, args=(q,))
   thread.start()
   threads.append(thread)
for thread in threads:
   thread.join()
输出
<Thread(Thread-3654, started 5044)> removed 0 from the queue
<Thread(Thread-3655, started 3144)> removed 1 from the queue
<Thread(Thread-3656, started 6996)> removed 2 from the queue
<Thread(Thread-3657, started 2672)> removed 3 from the queue
<Thread(Thread-3654, started 5044)> removed 4 from the queue
LIFO,后进先出队列
此队列与 FIFO(先进先出)队列使用完全相反的类比。在此排队机制中,最后到达的人将首先获得服务。这类似于实现堆栈数据结构。LIFO 队列在实现深度优先搜索等人工智能算法时非常有用。
LIFO 队列的 Python 实现
在 Python 中,LIFO 队列可以用单线程或多线程实现。
单线程 LIFO 队列
为了使用单线程实现 LIFO 队列,Queue 类将使用结构 Queue.LifoQueue 实现一个基本的后进先出容器。现在,调用 put() 时,元素被添加到容器的头部,使用 get() 时也会从头部移除。
示例
以下是使用单线程实现 LIFO 队列的 Python 程序 −
import queue

q = queue.LifoQueue()

for i in range(8):
   q.put("item-" + str(i))

while not q.empty():
   print (q.get(), end=" ")
Output:
item-7 item-6 item-5 item-4 item-3 item-2 item-1 item-0
输出显示,上述程序使用单个线程来说明元素从队列中删除的顺序与插入的顺序相反。
具有多个线程的 LIFO 队列
实现方式与我们已经使用多个线程实现了 FIFO 队列类似。唯一的区别是我们需要使用 Queue 类,该类将使用结构 Queue.LifoQueue 实现基本的后进先出容器。
示例
以下是用于实现具有多个线程的 LIFO 队列的 Python 程序 −
import threading
import queue
import random
import time
def myqueue(queue):
   while not queue.empty():
      item = queue.get()
      if item is None:
      break
	  print("{} removed {} from the queue".format(threading.current_thread(), item))
      queue.task_done()
      time.sleep(2)
q = queue.LifoQueue()
for i in range(5):
   q.put(i)
threads = []
for i in range(4):
   thread = threading.Thread(target=myqueue, args=(q,))
   thread.start()
   threads.append(thread)
for thread in threads:
   thread.join()
输出
<Thread(Thread-3882, started 4928)> removed 4 from the queue
<Thread(Thread-3883, started 4364)> removed 3 from the queue
<Thread(Thread-3884, started 6908)> removed 2 from the queue
<Thread(Thread-3885, started 3584)> removed 1 from the queue
<Thread(Thread-3882, started 4928)> removed 0 from the queue
优先级队列
在 FIFO 和 LIFO 队列中,项目的顺序与插入顺序相关。但是,在许多情况下,优先级比插入顺序更重要。让我们考虑一个现实世界的例子。假设机场的安检人员正在检查不同类别的人员。VVIP、航空公司工作人员、海关官员等类别的人员可能会优先接受检查,而不是像普通人那样根据到达时间接受检查。
优先级队列需要考虑的另一个重要方面是如何开发任务调度程序。一种常见的设计是在队列中按优先级为代理最多的任务提供服务。此数据结构可用于根据优先级值从队列中选取项目。
优先级队列的 Python 实现
在 Python 中,优先级队列可以用单线程和多线程实现。
单线程优先级队列
为了用单线程实现优先级队列,Queue 类将使用结构 Queue.PriorityQueue 在优先级容器上实现任务。现在,在调用 put() 时,元素将添加一个值,其中最低值将具有最高优先级,因此首先使用 get() 进行检索。
示例
考虑以下 Python 程序,用于用单线程实现优先级队列 −
import queue as Q
p_queue = Q.PriorityQueue()

p_queue.put((2, 'Urgent'))
p_queue.put((1, 'Most Urgent'))
p_queue.put((10, 'Nothing important'))
prio_queue.put((5, 'Important'))

while not p_queue.empty():
   item = p_queue.get()
   print('%s - %s' % item)
输出
1 – Most Urgent
2 - Urgent
5 - Important
10 – Nothing important
在上面的输出中,我们可以看到队列根据优先级存储了项目 - 值越小优先级越高。
多线程优先级队列
该实现类似于多线程 FIFO 和 LIFO 队列的实现。唯一的区别是我们需要使用 Queue 类通过使用结构 Queue.PriorityQueue 来初始化优先级。另一个区别是队列的生成方式。在下面给出的示例中,它将使用两个相同的数据集生成。
示例
以下 Python 程序有助于实现多线程优先级队列 −
import threading
import queue
import random
import time
def myqueue(queue):
   while not queue.empty():
      item = queue.get()
      if item is None:
      break
      print("{} removed {} from the queue".format(threading.current_thread(), item))
      queue.task_done()
      time.sleep(1)
q = queue.PriorityQueue()
for i in range(5):
   q.put(i,1)

for i in range(5):
   q.put(i,1)

threads = []
for i in range(2):
   thread = threading.Thread(target=myqueue, args=(q,))
   thread.start()
   threads.append(thread)
for thread in threads:
   thread.join()
输出
<Thread(Thread-4939, started 2420)> removed 0 from the queue
<Thread(Thread-4940, started 3284)> removed 0 from the queue
<Thread(Thread-4939, started 2420)> removed 1 from the queue
<Thread(Thread-4940, started 3284)> removed 1 from the queue
<Thread(Thread-4939, started 2420)> removed 2 from the queue
<Thread(Thread-4940, started 3284)> removed 2 from the queue
<Thread(Thread-4939, started 2420)> removed 3 from the queue
<Thread(Thread-4940, started 3284)> removed 3 from the queue
<Thread(Thread-4939, started 2420)> removed 4 from the queue
<Thread(Thread-4940, started 3284)> removed 4 from the queue


