使用 OpenCV Python 旋转图像而不切断边
旋转图像是图像编辑中最基本的操作。python OpenCV 库提供了方法 cv2.getRotationMatrix2D()、cv2.rotate() 来非常轻松地完成此任务。
cv2.rotate() 只会以 0 度、90 度、180 度或 270 度的角度旋转图像,而 Cv2.getRotationMatrix2D() 会将图像旋转到任何指定的角度。在下面的文章中,我们将使用 OpenCV Python 旋转图像而不裁剪或切掉边。
要使用 cv2.getRotationMatrix2D() 方法旋转图像,我们需要遵循以下三个步骤 -
首先,我们需要获取旋转中心。
接下来,通过使用 getRotationMatrix2D() 方法,我们需要创建 2D 旋转矩阵。
最后,通过使用 OpenCV 中的 warpAffine() 函数,我们需要将仿射变换应用于图像以校正图像的几何扭曲或变形。
使用 Cv2.getRotationMatrix2D() 函数
该函数创建输入图像数组的变换矩阵,因此它将用于旋转图像。如果角度参数的值为正,则图像将逆时针旋转。如果要顺时针旋转图像,则角度需要为负。
语法
cv2.getRotationMatrix2D(center, angle, scale)
参数
center:输入图像的旋转中心。
angle:以度为单位的旋转角度。
scale:各向同性比例因子。根据提供的值放大或缩小图像。
示例
我们来举个例子,使用数学模块的三角函数旋转图像。
import cv2
import math

def rotate_image(array, angle):
   height, width = array.shape[:2]
   image_center = (width / 2, height / 2)

   rotation_mat = cv2.getRotationMatrix2D(image_center, angle, 1)

   radians = math.radians(angle)
   sin = math.sin(radians)
   cos = math.cos(radians)
   bound_w = int((height * abs(sin)) + (width * abs(cos)))
   bound_h = int((height * abs(cos)) + (width * abs(sin)))

   rotation_mat[0, 2] += ((bound_w / 2) - image_center[0])
   rotation_mat[1, 2] += ((bound_h / 2) - image_center[1])

   rotated_mat = cv2.warpAffine(array, rotation_mat, (bound_w, bound_h))
   return rotated_mat

img = cv2.imread('Images/car.jpg',1)
rotated_image = rotate_image(img, 256)

cv2.imshow('Rotated image', rotated_image)
cv2.waitKey(0)
cv2.destroyAllWindows()
输入图像

输出
输出旋转图像显示如下。

输入图像成功旋转到 256 度。
示例
在此示例中,我们将使用 cv2.getRotationMatrix2D() 和 python 内置 abs() 函数旋转图像。
import cv2
def rotate_image(arr, angle):
height, width = arr.shape[:2]
# get the image centers
image_center = (width/2, height/2)
rotation_arr = cv2.getRotationMatrix2D(image_center, angle, 1)
abs_cos = abs(rotation_arr[0,0])
abs_sin = abs(rotation_arr[0,1])
bound_w = int(height * abs_sin + width * abs_cos)
bound_h = int(height * abs_cos + width * abs_sin)
rotation_arr[0, 2] += bound_w/2 - image_center[0]
rotation_arr[1, 2] += bound_h/2 - image_center[1]
rotated_mat = cv2.warpAffine(arr, rotation_arr, (bound_w, bound_h))
return rotated_arr
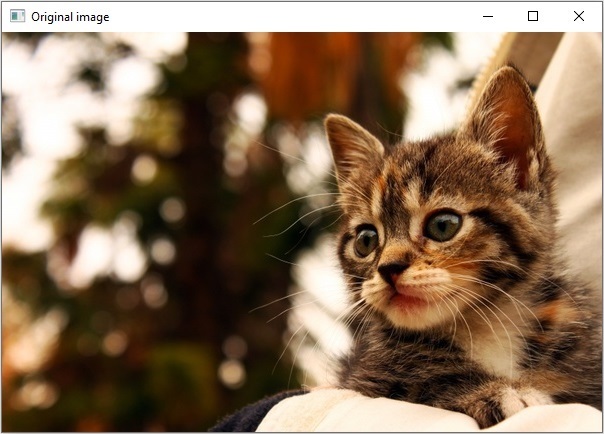
img = cv2.imread('Images/cat.jpg',1)
rotated_image = rotate_image(img, 197)
cv2.imshow('原始图像', img)
cv2.imshow('旋转图像', rotated_image)
cv2.waitKey(0)
cv2.destroyAllWindows()
原始图像
旋转图像
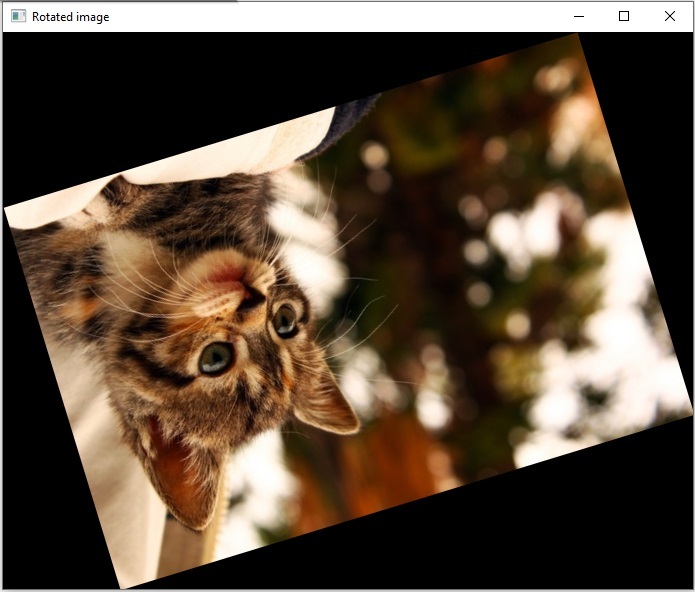
输入图像成功旋转到 197 度。
cv2.rotate()
cv2.rotate() 函数以 90 度的倍数(0 度、90 度、180 度或 270 度)旋转图像帧。该函数使用 rotateCode= 0 或 1 或 2 参数以三种不同的方式旋转图像。
语法
cv2.cv.rotate( src, rotateCode[, dst] )
参数
src:输入图像
rotateCode:指定如何旋转图像。
dst:它是与输入图像具有相同大小和深度的输出图像。
返回
它返回一个旋转的图像。
示例
在此示例中,输入图像"Fruits.jpg"将逆时针旋转 90 度方向。
import cv2
import numpy as np
img = cv2.imread('Images/logo.jpg',1)
rotated_image = cv2.rotate(img,rotateCode = 2)
cv2.imshow('原始图像', img)
cv2.imshow('旋转图像', rotated_image)
cv2.waitKey(0)
cv2.destroyAllWindows()
原始图像

旋转图像

使用 np.rot90() 函数
numpy.rot90() 方法用于将数组旋转 90 度。如果只需将我们的输入旋转约 90 度就足够了,那么这是一种简单且更简单的方法。
示例
在此示例中,我们将输入一个尺寸为 850X315 的矩形图像"car.jpg"。
import cv2
import numpy as np
img = cv2.imread('Images/car.jpg',1)
rotated_image = np.rot90(img)
cv2.imwrite('Rotated image.jpg', rotated_image)
cv2.imshow('InputImage', img)
cv2.waitKey(0)
原始图像

旋转图像
该方法将数组从第一个轴方向旋转到第二个轴方向。这样给定的图像就会以逆时针方向旋转。


